
Ambient Occlusion is a special render pass that helps add depth and reality to a render. Ambient Occlusion goes by the premise that when two objects or surfaces are close to each other, they reduce the amount of light at the intersection. Ambient Occlusion passes make for great contact shadows and bring out the definition in surface creases and corners very nicely. Figure 11-66 shows an Ambient Occlusion pass for the living room scene from the PDF Global Illumination exercise included on the book’s CD.
Figure 11-66: The Ambient Occlusion pass is black and white and is used to darken areas of the original color render.

How the composite works is very simple. Ambient Occlusion gives you a black-and-white pass of the same geometry you’ve already rendered. This pass is then multiplied over the color render. That means a brightness value of white (a value of 1) in the Ambient Occlusion pass won’t change the color of the original render (when the original color of the render is multiplied by 1, it stays the same color). The black parts of the frame (with a brightness value of 0) turn those parts of the original render black (when the original color of the render is multiplied by 0, it goes to black). The gray points of the multiplying image darken the original render. It sounds confusing, but when you see it, it makes much better sense.
The Living Room
You’ll now take the living room render made in the PDF file exercise on the CD and add an Ambient Occlusion pass using render layers. You don’t have to read the PDF exercise to understand the concepts and practices for making an ambient occlusion pass here. However, if you’d like to understand how to light the living room scene with Global Illumination, you may wish to read that exercise on the CD now and then return to the following.
Set your current project to the Livingroom project you copied from the CD, open the livingRoom_v2.mb file from the Scenes folder, and follow these steps:
1. Make sure mental ray is loaded, of course, and that Render Settings is set to render with mental ray. As you did earlier, you need to create a new render layer for the Ambient Occlusion. This layer requires all the objects in the scene but the lights to be assigned to it. In this scene, the only light is a single directional light. In the Outliner, select all the top nodes of the scene, but leave out the light, as shown in Figure 11-67.
Figure 11-67: Select the scene objects for your Ambient Occlusion pass.

2. Click the Render radio button in the Layer Editor to switch to Render, and then click the Create New Layer and Assign Selected Objects icon (![]() ). Doing so creates a new layer (layer1) along with the preexisting masterLayer, as shown in Figure 11-68.
). Doing so creates a new layer (layer1) along with the preexisting masterLayer, as shown in Figure 11-68.
Figure 11-68: Create a new render layer.

3. Click the new layer (layer1) to activate it. Everything in the scene should display as it did before, although the light disappears from view. Double-click layer1 to rename it ambientOcclusion.
4. You’re going to use a preset to create a material override. This takes all the objects in the scene and assigns a single material to them: in this case, an Ambient Occlusion shader that generates the Ambient Occlusion pass for the entire scene. Right-click the ambientOcclusion layer, and select Attributes. In the Attribute Editor, click and hold down the Presets button. From the menu that appears, select Occlusion, as shown in Figure 11-69.
If you’re in Shaded mode, everything should turn black in the view panels. This is normal, because everything now has the Ambient Occlusion Surface Shader assigned, and that shader displays black in Maya panels. If you click the masterLayer, everything pops back into place.
Figure 11-69: Setting an Occlusion preset for the layer
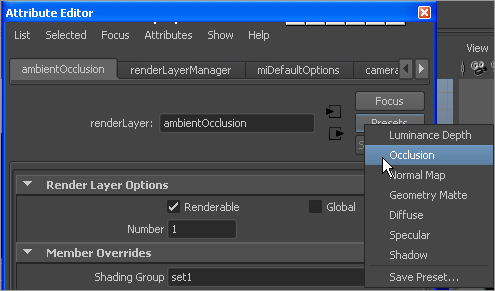
Figure 11-70: The Ambient Occlusion shader in the Hypershade
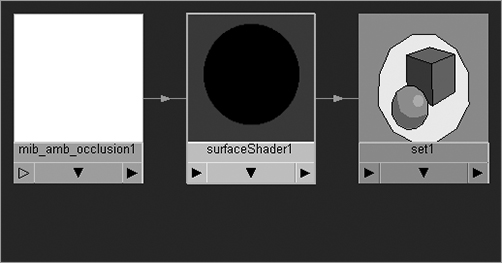
5. When you select Occlusion from the Presets menu, your Attribute Editor window should display a new shader called surfaceShader1. Figure 11-70 shows the new Ambient Occlusion shader that is assigned throughout the scene. Rename that shader to ambOccShader. Don’t worry if you don’t see the surfaceShader1 in your Attribute Editor; you come back to it in later steps.
6. While still in the ambientOcclusion layer, render a frame. You should see something like Figure 11-71. You needn’t worry about most of the settings in the Render Settings window; the layer preset takes care of it all. Well, almost all. It doesn’t turn off the Global Illumination pass that you used for the original color render in the PDF exercise (which you can find on the CD); you need to turn that off manually in the next step.
Figure 11-71: The first render from the Ambient Occlusion pass doesn’t look great. It’s too dark.
7. In the Render Settings window, under the Indirect Lighting tab, you need to turn off Global Illumination, but just for the ambientOcclusion layer. With ambientOcclusion still selected in the Layer Editor, right-click the Global Illumination check box in Render Settings, and choose Create Layer Override. The attribute lettering turns orange to signify that it’s being overridden for that render layer. Uncheck the box. It doesn’t turn off GI for the masterLayer pass. You don’t need to spend the time calculating any GI for this pass.
8. The render is mostly black, which darkens the original color render to black almost everywhere. You need the Ambient Occlusion shader to render mostly white with some darkening at the corners and where objects contact each other. You can adjust the Ambient Occlusion shader to fix this. Open the Hypershade window, and click ambOccShader (or surfaceShader1, if you didn’t rename it earlier in step 5—rename it now).
9. Notice that the Out Color attribute has a texture connection to it (signified by the ![]() icon). Click this button to display the mib_amb_occlusion1 texture node in the Attribute Editor, as shown in Figure 11-72.
icon). Click this button to display the mib_amb_occlusion1 texture node in the Attribute Editor, as shown in Figure 11-72.
10. Set the Max Distance attribute to 4.0, as shown in Figure 11-73, and render the frame again. Your Ambient Occlusion layer should look like Figure 11-74. It should have also taken less than half as long to render as the darker render from Step 6.
Figure 11-72: The Ambient Occlusion shader attributes
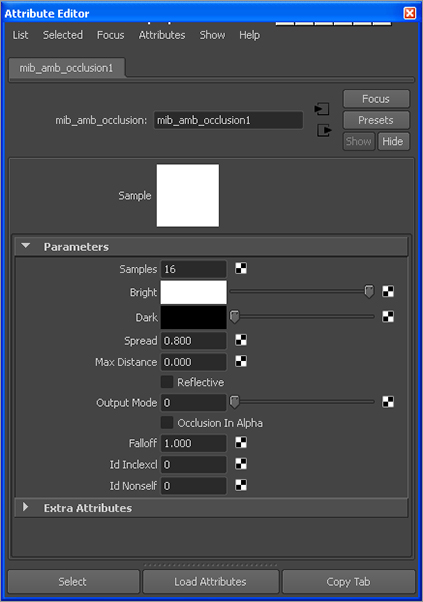
Figure 11-73: Set Max Distance to 4.
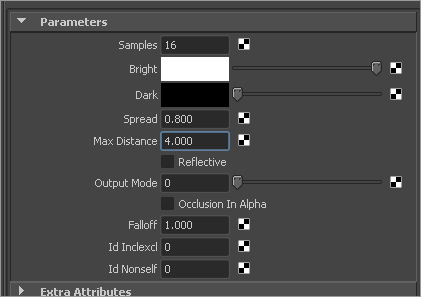
Figure 11-74: The Ambient Occlusion layer pass looks much better, but you aren’t done yet!

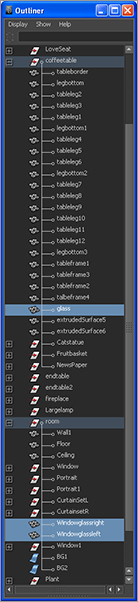
11. Notice that the glass in the window and the glass on the coffee table have shadows on them. Because glass is clear, they shouldn’t have any Ambient Occlusion applied to them; it would look odd in the final composite. Select those pieces of geometry (Figure 11-75 shows the Outliner view for those pieces).
Figure 11-75: The Outliner view of the glass geometry in the scene
12. With the glass geometry selected, select Display ⇒ Hide ⇒ Hide Selection. Now the glass won’t render in the Ambient Occlusion pass. But because you hid the objects only in this render layer, they still appear in the masterLayer; they will still render as glass in the color pass.
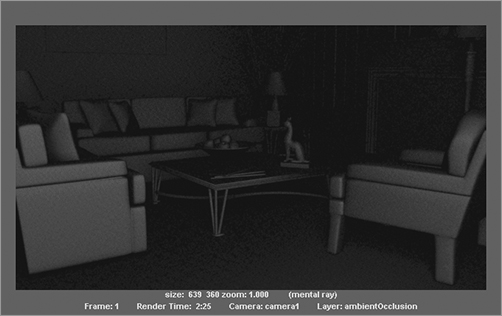
13. Render the frame, and you should have something similar to Figure 11-76. This is the Ambient Occlusion pass you need to composite.
Figure 11-76: The Ambient Occlusion pass

Rendering the Results
Remember to check out the PDF exercise on the CD if you’d like to learn how this scene was lighted with Global Illumination.
You could save the image you just rendered in the Render View window to use in the composite, and then render the masterLayer for the color pass in the Render View and save that frame as well. Instead, let’s batch-render the scene to show how Maya handles rendering with layers enabled. To batch-render the scene, follow these steps:
1. Turn on the Renderable icon box (![]() ) for the masterLayer, and make sure it’s on for the ambientOcclusion layer as well.
) for the masterLayer, and make sure it’s on for the ambientOcclusion layer as well.
2. Click to activate the masterLayer. Open the Render Settings window, and, in the Common tab, verify all the settings to render a single frame (name.ext.# in the Frame/Animation Ext field) at 639 × 360 (which is half 720p HD resolution). Also, select camera1 as the renderable camera.
3. If you batch-render (by choosing Render ⇒ Batch Render), Maya renders both render layers into the Images folder of your project in separate folders, as shown in Figure 11-77.
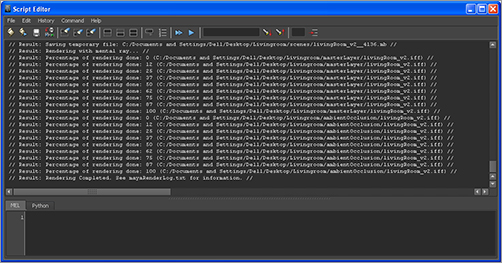
If for some reason your renders don’t show up in your project’s Images folder, open the Script Editor window, and look at the batch-render report. The render feedback shows you where the rendered images were saved, as shown in Figure 11-78. You may also want to make sure you set your project to the Livingroom project from the CD.
Figure 11-77: Maya renders the layers into their own folders by default.
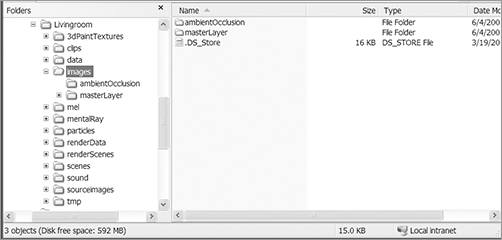
Figure 11-78: The Script Editor gives you feedback on the progress of the batch render.
Compositing the Results
Now that the two layers are rendered in their respective folders, load them into your favorite compositing package. You’ll layer the Ambient Occlusion pass over the color render using a Multiply Transfer mode. This exercise uses Adobe After Effects 7.0 to demonstrate how the Ambient Occlusion pass is composited over the original color render.
Figure 11-79 shows After Effects with the masterLayer color pass loaded. Figure 11-80 shows the ambientOcclusion pass layered on top of the color layer. Finally, Figure 11-81 shows the ambientOcclusion pass changed to a Multiply Transfer mode (as it’s called in After Effects). Notice how the dark areas of the Ambient Occlusion pass help give contact shadows and depth to the color pass. Voila!
This is a prime example of rendering different passes to achieve a more realistic result. Remember, you needn’t get everything in on a single pass. Use different layers to put your final images together in composite. The more you work with CG, the easier it will be to manage and plan.
You can see the difference Ambient Occlusion made to the living room image in the color section of this book and on the CD.
Figure 11-79: The masterLayer render pass is loaded into After Effects.
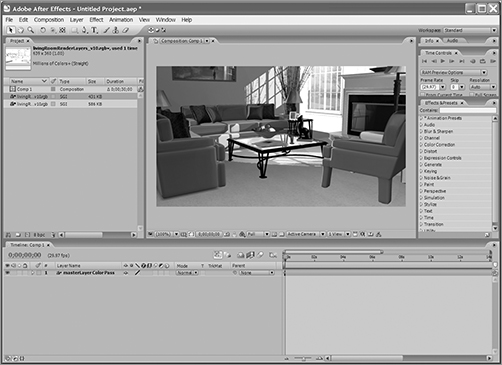
Figure 11-80: The ambientOcclusion render pass is loaded into After Effects.
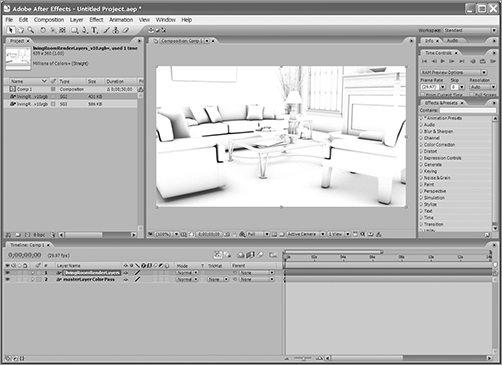
Figure 11-81: The ambientOcclusion pass is multiplied over the color pass and creates a more realistic image.
