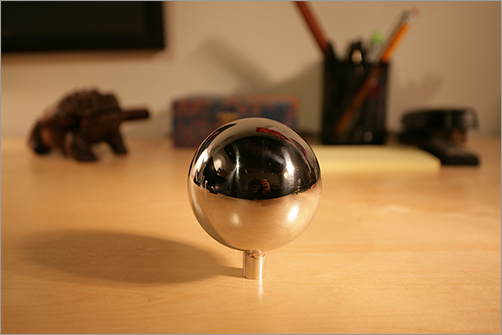
Figure 11-82: A light-probe photo of a desk is taken with a chrome ball.
As you saw in the Final Gather section, FG rendering is based on the illumination in the scene from lights as well as the brightness of objects in the scene, such as a light dome. In the previous section, you used an incandescent dome to light the still-life scene. But what if you were to use an image instead of just white for the light dome?
Figure 11-83: The five exposures that make up the HDRI of the desk to be used in the next section.

Furthermore, what if the image you used was an High Dynamic Range Image (HDRI)? In Chapter 1, we briefly discussed HDR images. Several photos at varying exposures are taken of the same subject, ranging from very dark (low exposure) to highlight only the brightest parts of the scene, all the way up to very bright (overexposure) to capture the absolute darkest parts of the scene. When these images (usually five or seven images) are compiled into an HDR image, you get a fantastic range of bright to dark for that one subject.
How does this help you light? With image-based lighting (IBL), mental ray creates an environment sphere in your scene to which you assign an image, usually an HDRI. That environment sphere, much like the white dome in the Final Gather exercise earlier in the chapter, uses the brightness of its image to cast light in your Maya scene.
The best type of image to capture for an IBL is sometimes called a light probe. This is a picture of an environment, such as the office reflected in a chrome ball shown in Figure 11-82. You can also take a light probe using a fish-eye camera lens capable of capturing a field of view of close to 180 degrees.
Figure 11-82 shows the middle exposure of five exposures taken of the same office. Figure 11-83 shows the range from underexposed (dark) to overexposed (bright) of the five photos that were used to compile the HDRI of the desk you’ll be using to light the decorative box in the next section.
The photos are compiled in an HDR image file (called DeskHDR.hdr in the Sourceimages folder of the Decorative_Box project on the CD) for the next section’s IBL lighting exercise and as shown in Figure 11-84. You won’t be able to see the extensive range of the HDR, because the great majority of computer displays are limited to a display of 8-bit color. But you’ll see that the image is cropped to the chrome ball’s edges, because the ball’s reflection of the office is what you’re really after, not the desk.
Figure 11-84: The images compiled into an HDR file and cropped to the ball

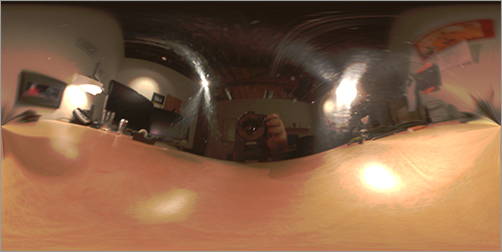
The HDR will be mapped onto an IBL sphere. This is a large sphere that surrounds the environment in your Maya scene. Although you could use the simple DeskHDR.hdr and map it to the IBL sphere, it wouldn’t be very accurate, because the corners of the square image show through to the desktop and background. The image first needs to be converted to a rectangular image file in which the sphere is unwrapped, as shown in Figure 11-85. This layout is called LatLong (Latitude/Longitude) and is just as if a geographic map on a school room globe was unwrapped into a rectangular sheet of paper. You can do this with a tool like HDRShop, available online. This LatLong image will now map more accurately onto the IBL sphere; only the reflection of the office in the ball will be used in the scene’s lighting.
We won’t get into the details of creating the HDRI, because it’s an advanced topic using Photoshop CS3 or CS4; however, it’s good to know the origins of HDR images and how they come to be used in IBL.
Figure 11-85: The chrome ball image is unwrapped and turned into a LatLong rectangular image.