
Final Gather (FG) is a type of rendering with mental ray that includes a single light bounce within the scene. Final Gather traces light as it reflects off surfaces to illuminate the scene for a nicely realistic render that takes into account color bleed of light from one surface to another. For example, a red wall casts a red hue on the surface right next to it. This is achieved easily with FG. FG is an intricate dance of settings and numbers that lets you get perfect renders. It’s tough to cover in an introductory text such as this; however, this section will give you a primer to start using FG. In a follow-up section, you’ll use a combination of lights and HDRI with Final Gather to render the red wagon.
The basic premise is that FG uses the illumination in the scene from lights as well as objects with color and incandescence set in their shaders to create a soft natural light. Its base settings will give you nice results right from the start.
To render the still life fruit scene with FG, begin by creating a dome light, which evenly illuminates a scene from a dome around the scene. (The term dome light is a bit of a misnomer, because a dome light isn’t itself a light.) You’ll construct a simple NURBS sphere, cut it in half to create a dome, and give it an Incandescent shader to provide the light for the scene. This type of quick FG setup is extremely useful for rendering out soft lighting and shadows to show off a model or a composition.
To light and render with FG, follow these steps:
1. Ensure that mental ray for Maya is loaded.
2. Load the still life scene file still_life_mentalray_v01.mb from the Lighting project from the CD. In the persp view (not the camera1 panel), create a NURBS sphere, and scale it up to enclose the entire scene. In the Channel Box, click the makeNurbSphere1 heading to select that node, and set the End Sweep attribute to 180 to cut the sphere in half. Rotate the dome to fit over the scene, as shown in Figure 11-61.
3. Add an Incandescent shader to the dome to give the scene some illumination through FG. To do so, in the Hypershade, create a new Lambert shader. Turn up its incandescence to a middle to light gray. Assign the new shader to the dome.
4. Maya has a feature that automatically creates a general default light in a scene that has no lights when you try to render it. Using this feature, you can test-render your scene quickly. However, because this incandescent dome light should be the only light source in the FG render, you have to turn off the default light feature before you render. Open the Render Settings window and, in the Common tab’s Render Options heading (at the bottom of the Attribute Editor), turn off the Enable Default Light check box.
Don’t forget to turn Enable Default Light back on when you’re done with this FG exercise.
Figure 11-61: Create a sphere to act as the dome light.
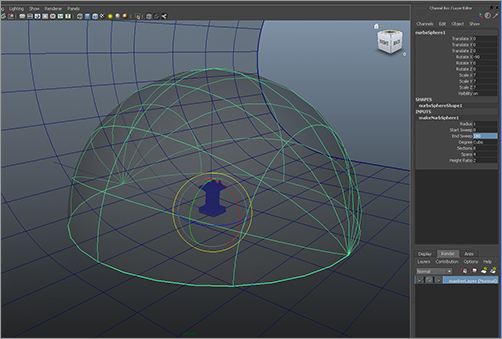
Figure 11-62: The Quality tab

5. At the top of the Render Settings window, switch the Render Using attribute to mental ray. You can keep the settings in the Common tab to render at 640 × 480. Choose the Quality tab to access its settings. Set Quality Presets to Preview: Final Gather to load the preset. This gives quick results using FG. Notice that raytracing is enabled under the Raytracing heading. Figure 11-62 shows the Quality tab of the Render Settings.
6. Click to open the Indirect Lighting tab, and click the Final Gathering heading to expand its attributes. Notice that Final Gathering is enabled. You can leave the settings at their defaults for your first render. Figure 11-63 shows the Indirect Lighting tab for the Render Settings window.
7. You need to make sure the sphere you’re using as a dome light doesn’t render out in the scene. Select the sphere, and, in its Attribute Editor under the Render Stats heading, turn off Primary Visibility. Highlight the camera1 panel, and render the frame. Maya makes two passes at the scene and shows you something like Figure 11-64. You can control the brightness of the scene with the Incandescence attribute value of the dome’s shader—the whiter the incandescence, the brighter the scene.
Figure 11-63: The Indirect Lighting tab accesses all the Final Gather settings.

Figure 11-64: The Final Gather render of the still life

You can adjust the level of lighting by increasing or decreasing the amount of incandescence on the light dome’s shader. The proximity of the sphere also affects the light amount, so moving the sphere closer or farther away will change the lighting level of the still life as well. You can also insert lights into the scene as you see fit. Using this sort of setup with only a light dome, however, gives you a quick and evenly lit render that is great for showing off models.
You can improve the quality of the render by adjusting either of the following two settings in the Indirect Lighting tab under the Final Gathering section of the Render Settings window:
Accuracy Increase this number for a more accurate render. Don’t increase it too much, however, because it will slow down your render. Figure 11-64 shows the still life rendered with the default Accuracy setting of 100. In Figure 11-65, which uses a setting of 500, the soft shadows are noticeably smoother. Accuracy dictates the number of FG rays that are cast into the scene. The more rays, the better the quality of the render, although at a cost of rendering time.
Figure 11-65: Accuracy set at 500 increases the smoothness of the soft shadows. It’s hard to see here, but you’ll notice it in your own render.

Primary Diffuse Scale Use this setting to adjust the overall lighting level globally in the scene. The higher the value of this color, the brighter the scene. You can type values greater than 1 in the Color Chooser.
The Point Density and Point Interpolation attributes, along with several other attributes under the Final Gathering section, optimize and further control the FG settings for optimum efficiency and results, especially with animated scenes. Consider using the basic settings shown in this chapter to become familiar with mental ray for Maya, and then use FG to crank out fast and elegant renders to show off your models until you get more comfortable with mental ray.
When you get into complicated and intricate mental ray renders, you should consult the Maya documentation to learn more about its advanced settings. For now, however, using FG with basic settings will get you going. Final Gather is a tough nut to crack; it will take you some time to become proficient at rendering with FG in scene files and especially with animated scenes.
Later in this chapter, you’ll try your hand at using FG, HDRI, and regular lights to render the decorative box from the previous chapters.