
It’s no surprise that Maya’s lighting resembles actual direct-lighting techniques used in photography and filmmaking. Lights of various types are placed around a scene to illuminate the subjects as they would for a still life or a portrait. Your scene and what’s in it dictate, to some degree at least, which lights you put where. The type of lights you use depends on the desired effect.
At the basic level, you want your lights to illuminate the scene. Without lights, your cameras have nothing to capture. Although it seems rather easy to throw your lights in, turn them all on, and render a scene, that couldn’t be further from the truth.
Lighting is the backbone of CG. Although it’s technically easy to insert and configure lights, it’s how you light that will make or break your scene. Knowing how to do that really only comes with a good deal of experience and experimentation, as well as a good eye and some patience.
This chapter will familiarize you with the basic techniques of lighting a scene in Maya and start you on the road to finding out more.
Learning to See
There are many nuances to the real-world lighting around us that we take for granted. We intuitively understand what we see and how it’s lit, and we infer a tremendous amount of visual information without much consideration. With CG lighting, you must re-create these nuances for your scene. That amounts to all the work of lighting.
The most valuable thing you can do to improve your lighting technique is to relearn how you see your environment. Simply put, refuse to take for granted what you see. Question why things look the way they do, and you’ll find that the answers almost always come around to lighting.
Take note of the distinction between light and dark in the room you’re in now. Notice the difference in the brightness of highlights and how they dissipate into diffused light and then into shadow.
When you start understanding how real light affects objects, you’ll be much better equipped to generate your own light. After all, the key to good lighting starts with the desire to create an interesting image.
What Your Scene Needs
Ideally, your scene needs areas of highlight and shadow. Overlighting a scene flattens everything and diminishes details. This is perhaps the number-one mistake of beginners. Figure 10-1 shows a still life with too many bright lights that only flatten the image and remove any sense of color and depth.
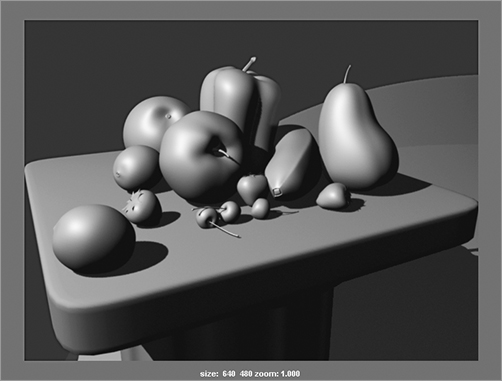
Similarly, underlighting your scene makes it muddy, gray, and rather lifeless, and it covers your details in darkness and flattens the entire frame. Figure 10-2 shows the still life underlit. The bumps and curves of the mesh are hardly noticeable.
Figure 10-1: An overlit still life

Figure 10-2: An underlit still life
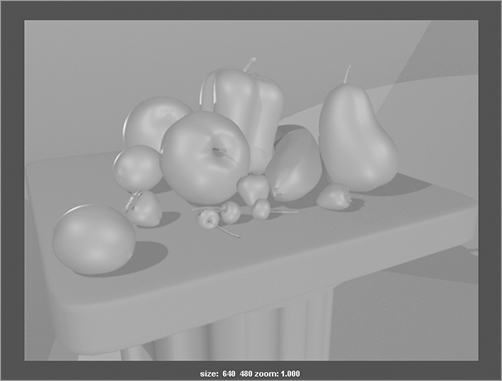
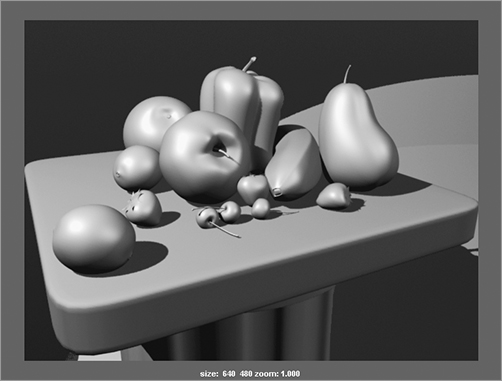
Figure 10-3: Balanced lighting creates a more interesting picture.

Finding a good middle ground to lighting your scene is key. Like a photographer, you want your image to have the full range of exposure. You want the richest blacks to the brightest whites in your frame to create a deep sense of detail. Even though you may not have an absolute black to white in the rendered image, the concept is appealing. As in Figure 10-3, light and shadow complement each other and work to show the features of your surface.
Three-Point Lighting
Because your scene needs to be rendered, and lighting can be a fairly heavy computational process when it comes to rendering, your lighting needs to be efficient. That means not using dozens of lights for every part of the scene.
The traditional approach to lighting an object efficiently, culled from filmmaking and television, starts with three-point lighting. In this setup, three distinct roles are used to light the subject of a shot. More than one light can be used for each of the three roles, but the scene should, in effect, seem to have only one primary, or key, light, a softer light to fill the scene, and a back light to pop the subject out from the background.
Three-point lighting ensures that the primary subject’s features aren’t just illuminated, but featured with highlights and shadow. Using three directions and qualities of light creates the best level of depth. Figure 10-4 shows a schematic of a basic three-point setup.
Figure 10-4: A three-point lighting schematic

Key Light
Figure 10-5: Key light only
A key light is placed in front of the subject and off to the side to provide the principal light on the subject. Because it’s usually off center, the key light creates one side of brighter light, increasing the depth of the shot. This light also provides the primary shadows and gives the important sense of lighting direction in the shot.
Although it’s possible for several lights to fulfill the role of key light in a scene—for example, three ceiling lights overhead—one light should dominate, creating a definitive direction. Figure 10-5 shows the subject being lit by only a key light, although it’s physically composed of two lights.
The direction of the two lights remains the same, and one takes intensity precedence over the other and casts shadows. The effect creates a single key light, which produces a moody still life.
Fill Light
A more diffused light than the key light, the fill light seems directionless and evenly spread across the subject’s dark side. This fills the rest of the subject with light and decreases the dark area caused by the key light.
The fill light isn’t meant to cast any shadows onto the subject or background itself and is actually used to help soften the shadows created by the key light. Figure 10-6 shows the still life with an added fill light. Notice how it softens the shadows and illuminates the dark areas the key light misses.
Figure 10-6: A fill light is now included.
Typically, you place the fill light in front of the subject and aim it so that it comes from the opposite side of the key light to target the dark side of the subject. Even though the still life in Figure 10-6 is still a fairly moody composition, much more is visible than with only the key light in Figure 10-5.
Back Light
The back light, or rim light, is placed behind the subject to create a bit of a halo, which helps to pop the subject out in the shot. Therefore, the subject has more presence against its background. Figure 10-7 shows how helpful a back light can be.
Figure 10-7: A back light makes the subject pop right out.

The back light brings the fruit in this still life out from the background and adds some highlights to the edges, giving the composition more focus on the fruit.
Don’t confuse the back light with the background light, which lights the environment behind the subject.
Using Three-Point Lighting
The three-point lighting system is used for the primary subject of the scene. Because it’s based on position and angle of the subject to the camera, a new setup is needed when the camera is moved for a different shot in the same scene. Three-point lighting is, therefore, not scene-specific but shot-specific.
After the lighting is set up for the subject of a shot, the background must be lit. Use a directed primary light source that matches the direction of the key light for the main light, and use a softer fill light to illuminate the rest of the scene and soften the primary shadows.
Practical Lighting
Practical lighting is a theatrical term describing any lights in a scene that are cast from lighting objects within the scene. For example, a desk lamp on a table in the background of a scene would need practical lighting when it’s on. You never want the practical lighting to interfere with the main lighting of the scene, unless the scene’s lighting is explicitly coming from such a source.
Each light-emitting object in your CG scene doesn’t necessarily need its own Maya light. Rendering tricks such as glow (for glow effects, see “Lighting Effects” later in this chapter) can simulate the effect that a light is turned on without actually having to use a Maya light. Of course, if you need the practical light to illuminate something in the scene, you need to create a light for it.