
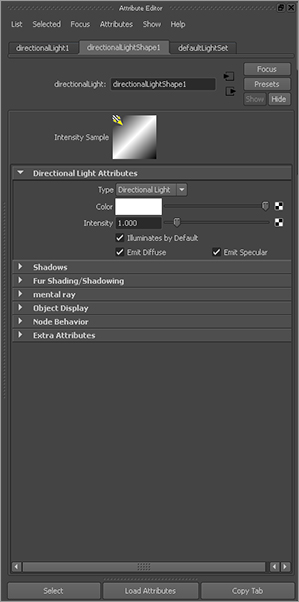
Figure 10-8: A typical light’s Attribute Editor
Six types of light are available in Maya: Ambient, Directional, Point, Spot, Area, and Volume. These lights are also used when rendering in mental ray. How you use each dictates whether they become key, fill, or rim lights. Each light can fill any of those roles, although some are better for certain jobs than others. The most commonly used light types for most scenes are Spot, Directional, and Ambient. All of these Maya lights render in Maya software as well as mental ray.
To create each light, choose Create ⇒ Lights, and click the light type.
Common Light Attributes
Lights in Maya are treated like any other object node. They can be transformed, rotated, scaled, duplicated, deleted, and so forth and are visible as nodes in the Hypergraph and Outliner alongside other objects in the scene. Like any other node, lights have attributes that govern how they function. Figure 10-8 shows the Attribute Editor for a typical light.
When you select any light type and then open the Attribute Editor, you’ll see the following attributes and options:
Type This drop-down menu sets the type of light. You can change from one light type to another (for instance, from Spot to Point) at any time.
Color This attribute controls the color cast by the light. The darker the color, the dimmer the light will be. You can use Color in conjunction with Intensity to govern brightness, although it’s best to leave that to Intensity only.
Intensity This attribute specifies how much light is cast. The higher the intensity, the brighter the illumination will be.
Illuminates by Default This check box deals with light linking, or the ability to illuminate specific objects with specific lights. Clearing this check box causes the light not to illuminate all objects by default, requiring you to link the light to objects you do want it to light. Keep this check box checked unless you’re linking lights to specific objects. This chapter will briefly touch on light linking later.
Figure 10-9: Lights can render diffuse or specular components if needed.

Emit Diffuse and Emit Specular These two check boxes aren’t available with the Ambient light type. For all other light types, they toggle on or off the ability to cast diffuse lighting or specular highlights on an object (see Figure 10-9). This is useful for creating specific lighting effects. For example, if lighting an object makes it too shiny, you can disable the specular emission from one or more of the lights on that object to reduce the glare.
Light Types
Beyond the common light attributes, each light type carries its own attributes that govern its particular settings.
Figure 10-10: Ambient light

Ambient Lights
Ambient lights cast an even light across the entire scene. These lights are great for creating a quick, even illumination in a scene; but, as you can see in Figure 10-10, they run the risk of flattening the composition. They’re perhaps best used sparingly and at low intensities as fill lights or background lights.
The Ambient Shade slider in the Attribute Editor governs how flat the lighting is. The lower the value, the flatter the lighting. Figure 10-11 shows the effect of two contrasting Ambient Shade settings.
Figure 10-11: A low Ambient Shade setting flattens the image.
Directional Lights
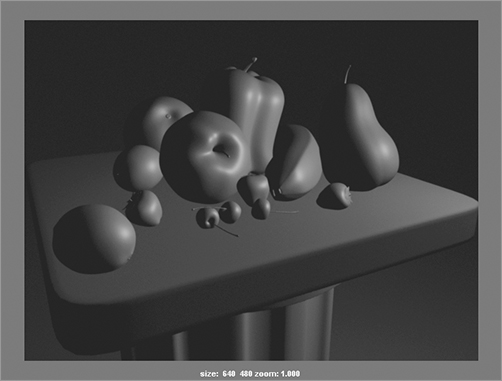
Figure 10-12: Directional light

Directional lights cast a light in a general direction evenly across the scene (see Figure 10-12). These lights are perhaps second to Spot lights as the most commonly used light type. They’re perfect for sunlight or general indoor lighting, for key lights, and for fill and back lights. They give an accurate sense of direction without having to emanate from a specific source.
Point Lights
A Point light casts light from a single specific point in space, similar to a bare light bulb. Its light is spread evenly from the emission point (see Figure 10-13).
Using the Decay Rate drop-down menu in the Attribute Editor, you can set how a Point light’s intensity diminishes over distance. With No Decay, the Point light illuminates an object far away as evenly as it does up close. This is the most common setting for most applications.
Setting the Decay Rate to Linear, Quadratic, or Cubic requires you to increase the intensity level exponentially to compensate for the decay. You can use Decay Rate settings to illuminate nearby objects and to leave distant ones unaffected. In reality, lights have decay rates. But in CG, they don’t really need to decay unless the falloff effect is needed, as shown in Figure 10-14. Clever lighting can easily avoid this cumbersome calculation.
Point lights are good for effects such as candlelight or setting a mood.
Figure 10-13: A Point light placed in the front right of frame

Figure 10-14: A Point light with a Decay Rate set
Spot Lights
Figure 10-15: Using a Spot light

Spot lights are arguably the most-used lights in Maya because they can be used for keys, fills, or rims; and they’re highly efficient, casting light in specific areas, just like real spotlights.
Similar to Directional lights, Spot lights emphasize direction. But these lights emit from a specific point and radiate out in a cone shape, whereas a Directional light emits from an infinite source from a certain direction. As such, Spot lights can create a circular focus of light on the geometry much like a flashlight on a wall; Directionals spread the light evenly. Figure 10-15 shows a Spot light on the still life.
The following attributes govern the behavior of Spot lights:
Decay Rate Specifies the rate at which the light’s intensity falls off with distance, as with the Point light. Again, the intensity needs to increase exponentially to account for any decay.
Cone Angle Sets the width of the cone of light emitted by the Spot light. The wider a cone, the more calculation intensive it becomes.
Penumbra Angle Specifies how much the intensity at the edges of the cone and hence the circular focus dissipates. (See Figure 10-16.) A negative value softens the light into the width of the cone, decreasing the size of the focus; a positive value softens away from the cone.
Dropoff Specifies how much light is decayed along the distance of the cone. The higher the dropoff, the dimmer the light gets farther along the length of the cone. This effect is much better to use than a decay rate, and it gives similar results.
Most practical lights are created with Spot lights. For example, a desk lamp’s light is best simulated with a Spot light. Spot lights are also the lights of choice to cast shadows. You’ll find more on shadows later in the chapter.
Figure 10-16: The Penumbra Angle attribute controls the softness of the edge of a Spot light.

Area Lights
Area lights emit light from a flat rectangular shape only (see Figure 10-17). They behave similarly to Point lights, except they emit from an area and not from a single point. You can still set a decay rate, just as you can with Point lights. Area lights are the only lights whose scale affects their intensity. The larger an Area light, the brighter the light.
Because you can control the size of the area of light being emitted, these lights are good for creating effects such as a sliver of light falling onto an object from a crack in a door, as in Figure 10-18, overhead skylights, or the simulation of large diffused lighting fixtures such as overhead office lights. Use Area lights when you need to light a specific area of an object.
Volume Lights
Volume lights emit light from a specific 3D volumetric area as opposed to an Area light’s flat rectangle (see Figure 10-19). Proximity is important for a Volume light, as is its scale.
Figure 10-17: An Area light and its placement
Figure 10-18: An Area light as a sliver, and its placement
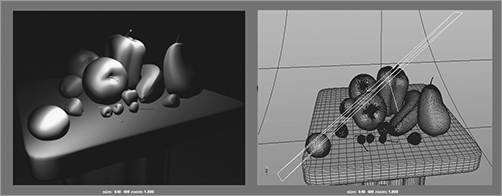
Figure 10-19: A Volume light and placement

A Volume light can have the following attributes:
Light Shape A Volume light can be in the shape of a sphere, a box, a cylinder, or a cone. You select a shape from the Light Shape drop-down menu.
Color Range This section of attributes sets the color of the light using a built-in ramp. The ramp (from right to left) specifies the color from inside to outside. For instance, a white-to-black ramp from right to left creates a white light at the center of the Volume light that grades down to black toward the outer edge.
Volume Light Dir This attribute sets the direction for the light’s color range. Outward lights from inside out, Inward lights from the volume’s edge into the center, and Down Axis lights as a gradient in an axis of the light.
Arc and Cone End Radius This attribute defines the shape for the volume.
Penumbra For cylinder and cone shapes, this attribute adjusts how much the light dims along the edge of its length.
Use Volume lights when you need to control the specific area in which light is cast or when you need an object to move into and out of a particular area of light. Volume lights are also great for creating volumetric lighting effects such as areas of lit fog. For volumetric effects, see the section “Volumetric Lighting” later in this chapter.
Lighting a Scene
It’s best to start with just a couple types of light, such as Directional and Spot, before turning to the more sophisticated types, such as Area and Volume.
Getting the essence of lighting is far more important in the beginning than understanding the nuances of all the attributes of a light. At first, limit yourself to Spots and Directionals, and try to avoid any Ambient light use.