
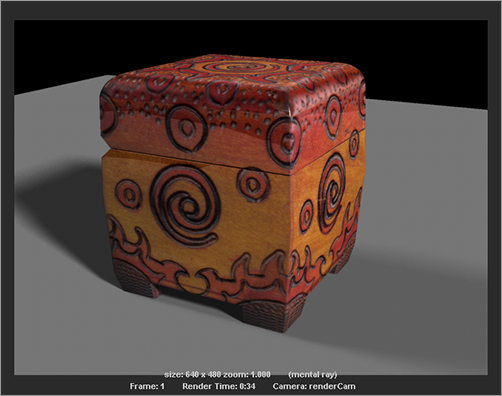
Figure 11-86: The decorative box’s current render from Chapter 10

You’re all grown up and ready to light a full scene using Final Gather, IBL with HDRI, and regular lights to get the best bang for your buck out of mental ray rendering. In the previous chapter, you briefly lit the decorative box with key, fill, and rim lights (the three-point lighting system). In this exercise, you’ll take this concept a few steps further, so take a deep breath, call your mother and tell her you love her, and let’s get started! Open the boxLighting02.ma file in the Scenes folder of the Decorative_Box project. This has the lights and soft shadows created in Chapter 10 and is set to render through mental ray with raytracing enabled already. Let’s take a critical look at the render from the previous chapter in Figure 11-86.
Most obviously, the carved details in the box need more detail. In the current render, the grooves are flat and shiny, whereas in the real box, they’re carved into the wood and aren’t glossy like the rest of the box.
Reflection Map
Just as you use a map to put color on the box, you can use similar maps to specify where and how much the box will reflect. Figure 11-87 shows the color map you used to texture the box in Chapter 7 side-by-side with a black-and-white map that shows only the carved regions of the box. This map was created with elbow grease and hard work to manually isolate just the carved areas of the box in Photoshop. See how much I do for you?
Figure 11-87: The black-and-white map on the right shows only the carved areas of the box.

You’ll first take the reflections out of the carved areas in the following steps:
1. In the boxLighting02.mb scene, open the Hypershade. In the Create Bar on the left, click 2D Textures under the Maya heading, and choose File to open a new image file node (called file2). See Figure 11-88.
2. Double-click the file node, and navigate to find and choose the boxCarvings.jpg file in the Sourceimages folder of the Decorative_Box project. See Figure 11-89.
Figure 11-88: Create a new file node.
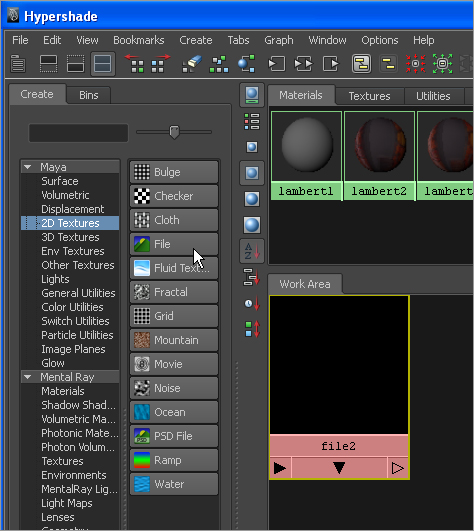
Figure 11-89: Select the proper image file.

3. Notice that the sample swatch at the top of the Attribute Editor for the file2 node doesn’t show the image you just selected. This is because the image is too large for Maya to create a thumbnail swatch automatically, for expediency’s sake. The file node in the Hypershade is also blank. Right-click the file node, and choose Refresh Swatch from the marking menu. Figure 11-90 shows the swatch with the black-and-white image as a thumbnail. This isn’t necessary, but it makes it easier for you to identify what file map is where.
Figure 11-90: The swatch now shows a thumbnail of the image you’re using.

Figure 11-91: Map the new image file to the reflectivity attribute.
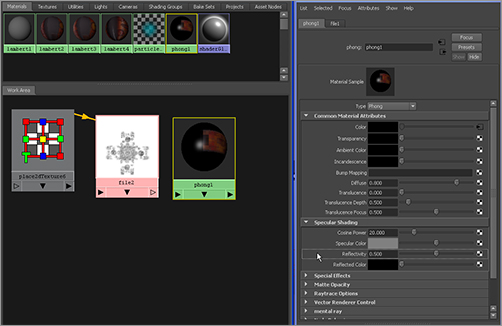
4. MMB-drag the phong1 node from the top of the Hypershade window down to the work area, alongside the file2 node. Double-click the phong1 node to open the Attribute Editor. MMB-drag the file2 node onto the Reflectivity attribute for the Phong2 shader, as shown in Figure 11-91.
Figure 11-92: The reflections are stronger; the entire box looks like a mirror!

5. Notice the connection line in the Hypershade between the file2 and phong1 nodes. The white areas of the map tell the phong1 shader to have a reflectivity of 1, whereas the black areas have zero reflectivity. This effectively removes reflections from the box’s carvings. Render a frame of the box in the renderCam view, and compare to Figure 11-92. In the Render View window, click the Keep Image icon (![]() ) to store this render in the render buffer. Doing so allows you to easily compare renders to see the changes you make as you continue.
) to store this render in the render buffer. Doing so allows you to easily compare renders to see the changes you make as you continue.
6. The box’s reflections are now stronger all over, and the carvings still reflect. You need to turn on one switch. Select the file2 node, and open the Color Balance heading in the Attribute Editor. Check the box for the Alpha Is Luminance attribute. This instructs Maya to use the luminance values (basically the brightness) of the image to output to the reflectivity attribute of the phong1 shader. The box renders properly and the carvings have no reflections, as shown in Figure 11-93. Save this render into the render buffer with the Keep Image icon (![]() ).
).
Figure 11-93: The carvings don’t reflect, but the rest of the box’s reflections are still too strong.
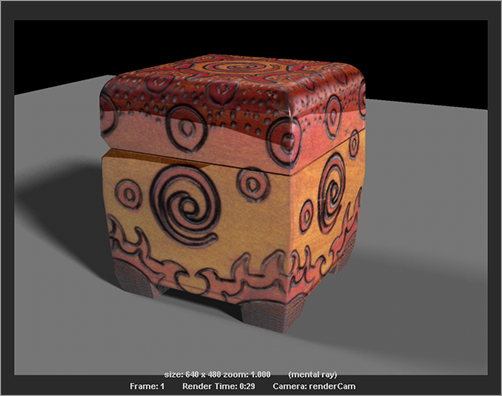
Figure 11-94: Set Alpha Gain to 0.4.
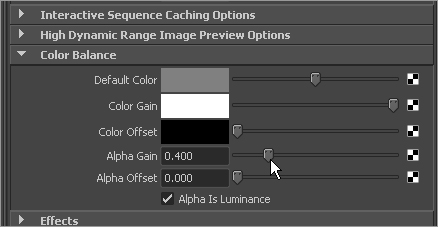
7. You need to reduce the reflections on the rest of the box. Double-click the file2 node to open the Attribute Editor. In the Color Balance heading, set Alpha Gain to 0.4, as shown in Figure 11-94. This sets the brightest part of the reflections to be capped at .4 and not the previous 1.0. Render, and you see a much better reflection in the box and no reflections in the carvings. (See Figure 11-95.) Save this to the render buffer.
8. Rename the file2 node to reflectionMap and the phong1 node to boxShader, and save your work.
You can open the scene file boxRendering01.ma from the Scenes folder in the Decorative_Box project to catch up to this point or to check your work so far.
Figure 11-95: The reflections look much better now.
Displacement Mapping
Now that the reflections are set up, you’ll use the same image map to create displacements in the box to sink the carvings into the box. Isn’t that convenient?
Figure 11-96: Add the new image map to the Displacement Map attribute.

1. In the Hypershade, click to create a new file node, and select the boxCarvings.jpg file in the Sourceimages folder again. You don’t want to reuse the same file node as you did for the reflections (reflectionMap node), because you need to change some of its attributes. Name the new file node displacementMap.
2. Double-click the boxShader node to open the Attribute Editor. MMB-drag the new displacementMap node onto the boxShader node in the Hypershade, and select Displacement Map from the context menu that pops up, as shown in Figure 11-96.
3. A new node appears called displacementShader1, but there is no connection apparent to the boxShader. Select the boxShader, and choose the Input and Output connections icon at the top of the Hypershade (![]() ). The Hypershade shows you the entire shader network, including the displacement map connection, as seen in Figure 11-97. Notice that the displacement connects to the phong1SG node and not directly to the boxShader node. This is normal and how it’s always done.
). The Hypershade shows you the entire shader network, including the displacement map connection, as seen in Figure 11-97. Notice that the displacement connects to the phong1SG node and not directly to the boxShader node. This is normal and how it’s always done.
Occasionally, when you click to view the input and outputs of a shader as you did in step 3, the Hypershade will put some nodes on top of others. If you don’t see any of the nodes shown in Figure 11-96, try clicking and dragging some of the nodes around in the Hypershade to see if there are any accidentally hidden nodes. These little touches make Maya extra fun!
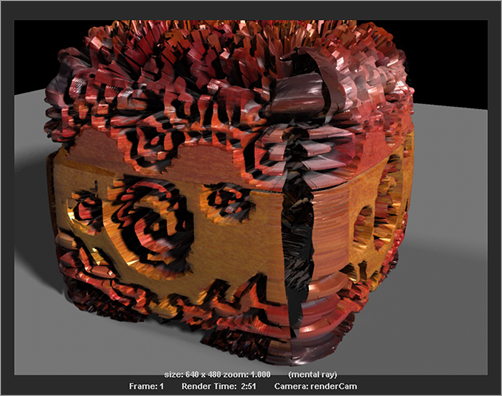
4. Render the box and see what happens now that you have a displacement map applied. Figure 11-98 shows how the box seems to have exploded!
Not to worry, this is to be expected. The values coming from the black-and-white map dictate how much of the geometry is displaced (moved). Obviously, you don’t have an image that works well for the amount of displacement, although it does look like the displacements are in the proper place to correspond to where the carvings are on the box.
Figure 11-97: The shader network for the box

Figure 11-98: Oh no, the box has exploded!
5. Double-click the displacementMap node. In the Attribute Editor, open the Effects heading, and turn on the Invert check box. This turns the background to black and the carvings to white. Set Alpha Gain to 0.1 in the Color Balance heading, and make sure Alpha Is Luminance is also checked. (See Figure 11-99.) The Alpha Gain value reduces the amount of displacement, and inverting the image lets the rest of the box outside of the carvings not be displaced.
Figure 11-99: Set the attributes for the displacement image.

Figure 11-100: The carvings are displacing outward.

6. Render a frame, and compare it to Figure 11-100. It’s not looking very good. The box isn’t exploding anymore, and only the carvings are displacing, which is good. However, the carvings are sticking out, instead of in.
7. Set the Alpha Gain attribute to -0.05 to push the carvings in a little instead of out. Render, and compare to Figure 11-101. The carvings are set into the wood as they should be, but the render looks bad. The displacements are very jagged and ill-defined.
Figure 11-101: The carvings are inset into the wood, but they don’t look good yet.
8. The jagged look of the carvings has to do with the tessellation of the box—that is, the detail of the box’s polygonal mesh. There are advanced ways to deal with how mental ray deals with displacements; however, the most basic method is to adjust the detail of the box’s mesh. Figure 11-102 shows the current box’s mesh. Notice that the sides of the box are very simply detailed. To increase the box’s faces to add detail, select the box, and then, in the Polygons menu set, choose Edit Mesh ⇒ Add Divisions ❒. Set the options to Exponentially and Division Levels of 3, as shown in Figure 11-103. Click Add Divisions to execute.
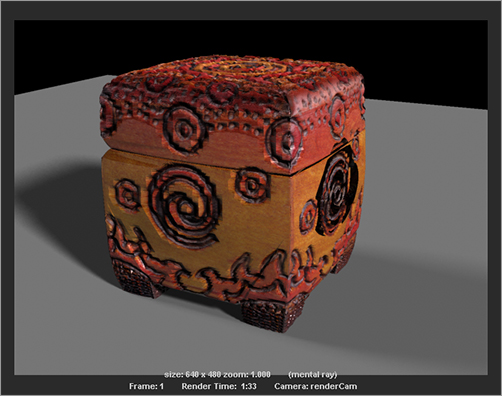
9. Figure 11-104 shows the newly tessellated box. It’s far more detailed in the mesh. When you render, it gives a result similar to Figure 11-105.
Figure 11-102: The current box’s mesh isn’t detailed enough.

Figure 11-103: Set the Add Division values.

Figure 11-104: Added divisions
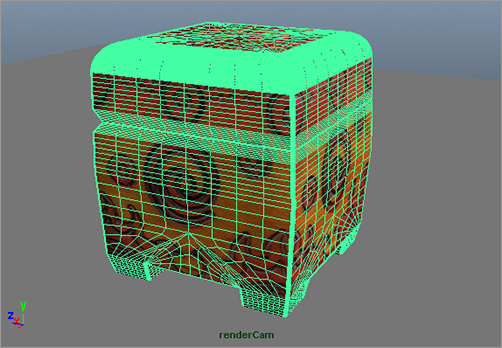
Figure 11-105: The displacements render much better now.

Figure 11-106: Click to create an IBL.
Notice that the render times have gone up because you increased the detail on the mesh. This is normal, but it can become a problem if the mesh is too divided and has more faces than you need. This box has fairly detailed carvings, so the level to which you set Add Divisions in Step 8 gives a good result without being too detailed. As your experience increases in Maya and mental ray rendering, you’ll learn how to use functions such as mental ray’s Approximation Editor to keep the overall detail low on the mesh, but with smooth displacement results when you render. This is an advanced technique, so we won’t cover it in this book. You’ve taken in quite a lot by this point already.
The next time you select the box and open the Attribute Editor, you’ll see a new tab called polySubdFace1. This is the node added with the Add Divisions function in Step 8. Feel free to adjust the Subdivision Levels in that tab and rendering to see how the detail levels affect the final render. Also try better quality settings in Render Settings, as you did with the red wagon earlier in this chapter, to clean up the render to your satisfaction.
Figure 11-107: The Attribute Editor for the IBL node
You can open the scene file boxRendering02.ma from the Scenes folder in the Decorative_Box project to catch up to this point or to check your work so far. You’ll next add an IBL sphere and use the HDR image you saw earlier in the chapter.
Adding an IBL
Here’s where things get fun. You’ll add an IBL node to the scene and add the office desktop HDR image to that IBL. First, make sure you have mental ray selected as your renderer in the Render Settings window, and then follow along with these steps:
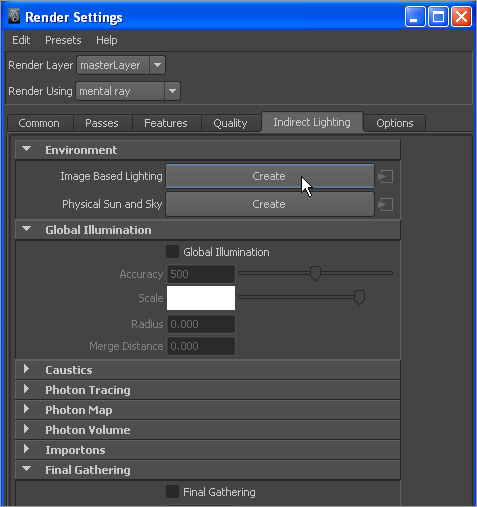
1. In the Render Settings window, click the Indirect Lighting tab. At the top, in the Environment heading, click the Create button for Image Based Lighting, as shown in Figure 11-106.
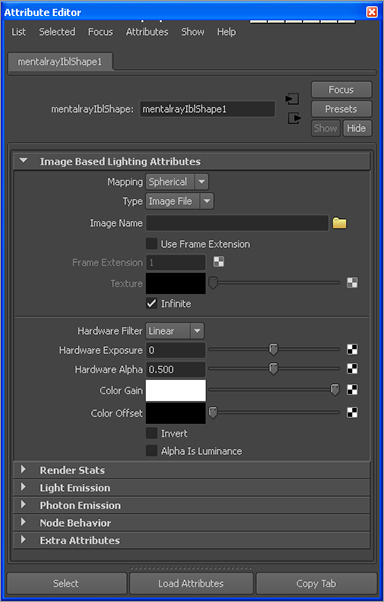
2. The Attribute Editor opens to a view of the newly created IBL (named mentalrayIblShape1), as shown in Figure 11-107.
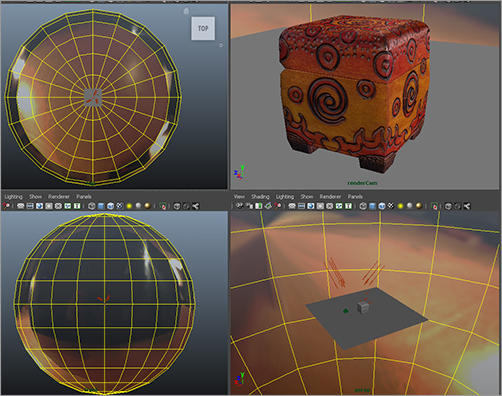
3. Click the folder icon (![]() ) next to the Image Name attribute. Navigate to the Sourceimages folder of the Decorative_Box project on your system, and select the file DeskHDRLatLong.hdr. You see in your view panes that a large yellow sphere is created in your scene. The office light probe HDR image is mapped. (See Figure 11-108.)
) next to the Image Name attribute. Navigate to the Sourceimages folder of the Decorative_Box project on your system, and select the file DeskHDRLatLong.hdr. You see in your view panes that a large yellow sphere is created in your scene. The office light probe HDR image is mapped. (See Figure 11-108.)
Figure 11-108: The IBL is in place and mapped to the office chrome ball HDRI.
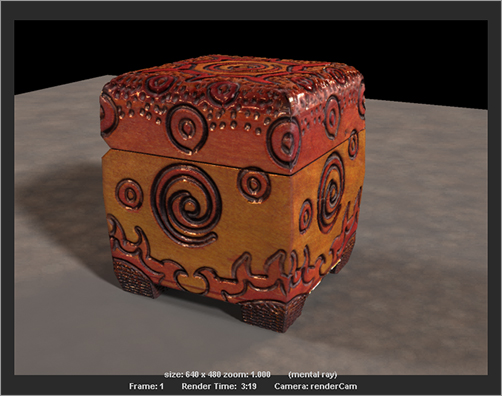
4. If you render a frame, you see the light probe in the background and in the reflections; however, the lighting is unchanged from before. This is because you need to enable Final Gather to take advantage of the IBL and the HDRI mapped to it. In the Render Settings window’s Indirect Lighting tab, check the Final Gathering check box in the Final Gathering heading. Leave the settings at their defaults, and render a frame.
Figure 11-109 shows a marked change in the look of the box from previous renders (as well as a longer render time). Save the image into your Render View buffer (![]() ), and compare it to your earlier render before the IBL. Also notice the bounced light on the gray floor, which is a nice touch, albeit splotchy right now.
), and compare it to your earlier render before the IBL. Also notice the bounced light on the gray floor, which is a nice touch, albeit splotchy right now.
5. Let’s remove the IBL from the background of the render. Select the IBL sphere and, in the Attribute Editor under the Render Stats heading, turn off Primary Visibility. The background renders black without the IBL.
6. Because the IBL is doing some of the heavy lifting for the lighting, you can turn down the intensities of the direct lights. Set the key light (directionalLight1) intensity to 1.25 and the directional rim light (directionalLight3) to 0.35. The orientation of the IBL affects the lighting in the scene, although it’s fine as it is now.
Figure 11-109: The IBL contributes to the lighting.

Figure 11-110: The box looks pretty good now, although still noisy.
Render the frame, and compare to Figure 11-110 and your previous renders. Feel free to select the IBL and change its rotation to a different orientation to see how it changes the look of the box. Just don’t forget to return it to its current orientation to stay consistent with the results shown in Figure 11-110 and the following steps.
Orienting the IBL
The image (HDRI or otherwise) used in an IBL and the IBL’s orientation are huge factors in the lighting of a scene. Play around with the rotations of the IBL to see how the lighting differs until you settle on a look you like.
7. The render looks nice, except it’s noisy. Notice the blotches of color all over the floor. This is from having low-quality settings for FG. In the Render Settings’ Indirect Lighting tab, increase Accuracy to 300 under the Final Gathering heading. Also set Point Density to 2.0 and Point Interpolation to 30. Doing so dramatically increases the render time for the frame (almost doubling the previous time); however, it makes the box look much better—practically eradicating the blotchy nature of the previous renders. The box has a nice glossy look to it. (See Figure 11-111.) Save the image to your Render View buffer.
You can open the scene file boxRendering03.ma from the Scenes folder in the Decorative_Box project to catch up to this point or to check your work so far.
Figure 11-111: Using higher-quality settings for FG makes a big difference.

FG is a difficult beast to tame, especially with an IBL. It takes a lot of experience and practice to be able to use this powerful feature of mental ray successfully in scenes. Experiment with different HDR images that you can download from the Internet as well as adjusting the lights in the scene.
Blurring Reflections
Let’s tweak the render a little more by making a new desktop for the box to sit on:
1. Open the Hypershade, and create a new Blinn shader for the desktop. Call it deskShader, and assign it to the floor plane of the box scene.
2. Click the map icon next to the Color attribute for the deskShader, create a new file node, and choose the deskWood.jpg image from the project’s Sourceimages folder.
3. Create two polygonal planes to make the corner of two walls behind the box, as shown in Figure 11-112, to have something in the background. Assign a light gray Lambert to the walls. Adjust the desk shape to be more of a rectangle, to make the wood image map look nicer.
Figure 11-112: Create walls and a wood desktop.

Figure 11-113: The reflections look too perfect and glossy.

4. Render a frame, and compare it to Figure 11-113. The reflections are too glossy and apparent; you want to mimic a semigloss desktop table. Also, the lighting on the box has changed, because the new, shiny desktop shader is bouncing more light than the earlier default gray plane. This is why indirect lighting can be more photo-real, if not more tricky to control.
5. Select the deskShader, and turn down Reflectivity to 0.25. Open the mental ray heading, and set Mi Reflection Blur to 4. Set Reflection Rays to 8, as shown in Figure 11-114.
6. While you’re at it, select the boxShader and set its reflections to be blurred, with a Mi Reflection Blur value of 2. Set Reflection Rays to 4. Render, and check against Figure 11-115. You’ll see better results on your own screen, because the differences in reflections are subtle. And that’s the point: the more finesse and attention you pay to the minor details, the better your image(s). You can play with the Reflection Rays for your desktop to get a softer look than in Figure 11-115.
Figure 11-114: Create blurred reflections for the desk.

Figure 11-115: Blurred reflections on the desktop and the box make the image more real.

Adding Depth of Field
One last item of interest is adding a depth of field (DOF) to the image. This effect adds blur to the render for the areas of the image that may be out of the lens’ focal depth. It can greatly add to the photo-realism of a rendered image.
Select the renderCam, and open the Attribute Editor. In the Depth of Field heading, check the Depth of Field attribute. Set Focus Distance to 11, because the box is about 11 units away from the camera, and set F Stop to 9.0. This setting, as with a real lens, sets how much is in focus around the focal distance. With a higher F Stop value, the focus runs deeper than with a low F Stop value.
Figure 11-116: The decorative box is done!
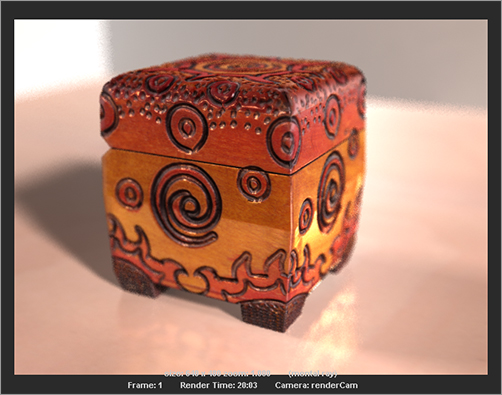
Figure 11-116 shows the final render of the box with DOF enabled. Your render times will be longer; and for a better render, you’ll need to increase your Sample settings. Figure 11-116 was rendered with Min Samples of 0, Max Samples of 1, and Anti-Aliasing Contrast of 0.04.
The scene file boxRendering04.ma from the Scenes folder in the Decorative_Box project will take you to this point.
Notice from the render that the back end of the box is thrown out of focus, along with the back of the desktop and the walls. Depending on the need and the size of the render, you’ll have to set the sampling levels to suit your needs; but be warned that your rendering times will dramatically increase, easily tripling depending on the quality settings. There are several ways to create DOF in a render that are faster or more controllable than we’ve covered here. You can render out a depth pass to use with a lens filter in a compositing package such as Nuke, to keep render times down. There are also more accurate DOF methods in mental ray and its lens shaders that you can experiment with when you’ve comfortably grasped the overall workflow presented here.
Finally, adding an Ambient Occlusion pass isn’t absolutely necessary for this render, although it will enhance the look of the contact shadows.
Wrapping Up the Decorative Box
When you’ve learned a lot more about lighting and gained confidence with the processes of lighting, rendering, and compositing, you’ll find a wealth of options when you render in several different layers. For example, if this decorative box were a professional job, its render would most likely be split into a flat color pass, a reflection pass, a specular highlight pass, a shadow pass, an Ambient Occlusion pass, a depth pass, and several different matte passes that separate parts of the scene to give the compositor the ultimate control in adjusting the image to taste.
You may not know what all those passes do right now, but understanding will come with time as long as you continue practicing your CG Kung Fu. Rendering your own color passes and ambient occlusions will give you some beautiful renders even without all the other passes. Keep in mind that small changes and additions can take you a long way toward a truly rich image.