
As an exercise in animating a system of parts of a model, before you continue to animate the locomotive in the next chapter, you’ll now animate a catapult. This catapult model is straightforward to animate. You’ll turn its winch to bend back the catapult arm, which shoots the projectiles, and then you’ll fire and watch the arm fly up.
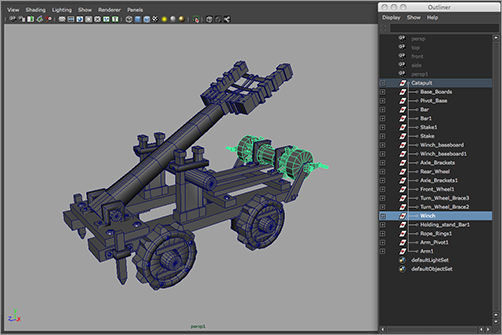
First, let’s get acquainted with the scene file and make sure its pivots and hierarchies are set up properly. The scene file catapult_anim_v1.mb in the Catapult_Anim project on the CD has everything in order, although it’s always good to make sure. Figure 8-46 shows the catapult with its winch selected and ready to animate.
Figure 8-46: The catapult’s winch is ready to animate.
Get a timing put down for the winch first, and use that to pull back the arm to fire. Follow these steps:
1. Select the Winch group with its selection handle. At frame 1, set a keyframe for rotation. If the selection handle isn’t turned on, select Winch from the Outliner and turn on the selection handle by choosing Display ⇒ Transform Display ⇒ Selection Handles. To keep it clean as you go along, instead of pressing Shift+E to set a key for all three axes of rotation, select only the Rotate X attribute in the Channel Box, right-click to open the shortcut menu, and choose Key Selected. There only needs to be rotation in X for the winch.
2. Jump to frame 60.
3. Rotate the winch backward a few times, or enter –400 or so for the Rotate X attribute.
4. Open the Graph Editor, ease in the curve a bit, and ease out the curve a lot so that the rotation starts casually but grinds to a stop as the arm becomes more difficult to pull back.
Obviously, you’re missing the rope between the winch and the arm. Because animating a rope is a fairly advanced task, the catapult is animated without its rope; but the principle of an imaginary rope pulling the arm down to create tension in the arm drives the animation.
5. To accentuate the more difficult winding at the end, add a key to the X-axis rotation through the Graph Editor. To do so, select the curve, and click the Insert Keys Tool icon (![]() ) in the upper-left corner of the Graph Editor. Your cursor changes to a cross.
) in the upper-left corner of the Graph Editor. Your cursor changes to a cross.
6. MMB+click frame 42 to add a keyframe already on the curve at frame 42. You can drag the key back and forth on the curve to place it directly at frame 42. It may help to turn on key snapping first. (See Figure 8-47.)
7. Move that keyframe down to create a stronger ease-out for the winch. Be careful not to let the curve dip down so that the winch switches directions. Adjust the handles to smooth the curve. You can also add a little recoil to the winch by inserting a new keyframe through the Graph Editor at frame 70. (See Figure 8-48.)
Figure 8-47: Insert a keyframe at frame 42.
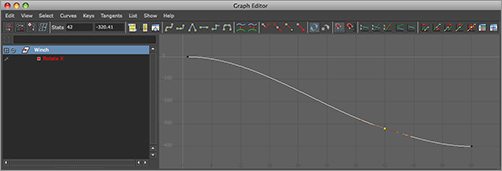
Figure 8-48: Creating a greater ease-out and adding a little recoil at the end

Animating with Deformers
It’s time to animate the arm coiling back, using the winch’s timing as it’s driving the arm. Because the catapult’s arm is supported by a brace, and the whole idea of a catapult is based on tension, you have to bend the arm back as the winch pulls it.
You’ll use a nonlinear deformer, just as you did in the axe head exercise in Chapter 5, “Modeling with NURBS, Subdivisions, and Deformers”; but this time, you’ll animate the deformer to create the bending of the catapult arm. Follow these steps:
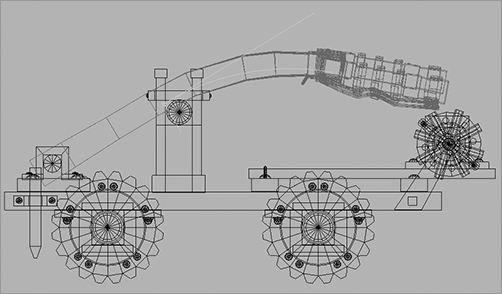
1. Switch to the Animation menu set. Select the Arm1 group, and choose Create Deformers ⇒ Nonlinear ⇒ Bend to create a Bend deformer perpendicular to the arm. Select the deformer, and rotate it to line it up with the arm, as shown in Figure 8-49.
Figure 8-49: Align the Bend deformer with the catapult arm.

Figure 8-50: Orient the Bend deformer to bend the arm back and down.

2. With the Bend deformer selected, look in the Channel Box for bend1 under the Inputs section, and click it to expand its attributes. Try entering 0.5 for Curvature. More than likely, the catapult arm will bend sideways. Rotate the deformer so that the arm is bending back and down instead. (See Figure 8-50.)
3. You don’t want the arm’s base to bend back, just the basket side. You want it to bend at the brace point, not in the middle where it is now. Move the deformer down the length of the arm until the middle lines up with the arm’s support brace.
4. To prevent the bottom of the arm from bending, change the Low Bound attribute to 0. To keep the basket from bending, set the High Bound attribute to 0.9.
The Low Bound and High Bound attributes control how far up and down the deformer the object is affected. The Envelope attribute for a deformer governs how much the object is affected overall, with 0 not affecting the geometry at all.
5. Instead of trying to match the speed, ease in and out of the winch and set the gross keyframes for the arm pulling back first. Reset Curvature to 0, and set a key for Curvature at frame 1. (Select bend1’s Curvature in the Channel Box, right-click, and choose Key Selected from the shortcut menu.)
6. Go to frame 60, and set Curvature to 0.8. If Auto Key is turned on, this sets a keyframe; otherwise, set a key manually. (See Figure 8-51.)
Figure 8-51: Bend the arm back at frame 60 and set a keyframe.
7. If you play back the animation, notice that the way the winch winds back and the way the arm bends don’t match. In the Graph Editor, you can adjust the animation curve on the Bend deformer to match the winch’s curve.
8. Insert a key on the Curvature curve at frame 42, and move it up to match the curvature you created for the winch.
9. Insert a new key at frame 70, and make the arm bend back up slightly as the winch recoils. Set Curvature to about 0.79 from 0.8. (See Figure 8-52.)
10. Go to frame 90, and set a key again at Curvature of 0. Set a key at 0.82 for frame 97 to create anticipation, and then keyframe at frame 103 to release the arm and fire the imaginary payload with a Curvature of –0.8.
Figure 8-52: Try to match the relative curvature of the winch’s animation curve with the Bend deformer’s animation curve.

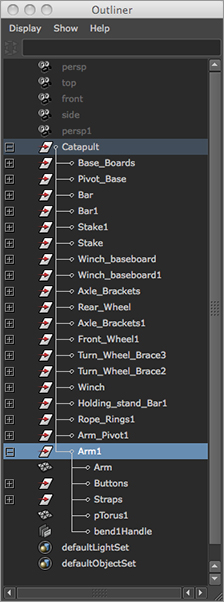
Figure 8-53: Group the deformer node under the Arm1 group node.
11. Add some rotation to the arm for dramatic effect. At about frame 100, during the release, the arm is almost straight. Select the Arm1 group, and set a rotation key on the X-axis. Go to frame 105, and rotate the arm 45 degrees to the left in the X-axis. If the starting rotation of the arm is at 30 (as it is in the sample file), set an X-axis rotation key of 75 at frame 105.
12. Notice that the arm is bending strangely now that it’s being rotated. It’s moving off the deformer, so its influence is changing for the worse. To fix this, go back to frame 100, and group the deformer node (called bend1Handle) under the Arm1 group, as shown in Figure 8-53. Now it rotates along with the arm, adding its own bending influence.
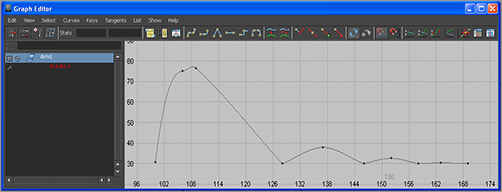
13. Work on setting keyframes on the deformer and the arm’s rotation so that the arm falls back down onto the support brace and quivers until it becomes straight again. The animation curve for the Bend deformer should look like Figure 8-54. The rotation of the arm should look like Figure 8-55. Remember to make the tangents flat on the keys where the arm bounces off the brace linear and the peaks, like the ball’s bounce from earlier in the chapter.
The file catapult_anim_v2.mb will give you a good reference to check out the timing of the arm bend and rotation.
Figure 8-54: The animation curve for the arm’s vibration back and forth as it comes to a rest
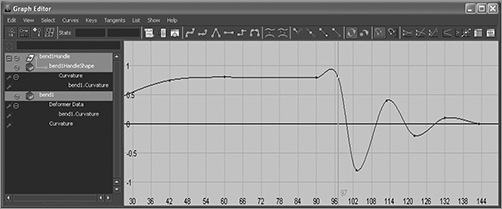
Figure 8-55: The animation curve for the arm’s rotation as it heaves up and falls back down, coming to an easy rest on the brace
Without getting into a lot more detail, try your hand at animating the catapult on your own. Here are some items you can animate to make this a complete animation:
- Spin the winch around as the arm releases, as if its rope is being yanked away from it.
- Animate the entire catapult rocking forward and backward as the arm releases, similar to the way a car rocks when you jump onto the hood.
- Move the catapult forward on a road, spinning its wheels as best you can to match the distance it travels.
- Design and build your own catapult, and animate it along the same lines.