
If you still feel a little unsure about nodes and hierarchies, take the time to reread the previous section and try the short exercise again. You’ll practice these concepts as you resume the Solar System exercise. By the time you’ve finished this exercise, you’ll have a strong sense of how hierarchies work in Maya, although you should feel free to repeat the entire exercise if you think that will help you master hierarchies. Understanding nodes and hierarchies is important to animating in Maya.
If you’re new to CG animation, take your time with the following section.
Animating Mercury’s Orbit Around the Sun
Load up your scene from where you last saved it. When you left off, you had created the self-rotation animation for Mercury and were about to create a second pivot point for the planet to orbit around the Sun by creating a new parent node for the Mercury sphere.
To create a new pivot point by making a new parent node, follow these steps:
1. With Mercury selected, press E for the Rotate tool, and then choose Edit ⇒ Group from the Main Menu bar. The Channel Box displays attributes for a new node called group1. Notice that nothing about the Mercury sphere changed, except that the Rotation Manipulator handle jumped from where it was originally centered on Mercury all the way back to the origin, where the zero points of the X-, Y-, and Z-axes collide. Figure 2-21 shows the new Mercury group and its new pivot location.
Figure 2-21: Grouping Mercury to itself creates a new pivot point at the origin.
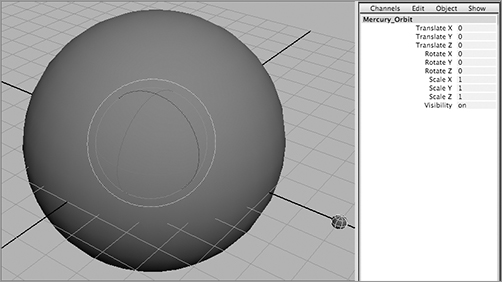
You just created a new Maya object by grouping Mercury to itself. In doing so, you also created a second pivot point for Mercury, in effect, which was placed by Maya at the origin by default. Because an object’s Manipulator always centers on its pivot point when it’s selected, Mercury’s Rotate Manipulator jumped to the origin when the new parent node became selected upon its creation. That is fortunate for you, because that happens to be the center of the Sun—exactly where you need it to be for Mercury to orbit the Sun properly.
2. Without unselecting Mercury, click group1 in the Channel Box, and change the name of this new group to Mercury_Orbit. It’s important to make the distinction between node names so you never get confused. Now you know that the Mercury node is the planet sphere itself, whereas Mercury_Orbit is the name of the new parent node, with which you’ll orbit Mercury around the Sun.
3. Click anywhere in an empty space in your view window to unselect Mercury_Orbit. Try selecting it again. Notice that when you click Mercury, you select only the planet and not the new parent node Mercury_Orbit, the group that has its pivot point at the center of the Sun. This happens because you’re in Object Selection mode (a.k.a. Object mode). To select the group Mercury_Orbit, you need to switch into Hierarchy mode by toggling its icon (![]() ) on the Status line at the top of the UI, as shown in Figure 2-22. Make sure you switch back to Object mode by clicking its icon (
) on the Status line at the top of the UI, as shown in Figure 2-22. Make sure you switch back to Object mode by clicking its icon (![]() ) in the Status line. For more on selection modes, see Chapter 3.
) in the Status line. For more on selection modes, see Chapter 3.
Figure 2-22: Toggling on the Hierarchy mode

4. Go back to frame 1 of your animation. Set a keyframe for Mercury_Orbit’s Rotate Y attribute by selecting its name in the Channel Box and then choosing Animate ⇒ Set Key from the Main Menu bar.
5. Go to frame 240, grab Mercury_Orbit’s Rotate Manipulator handle by the green Y-axis, and spin it around the Sun twice in either direction. (It doesn’t matter if you go clockwise or counterclockwise.) You can also enter 720 (or -720 Object Selection mode to go in the other direction) in the Rotate Y attribute field in the Channel Box.
6. Choose Animate ⇒ Set Key to set a keyframe at frame 240 for Mercury_Orbit. Scrub your animation to play it back.
Does that make good sense? You’ll have the chance to do this a few more times as you animate the other planets and their moons. However, if you still find yourself a little fuzzy on this concept (which is perfectly normal), repeat the steps to animate Mercury in a new scene file if need be. One down, eight to go.
Creating Venus
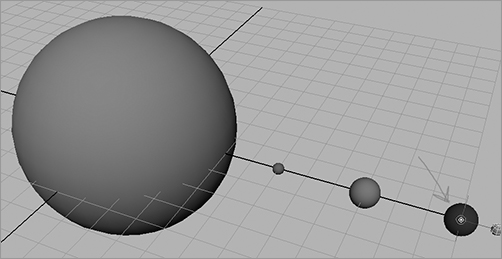
For your next planet, Venus, follow the same procedure as for Mercury’s self-rotation, and animate it so that it rotates about itself. Then, create a new pivot point (placed by default at the origin) by grouping Venus to itself to create a new parent node for that sphere, and call the new parent node Venus_Orbit. Last, animate Venus_Orbit to revolve around the Sun just as you did with Mercury_Orbit in the previous steps.
Earth and the Moon
Now you need to animate the third planet, the Earth, in much the same way, except that this time there will be the added complication of a moon. In addition, instead of choosing Animate ⇒ Set Key to set your keyframes, you’ll use the keyboard hotkey S. (The Earth? Hey, I can see my house from here!)
Whenever you press S when an attribute is highlighted in the Channel Box, you’re essentially choosing Animate ⇒ Set Key. In the Set Key Options dialog box, be sure you’ve changed Set Keys On to All Keyable Attributes instead of the default All Manipulator Handles and Keyable Attributes. Also make sure you’ve set Channels to From Channel Box instead of the default All Keyable, as mentioned in the earlier sidebar.
To animate Earth and the Moon, follow these steps:
1. Select Earth, and give it its self-rotation animation as you did for Mercury. But this time, select the rotation channel names in the Channel Box and press S, instead of choosing Animate ⇒ Set Key to set rotation keyframes. Again, if you left the Animate ⇒ Set Key ❒ at its defaults, pressing S sets keys for all attributes; but if you followed the advice given previously in the sidebar, only the selected channels are keyframed.
2. Select the Moon, and give it its self-rotation animation by spinning it around itself and keyframing it as you’ve just done with Earth.
3. To spin the Moon around Earth, do what you did earlier in this chapter to spin a planet around the Sun: group the Moon to itself by choosing Edit ⇒ Group, and name the new parent node Moon_Orbit.
This time, however, you need the pivot point to be at the center of Earth and not at the center of the Sun object, where it is currently. Follow these steps:
1. Turn on the grid snap, and then press the Insert key to activate the pivot point. If you’re using a Macintosh, press the Home key. The Moon’s Manipulator changes from a rotation handle to the Pivot Point Manipulator. This Manipulator acts just like the Move Manipulator, but instead of moving the object, it moves the object’s pivot point.
2. Grab the yellow circle in the middle of the Manipulator, and move the pivot point to snap it to the grid point located at the center of Earth (see Figure 2-23).
3. Press the Insert key again (or the Home key on a Macintosh) to return to the Rotation Manipulator for Moon_Orbit. At frame 1, set a keyframe for the Moon’s Y-axis rotation. Then, at frame 240, rotate the Moon about the Y-axis and set a keyframe. Return to frame 1.
Figure 2-23: Moving the Moon’s pivot point to the center of Earth
Grouping the Moon with Earth
To animate Earth’s orbit of the Sun, you need to make sure the Moon will also follow Earth around the Sun. Instead of just selecting Earth and grouping it to itself as you’ve done for the other two planets, you need to include the Moon_Orbit node in that group. Follow these steps:
1. Select Earth. Shift+click the Moon_Orbit group while in Hierarchy mode (![]() ) to make sure you get the topmost node of the Moon, and then choose Edit
) to make sure you get the topmost node of the Moon, and then choose Edit ![]() ), the Earth_Orbit node isn’t selected. If you select Earth and then Shift+click the Moon, you select both objects, but you still don’t select the parent node Earth_Orbit, which is the group that contains both these objects and has its pivot point at the center of the Sun. Make sure you select the right group. Keep an eye on where the Manipulator is when you make your selection. If you have the Earth_Orbit node selected, its Manipulator should be in the middle of the Sun. We’ll deliberately illustrate this mistake and its consequences when you animate Pluto a little later.
), the Earth_Orbit node isn’t selected. If you select Earth and then Shift+click the Moon, you select both objects, but you still don’t select the parent node Earth_Orbit, which is the group that contains both these objects and has its pivot point at the center of the Sun. Make sure you select the right group. Keep an eye on where the Manipulator is when you make your selection. If you have the Earth_Orbit node selected, its Manipulator should be in the middle of the Sun. We’ll deliberately illustrate this mistake and its consequences when you animate Pluto a little later.
Make sure you use Hierarchy mode (![]() ) when you click the moon object to select Moon_Orbit and not just the moon sphere. Otherwise, you’ll lose the animation of the Moon orbiting Earth.
) when you click the moon object to select Moon_Orbit and not just the moon sphere. Otherwise, you’ll lose the animation of the Moon orbiting Earth.
2. Set a keyframe for Earth_Orbit’s Rotate Y attribute at frame 1 by highlighting Rotate Y in the Channel Box and pressing S for the Set Key command. This assumes you’ve changed the defaults in Animate ⇒ Set Key ❒ as discussed in the earlier sidebar.
3. Go to frame 240, spin Earth and the Moon around the Sun a few times in whichever direction and for however many revolutions you want, and set a keyframe at frame 240 as well.
Now the first three planets are going around themselves and around the Sun, with a moon for the Earth. If you haven’t been saving your work, save it now. Just don’t save over the un-animated version from earlier.
Creating the Other Planets’ Moons
Repeat this animation procedure for the remaining planets and moons, but leave out Pluto for now. (Poor Pluto: first it loses out on being a planet, and now it has to wait for last.)
If you find that one of your moons is left behind by its planet or that it no longer revolves around the planet, you most likely made an error when grouping the moon and planet. Undo until you’re at the point right before you grouped them, and try again. If that still doesn’t work, start over from the earlier version of the file you saved just before you began animating it. You’ll learn how to fix it in the section “Using the Outliner,” later in this chapter.
Auto Keyframe
You can also use the Auto Keyframe feature when animating the planets and moons. Auto Keyframe automatically sets a keyframe for any attribute that changes from a previously set keyframe. For example, an initial keyframe for an attribute such as Y-Axis Rotation needs to be set at some point in the animation. The next time the Y-Axis Rotation is changed, Maya will set a keyframe at the current frame automatically.
To turn on Auto Keyframe, click the Auto Keyframe icon (![]() ), which is to the right of the Range slider. When the icon is red, Auto Keyframe is active.
), which is to the right of the Range slider. When the icon is red, Auto Keyframe is active.
To use Auto Keyframe to animate the moon orbiting Mars, follow these steps:
1. Turn on Auto Keyframe.
2. Start at frame 1. Select Mars’s moon, and set a keyframe for its Y-axis orbit by highlighting Rotate Y in the Channel Box and pressing S.
3. Go to frame 240. Revolve the moon around Mars several times in a direction of your choosing. Maya automatically sets a frame for Y rotation at frame 240. Save your file.
Use Cubes Instead of Spheres
Feel free to create the planets and moons as cubes instead of spheres. That way, you can see each of their individual rotations much more easily, so you can tell whether the animation is working properly for you.
Using the Outliner
Figure 2-24: The Outliner view of the planet hierarchies
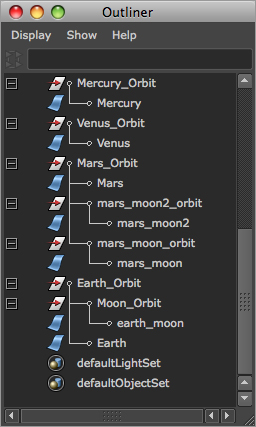
The Outliner is an outline format listing of all the objects and nodes in your scene. For an in-depth look at the Outliner, see Chapter 3. For now, let’s look at how to use the Outliner to illustrate the hierarchies for the planets and moons. When all is good and proper, the Outliner should look like Figure 2-24. Choose Window ⇒ Outliner to open the Outliner window and take a peek at what you have. If you haven’t yet properly named everything, including the moons, take this opportunity to do so by double-clicking a name in the Outliner and entering a new name.
Let’s look at the planet Mars and its layout in the Outliner to better understand the hierarchy for all the planets. All the other planets should be laid out exactly like Mars (except the planets that have just one or no moons).
At the bottom of the hierarchy are Mars’s two moons, mars_moon and mars_moon2. Each of those moons is spinning on its own pivot point. You grouped each moon to itself, created the mars_moon_orbit and mars_moon2_orbit nodes, and placed their pivot points at the center of Mars to animate their orbits around Mars.
Mars is spinning on its own pivot point, but it needed another pivot point to be able to orbit the Sun. Because you had to make the moons go with it around the Sun, you selected Mars, mars_moon_orbit, and mars_moon2_orbit (the top nodes of the moons that circle the planet Mars) and grouped them all together, placing that pivot point at the center of the Sun. You called this node Mars_Orbit. This is the parent node because it’s the topmost node for this group. Wherever this parent node goes, the child nodes that are under it will follow.
Hierarchies such as this are a cornerstone of Maya animation. It’s imperative that you’re comfortable with how they work and how to work with them. If you find yourself scratching your head even a little, try the exercise again. A proper foundation is critical. Remember, this learning 3D thing isn’t easy, but patience and repetition help a lot.
Correcting Hierarchy Problems Using the Outliner
One of the most common problems you’ll run into with this project is a planet revolving around the Sun without its moon. To illustrate how to fix it using the Outliner, as opposed to undoing and redoing it as suggested earlier, the following steps will force you to make this error with Pluto. Usually, people learn more from mistakes than from doing things correctly.
Go to Pluto, start the same animation procedure as outlined earlier, and then follow these steps to force an error:
1. Create Pluto’s own self-rotation by spinning it around itself and keyframing as before.
2. Do the same for Pluto’s moon’s rotation.
3. Group the moon to itself, and grid-snap the pivot point at the center of Pluto to create the moon’s orbit of Pluto.
When Pluto’s moon (pluto_moon) is orbiting Pluto, you’re ready to group the moon’s orbit and Pluto together to create an orbit of the Sun for both.
4. Here is where you make your mistake. In Object mode, select the sphere for Pluto’s moon, and select the sphere for Pluto. Your error is that you’re remaining in Object mode instead of switching to Hierarchy mode.
5. Choose Edit ⇒ Group to group them together, and call that new node Pluto_Orbit (following the naming convention you used for the others).
6. Animate Pluto_Orbit revolving around the Sun.
7. Play back the animation.
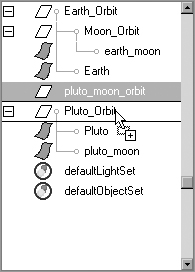
Figure 2-25: Pluto’s incorrect hierarchy

Notice that the moon is no longer orbiting the planet. This is because you didn’t include pluto_moon_orbit in your group Pluto_Orbit. The animation of the moon going around Pluto is stored in that node; and because it’s no longer attached to Pluto_Orbit, there’s no moon orbit of Pluto.
Figure 2-25 shows the hierarchy of Pluto and how it’s different from that of the other planets: the moon’s orbit node has been left out of the group. (Earth has been expanded as a contrasting example.)
Figure 2-26: Regrouping objects in the Outliner
Using the Outliner, you can easily fix this problem. Place the pluto_moon_orbit node under the Pluto_Orbit node. Go to frame 1 of the animation, grab the pluto_moon_orbit node in the Outliner, and use the middle mouse button to drag it to the Pluto_Orbit node so that it has a black horizontal line above and below it to show a connection, as in Figure 2-26.
You’ve just grouped pluto_moon_orbit under Pluto_Orbit, a practice known as parenting. Now you need to parent pluto_moon under pluto_moon_orbit as well. Use the middle mouse button to drag pluto_moon onto pluto_moon_orbit. When you play back the animation, you’ll see that the moon is revolving around the planet, while at the same time Pluto and the moon are orbiting the Sun. Now that you’ve corrected Pluto’s layout in the Outliner, it’s similar to the layouts for the other properly working planets.
The file Planets_v3.mb in the Scenes folder of the Solar_System project on the CD will give you an idea of how this project should look. The first five planet systems are grouped and animated as a reference, leaving the final four for you to finish.
You can add objects to a group by MMB+dragging their listing onto the desired parent node in the Outliner. You can also remove objects from a group by MMB+dragging them out of the parent node to a different place in the Outliner.
Grouping Terminology
Grouping terminology can be confusing. Grouping Node A under Node B makes Node A a child of Node B. Node B is now the parent of Node A. Furthermore, any transformation or movement applied to the parent Node B will be inherited by the child Node A.
When you group Node A and Node B, both nodes become siblings under a newly created parent node, Node C. This new node is created just to be the parent of Nodes A and B and is otherwise known as a null node. To group objects, select them and choose Edit ⇒ Group. Parenting nodes together places the first selected node under the second selected node. For example, if you select Node A, Shift+select Node B, and then choose Edit ⇒ Parent, Node A will group under Node B and become its child. This is the same procedure as MMB+dragging Node B to Node A in the Outliner, as you did with Pluto’s moon and Pluto itself.