Hierarchy and Maya Object Structure
Let’s take a timeout from the Solar System exercise and look at how objects and hierarchies work in Maya. On top of everything that you see in Maya—its interface—is a layer you don’t see: the code. The layer of code keeps the objects in Maya organized through a network of nodes. How you relate these nodes defines how you’ve built your scene. In short, using Maya is essentially programming your computer directly to create 3D objects and animation.
So, having a solid understanding of how Maya defines objects and how they interact is essential to an efficient and successful animation process. This involves getting an intrinsic understanding of how nodes relate, whether it’s a straightforward parent-child hierarchy in which one affects the other directly or a more complicated script-driven expression connecting 15 attributes of several objects to simplify a task.
Understanding Nodes
At its core, Maya relies on packets of information called nodes, and each node carries with it a group of attributes that in combination define an object. These attributes can be spatial coordinates, geometric descriptors, color values, and so on. Taken together, an object’s attributes define it and how it animates. You can define, animate, and interconnect any or all of these attributes individually or in concert, which gives you amazing control over a scene.
When you’re beginning to work with a robust program, the learning curve occasionally spikes. With Maya, these spikes typically involve nodes and their interconnections. Although the interface automates much of the node creation and relationship process, the sooner you’re exposed to the implications of the node level of objects, the easier it will be for you to overcome the typical learning curve. Even though you may not actively see that you’re making root-level connections between nodes and attributes, that is exactly what you’re doing every time you click a command.
Nodes that define the shape of a surface or a primitive are called creation nodes or shape nodes. These nodes carry the information that defines how that object is created. For example, a sphere’s creation node has an attribute for its radius. Changing that attribute changes the radius of the sphere at its base level. Shape nodes are low on the hierarchy chain and are always child nodes of transform nodes. The sphere listens to its creation node attributes first and then moves down the chain to its other nodes’ attributes (such as position, rotation, or scale).
Not all primitives are created with shape nodes, so changes at the creation level may not be possible on certain objects; some objects are created without a creation node. When you create a new primitive or an object, make sure the History button (![]() ) is turned on in the Status line (see Chapter 3 for more about the Status line and its icons). If it displays a small red X in the icon, History is off, and the primitive will be created without a shape node.
) is turned on in the Status line (see Chapter 3 for more about the Status line and its icons). If it displays a small red X in the icon, History is off, and the primitive will be created without a shape node.
The most visible and used nodes are the transform nodes, also known as DAG nodes (Directed Acyclic Graph nodes). These nodes contain all the transformation attributes for an object or a group of objects below it. Transformations are the values for translation (position), rotation, and scale. These nodes also hold hierarchy information about any other children or parent nodes to which they’re attached. When you move or scale an object, you adjust attributes in this node.
Try This As an example of working with transform nodes, you can create a sphere and see what happens in the Attribute Editor as you adjust its position and size. Follow these steps in a new Maya scene:
1. Press Ctrl+A to toggle the Attribute Editor on the right of the UI or to open it as its own window if you’ve set it up to do so in Maya’s preferences. (Ctrl functions the same on a Mac as on a PC, so Mac users can also use their Ctrl key when called for in the text.)
The tabs along the top of the window let you switch between the nodes that are attached to this object. The current tab should be on the sphere’s shape node, called nurbsSphereShape1. This node contains specific information about the object, but it isn’t typically a node that you edit.
2. Press W to select the Translate tool. With the sphere still selected, click the nurbsSphere1 tab in the Attribute Editor to access the sphere’s transforms node. Move the sphere a little in the X direction. Notice in the Attribute Editor that the Translate attribute for X has changed. You should also see the change in the Channel Box.
3. Press R to select the Scale tool. R is the hotkey by default in Maya for the Scale tool and is the same as clicking the Scale tool icon in the Tool Box (![]() ). Scale the sphere uniformly, meaning equally, in all directions by clicking and dragging the Center Manipulator handle (the cyan box). Notice that the Scale X, Scale Y, and Scale Z attributes of the sphere change in the Attribute Editor. In the Attribute Editor, enter 1.0 for the X, Y, and Z Scale values to reset the sphere back to its original size.
). Scale the sphere uniformly, meaning equally, in all directions by clicking and dragging the Center Manipulator handle (the cyan box). Notice that the Scale X, Scale Y, and Scale Z attributes of the sphere change in the Attribute Editor. In the Attribute Editor, enter 1.0 for the X, Y, and Z Scale values to reset the sphere back to its original size.
4. In the creation node of makeNurbsSphere1, change the radius from 1.0 to 2.0. The sphere doubles in size because its radius is doubled. Switch back to the transform node (nurbsSphere1), and note that the Scale X, Scale Y, and Scale Z attribute values are unchanged. This is because you affected the size of the sphere through its Radius attribute in the creation node at its root level, not through the Scale attributes in a higher node. Any changes you make to the Scale attributes take effect after changes in the lower node. This is a perfect example of how one node’s output (here, the Radius attribute) changes another node.
Parents and Children
A parent node is simply a node that passes its transformations down the hierarchy chain to its children. A child node inherits the transforms of all the parents above it. So, by using hierarchies for the Solar System exercise, you’ll create a nested hierarchy of parents and children to animate the orbital rotation of the nine planets and some of their moons.
By creating parent-child relationships, you can easily animate the orbit of a moon around a planet while the planet orbits the Sun. With the proper hierarchy, the animation of the planet orbiting the Sun automatically translates to the moon. In effect, the planet takes the moon with it as it goes around the Sun.
Child nodes have their own transformations that can be coupled with any inherited transforms from their parent, and these transformations affect them and any of their children down the line.
The revolution of one of the planets around the Sun takes into account its moons, but those moons can have their own animation to spin themselves around their planets. You’re about to experience this firsthand as you continue the Solar System exercise. The more you hear about these concepts in different contexts, the easier they will be to master.
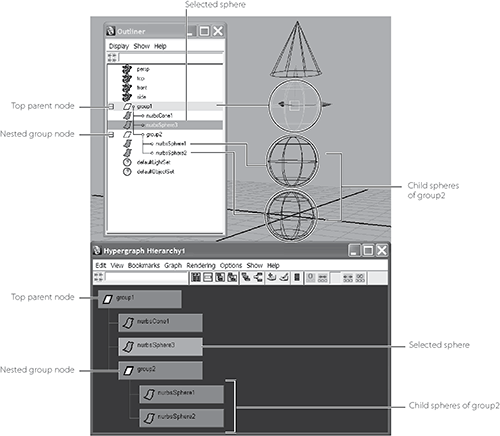
Figure 2-20 shows the Outliner and Hypergraph views with a simple hierarchy of objects for your reference. The Outliner and Hypergraph show you the objects in your scene in an outline and flowchart format, respectively. Both of these windows allow you to access the different levels of nodes (the hierarchy) in a scene and are discussed further in Chapter 3.
A top parent node called group1 holds its children nurbsCone1, nurbsSphere3, and the nested group node group2. The node group2 is the parent node of nurbsSphere2 and nurbsSphere1.
Figure 2-20: A simple hierarchy in both the Outliner and Hypergraph windows

