Figure 10-24: Darkness and shadow help add a sense of realism, depth, and mood to an otherwise simple still life.
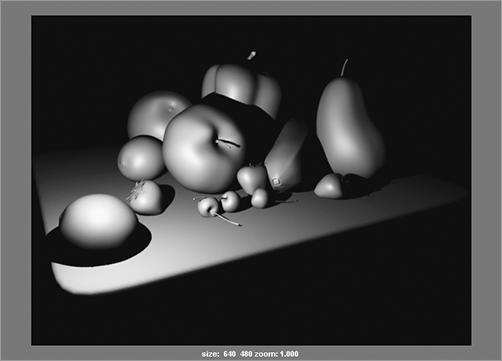
Don’t be too quick to create an abundance of light in your scene—eager to show off your models and textures. Shrouding objects in darkness and shadow is just as important as revealing them in light. You can say a lot visually by not showing parts of a whole, leaving some interpretation to the audience.
A careful balance of light and dark is important for a composition. As Figure 10-24 shows, the realism of a scene is greatly increased with the simple addition of well-placed shadows. Don’t be afraid of the dark. Use it liberally, but in balance.
Creating Shadows in Maya
Maya lights don’t cast shadows by default; you need to enable this feature in the light’s Attribute Editor. When you do that, however, lights can cast shadows in one of two ways, depending on how the scene is rendered.
The more common method of the two is to create shadows by using Depth Map shadows. When you enable shadow maps (by clicking the Use Depth Map Shadows check box in the Shadows area of a light’s Attribute Editor), Maya generates shadow maps that locate where shadows fall by following the path of the light backward from the lighted object to the light itself. Shadow maps create fast, fairly accurate shadows through Maya’s renderer. See the next section on how to create shadow map shadows.
The second method for casting shadows is achieved by raytracing with Maya’s software renderer. Raytracing involves tracing a ray of light from every light source in all directions and tracing the reflection to the camera lens. Therefore, you can create more accurate shadows with raytracing. However, this render can take longer to calculate, particularly when using soft shadows. Later in this chapter, you’ll learn how to create raytraced as well as soft shadows.
You need to turn on raytraced shadows for each light when you want more accurate shadows: either soft and diffused or sharp and crisp-edged, as well as enabling raytracing in the Render Settings window. See Figures 10-25 and 10-26.
Figure 10-25: A Directional light with Depth Map shadows renders faster and is usually detailed enough.
Figure 10-26: A Directional light with raytraced shadows produces more detailed shadows but sometimes renders more slowly.

Shadow Map Shadows
For every light type except Ambient, you can turn on shadow maps through the light type’s Attribute Editor, as shown in Figure 10-27.
The depth-map Resolution defaults at 512. The higher this resolution, the better defined the shadows. Figure 10-25 was rendered with a depth map Resolution of 4096, a very high value. Figure 10-28 is the same render with a depth map Resolution of 768. Most shadows are detailed enough with a depth map Resolution of 1024.
Directional lights aren’t the best lights to use for detailed shadow-map shadows because they require a high resolution for the maps; however, their raytraced shadows are extremely well done, as shown in Figure 10-26.
Spot lights create shadow maps with greater accuracy at lower depth-map Resolution settings and faster render times. As such, Spots are preferred to Directionals for shadow-casting lights. Figure 10-29 shows the same render with a Spot light and a depth map Resolution setting of only 1024, one-fourth the size of the Directional light’s depth-map Resolution.
Figure 10-27: Turning on shadow maps in the Attribute Editor for a Directional light

Figure 10-28: The depth map Resolution setting affects shadow quality for shadow maps.

Figure 10-29: Spot lights cast faster and more detailed shadow-map shadows.

Trying to squeeze a detailed shadow map from a Directional light with an absurdly high depth-map Resolution setting can even crash your system. In these cases, it’s wiser to use raytraced shadows.
Raytraced Shadows
To enable raytraced shadows, turn on the light’s Use Ray Trace Shadows setting in the Attribute Editor (see Figure 10-27 earlier in this chapter), and enable the Raytracing check box under the Raytracing Quality heading in the Render Settings window. Choose Window ⇒ Rendering Editors ⇒ Render Settings, or click the Render Settings icon (![]() ) in the Status line.
) in the Status line.
Figure 10-30: The Spot light shown in Figure 10-29, now has raytraced shadows.

Figure 10-30 shows the Spot light from Figure 10-29, this time rendered with a raytraced shadow. Notice that there isn’t much difference in the renders at this point with simple shadows like these. However, as you’ll see with soft shadows later in this chapter, raytracing shadows can make a big difference in the look of your renders.
For an object that has a transparency map applied to its shader, however, only raytraced shadows can cast proper shadows. On the left in Figure 10-31 is a plane with a mapped checkerboard transparency casting a raytraced shadow over the still life. On the right is the same light using shadow maps instead of raytraced shadows.
Figure 10-31: Only raytraced shadows work with transparencies.

Controlling Shadows per Object
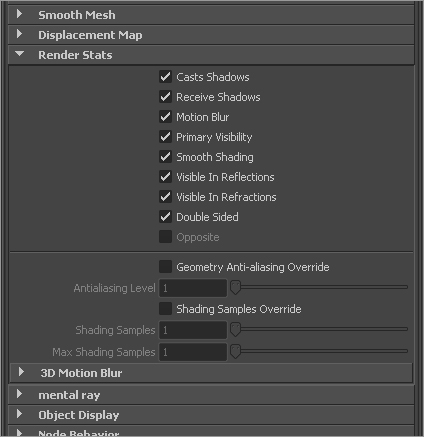
To better control your lighting, you can specify whether an object can cast and receive shadows in Maya. For example, if you have geometry casting light in front of a shadow, but you don’t want it to cast a shadow, you can manually turn off that feature for that object only.
To turn off shadow casting for an object, select the object and open its Attribute Editor. In the Render Stats section is a group of check boxes that control the render properties of the object, as shown in Figure 10-32. Clear the Casts Shadows check box. If you don’t want the object to receive shadows, clear the Receive Shadows check box.
Figure 10-32: You easily can set whether an object casts or receives shadows.