
Shaders are composed of nodes just like other Maya objects. Within these nodes, attributes define what shaders do. Here is a brief rundown of the common shader attributes with which you’ll be working:
Color An RGB or HSV value defines what color the shader is when it receives a neutral color light. For more on RGB and HSV, see Chapter 1, “Introduction to Computer Graphics and 3D.”
Transparency The higher the Transparency value, the less opaque and more see-through the object becomes.
Although usually expressed in a black-to-white gradient, with black being opaque or solid and white being totally clear, transparency can have color. In a color transparency, the shader’s color shifts because only some of its RGB values are transparent, as opposed to the whole.
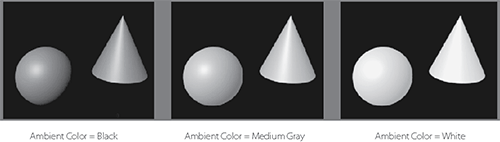
Ambient Color This color affects the Color attribute of the shader as more ambient light is created in the scene. Ambient color tends to flatten an object because this attribute evenly colors the object. This attribute is primarily used to create flat areas and should be used with care. The default is black, which keeps the darker areas of a surface dark. The lighter the ambient color, the lighter those areas are. A bright Ambient Color setting flattens out an object, as shown in Figure 7-9.
Figure 7-9: Ambient color values
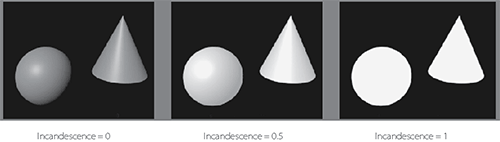
Incandescence This is the ability to self-illuminate. Objects that seem to give off or have their own light, such as an office’s fluorescent light fixture, can be given an Incandescence value. Incandescence doesn’t, however, light objects around it in regular renders, nor does it create a glow. It also serves to flatten the object into a pure color. As you’ll see in Chapter 11, “Maya Rendering,” incandescence can also help light a scene in mental ray’s Final Gather rendering. The value of Incandescence (as well as the color) of an object is used to calculate the overall brightness in a Final Gather scene. (See Figure 7-10.)
Figure 7-10: Incandescence values
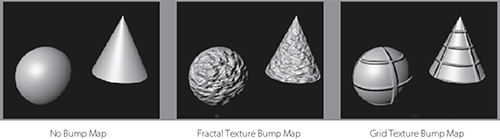
Bump Mapping This attribute creates a textured feel for the surface by adding highlights and shadows to the render. It doesn’t alter the surface of the geometry, although it makes the surface appear to have ridges, marks, scratches, and so forth. The bump map has to be a texture node such as a ramp, a fractal noise, or an image file. The more intense the variation in tones of that map, the greater the bump. Bump maps are frequently used to make surfaces look more real, because nothing in reality has a perfectly smooth surface. Using bumps very close up may create problems; bumps are generally good for adding inexpensive detail to a model that isn’t in extreme close-up. (See Figure 7-11.)
Figure 7-11: The effects of a bump map
Close-up geometry, where you have to change the topology of the model physically using texture maps, requires displacement maps. We’ll cover displacement maps in Chapter 11.
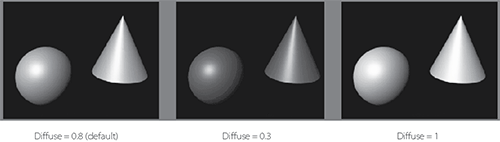
Diffuse This value governs how much light is reflected from the surface in all directions. When light strikes a surface, light disperses across the surface and helps to illuminate it. The higher this value, the brighter its object is when lit, because more of the striking light is reflected from the surface. The lower the Diffuse value, the more light is “absorbed” into the surface, yielding a darker result, especially in areas that aren’t well lit. Metals have very low Diffuse values because they rely on reflections and direct light. (See Figure 7-12.)
Figure 7-12: How a Diffuse value affects a shader’s look
Translucence and Translucence Focus The Translucence and Translucence Focus attributes give the material the ability to transmit light through its surface, like a piece of canvas in front of a light. At a value of 1 for Translucence, all light shines through the object; at 0, none does. The Translucence Focus attribute specifies how much of that light is scattered. A light material such as paper should have a high translucence focus, and thicker surfaces should have low focus rates.
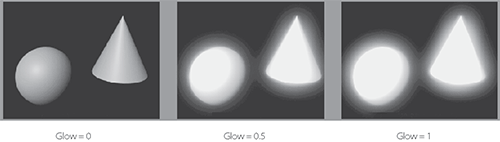
Glow Intensity Found in the Special Effects section of the Attribute Editor, the Glow Intensity attribute adds a glow to the object, as if it were emitting light into a foggy area. (See Figure 7-13.) You’ll add glow to an object in Chapter 10.
Figure 7-13: Adding a glow
Matte Opacity Objects rendered through Maya generate a solid matte. Where there is an object, the matte is white; where there is nothing, the matte is black. This helps compositing programs, which bring together elements created independently into a single composite scene, to separate rendered CG from their backgrounds. Turning down the slider decreases the brightness of the object’s matte, making it appear more transparent. This is usually used for compositing tricks or to make an object render in RGB but not appear in any composites. For more information about mattes, see both the sidebar “Image Mattes” in this chapter and Chapter 11.
Raytrace Options With raytracing, you can achieve true reflections and refractions in your scene. This subset of attributes allows you to set the shader’s raytracing abilities. See Chapter 11 for more on raytracing.
Some attributes are available only with certain shader types. The following are the attributes for the Phong, Phong E, and Blinn shaders:
Specular Color The color of the highlights on a shiny surface. Black produces no specular, and white creates a bright one.
Reflectivity The amount of reflection visible in the surface. The higher the value, the more reflective the object will render. Increasing this value increases the visibility of the Reflected Color attribute or of true reflections in the scene when raytraced.
Reflected Color Gives the surface a reflection. Texture maps are generally assigned to this attribute to give the object a reflection of whatever is in the image file or texture without having to generate time-consuming true reflections with a raytraced render. Using raytracing to get true reflections, however, is the only way to generate reflections of other objects in the scene.
Cosine Power Only available with a Phong shader. This attribute changes the size of the shiny highlights (a.k.a. specular) on the surface. The higher the number; the smaller the highlight looks.
Image Mattes
As you learned in Chapter 1 (and will explore further in Chapter 11), image files are stored with a red, a green, and a blue channel that keep the amount of each color in each pixel of the image. Some image formats, including TIFF and TARGA, also have an alpha channel, known as a matte channel or image matte. This is a grayscale channel that controls the opacity of an image. Completely white parts of the matte make those parts of the image opaque (solid), whereas black parts make those parts of the image fully transparent. Gray in the matte channel makes those parts of the image partly transparent. These mattes are used in compositing—bringing together elements created separately into a single composite scene. See Chapter 11 for an example of how an alpha channel works.
Roughness, Highlight Size, Whiteness Control the specular highlight on a Phong E surface only. They control specular focus, amount of specular, and highlight color, respectively.
mental ray Attributes Because Autodesk now integrates features of its mental ray rendering engine into Maya, an object’s Attribute Editor usually includes a set of mental ray options. Shaders are no different. If you open the Mental Ray heading in the Attribute Editor for a shader, you’ll see attributes such as Reflection Blur and Irradiance, as well as a few ways to override Maya’s shading attributes with mental ray’s own.
An in-depth discussion of the mental ray attributes is beyond the scope of this introductory text. But it’s a good idea to know that this brief section is available to you after you have more experience with rendering and you want to work with mental ray at its more advanced levels in Maya. You’ll work with mental ray in Chapters 10 and 11.