
Now, you’ll create a starfish model starting with polygons, like the models you created in Chapter 4. You’ll then convert the polygon mesh to a subdivision surface to mold it into a proper starfish. Follow these steps:
1. Create a new scene, and switch into the Polygons menu set. With Interactive Creation turned off, create a polygon cube and scale it to be 8 wide, 8 deep, and 1.2 high.
2. Use the Split Polygon tool (Edit Mesh ⇒ Split Polygon Tool) to split one side of the box into halves (see Figure 5-74). You can right-click every time you finish one of the splits without exiting the tool. When you do this, center the new edge by using the readout display in the Feedback bar (at lower-left on the screen) to place the split at 50 percent along each edge.
Figure 5-74: Split the sides.

When you invoke the Split Polygon tool, Maya’s view panel prompts you to select along the first edge.
3. Reshape the box into an irregular pentagon, as shown in Figure 5-75, by selecting the polygonal edges of the box in Component mode (F8) and moving them one by one. You needn’t make all five sides exactly the same size—real starfish are irregular—but be careful not to move any of the edges up or down in the Y-axis because you want the pentagon to be flat.
Figure 5-75: After the pentagon is created, split each face into two.

4. Use the ever-popular Split Polygon tool again to cut all five sides in half, as shown in Figure 5-75. You’ll use these edges to create a polygonal star, which you’ll then convert to the subdivision surface.
5. Use the newly created edges to shape the pentagon into a star by moving the edges in toward the center (see Figure 5-76). This will be the basis for your starfish subdivision surface.
6. Save your work, and compare it to the scene file Starfish_v01.ma in the Starfish project on the CD.
Figure 5-76: Create a star shape.

Converting to a Subdivision Surface
Now that you have the basic polygonal shape for the starfish, convert it to a subdivision surface. Follow these steps:
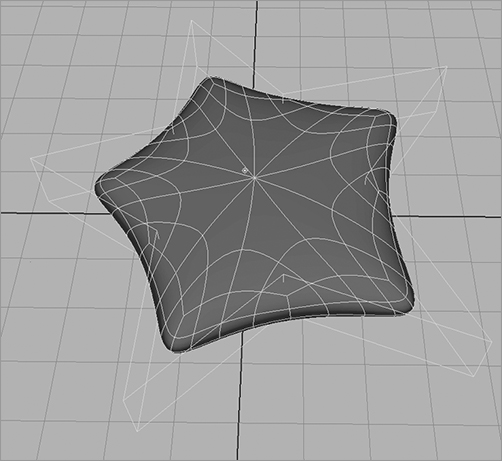
1. Select the star, and then choose Modify ⇒ Convert ⇒ Polygons to Subdiv. The star turns into a smooth subdivision surface, as shown in Figure 5-77.
2. Although you’ve all but lost the points of the star by converting it to smooth subdivisions, you have far greater control. Press the 3 key to increase the display resolution of the surface. As they do with NURBS objects, the 1, 2, and 3 keys set the display resolution of a subdivision surface.
3. With the starfish still selected, switch to the Surfaces menu set (F4) and choose Subdiv Surfaces ⇒ Polygon Proxy Mode. This switches Maya to a low-level editing mode and restores the shape of the star as a cage around the starfish (see Figure 5-78). Note that the star here isn’t the surface of the starfish, but a proxy that shapes the subdivision surface, much as a lattice does. Switch to Component mode (F8), and you see vertices on the polygon proxy (sometimes called a cage) that you can move to shape the starfish.
4. Change the display of the vertices of the subdivision surfaces before continuing. To do so, click Window ⇒ Setting/Preferences ⇒ Preferences and select Display ⇒ Subdivs in the Categories list on the left. Set the Component display to Numbers for this exercise.
Figure 5-77: Converting the star shape to a subdivision

Figure 5-78: The starfish’s cage
5. Using the polygon proxy to shape the starfish is a good way to create broad strokes when creating your final model. It won’t yield good results by itself, however.
Figure 5-79: The zeros represent the zero level of detail on this subdivision starfish and correspond to the vertices on its polygon proxy.
Press F8 to go back to the Object Selection mode, where you can select the starfish and not its vertices, and then switch back to Standard mode (choose Subdiv Surfaces ⇒ Standard Mode). With the starfish still selected, enter Component mode to select vertices. The vertices of the starfish appear in the same locations as the points on the polygon proxy and are represented with zeros, as in Figure 5-79.
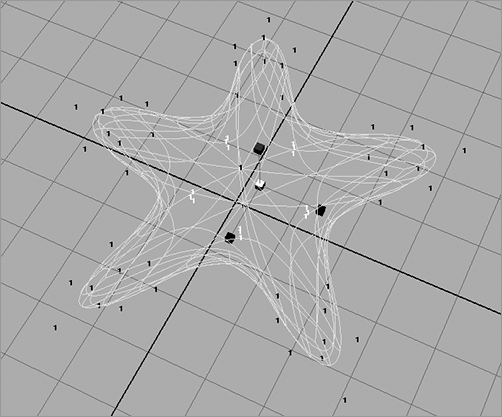
6. Right-click the starfish to open a marking menu, and choose Display Level ⇒ 1. You’ll define the arms of the fish at this level of detail. Select the vertices (now represented with 1s, as in Figure 5-80) between each point, and pull them in toward the center of the fish. This level of detail is automatically generated when you convert a poly image to a subdivision surface. Maya also has another level of detail (Display Level ⇒ 2), which you’ll use later.
If by chance you don’t see Display Level ⇒ 2 as an option and Display Level ⇒ 1 is the highest detail level you have, you can create a higher level of display by selecting all the level 1 vertices on the starfish in Component mode and choosing Subdiv Surfaces ⇒ Refine Selected Components to create level 2 vertices. You’ll then be able to choose Display Level ⇒ 2 when needed.
Figure 5-80: Level 1 of the starfish
7. Save your file, and compare your work to the scene file Starfish_v02.ma in the Starfish project on the CD.
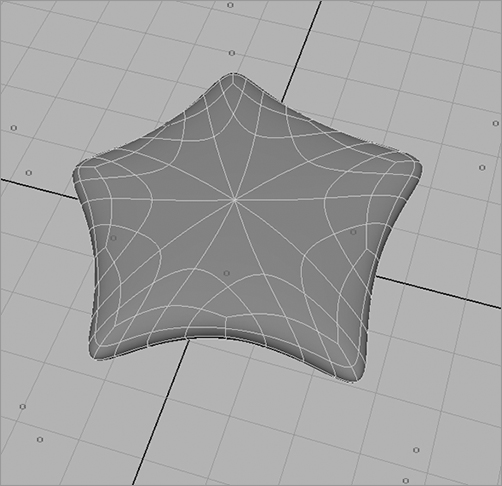
8. Right-click the starfish, and choose Display Level ⇒ 2. The vertices on the next higher detail level appear and are represented by 2s. At this level of detail, you can move these vertices to give your starfish more character. Try making the areas between the points on the star smoother, as shown in Figure 5-81. Also try to flatten the bottom of the starfish using either level 1 or level 2 vertices.
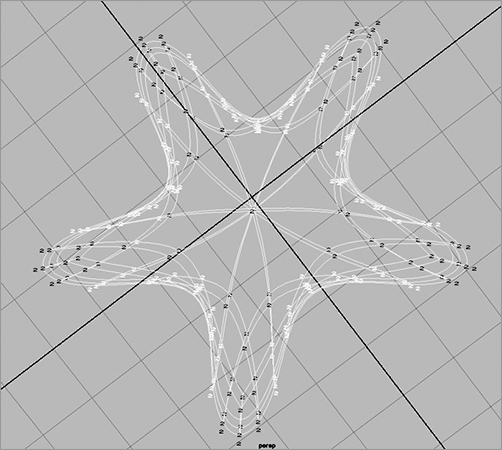
9. To achieve the appearance shown in Figure 5-81, you may need to detail your starfish further in some areas. As it stands now, the starfish can be edited up to level 2. To create another level of detail, select the areas you want to refine by selecting the level 2 vertices along the outside of each star point, as shown in Figure 5-82.
10. With those vertices selected, right-click the selection, and choose Refine Selected from the marking menu. Maya adds another level of detail to that area of the starfish with vertices marked as 2s. This allows you to make more detailed adjustments to the surface to mold it to your liking. Work the vertices at all levels to sculpt your starfish so it looks similar to the one in Figure 5-81.
Right-clicking the starfish and choosing Refine Selected is the same as selecting the vertices and choosing Subdiv Surfaces ⇒ Refine Selected Components. Choosing vertices in an area of your model and refining them beyond a display level of 2 creates more vertices for that area only. You can continue to refine your selection as needed. At any time, you can go back to Polygon Proxy mode to access the lowest level of detail and adjust the broad strokes of the model.
Figure 5-81: A molded starfish

Figure 5-82: Select the area to be refined.
11. Save your work again, and open the scene file Starfish_v03.ma in the Starfish project on the CD to compare your work with the model.
You can use these same techniques to re-create the polygon hand from Chapter 4 with subdivision surfaces.