
Animating a Particle Effect: Locomotive Steam
You’ll create a spray of steam puffing out of the steam pump on the side of the locomotive that drives the wheels on the model you started creating in Chapter 4, “Beginning Polygonal Modeling,” and Chapter 5, “Modeling with NURBS, Subdivisions, and Deformers.” You’ll use the more detailed locomotive model from Chapter 8, “Introduction to Animation,” and Chapter 9, “More Animation!”
Emitting the nParticles
The first step is to create an emitter to spray from the steam pump and to set up the motion and behavior of the nParticles:
1. In the nDynamics menu, choose nParticles ⇒ Create nParticles. Cloud should still be checked in the Create nParticles menu. If it isn’t, select Cloud, and then choose nParticles ⇒ Create nParticles ⇒ Create Emitter ❒. Set Emitter Type to Directional, and click Create. Place the emitter at the end of the pump, as shown in Figure 12-25.
Figure 12-25: Place the emitter at the end of the pump.

2. To set up the emission in the proper direction, adjust the attributes of the emitter. In the Distance/Direction Attributes section, set Direction Y to 0, Direction X to 0, and Direction Z to 1. This emits the particles straight out of the pump over the first large wheel and toward the back of the engine.
The Direction attributes are relative. Entering a value of 1 for Direction X and a value of 2 for Direction Y makes the particles spray at twice the height (Y) of their lateral distance (X).
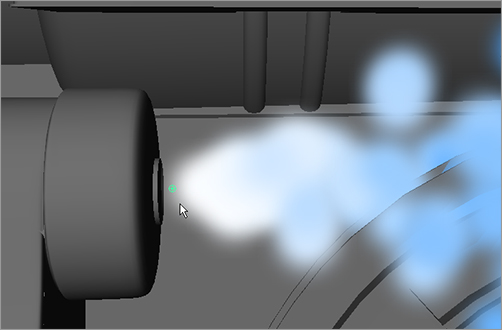
3. Play back your scene. The Cloud nParticles emit in a straight line from the engine, as shown in Figure 12-26.
You can load the file Locomotive_Steam_v1.ma from the Locomotive project on the CD to check your work.
Figure 12-26: Cloud nParticles emit in a straight line from the pump.

4. To change the particle emission to more of a spray, adjust the Spread attribute for the emitter. Click the emitter1 tab in the particle’s Attribute Editor (or select the emitter to focus the Attribute Editor on it instead), and change Spread from 0 to 0.30. Figure 12-27 shows the new cloud spray.
The Spread attribute sets the cone angle for a directional emission. A value of 0 results in a thin line of particles. A value of 1 emits particles in a 180-degree arc.
Figure 12-27: The emitter’s Spread attribute widens the spray of particles.

Figure 12-28: A range of offset between 0 and 0.3 units creates a more believable emission.
5. The emission is rather slow for hot steam being pumped out as the locomotive drives the wheels, so change the Speed setting for the emitter from 1 to 2.0, and change Speed Random from 0 to 1. Doing so creates a random speed range between 1 and 3 for each particle. These two attributes are found in the emitter’s Attribute Editor in the Basic Emission Speed Attributes section.
6. So that all the steam doesn’t emit from the same point, keep the emitter’s Min Distance at 0 but set its Max Distance to 0.3. This creates a range of offset between 0 and 0.3 units for the particle to emit from, as shown in Figure 12-28.
Setting nParticle Attributes
It’s always good to get the particles moving as closely to what you need as possible before you tend to their look. Now that you have the particles emitting properly from the steam pump, you’ll adjust the nParticle attributes. Start by setting a lifespan for them, and then add rendering attributes:
Figure 12-29: The initial radius settings for the steam nParticles
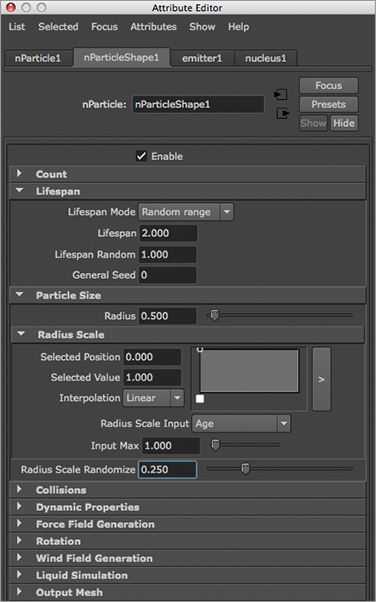
1. Select the nParticle object, and open the Attribute Editor. In the Lifespan section, set Lifespan Mode to Random Range. Set Lifespan to 2 and Lifespan Random to 1. This creates a range of 1 to 3 for each particle’s lifespan. (This is based on a lifespan of 3, plus or minus a random value from 0 to 1.)
2. You can control the radius of the particles as they’re emitted from the pump. Under the Particle Size heading in the Attribute Editor, set a Radius attribute of 0.50. Set the Radius Scale Randomize attribute to 0.25. This allows you to have particles that emit with a radius range between 0.25 and 0.75. Figure 12-29 shows the attributes.
3. If you play back the simulation, you see the particles are quite large initially. Because steam expands as it travels, you need to adjust the size (radius) of your nParticles to make them smaller at birth; they will grow larger over their lifespan and produce a good look for your steam.
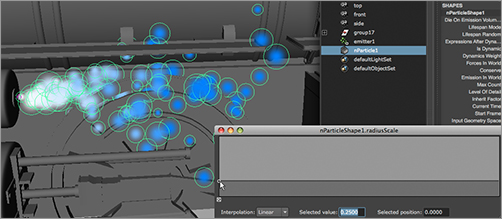
4. In the Radius Scale heading in the Attribute Editor, click the arrow to the right of the ramp to open a larger view of the ramp, as shown in Figure 12-30.
5. Click and drag the ramp’s first and only handle (an open circle at the upper-left corner of the Ramp window) down to a value of about 0.25, as shown in Figure 12-31. The particles get smaller as you adjust the ramp value.
Figure 12-30: Open the Radius Scale ramp.

Figure 12-31: Decrease the Radius of the nParticles using the Radius Scale ramp.
6. To allow the particles to grow in size, add a second handle to the scale curve by clicking anywhere on that line, and drag to a value of 1.0 and the position shown in Figure 12-32. The particles toward the end of the spray get larger.
7. You can set up collisions so the nParticle steam doesn’t travel right through the mesh of the locomotive. Select the meshes shown in Figure 12-33, and choose nMesh ⇒ Create Passive Collider.
Figure 12-32: Adjust the Radius Scale ramp to grow the particles.
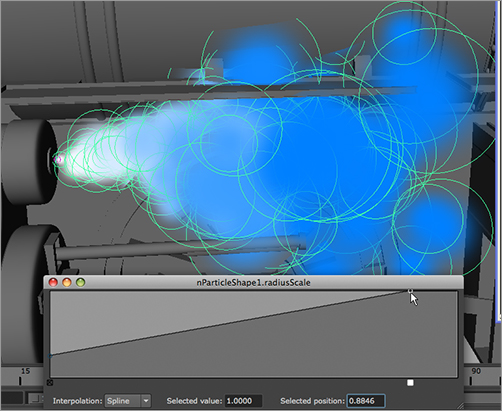
Figure 12-33: Select the meshes with which the nParticles will collide.

8. In the Outliner, select the three nRigid nodes that were just created, and set the Friction attribute in the Channel Box to 0.0 from the default of 0.10. Play back your scene, and your particles now collide with the surface of the locomotive. (See Figure 12-34.)
Figure 12-34: The particles now react very nicely against the side of the locomotive.

If you want to check your work, load the file locomotive_steam_v2.ma from the Locomotive project on the CD.
Setting Rendering Attributes
After you define the nParticle movement to your liking, you can create the proper look for the nParticles. This means setting and adjusting their rendering parameters. Because Maya has several types of particles, the particles are set up according to their type; the following workflow applies only to the Cloud particle type:
1. Select the nParticle object, and open the Attribute Editor. Expand the Shading heading, and look at the Color ramp. By default, the particles go from white to light blue in color. Click the cyan color’s circle handle on top of the ramp. The Selected Color attribute next to the ramp shows the cyan color. Click in the swatch to open the Color Chooser, and change the color to a very light gray.
2. Click the arrow bar to the right of the Opacity Scale ramp to open a larger ramp view. Grab the first handle in the upper-left corner, and drag it down to a value of 0.12.
3. The steam needs to be less opaque at its birth, grow more opaque toward the middle of its life, and fade completely away at the end of the particle’s life. Click to create new handles to create a curve for the ramp, as shown in Figure 12-35. The values for the five ramp handles shown from left to right are 0.12, 0.30, 0.20, 0.08, and 0.
4. In the Render Settings window, set Image Size to 640 × 480. In the Maya Software tab, set Quality to Intermediate Quality. Run the animation, and stop it when some steam has been emitted. Render a frame. It should look like Figure 12-36. The steam doesn’t travel far enough along the engine; it disappears too soon.
With the steam nParticles selected, open the Attribute Editor and, in the Radius Scale, change the first handle’s value from 0.25 to 0.35 to make the steam particles a bit larger. Below the Opacity Scale ramp is the Input Max slider; set that value to 1.6.
Figure 12-35: Creating an Opacity ramp for the steam

Figure 12-36: The steam seems too short and small.
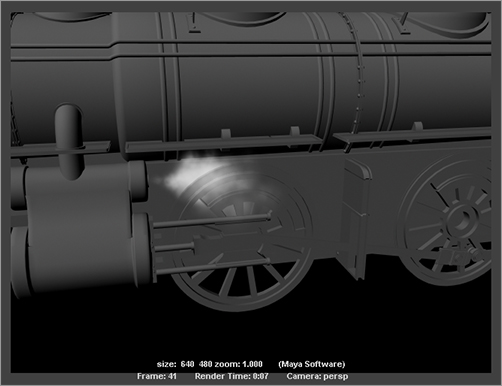
5. Select the emitter1 tab, and change the Spread for the emitter to 0.2. Change Rate (Particles/Sec) to 200 and Speed to 3.0. Play back the simulation, and render a frame to compare to Figure 12-37.
6. The Color ramp in the nParticle’s Attribute Editor controls the color of the steam, and a shader is assigned to the particles. Select the steam nParticle object, and open the Hypershade window. In the Hypershade, click the Graph materials on the selected object’s icon (![]() ), as shown in Figure 12-38.
), as shown in Figure 12-38.
Figure 12-37: A better emission, but a bit too solid

Figure 12-38: The shaders assigned to the Cloud nParticle

7. In the Hypershade, select the npCloudVolume shader, and open the Attribute Editor. Notice that the Common Material Attributes section’s attributes all have connections. The ramp controls in the nParticle Attribute Editor are controlling the attributes in this Particle Cloud shader.
8. Under the Transparency heading in the Attribute Editor for the shader, set Density to 0.35. Try a render; the steam should look better. (See Figure 12-39.)
Batch-render a 200-frame sequence of the scene at a lower resolution, such as 320 × 240, to see how the particles look as they animate. (Check the frames with FCheck. Refer to Chapter 11, “Maya Rendering,” for more on FCheck.)
Load the file locomotive_steam_v3.ma from the Locomotive project on the CD to check your work.
Figure 12-39: The steam is less flat and solid.

Experiment with the steam by animating the Rate attribute of the emitter to make the steam pump out in time with the wheel arm. Also, try animating the Speed values and playing with different values in the Radius and Opacity ramps. The steam you’ll get in this tutorial looks pretty good, but it isn’t as lifelike as it could be. You can do a lot more as you continue to learn about Maya, but those techniques are beyond the scope of this book. Particle animators are always learning new tricks and expanding their skills, and that comes from always trying new things and retrying the same effects with different methods.
When you feel comfortable with the steam exercise, try using the Cloud nParticle to create steam for a mug of coffee. That steam moves much more slowly and is less defined than the blowing steam of the locomotive, and it should pose a new challenge. Also try your hand at creating a smoke trail for a rocket ship or a wafting stream of cigarette smoke, or even the billowing smoke coming from the engine’s chimney.
Cloud nParticles are the perfect particle type with which to begin. As you feel more comfortable animating with clouds, experiment with the other render types. The more you experiment with all the types of nParticles, the easier they will be to harness. You’ll quickly find that Maya nParticles can create a wild array of realistic and stylized effects for your animations more easily than traditional Maya particles.