Exploring the PowerPoint Desktop
The PowerPoint 2000 desktop is very similar to that of other Office 2000 applications. If you're familiar with one Office program, you should be able to navigate the others as well.
Using Menus and Shortcut Menus
You use PowerPoint menus to perform specific actions. The PowerPoint menu bar (p. xxx) includes nine menu categories, each displaying a list of related commands. Figure 1.1 illustrates the menu bar.
Figure 1.1. Use menus to navigate PowerPoint.

In PowerPoint, only the most commonly used menu commands display when you first install the program. To see additional menu commands, click the double down arrows at the bottom of the list. After you use a menu command, it becomes part of the regular menu and you don't need to select the down arrows to locate it.
Tip
To open a menu using the keyboard, press the Alt key plus the underlined letter in the menu category you want to open. For example, pressing Alt+D opens the Slide Show menu. This is called a hotkey.
Tip
You can automatically display all menu commands if you want to. To do this, choose Tools, Customize and go to the Options tab of the Customize dialog box. Remove the check mark from the Menus Show Recently Used Commands First check box and click Close.
Several PowerPoint menus also include submenus, identified with a right arrow next to the menu command itself. Figure 1.2 illustrates a submenu.
Figure 1.2. Submenus are a second menu-level of navigation in PowerPoint.

PowerPoint also includes shortcut menus, specific menus that are context-sensitive and relate to a selected object. To view a shortcut menu, right-click the mouse. Figure 1.3 displays a shortcut menu.
Figure 1.3. To see specific menu options, right-click the mouse.

→ To learn more about the many ways you can customize PowerPoint menus, see Customizing Menu Commands.
Using Toolbars
A toolbar is similar to a menu in that it categorizes related commands to make it easier for you to perform a specific task. But toolbars use a graphical representation, or button, rather than a menu-based text representation. Even though toolbars use buttons rather than text, you can still display a text description of what the button does by pausing the mouse over it. A ScreenTip (p. 348) appears, identifying the button's function. Figure 1.4 illustrates a ScreenTip.
 ScreenTips don't appear?
See the Troubleshooting section at the end of the chapter.
Figure 1.4. ScreenTips identify toolbar buttons.

The Standard and Formatting toolbars are the two most commonly used PowerPoint toolbars. Table 1.1 describes the buttons on the Standard toolbar, which you'll use frequently in PowerPoint.
Tip
If you want to save screen space, check the Standard and Formatting toolbars share one row check box on the Options tab of the Customize dialog box. This moves these toolbars to one row. Open this dialog box by selecting Tools, Customize.
→ To view a table of the buttons on the Formatting toolbar, see Using the Formatting Toolbar.
Displaying Toolbars
Other toolbars appear automatically when you select a certain command. For example, when you choose Insert, Comment from the menu, the Reviewing toolbar automatically displays.
To the right of each toolbar is a down arrow. Click this arrow and then click Add or Remove Buttons. In the drop-down menu that appears, you can choose which buttons you want to appear on the toolbar, reset the toolbar to its default, or customize the toolbar even further (see Figure 1.5).
Figure 1.5. Choose the toolbar buttons you want to display.

→ To learn how to customize and modify PowerPoint toolbars to fit your needs, see Customizing Toolbars.
To open and close toolbars manually, choose View, Toolbars and select or deselect toolbars from the list of available options. Figure 1.6 illustrates this menu and the available toolbars.
Figure 1.6. Select a toolbar from this menu to display it.

Moving Toolbars
You can easily move a toolbar to a new location. How you do this depends on whether the toolbar is docked (p. 446) or is a floating toolbar (p. 446). Figure 1.7 illustrates both types of toolbars.
Figure 1.7. You can move PowerPoint toolbars to make the program easier to use.
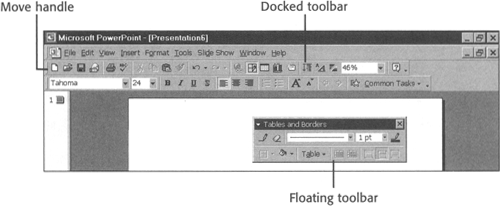
To move a docked toolbar, drag the move handle on its left side to a new location. To move a floating toolbar, drag its title bar. You can easily switch a toolbar from docked to floating, and vice versa. Drag a docked toolbar to a central location on the screen to float it. Drag a floating toolbar to the edge of the window to dock it.
Tip
You can resize a floating toolbar by dragging on any side. This way you can display the buttons straight across in one row or in several rows, depending on which way it's easier to view your presentation.
 Can't find a toolbar button you've used before?
See the Troubleshooting section at the end of the chapter.
Using the Clipboard Toolbar
Multiple clipboard functionality is new to PowerPoint 2000 and is shared with other Office 2000 applications such as Word or Excel. This collect-and-paste feature enables you to copy multiple items and then paste them selectively, rather than simply copying and pasting a single item as you could in past Office versions. In Office 2000, you can collect up to 12 items—text, objects, graphics, documents, Web pages, and so forth—and then selectively paste these as needed. The Clipboard toolbar (p. 448) enables you to view and manage the 12 items you have most recently copied. Figure 1.8 illustrates this toolbar, which you can open by selecting View, Toolbars, Clipboard.
Figure 1.8. You can more easily manage and share information using the Clipboard toolbar.
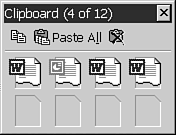
The toolbar displays up to 12 items, leaving empty spaces if you have fewer than this number of collected items. If you pause the mouse over the button that represents each individual item, the initial text of that item displays as a ScreenTip. Click on the button to paste its data into your presentation. Table 1.2 lists the buttons on this toolbar.
Understanding PowerPoint Views
PowerPoint includes five different kinds of views. A view is a way you see and work with the software; which one you use depends on what you're doing at any particular time.
To display a particular view, click its view button in the lower-left portion of the PowerPoint window (see Figure 1.9).
Figure 1.9. PowerPoint includes five different views.

PowerPoint's five views are
Normal View
 This is the default view and displays three different panes: slide, outline, and notes. Figure 1.10 illustrates Normal View.
Note
Use the drop-down list next to the Zoom button on the Standard toolbar to make the magnification larger or smaller than the default.
The outline pane is on the left side of the window and displays an outline of your presentation. You can use this pane to enter the text content, to rearrange and organize slides, or to move to another slide.
Figure 1.10. Normal View is PowerPoint's default viewing option.

Tip
You can also use the scrollbar on the right side of the slide pane to navigate between presentation slides. The Page Up and Page Down keys can also enable you to navigate.
The notes pane includes space for you to write speaker's notes or notes to yourself about your presentation.
→ To get suggestions about creating effective speaker's notes, see Creating Notes and Handouts.
Outline View
 Outline View also includes the outline, slide, and notes panes, but in different sizes. The focal point in this view is the outline pane and it provides you more space in which to create a detailed outline. The slide pane includes a slide miniature in which you can still see the basic format of your slide as well as a notes pane for detailed notes. Figure 1.11 illustrates Outline View.
Slide View
 This view provides a close-up look at your slide. The notes pane doesn't display at all, and the outline pane only includes slide numbers, not a detailed outline. Figure 1.12 displays this view.
Slide Sorter View
 This view, shown in Figure 1.13, displays miniature views of all the slides in your presentation, making it easier for you to organize them.
Slide Show View
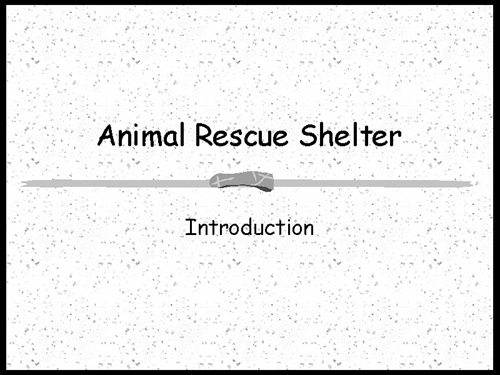
 Slide Show View displays your slides as they would appear in a slide show, full-screen without any PowerPoint menus, toolbars, or other features. Figure 1.14 illustrates this view.
Figure 1.11. Outline View helps you organize your presentation.

Figure 1.12. To enlarge the slide pane, choose Slide View.
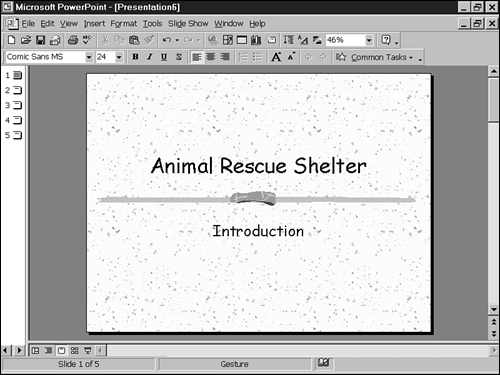
Figure 1.13. Seeing miniature versions of your slides can help you rearrange them.

Figure 1.14. Slide Show View demonstrates how your presentation will look.
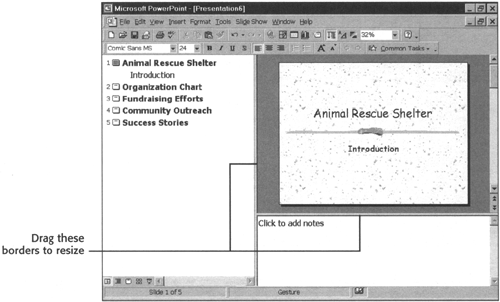
You can easily resize the panes in Normal, Outline, or Slide View. To do so, drag the border between panes to a new location. Figure 1.15 illustrates a resized pane.
Figure 1.15. You can resize Normal View to suit your needs.
