
Formatting a Table
PowerPoint enables you to apply a variety of formats and borders to your tables including the ability to
Apply different styles, widths, and colors
Insert and delete rows and columns
Merge and split cells
Align cell text to the top, bottom, or center
You want to use the Tables and Borders toolbar to access all PowerPoint's table formatting options. If this toolbar doesn't currently display, you can open it by clicking the Tables and Borders button on the Standard toolbar or by selecting View, Toolbars, Tables and Borders. Table 4.1 lists all the buttons on this toolbar.

Merging and Splitting Cells
In PowerPoint you can merge and split cells if you don't want to have the same number of rows or columns throughout your table. For example, you may want to merge all the cells across the top row of your table to serve as a title. Or, you may want to split one cell into two if the content of that cell includes two separate sets of information.
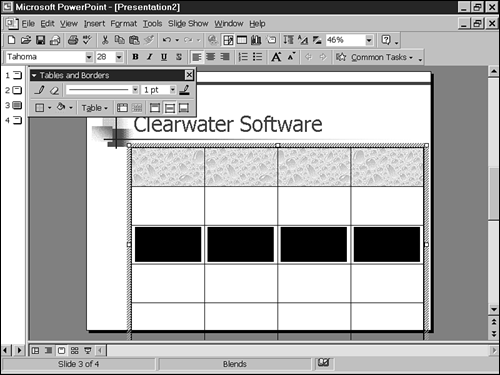
![]() To merge cells, select the cells you want to merge and click the Merge Cells button on the Tables and Borders toolbar. Figure 4.5 illustrates two cells that were merged into one.
To merge cells, select the cells you want to merge and click the Merge Cells button on the Tables and Borders toolbar. Figure 4.5 illustrates two cells that were merged into one.
Figure 4.5. Merging cells is one way to add a title row to your table.
Caution
If you already have text in each of the cells you merge, each cell text becomes a line of text in the new single cell.
Tip
![]() To undo a merge, click the Undo button on the Standard toolbar; choose Edit, Undo Merge Cells; or press Ctrl+Z.
To undo a merge, click the Undo button on the Standard toolbar; choose Edit, Undo Merge Cells; or press Ctrl+Z.
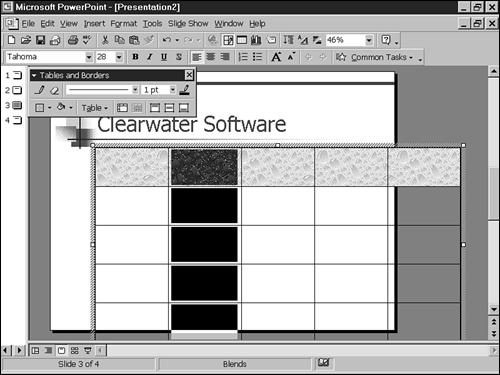
![]() To split a cell, select the cell you want to split and click the S_plit Cell button on the Tables and Borders toolbar. Figure 4.6 illustrates a cell that was split into two.
To split a cell, select the cell you want to split and click the S_plit Cell button on the Tables and Borders toolbar. Figure 4.6 illustrates a cell that was split into two.
Figure 4.6. Use split cells to create columns within columns.

Tip
![]() To undo a split, click the Undo button on the Standard toolbar; choose Edit, Undo Split Cell; or press Ctrl+Z.
To undo a split, click the Undo button on the Standard toolbar; choose Edit, Undo Split Cell; or press Ctrl+Z.
Aligning Table Text
![]()
![]()
![]() You can align table text to the top, bottom, or center of the cell. To do so, select the cell that you want to align and click the Align Top, Center Vertically, or Align Bottom button on the Tables and Borders toolbar. Figure 4.7 illustrates examples of each kind of alignment.
You can align table text to the top, bottom, or center of the cell. To do so, select the cell that you want to align and click the Align Top, Center Vertically, or Align Bottom button on the Tables and Borders toolbar. Figure 4.7 illustrates examples of each kind of alignment.
Tip
You can also select multiple cells and apply the alignment in one step.


 To align table text to the left, right, or center, you can use the Align Left, Center, or Align Right buttons on the Formatting toolbar. To do so, select the table cells you want to align and click the appropriate button.

Creating a Border
Borders can add to the visibility of your table and can also add to its dramatic flair. PowerPoint tables include a solid line, black border by default, but you can change this. To apply border formatting options, select the table and then click the appropriate Tables and Borders toolbar button.
Setting Border Style
To set the border style, click the Border Style drop-down list on the Tables and Borders toolbar and choose the style of border you prefer. The list includes the option to apply no border, a solid line, or a variety of dashed line styles, shown in Figure 4.8.
Figure 4.8. Choose the border style that suits your table.

Setting Border Width
To set the border width, click the Border Width drop-down list on the Tables and Borders toolbar and choose the width you prefer. Options include point sizes from 1/4 point (a very thin line) to 6 points (a thick line), shown in Figure 4.9.
Figure 4.9. Use a thick border to create more emphasis, a thin border to create less.

Setting Border Colors
![]() To set the color for the table border, click the Border Color button. The box that displays (see Figure 4.10) offers several possible colors from which to choose based on the presentation's color scheme.
To set the color for the table border, click the Border Color button. The box that displays (see Figure 4.10) offers several possible colors from which to choose based on the presentation's color scheme.
Figure 4.10. Choose one of the default colors for your border.

Or you can select More Border Colors to open the Colors dialog box in which you can choose from a multitude of color options or even create your own custom color as shown in Figure 4.11.
Choose the color you prefer and click OK.
If you want to create a custom color, go to the Custom tab in the Colors dialog box. On this tab you can click the color you prefer in the Colors box. The level of hue, saturation, and luminance display as well as the amounts of red, green, and blue that make up the selected color. To modify these levels, you can adjust the numbers from 0 to 255 to increase or decrease the desired color effect.
Figure 4.11. The Colors dialog box enables you to make more sophisticated color choices.

Note
If you're not familiar with color theory, hue refers to the actual color, saturation refers to the intensity of the color, and luminance refers to the brightness of the color. In general, the lower the number, the lighter or less intense it is.
→ To learn more about color and color theory, see "Using Color,"
Creating Outside Borders
You can specify which parts of your table contain a border—all of it or only specific outside or inside areas.
![]() To set options for outside borders, click the down arrow to the right of the Outside Borders button on the Tables and Borders toolbar. A palette displays with several outside border options, shown in Figure 4.12.
To set options for outside borders, click the down arrow to the right of the Outside Borders button on the Tables and Borders toolbar. A palette displays with several outside border options, shown in Figure 4.12.
Figure 4.12. You can have both inside and outside borders on your table.

Select the option you prefer to apply. Choices include
Outside Borders
All Borders
Inside Borders
No Border
Top Border
Bottom Border
Left Border
Right Border
Inside Horizontal Border
Inside Vertical Border
Diagonal Down Border
Diagonal Up Border
You can also specify table border options in the Format Table dialog box. Open it by choosing Table, Borders and Fill from the Tables and Borders toolbar. Figure 4.13 illustrates this dialog box.

Setting Table Fill Color
You can change the fill color of an individual cell or cells in your table if you want.
Caution
Be sure that your table is still readable if you change a cell's fill color.
→ To learn more about color and color theory, see "Using Color,"
→ For more information about changing fill color, see "Specifying Fill Color,"
 To change fill color, select the cell or cells that you want to change and click the down arrow next to the Fill Color button on the Tables and Borders toolbar. Figure 4.14 illustrates the palette that appears.
Figure 4.14. Filling table cells with a color, texture, or pattern can add variety and emphasis.

You can
Click More Fill Colors to display the Colors dialog box. You can choose from a large number of colors in this dialog box or create a custom color.
Click Fill Effects to choose from a number of gradients, textures, patterns, and pictures.
Figure 4.15 illustrates the use of a textured fill.
Figure 4.15. Carefully chosen, a textured fill can add a creative flair to a table.

Tip
To remove a fill you no longer want, click the down arrow next to the Fill Color button and choose No Fill from the palette.choose no fill from the palette
Working with Columns and Rows
After you create a table, you may decide that you need to add additional information or that you want to remove some of the data it currently contains.
Inserting Rows and Columns
To insert a new row into your table, select an existing table row by inserting the cursor in the row and choosing Table, Select Row from the Tables and Borders toolbar. You can also select a row by clicking the first cell in the row and dragging across with the mouse. Then choose Table, Insert Rows Above or Insert Rows Below from the Tables and Borders toolbar. PowerPoint inserts a row either above or below the selected row, depending on your menu choice. Figure 4.16 illustrates a table with an added row.
Figure 4.16. Add rows if you didn't choose enough during initial table creation.
Tip
You can resize the height or width of any row or column by selecting the row or column separator with the mouse and dragging it to the new location.
Caution
When you add or delete rows and columns, your table may no longer fit well on the slide. You then need to resize the table by dragging a corner with the mouse. Be careful, however, that you don't hide existing text by making the cells too small during resizing.
Tip
If you want to insert multiple rows, select that number of rows before selecting the insert command. For example, if you select two table rows and then choose Table, Insert Rows Above in the Tables and Borders toolbar, two rows are inserted above the selected rows.
To add a new column to your table, select an existing table column by inserting the cursor in the column and choosing Table, Select Column from the Tables and Borders toolbar. You can also select a column by clicking the first cell in the column and dragging down with the mouse. Then choose Table, Insert Columns to the Left or Insert Columns to the Right from the Tables and Borders toolbar. PowerPoint inserts a column either to the right or the left of the selected column, depending on your menu choice. Figure 4.17 illustrates a table with added columns.
Figure 4.17. You can add columns if your table design changes.
Deleting Rows and Columns
To delete rows or columns, select the areas you want to delete and then choose Table, Delete Rows or Delete Columns from the Tables and Borders toolbar. PowerPoint deletes the entire column or row of the cell(s) you select.
Tip
Click the Undo button to undo any row/column insertion or deletion if you make a mistake.
Changing Row and Column Width and Height
To change the width or height of a table row or column, select the object you want to change by clicking with the mouse and drag the column or row separator to resize.