Formatting Text
PowerPoint's design templates include preselected colors, fonts, font sizes, and other formatting parameters that are designed to work well together—a real timesaver and also very useful for people who are new to presentation design.
→ To learn more about how typefaces and fonts affect your presentation, see "Choosing Typefaces" and Fonts, p. 559
→ To learn more about how to modify text and formatting on Slide Masters, rather than on individual slides, see "Modifying the Slide Master,"
You'll only need to apply extensive text formatting if you create a text box in a blank slide in a presentation without an attached design template. In most cases, you'll either use the formatting that the design template suggests or make only minor modifications to it.
Some changes you may consider:
Enlarge or reduce font size to fit the page For example, if your title is too long to fit across one line, you may want to slightly reduce the font size. Or, if you have only a few bullet points on a slide, you may want to increase their size to fill the page.
Replace one font with another You may have a particular font you prefer to use in presentations. Be careful, however, not to be too creative with unusual fonts. You want to be sure everyone can clearly read your presentation.
Add boldface, italics, or color Use these to emphasize a point with a certain word or words.
Caution
Unless you have experience in graphic design, you're better off using the preselected fonts, colors, and font sizes included in one of PowerPoint's design templates or making only very minor modifications.
You can format text in two different ways:
Use the Font dialog box to make a number of changes in one place and to set font defaults.
Apply text formatting individually using the buttons on the Formatting toolbar.
Using the Font Dialog Box
To use the Font dialog box to format text, follow these steps:
Select the text you want to format and choose Format, Font. The Font dialog box appears, shown in Figure 3.3.
Figure 3.3. Make numerous font changes quickly in the Font dialog box.
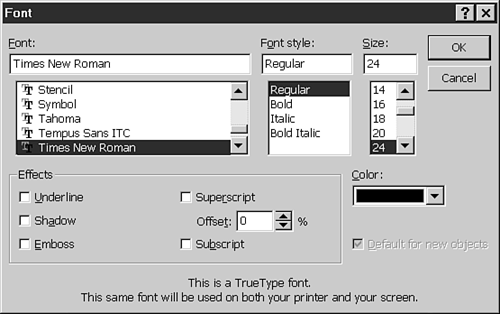
Select the font you want to use from the Font drop-down list. Scroll down the list to see additional font selections.
Choose a Size—from 8 to 96 points, or enter an exact size in the edit box.
Apply additional desired effects by checking the check box next to any of the following:
Shadow Applies a slight shadow to the lower right of the text.
Superscript Raises the text above the baseline and reduces the font size. Sets the Offset to 30%, which you can adjust.
Subscript Lowers the text below the baseline and reduces the font size. Sets the Offset to –25%, which you can adjust.
Figure 3.4 illustrates examples of these text effects.
Figure 3.4. Text effects such as underlining and shadowing can add emphasis to your presentation, but use them sparingly.

→ To learn how PowerPoint WordArt can also create innovative text objects,see "Inserting WordArt,"
Choose a color from the palette that displays from the Color drop-down list.
To learn more about color theory and how it relates to emotions, see "Understanding Background Colors and Emotions," p. 580
If you want to see additional colors, click More Colors, and the Colors dialog box appears. Figure 3.5 illustrates the dialog box, which offers you very precise color selections.
By moving the hexagonal cursor, choose the color you want and click OK to return to the Font dialog box.
Figure 3.5. Choose from a wide variety of color variations.

Using the Formatting Toolbar
You can use the Formatting toolbar (see Figure 3.6) to apply individual formatting elements to selected text such as bold, italics, and shadows.
Table 3.1 lists the formatting options on this toolbar.
Figure 3.6. The Formatting toolbar includes buttons for commonly used text effects.
![]()


To apply specific formatting, select the text you want to format and click the toolbar button. Clicking the Bold, Italic, Underline, Text Shadow, Numbering, or Bullets button a second time acts as a toggle and removes the formatting.
With the Font drop-down list, you can preview a sample of what each font actually looks like. Figure 3.7 illustrates some sample fonts in the list.
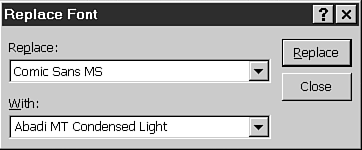
Replacing Fonts
If you want to replace all occurrences of one type of font in your presentation with another font, you can easily do so by following these steps:
Choose Format, Replace Fonts to open the Replace Font dialog box (see Figure 3.8).
Figure 3.7. Being able to preview a font before applying it can be a timesaver.

Select the font that you want to replace from the Replace drop-down list. Only those fonts that currently exist in your presentation display.
Select the replacement font from the With drop-down list. All available fonts in PowerPoint display.
Click Replace to automatically replace all matching fonts in your presentation.
Click Close to return to the presentation.
→ To learn how to change fonts on the Master Slide, see "Modifying"
Changing Case
You can also automate a change of case in your presentation, by following these steps:
Select Format, Change Case to open the Change Case dialog box, shown in Figure 3.9.
Choose the case to which you want to change. Options include
Sentence case Only the first word in a sentence is capitalized.
Title Case The first letter of every title word is capitalized. Exceptions include words such as the, and, to, and so on, which remain lowercase in titles.
tOGGLE cASE Toggles all existing cases. For example, lowercase becomes uppercase and uppercase becomes lowercase.
Click OK to apply the case changes to the selected text.

Tip
If you can't find this menu option, select the down arrow at the bottom of the menu list, and more menu options display.
Caution
Remember that an unusual use of case may be difficult to read, particularly uppercase and toggle case. With text, you need to strive for readability and clarity.
 Only part of your text changes?
See the Troubleshooting section at the end of the chapter.
Only part of your text changes?
See the Troubleshooting section at the end of the chapter.
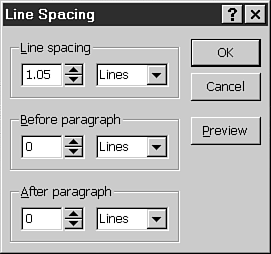
Setting Line Spacing
To set line spacing, follow these steps:
Select the text you want to format and choose Format, Line Spacing. Figure 3.10 illustrates the Line Spacing dialog box, which appears.
In this dialog box you can set either lines or points for line spacing, space before paragraphs, and space after paragraphs.
Select the numeric amount from the first field and then choose either Lines or Points from the second drop-down list.
Click the Preview button to view the suggested changes in your presentation before accepting them.