
Basic Relationships: Constraints
As you know, Maya is all about the relationships between object nodes. You can create animation on one object based on the animation of another object by setting up a relationship between the objects. The simplest way to do that (outside of grouping) is to create a constraint. For example, you can “glue” one object to another’s position or rotation through a constraint.
A constraint creates a direct relationship between the source and the target object’s Translate or Rotate attributes. This section explores six types of constraints: point, orient, scale, aim, geometry, and normal.
The Point Constraint
To attach a source object to a target object but have the source follow only the position of the target, use a point constraint. A point constraint connects only the Translate attributes of the source to the target. To use this method, select the target object(s) and then Shift+click the source object. In the Animation menu, choose Constrain ⇒ Point ❒.
The options allow you to set an offset that creates a gap between the source and the target. Constraints are based on the pivots of the objects, so a point constraint snaps the source at its pivot point to the pivot point of the target. Offset would dictate the distance between their pivots in any of the axes.
Figure 9-52: A cone point that is constrained to a sphere follows that sphere’s position.
You can constrain the same source to more than one target object. The source then takes up the average position between the multiple targets. By setting the Weight slider in the option box, you can create more of an influence on the source by any of the targets.
In Figure 9-52, a cone has been point-constrained to a sphere. Wherever the sphere goes, the cone follows. This is different from parenting the cone to the sphere in that only its translations are affected by the sphere. If you rotate or scale the sphere, the cone won’t rotate or scale with it.
Although you can blend keyframe animation with constraint animation, as a beginner to Maya, consider that after you set a point constraint like that shown in Figure 9-52, you’re unable to control the cone’s Translate attributes because they’re being driven by the sphere’s translations.
Point constraints are perfect to animate a character carrying a cane or a sword, for example. The rotations on the sword are still free to animate, but the sword is attached to the character’s belt and follows the character throughout the scene.
The Orient Constraint
An orient constraint attaches the source’s Rotation attributes to the target’s Rotation attributes. Select the target object(s) first, and then Shift+click the source object. In the Animation menu, choose Constrain ⇒ Orient ❒.
Figure 9-53: The cone’s rotations match the sphere’s rotations.
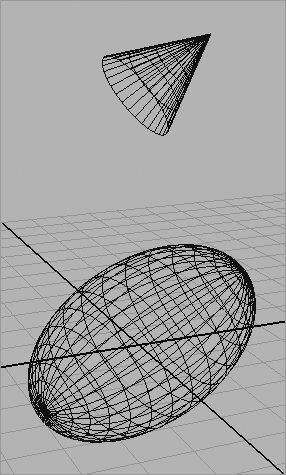
The Offset parameter allows you to set an offset in any axis. Otherwise, the source assumes the exact orientation of the target. In the case of multiple targets, the source uses the average of their orientations. Figure 9-53 shows the cone’s orientation following an elongated sphere (the target).
A rotation constraint saves a lot of hassle when you have to animate an object to keep rotating in the same direction as another object. For example, if two speedboats are cruising along neck and neck and one turns, the other can turn to match, keeping them both on course. You can also set offsets and animate them to make the second boat look as if it’s reacting to the other so that the animation doesn’t look too perfect.
The Scale Constraint
A scale constraint attaches the source’s Scale attributes to the target’s Scale attributes. Select the target object(s) first, and then Shift+click the source object. In the Animation menu, choose Constrain ⇒ Scale ❒.
The Offset parameter allows you to set a scale offset in any axis. Otherwise, the source assumes the exact scale of the target. The source uses the average of the scales of multiple targets. Figure 9-54 shows the cone’s scale matching the target sphere.
Figure 9-54: The cone now matches the sphere’s scale.

The scale constraint is good for matching the sizes of objects. For example, if an air hose is inflating a string of balloons, constraining the balloons to one target saves you the hassle of animating all their Scale attributes in unison. If a cartoon character’s eyes are bugging out at something, you can scale-constrain one to the other so that both bug out in the same time and proportion.
The Aim Constraint
The aim constraint adjusts the source’s rotations so that the source always points to the target object. Select the target object(s) first, and then Shift+click the source object. In the Animation menu, choose Constrain ⇒ Aim ❒.
The aim constraint has more options than the other constraints because you need to specify which axis of the source is to point to the target. You do so using the Aim Vector and Up Vector settings.
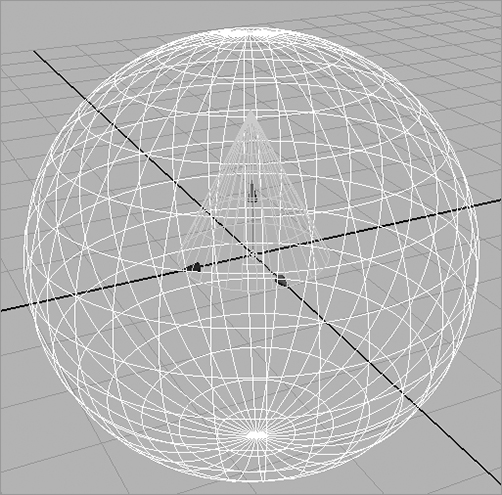
The Aim Vector setting specifies which axis of the source is the “front” and points to the target. In the cone and sphere examples, you set the Aim Vector of the cone to (0,1,0) to make the Y-axis the front so that the cone’s point aims at the sphere. If Aim Vector is set to (1,0,0), for example, the cone’s side points to the sphere. Figure 9-55 shows the cone pointing to the sphere with an Aim Vector setting of (0,1,0).
Figure 9-55: The cone aiming at the sphere

The Offset values create an offset on the source’s Rotation attributes, tilting it one way or another. The Up Vector setting specifies which way the cone faces when it’s pointing to the sphere.
Aim constraints are perfect for animating cameras to follow a subject, such as a car at a racetrack.
Geometry and Normal Constraints
The geometry and normal constraints constrain the source object to the surface of the target object (as long as it’s a NURBS or poly mesh).
With a geometry constraint, the source object attaches at its pivot point to the surface of the target. It tries to keep its own position as best it can, shifting as its target surface changes beneath it. Again, select the target, select the source object, and choose Constrain ⇒ Geometry.
Using a geometry constraint is useful when you want to keep an object on a deforming surface, such as a floating boat on a lake. Figure 9-56 shows the cone after it has been geometry-constrained to a NURBS plane that is being deformed by a Wave deformer (choose Create Deformers ⇒ Nonlinear ⇒ Wave). The cone sits on the surface as the waves ripple through, but it doesn’t rock back and forth to stay oriented with the surface.
To get the cone to orient itself so that it truly floats on the surface, you need to use a normal constraint. Using a normal constraint rotates the cone to follow the surface’s normals, keeping it perpendicular to the surface.
A surface normal is an imaginary perpendicular tangent line that emanates from all surfaces to give the surface direction.
Figure 9-56: With a geometry constraint, the cone sits on the deforming surface.

The normal constraint is similar to the aim constraint, and its options are similar. Using the Aim Vector setting, you specify which way is up for the object, to define the orientation that the source should maintain. However, this setting doesn’t constrain the location of the source to the target. If you want a floating effect, use geometry and a normal constraint to get the cone to bob up and down and roll back and forth as the waves ripple along (see Figure 9-57).
Figure 9-57: The cone now animates to float on the water surface, using both geometry and normal constraints.

Parent, Tangent, and Pole Vector Constraints
Three more constraints are possible in Maya: the parent, tangent, and pole vector constraints. A parent constraint constrains an object’s translation and rotation to another object by mimicking a parent-child relationship without actually parenting the objects. This keeps objects aligned without worrying about any grouping issues. You’ll have a firsthand look at this in the exercise where you rig the locomotive later in this chapter. Lucky you!
A tangent constraint keeps an object’s orientation so that the object always points along a curve’s direction. This constraint is usually used with a geometry constraint or path animation to keep the object traveling along a curve pointed in the right direction, no matter the direction of the curve. Pole vector constraints are used extensively in character animation rigs to keep IK joints from flipping beyond 180 degrees of motion.