A simple deformer, such as a Bend or Flare, will get you only so far; when a model requires more intricate editing with a deformer, you’ll need to use a lattice.
A lattice is a scaffold that fits around your geometry. The lattice object controls the shape of the geometry. When you adjust the Lattice deformer, the geometry deforms to match. When a lattice point is moved, the lattice smoothly deforms the underlying geometry. The more lattice points, the greater control you have. The more divisions the geometry has, the more smoothly the geometry will deform, as you saw with the bending cylinder in the previous example.
Lattices are especially useful when you need to edit a relatively complex poly mesh or NURBS surface that is too dense to edit efficiently directly with CVs or vertices. Instead, you assign a lattice and use it to create changes. This way, you don’t have to move the individual surface points.
Lattices can work on any surface type, and a single lattice can affect multiple surfaces simultaneously. You can also move an object through a lattice (or vice versa) to animate a deformation effect, such as a golf ball sliding through a garden hose.
Creating an Alien Hand
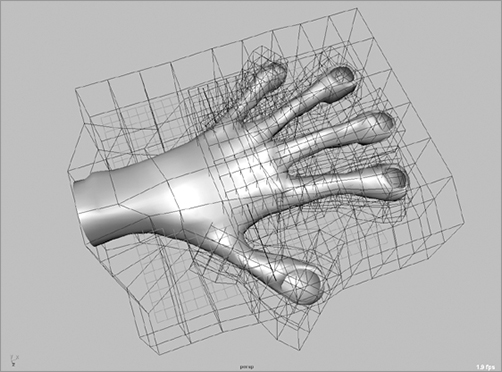
Make sure you’re in the Animation menu set. To adjust an existing model or surface, select the model(s) or applicable groups to deform, and choose Create Deformers ⇒ Lattice. Figure 5-62 shows a polygonal hand model with a default lattice applied. The top node of the hand has been selected and the lattice applied.
Figure 5-62: A lattice is applied to the polygonal hand model.

To experience how this works, you’ll remodel the poly hand using a few different lattices. Your objective is to create an alien hand by thinning and elongating the hand and each of the fingers—we all know aliens have long gawky fingers. Because it would take a lot of time and effort to achieve this by moving the vertices of the poly mesh, using lattices here is ideal.
To elongate and thin the entire hand, load the scene file detailed_poly_hand.ma from the Poly_Hand project on the CD, and follow these steps:
1. Select the top node of the hand (poly_hand) in the Outliner, and choose Create Deformers ⇒ Lattice. Doing so creates a default lattice that affects the entire hand, fingernails and all, as shown in Figure 5-62. Although you can change the lattice settings in the Options window upon creation, you’ll edit the lattice after it’s applied to the hand.
2. The lattice is selected after it’s created. Open the Attribute Editor, and click the ffd1LatticeShape tab. The three attributes of interest here are S Divisions, T Divisions, and U Divisions. These sliders control how many divisions the lattice uses to deform its geometry. Set S Divisions to 3, set T Divisions to 2, and set U Divisions to 3 for the result shown in Figure 5-63.
Figure 5-63: Changing the number of divisions in the lattice

A 3 x 2 x 3 lattice refers to the number of division lines in the lattice as opposed to the number of sections; otherwise, this would be a 2 x 1 x 2 lattice!
3. With the lattice selected, press F8 to switch to Component mode and display the lattice’s points. These points act just like the vertices on a polygonal shape. You’ll use them to change the overall shape of the hand without moving the vertices of the hand. Select the vertices on the thumb side of the hand, and move them to squeeze in that half of the hand. Notice how only that zone of the model is affected by that part of the lattice.
4. Toggle back to Object mode (press F8 again), and scale the entire lattice to be thinner in the Z-axis and longer in the X-axis. The entire hand is deformed in accordance with how the lattice is scaled (see Figure 5-64).
5. Now that you’ve altered the hand, you have no need for this lattice. If you delete the lattice, the hand will snap back to its original shape. You don’t want this to happen. Instead, you need to delete the construction history on the hand to get rid of the lattice, as you did with the axe head exercise earlier in this chapter.
Select the top node of the hand, and choose Edit ⇒ Delete by Type ⇒ History.
Figure 5-64: Lengthen the hand using the deformer.
Creating Alien Fingers
The next step is to elongate the individual fingers and widen the knuckles. Let’s begin with the index finger. Follow these steps:
Figure 5-65: Select the lattice and base nodes.

1. Select the top node of the hand, and create a new lattice as before. It forms around the entire hand.
Although you can divide the lattice so that its divisions line up with the fingers, it’s much easier and more interactive to scale and position the entire lattice so it fits around the index finger only.
Figure 5-66: Position the lattice and its base to fit around the index finger.
2. Simply moving and scaling the selected lattice will deform the hand geometry. You don’t want to do this. Instead, you need to select the lattice and its base node. This lets you change the lattice without affecting the hand. In the Outliner, select both the ffd1Lattice and ffd1Base nodes (see Figure 5-65).
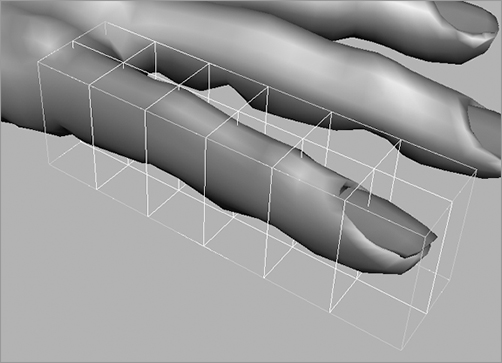
3. Scale, rotate, and transform the lattice to fit around the index finger, as shown in Figure 5-66.
4. Deselect the base, and set the lattice S Divisions to 7, T Divisions to 2, and U Divisions to 3.
Figure 5-67: Flare out the knuckles.

5. Adjust the lattice to lengthen the finger by pulling the lattice points (see Figure 5-67). Pick the lattice points around each of the knuckles individually, and scale them sideways to widen them.
6. To delete the lattice and keep the changes to the finger, select the top node of the hand and delete its History. Repeat this entire procedure for the rest of the fingers to finish your alien hand. (Try to creep out your younger sister with it.)
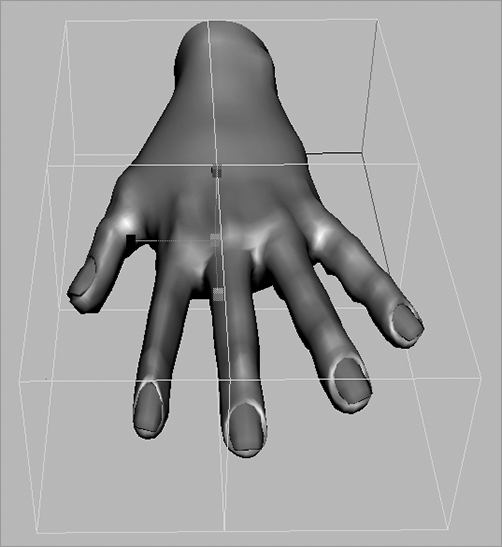
The alien hand in Figure 5-68 was created by adjusting the polygonal hand from this exercise using only lattices.
As you can see, lattices give you powerful editing capabilities without the complication of dealing with surface points directly. Lattices can help you reshape an entire complex model quickly or adjust minor details on parts of a larger whole.
In Chapter 8, “Introduction to Animation,” you’ll animate an object using another type of deformer. You’ll also learn how to deform an object through a path.
Figure 5-68: The human hand model is transformed into an alien hand by using lattices to deform the geometry.