
One of Maya’s most endearing features is its almost infinite customizability. Maya includes many tools, features, and functions to fulfill a variety of artistic needs, which appeals to a wide cross-section of people. Everyone has different tastes, and everyone works in their own way. Part of what makes Maya powerful is the fact that anyone can shape how they work with Maya.
You’ve probably noticed that we’ve run into the same tools more than once as we’ve gone through the different aspects of the user interface. Simply put, for everything there is to do in Maya, there are several ways of doing it; there are at least a couple of different ways to access Maya’s tools, features, and functions, as well.
Most of Maya’s commands and tools can be found in at least two different places. This may be confusing at first, but you’ll discover that in the long run it’s very advantageous. This enables the greatest flexibility in individual workflow and is partly why Maya is as customizable and flexible as it is.
It’s best to use Maya at its defaults as you go through this book. However, when you feel comfortable enough with your progress, you can refer back to this section to change some of the interface elements in Maya to better suit how you like to work.
User Preferences
All the customization features are found under Window ⇒ Settings/Preferences, which displays the window shown in Figure 3-29.
Figure 3-29: The Settings/Preferences menu

Figure 3-30: The Preferences window

The Preferences window (see Figure 3-30) lets you make changes to the look of the program as well as to toolset defaults by selecting from the categories listed in the left pane of the window. You’ve already changed some settings here when you set the Attribute Editor to open in a separate window.
The Preferences window is separated into categories that define different aspects of the program. Interface and Display deal with options to change the look of the program. Interface affects the main user interface, whereas Display affects how objects are displayed in the workspace.
The Settings category lets you change the default values of several tools and their general operation. An essential aspect of this category is Working Units: these options set the working parameters of your scene (in particular, the Time setting).
By adjusting the Time setting, you tell Maya your frame rate of animation. If you’re working in film, you use a frame rate of 24 frames per second. If you’re working in NTSC video (the standard video/television format in the Americas), you use the frame rate of 30 frames per second. This Category window is also accessed through the Animation Preferences icon at the end of the Range slider (![]() ).
).
The Modules category allows you to enable or disable Dynamics and Paint Effects.
The Applications category lets you specify which applications you want Maya to start automatically when a function is called. For example, while looking at the Attribute Editor for a texture image, you can press a single button to open that image in your favorite image editor, which you specify here.
Under the Settings section, click the Undo header and set the undo Queue to Infinite. This allows you to undo as many actions as have occurred since you loaded the file. This is an unbelievably handy feature, especially when you’re first learning Maya.
Shelves
Figure 3-31: The Shelf Editor

Under the Shelf Editor command (Window ⇒ Settings/Preferences ⇒ Shelf Editor) lurks a window that manages your shelves (see Figure 3-31). You can create or delete shelves, or manage the items on the Shelf with this function. This is handy when you create your own workflow for a project. You probably won’t customize your own Shelf until you’re very comfortable with Maya. Simply click the Shelves tab to display the icons on that Shelf in the Shelf Editor window. Click in the Shelf Contents section to edit the icons and where they reside on that selected Shelf. Clicking the Command tab gives you access to the MEL command for that icon when it is single-clicked in the Shelf. Click the Double Click Command tab for the MEL command for the icon when it is double-clicked in the Shelf.
You can also edit Shelf icons from within the UI; you don’t need to load the Shelf Editor. For example, to add items to your Shelf, you merely have to drag its icon to the Shelf. To add a menu command to the current Shelf, hold down Ctrl+Alt+Shift, and click the function or command directly from its menu. Items from the Tool Box, pull-down menus, or the Script Editor may be added to any Shelf:
- To add an item from the Tool Box, MMB+drag its icon from the Tool Box into the appropriate Shelf.
- To add an item from a menu to the current Shelf, hold down the Ctrl+Alt+Shift keys while selecting the item from the menu.
- To add an item (a MEL command) from the Script Editor, highlight the text of the MEL command in the Script Editor, and MMB+drag it onto the Shelf. A MEL icon will be created that will run the command when you click it.
- To remove an item from a Shelf, MMB+drag its icon to the Garbage Can icon at the end of the Shelf, or use Window ⇒ Settings/Preferences ⇒ Shelf Editor.
Hotkeys
Hotkeys are keyboard shortcuts that can access almost any Maya tool or command. You’ve already encountered a few in your exploration of the interface and in the Solar System exercise in the previous chapter. What fun! You can create even more hotkeys, as well as reassign existing hotkeys, through the Hotkey Editor, shown in Figure 3-32 (Window ⇒ Settings/Preferences ⇒ Hotkey Editor).
Through this monolith of a window, you can set virtually any key combination to be used as a shortcut to virtually any command in Maya. This is the last customization you want to touch. Because so many tools have hotkeys assigned by default, it’s important to get to know them first before you start changing things to suit how you work.
Every menu command is represented by menu categories on the left; the right side allows you to view the current hotkey or assign a new hotkey to the selected command. Ctrl and Alt key combinations may be used with any letter keys on the keyboard. Keep in mind that Maya is case sensitive, meaning that it differentiates between uppercase and lowercase letters. For example, one of my personal hotkeys is Ctrl+H to hide the selected object from view; Shift+Ctrl+H unhides it. (I’m sharing.)
When you’re ready to start setting your own hotkeys, you should query your intended hotkey with the Query button to find out if it’s assigned to a command that better suits that hotkey.
Figure 3-32: The Hotkey Editor
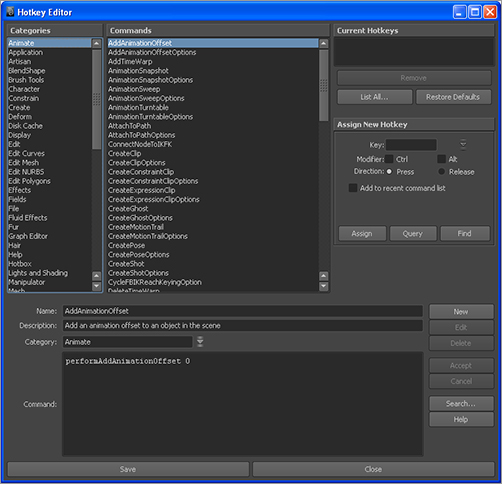
The lower section of this window displays the MEL command that the menu command invokes. It also allows you to type in your own MEL commands, name them as new commands, categorize them with the other commands, and assign hotkeys to them.
The important thing to focus on right now is discovering how to use the tools to accomplish the tasks you need to perform and establishing a basic workflow. Toward that end, I strongly suggest learning Maya in its default configuration and only using the menu structure and default shelves to access all your commands at first, with the exception of the most basic hotkeys.
Color Settings
You can set the colors for almost any part of the interface to your liking through the Colors window shown in Figure 3-33 (Window ⇒ Settings/Preferences ⇒ Color Settings).
Figure 3-33: Changing the interface colors is simple.

The window is separated into different aspects of the Maya interface by headings. The 3D Views heading lets you change the color of all the panels’ backgrounds. For example, color settings give you a chance to set the interface to complement your office’s décor as well as make certain items easier to read.
Customizing Maya is important. However—and this can’t be said enough—it’s important to get your bearings with default Maya settings before you venture out and change hotkeys and such. When you’re ready, this section of this chapter will still be here for your reference.