
Fire up your computer, and let’s get this project going. This section will introduce you to getting around the Maya user interface (UI). It may seem difficult at first, but it will make sense as you move along.
You’ll find everything you ever wanted to know about the interface and more in Chapter 3, “The Maya 2011 Interface.” The overall goal of this chapter is to expose you to Maya UI basics as well as important scene creation and editing tools. You can consider the next chapter a debriefing of sorts, to fill in UI details that aren’t covered in this chapter. If you prefer, you can skip ahead and get a more detailed rundown of the UI first and then return to this chapter for your first Maya project experience.
Keyboard and Symbol Conventions Used in This Book
The following terms are used throughout this book:
Click and LMB+click refer to a mouse click with the primary (left) mouse button.
RMB+click refers to a mouse click with the right mouse button.
MMB+click refers to a mouse click with the middle mouse button.
Shift+click indicates that you should hold down the Shift key as you click with the primary (left) mouse button.
Shift+select indicates that you’re holding down the Shift key as you select the next object for multiple selections.
Right-click refers to clicking with the right mouse button.
The ❒ symbol next to a menu command indicates that you should click the box (❒) next to the menu command to open the Options for that command.
A Quick Screen Roadmap
Let’s get to the basics of how Maya is laid out (see Figure 2-1). Running across the top of the screen, right under the application’s title bar, are the UI elements: the Main Menu bar, the Status line, and the Shelf. On a Macintosh system running OS X, note that the Main Menu bar runs at the very top of the screen, above the application’s title bar.
Figure 2-1 shows the major parts of the UI. In the middle of the interface is the workspace, which is host to your panels (or Scene windows) and their menu options (known as views or viewports in some other 3D packages). This is where most of your focus will be; this is where you create and manipulate your 3D objects.
Click inside the large perspective view panel (named persp) with the mouse to activate the panel, highlighting its border slightly. Press the spacebar to display a four-panel layout, which gives you top, front, and side views as well as the perspective view. Press the spacebar in any of the panels to display a large view of that panel.
Figure 2-1: The initial Maya screen
To the right of the panels is the Attribute Editor / Channel Box. This is where most of the information (attributes) about a selected object is displayed and edited. Pressing Ctrl-A toggles between the Attribute Editor and the Channel Box. In short, the Attribute Editor gives you access to all of an object’s attributes, whereas the Channel Box is a quicker display of the most commonly animated attributes of the selected object. The Attribute Editor is typically wider than the Channel Box, so you’ll notice a shift in your view panels when you toggle between them. You can set Maya’s preferences to treat the Attribute Editor as its own window, to prevent it from displaying on the right side of the UI. More on this in the next chapter.
Keys and Syntax in Maya
Maya is case sensitive in that it distinguishes between lowercase and uppercase letters. The conventions of this book will be to always print an uppercase letter to denote which key you must press, but to specify “Shift + the letter” when you must press the uppercase of that key. In other words, when we ask you to press the E key, for example, you should simply press the E key on your keyboard, lowercase. When an uppercase letter is called for, the book tells you to press Shift+E, requiring you to enter the uppercase letter E into Maya. Make sure your Caps Lock key is turned off.
Mouse Controls
Maya requires the use of a three-button mouse, even on a Macintosh system. The clickable scroll wheel found on most mice can be used as the third button by pressing down to click with the wheel. Scrolling the wheel lets you zoom into or out of a view panel.
In Maya, you press and hold the Alt key on a PC (or the Option key on a Mac) along with the appropriate mouse button to move in the view panel:
- The left mouse button (LMB) acts as the primary selection button and allows you to orbit around objects when used with the Alt key.
- The right mouse button (RMB) activates numerous shortcut menus and lets you zoom when used with the Alt key.
- The middle mouse button (MMB) used with the Alt key lets you move within the Maya interface panels, and the mouse’s wheel can be used to zoom in and out as well.
Shortcuts to Navigating
Here’s a rundown of how to navigate Maya. Keep in mind that the Option key is used on a Macintosh in place of the Alt key on a PC:
Alt+MMB+click Tracks around a window. Tracking moves left, right, up, or down in two dimensions; hold down the Alt key, press and hold the MMB, and drag the mouse.
Alt+RMB+click Dollies into or out of a view. A dolly moves the scene’s camera in and out of the view, essentially zooming the view in and out. To dolly, hold down the Alt key, press and hold the RMB, and drag the mouse.
Scroll Wheel The scroll wheel, in addition to acting as a middle mouse button, can also dolly into or out of a view just like the Alt+RMB+click combination. Scrolling up dollies in, and scrolling down dollies out.
Alt+click Rotates or orbits the camera around in a Perspective window. Orbiting lets you get around your object to observe it from different vantage points. To orbit, hold down the Alt key and the LMB. This move is called a tumble. You can’t tumble your view in an orthographic panel.
Alt+Ctrl+click and drag Dollies your view into the screen area specified in your mouse drag. Hold down the Alt and Ctrl keys while using the LMB to outline a window in the panel to execute this bounding box dolly. This action is commonly referred to as a window zoom in other applications.
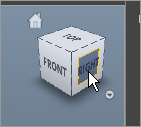
The ViewCube This part of a panel’s interface lets you easily change your current panel view from, for example, perspective to side, top, and back to perspective with just a click. By clicking an area of the ViewCube (shown here), you can switch to other views inside that panel. Clicking one of the conical axis markers gives you an orthogonal view from that direction. Clicking the center square gives you the perspective view. You can toggle the ViewCube in the preferences by choosing Window ⇒ Settings/Preferences ⇒ Preferences and clicking the ViewCube category.
Macintosh Keys The major difference in keys between a PC and a Mac, as far as Maya is concerned, is that the Option key on a Mac serves the same function as the Alt key on a PC. Although a few Ctrl key combinations in Windows are accessed via the Command key on a Mac, Mac users can generally use the Mac’s Ctrl key for their key combinations just as PC users do.
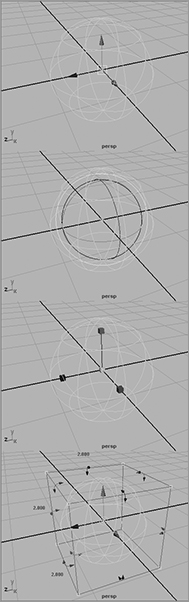
Figure 2-2: The Maya Manipulators
Making Selections
Selecting objects in a view panel is as easy as clicking them. If the object is displayed in Wireframe mode, its wireframe turns green while it’s selected. If the object is displayed in a Shaded mode, the object’s wireframe will appear around the object. Shaded mode is a way of seeing your objects in the view panel with a basic surface, as opposed to a wireframe that you can see through. You’ll see this as you do the following exercise.
As you select an object, its attributes appear in the Attribute Editor or Channel Box on the right.
To select multiple objects, simply hold the Shift key as you click objects to add to your current selection. The previous selection’s wireframe turns white, and the new selection is now green. If you press Ctrl+LMB (that is, press the Ctrl key and click) on an active object, you’ll deselect it. To clear all of your current selections, click anywhere in the empty areas of the view panel.
Manipulating Objects
When you select an object and enable one of the transformation tools (tools that allow you to move, rotate, or scale an object), you’ll see a Manipulator appear at or around the selected object. Figure 2-2 shows the three distinct and most common Manipulators for all objects in Maya: Move, Rotate, and Scale as well as the Universal Manipulator. You use these Manipulators to adjust attributes of the objects visually and in real time.
Figure 2-3: The Transform tools in the Tool Box
To activate a Transform tool, select an object and then click one of the Transform tool icons in the Tool Box, shown in Figure 2-3.
Try This Let’s put some of this into action, shall we?
Choose Create ⇒ NURBS Primitives ⇒ Sphere. Drag in a view panel anywhere on its grid to create a wireframe sphere, and then size it to your liking. In one of the view panels, press the 5 key on your keyboard, and the display of the sphere will become solid gray, as opposed to open wireframe. This is called Shaded mode. Press the 4 key to return to Wireframe mode.
With the sphere selected, select the Move tool (![]() ) from the Tool Box. The first Manipulator shown in Figure 2-2 should appear in the middle of the sphere. The three arrows represent the three axes of possible movement for the object.
) from the Tool Box. The first Manipulator shown in Figure 2-2 should appear in the middle of the sphere. The three arrows represent the three axes of possible movement for the object.
Red is for the X-axis, green is for the Y-axis, and blue is for the Z-axis. Cyan is for free movement in both axes of the active panel view.
Clicking any one of the three arrows lets you move the object only on that particular axis. The square in the middle of the Manipulator lets you move the object freely about the plane of the view panel, regardless of the axis. When you select a Manipulator handle for movement, it turns yellow. The Free Movement box in the center then turns back to its regular color, cyan.
Next, select the Rotate tool (![]() ) from the Tool Box, and you’ll see the second Manipulator in Figure 2-2. The three colored circles represent the three axes of rotation for the object—red for X, green for Y, and blue for Z. Select a circle to rotate the object on that axis. The yellow circle surrounding the three axis circles lets you freely rotate the object on all three axes. The Free rotation handle also turns cyan when an axis handle is active.
) from the Tool Box, and you’ll see the second Manipulator in Figure 2-2. The three colored circles represent the three axes of rotation for the object—red for X, green for Y, and blue for Z. Select a circle to rotate the object on that axis. The yellow circle surrounding the three axis circles lets you freely rotate the object on all three axes. The Free rotation handle also turns cyan when an axis handle is active.
Now, try selecting the Scale tool (![]() ) to see the third Manipulator in Figure 2-2. By selecting one of the axis handles and dragging the mouse, you can scale the object in a nonuniform manner in that axis. The middle cyan box scales the object uniformly on all three axes.
) to see the third Manipulator in Figure 2-2. By selecting one of the axis handles and dragging the mouse, you can scale the object in a nonuniform manner in that axis. The middle cyan box scales the object uniformly on all three axes.
Try selecting the Universal Manipulator (![]() ). This tool acts in place of all three Manipulators you just tried. Grabbing the familiar arrows translates the sphere. Selecting any of the curved arrows in the middle of the edges of the Manipulator box lets you rotate the sphere in that axis. Finally, selecting and dragging the cyan boxes in the corners of the Manipulator box lets you scale the sphere. If you hold down the Ctrl key as you drag, you can scale the sphere in just one axis.
). This tool acts in place of all three Manipulators you just tried. Grabbing the familiar arrows translates the sphere. Selecting any of the curved arrows in the middle of the edges of the Manipulator box lets you rotate the sphere in that axis. Finally, selecting and dragging the cyan boxes in the corners of the Manipulator box lets you scale the sphere. If you hold down the Ctrl key as you drag, you can scale the sphere in just one axis.
Go ahead and click around the interface some more. Create more primitive objects, and tool around a bit. Move around the view panels, and see how it feels. Give the tires a good kick.
Enough chatting—let’s jump into the Solar System project.