
Looking Around in Layout Land
All the zoom, pan, and view operations I describe in this chapter work in paper space layouts as well as in model space. (Chapters 4 and 5 describe the differences between model space and paper space and how to navigate between the two.) One little complication exists, though: In a paper space layout — that is, any drawing area tab except for the Model tab — it's possible for the crosshairs to be in either paper space or in model space inside a viewport. Zooming and panning produce different effects depending on which space your crosshairs are in at the moment. You switch between the two spaces using the MSPACE (MS) and PSPACE (PS) commands.
Experiment with the different effects by following these steps:
- Open a drawing that contains at least one paper space layout with a title block and one or more viewports.
If you don't have any such drawings handy, try using one of the AutoCAD sample drawings that you can download from http://www.autodesk.com/autocad-samples. For example, have a look at architectural_-_annotation_scaling_and_multileaders.dwg.
- Click Quick View Layouts on the status bar and then click one of the layout preview images — that is, any image other than the Model preview image.
AutoCAD displays the paper space layout, including any title block and viewports. Click somewhere away from an image to dismiss the Quick View image bar.
- Type PSPACE (or PS) and press Enter.
AutoCAD will either switch to paper space or tell you that you're already there.
 Alternatively, you can double-click in the gray part of the drawing area or anywhere outside the viewport.
You should see the triangular paper space UCS icon at the lower-left corner of the display. If you don't see an icon, click the View tab on the Ribbon and then click Show UCS Icon or Show UCS Icon at Origin on the Coordinates panel's Show UCS Icon drop-down menu.
 AutoCAD's programmers decided to remove the Coordinates panel from the View tab in the Drafting & Annotation workspace. The good news is, you can put it back! To do so, with the View tab current, right-click in the gray area at the right end of the ribbon and choose Show Panels from the shortcut menu. Select Coordinates to permanently add this panel to the View tab.
The crosshairs are now in paper space, so zooming and panning changes the appearance of all the objects in the layout, including the title block.
- Type Z, press Enter, then type A, then press Enter.
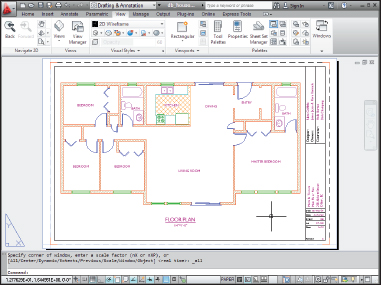
AutoCAD displays the entire layout, as shown in Figure 12-5.
 As an alternative to typing — or to navigating through Ribbon panels — here's an easier way to choose from a list of all available ZOOM options: Type Z and press Enter, then right-click in the drawing area to see the right-click menu, as shown in Figure 12-6.
Figure 12-6: All (and Extents, and Window) is revealed when you right-click.
- Zoom and pan by using any of the techniques described in this chapter.
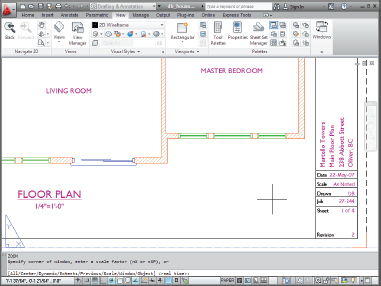
While you're in paper space, zooming and panning change the magnification of the whole drawing layout, as shown in Figure 12-7. The effect is similar to moving a plotted sheet in and out and all around in front of your face.
- Return to a zoomed-all view using any of these techniques; or type Z and press Enter, then type A and press Enter.
AutoCAD displays the entire layout again.
- Type MSPACE (or MS) and press Enter.
Alternatively, you can double-click with the crosshairs over a viewport.
You should see the model space UCS icon at the lower-left corner of the display (refer to Step 3 if you don't see an icon). The crosshairs are now in model space, inside the viewport, so zooming and panning change only the display of the objects that are visible in the viewport. The display of the title block doesn't change.
- Zoom and pan using any of the techniques described in this chapter.
Zooming and panning don't change the appearance of the title block, as shown in Figure 12-8. The result looks as if you're moving a picture of the model space geometry in and out and all around behind a frame.
 In real drawings, you usually shouldn't zoom and pan inside viewports after they've been set up (see Chapter 5). Doing so changes the scale of the viewport, which messes up plotting. I'm asking you to do it here only to illustrate the difference between zooming in paper space and zooming in a model space viewport.
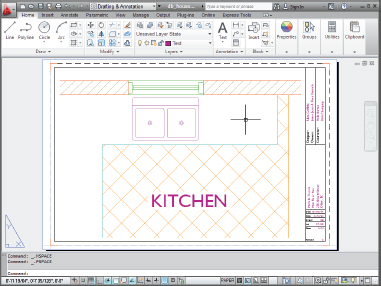
Figure 12-8: Showing nothing but the kitchen sink in a model space viewport.
If the title block changes when you zoom and pan, it means someone has locked the viewport to prevent the kind of mischief that I warn against in the previous paragraph. (You also see the command prompt Viewport is view-locked. Switching to Paper space.) Refer to Chapter 5 for information on locking and unlocking viewports.
- Choose Zoom Previous using your favorite ZOOM technique one or more times until you've restored the original view.
- Type PS and press Enter.
Always leave the crosshairs in paper space when you're ready to call a drawing finished.
- Click the Close window control in the upper-right corner of the drawing area. Click No to close the drawing without saving changes.
In this example, I have you close the drawing without saving changes just in case you did mess up the viewport zoom scale.
In most cases, you set up a paper space layout once (as described in Chapter 5) and then just return to it to plot. You shouldn't be spending a lot of time zooming and panning in paper space layouts. You zoom and pan to get a better view of what you're drawing and editing, and that's what full-screen model space is for. But if you do want to zoom in paper space — to get a better look at part of your title block, for example — make sure that you're doing it with the triangular paper space UCS icon on display at the lower-left corner of the drawing area.
The in-canvas viewport controls I describe earlier in the chapter are for manipulating model space, or tiled, viewports. The VPMAX and VPMIN commands allow you to maximize and minimize a viewport in the current layout. These commands provide an alternative to switching between the Model and Layout buttons without the potential problems of zooming inside of paper space viewports. The easiest way to run VPMAX or VPMIN is to click the Maximize Viewport/Minimize Viewport button located on the status bar, to the right of the Model and Layout buttons.