
Using the Same Old Line
Despite its limitations, the TEXT command is useful for labels and other short notes for which MTEXT would be overkill. The following procedure shows you how to add text to your drawing by using AutoCAD's TEXT command.
 You can use TEXT for multiple lines of text: Just keep pressing Enter after you type each line of text, and TEXT puts the new line below the previous one. The problem with this approach is that TEXT creates each line of text as a separate object. If you want to add or remove words in those multiple lines later on, AutoCAD can't do any word-wrapping for you; you have to edit each line separately, cutting words from one line and adding them to the adjacent line.
 The TEXT command doesn't use a dialog box, a fancy formatting toolbar, or a contextual Ribbon tab like the MTEXT command's In-Place Text Editor. You set options by typing them into the command line or the Dynamic Input tooltip.
Here's how you add text with the TEXT command:
- Set an appropriate text style current, as described in the section “Simply stylish text,” earlier in this chapter.
It's possible to set an already-created text style current at the TEXT command prompt, but it's usually more straightforward to set the style before starting the command.
An alternative to opening the Text Style dialog box to make an existing style current is to click the Text Style drop-down list and choose the style there. Look for the Text Style drop-down list on the Annotation panel's slideout (Home tab) or the Text panel of the Annotate tab. - (Optional) Use the Object Snap button on the status bar to enable or disable running object snaps.
You may or may not want to snap text to existing objects. For example, you'd want to use a Center object snap to locate a letter or number precisely at the center of a circle.
 On the Home tab's Annotation panel, click the lower part of the big button labeled Text, then choose Single Line from the drop-down menu to start the TEXT command.
Don't click the upper part of the Text button — that starts the multiline text command, MTEXT, which I cover in the next section.
If your text style is annotative and this is the first annotative object you're creating in this drawing session, AutoCAD displays a Select Annotation Scale dialog box, which advises you that you are indeed creating an annotative object and asks you to set the scale at which you want the annotation to appear; click OK to continue.
AutoCAD tells you the current text style and height settings and prompts you to select a starting point for the text or to choose an option for changing the text justification or current text style first:
Current text style: “Standard” Text height: 0.2000
         Annotative: No
Specify start point of text or [Justify/Style]:
If the text style is annotative, the text height displayed in the prompt is the model space height, not the ultimate plotted text height. For example, if the text style is created with a fixed paper text height of 0.2000, and the annotation scale is set to 1:2, the AutoCAD prompt will read Text height: 0.4000.
- If you want a different justification from the default (Left), type J, press Enter, and choose one of the other justification options.
Look up create single-line text in the online help system if you need help with the justification options.
- Specify the insertion point for the first text character.
You can enter the point's coordinates from the keyboard, use the mouse to click a point on-screen, or press Enter to locate new text immediately below the most recent single-line text object that you created.
AutoCAD prompts you for the text height (or the paper height if the text style is annotative):
Specify height <0.2000>:
- Specify the height for the text.
This prompt doesn't appear if you're using a text style with a fixed (that is, nonzero) height. See the “Simply stylish text” section, earlier in this chapter, for information about fixed versus variable text heights.
AutoCAD prompts you for the text rotation angle:
Specify rotation angle of text <0>:
- Specify the text rotation angle by typing the rotation angle and pressing Enter or by rotating the line on-screen with the mouse.
AutoCAD prompts you to type the text.
- Type the first line of text and press Enter.
- Type additional lines of text, pressing Enter at the end of each line.
Figure 13-2 shows text appearing on-screen as you type it (or it would if this book had animated pages).
- To stop entering text and return to the command prompt, press Enter at the start of a blank line.
AutoCAD adds the new single-line text object — or objects, if you typed more than one line — to the drawing.
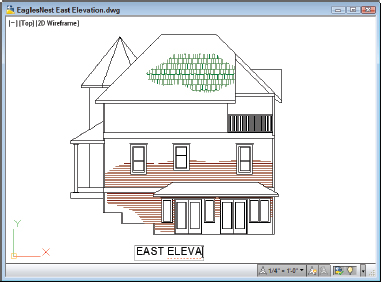
Figure 13-2: Single-line text appears letter by letter.
To align lines of text exactly, make sure that you type all the lines in one instance of the TEXT command, pressing Enter after each line to make the next line appear just after it. Otherwise, aligning different lines of text precisely is harder to do (unless you set your snap just right or use a complicated combination of object snaps and point filters). To edit single-line text after you've created it, select the text, right-click, and choose Edit (or double-click the text) to open the In-Place Text Editor. (In-place simply means that you edit text at its exact size and location in the drawing.) I tell you more about in-place text editing in the section “Making it with Mtext,” later in this chapter.
An in-place editing box highlights the selected text object, enabling you to edit the contents of the text string. If you want to edit other text properties such as text height, select the text, right-click, and choose Properties to display the Properties palette. Use the Properties palette to change parameters as needed.
If the Quick Properties button on your application status bar is enabled, clicking a single-line text object opens the Quick Properties panel, allowing you to change some (but not all) of the same properties as the Properties palette.