
And They're Off: AutoCAD's Opening Screens
In addition to the Drafting & Annotation workspace, a few additional preconfigured workspaces are available from the Workspace Switching button. However, for most of this book, I stick with the out-of-the-box Drafting & Annotation workspace (the exception is Part V, which deals with 3D modeling), and I recommend you do the same as you read along.
 A workspace is a collection of menus, palettes, toolbars, and/or Ribbon panels tailored for specific tasks, such as 3D modeling or 2D drafting.
After you switch, AutoCAD remembers which workspace you last used and opens in that one. Four standard workspaces are created when you install AutoCAD 2012 (only two come with AutoCAD LT 2012):
- Drafting & Annotation: This workspace (as shown in Figure 2-1) is configured for a 2D drafting environment, with Ribbon tabs and panels optimized for technical drawing in two dimensions.
- 3D Basics: This workspace is designed to help you get your feet wet with 3D modeling in AutoCAD 2012. It leaves out the Solid, Surface, and Mesh object creation tabs, and provides simplified panels in the other tabs. I cover modeling in 3D in Part V of this book, and there I use (and recommend that you do the same) the full 3D Modeling workspace Ribbon. This workspace isn't included in AutoCAD LT because LT doesn't do 3D.
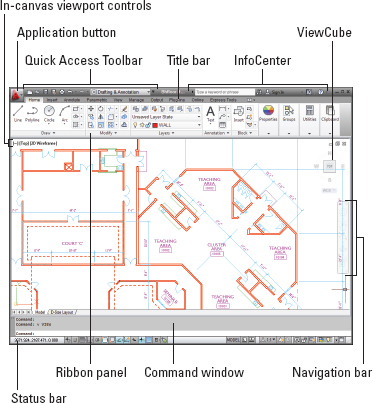
Figure 2-1: Where's my AutoCAD?: The AutoCAD 2012 Drafting & Annotation workspace.
- 3D Modeling: This Ribbon-based workspace is configured for a 3D modeling environment, with navigation, visualization, and modeling tools suitable for working in 3D. This workspace isn't included in AutoCAD LT, either.
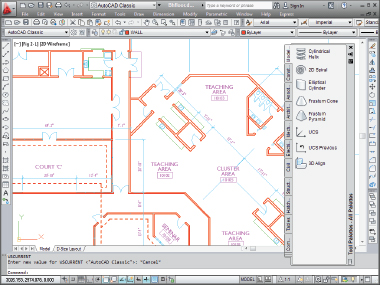
- AutoCAD Classic: This workspace is configured for a 2D drafting environment, with toolbars and tool palette arrangements similar to those in AutoCAD 2008 and earlier. In AutoCAD LT, this workspace is called AutoCAD LT Classic.
Running with Ribbons
Whether you're running AutoCAD 2012 in Windows 7, Vista, or XP, most of the AutoCAD default screen (refer to Figure 2-1) is pretty different from traditional Windows fare. Yes, you have title bars and a status bar, but the rest of the interface might look foreign. I cover the familiar stuff first.
A hierarchy of title bars
Like most Windows programs, AutoCAD has a title bar at the top of its application window that reminds you which program you're in (not that you'd ever mistake the AutoCAD 2012 window for, say, FreeCell — or even AutoCAD 2008!).
- At the right side of the program title bar is the standard set of three Windows control buttons: Minimize, Maximize/Restore, and Close.
- Each non-maximized drawing window within the AutoCAD program window has its own title bar, as shown in Figure 2-2. You can use the control buttons on a drawing window's title bar to minimize, maximize/restore, or close that drawing instead of the entire AutoCAD program.
As in other Windows programs, if you maximize a drawing's window, it expands to fill the entire drawing area. In the AutoCAD 2012 Drafting & Annotation workspace, a maximized drawing window's control buttons have migrated south, from the menu bar (which isn't there anymore) to the upper-right corner of the drawing area itself. To un-maximize (restore) the drawing so that you can see any other drawings that you have open, click the lower Restore button.
The program title and drawing name are centered in the title bar instead of being off to the left, beside a program icon. The AutoCAD title bar also has a couple of devices added to it:
- InfoCenter: Located at the right side of the program title bar, this is Information Central for AutoCAD. Type a keyword and then click the binoculars for more information, or sign in to your Autodesk account (if you have one). The remaining two buttons both open the Autodesk Exchange for AutoCAD window. The button that looks like a half-positive, half-negative X opens the Exchange window Home page with links to “what's new” videos and the Autodesk Subscription Center (alas, not included in the price of admission). You can download free or inexpensive add-on programs from the Apps page. Clicking the question mark button in the InfoCenter area, as you can probably figure out for yourself, opens the Exchange window Help page.

Figure 2-2: The AutoCAD screen with the drawing window restored.
- Quick Access Toolbar: This permanent toolbar (the only one common to all workspaces) contains frequently used commands in an easily accessible location. You can add and remove tool buttons by clicking the down arrow at the right end of the Quick Access Toolbar and selecting or deselecting the ones you want to add or remove, respectively.
 If you're floundering around looking for the commands you used to be able to find, a life preserver is hiding in the drop-down menu at the right end of the Quick Access Toolbar. Click Show Menu Bar, and the old familiar classic menu appears above the Ribbon.
Like it or not, the Ribbon-based user interface isn't going away any time soon. I didn't care for the 2D Drafting & Annotation workspace when it first showed up in AutoCAD 2008, but thanks to the Ribbon, I'm now sold on it. AutoCAD 2012's Drafting & Annotation workspace is where I spend most of my time, and that's what nearly all the figures in this book (including the figure here) show.
Unlike the Microsoft Office 2007 suite, which dragged longtime users kicking and screaming into the new Fluent User Interface, AutoCAD users have the option of staying with the old interface. The easiest way to go back to the future is to switch workspaces using (what else?) the Workspace Switching button on the status bar, or the Workspace drop-down menu on the Quick Access Toolbar. Select AutoCAD Classic, and presto! — this is (almost) your father's AutoCAD! You end up with a menu bar; some familiar-looking toolbars docked to the top, left, and right sides of the drawing area; and a floating tool palette near the middle of the display.
The Ribbon-based interface lets you add bits of the old one, too. You can display the classic drop-down menu system by clicking the down arrow at the right end of the Quick Access Toolbar and choosing Show Menu Bar. You can also stay mostly in the Ribbon but display your favorite classic toolbars at the same time. Just click Toolbars on the Windows panel of the View tab, click AutoCAD to display the entire list of toolbars, and then select the one you want.
Making choices from the Application Menu
The Application Menu is accessible from all workspaces. The AutoCAD 2012 Application Menu follows the Microsoft FUI guidelines in placing file management commands here, and all drawing and editing commands on the Ribbon. The Application Menu is divided into nine categories, as follows:
- New: Create a new drawing from a list of templates or create a new sheet set (a named collection of drawing layouts derived from one or more drawing files that can be printed or archived at one go). Sheet sets are included in AutoCAD LT 2012, but I don't cover them in this book.
- Open: Open an existing drawing or sheet set for editing, or import data from a MicroStation DGN file into a new AutoCAD drawing.
- Save: Save the current drawing in the current location; if the current drawing hasn't been saved, you're prompted for a filename and a location.
- Save As: Save the current drawing to a new filename and/or location and make the newly named or located file the current drawing. Also save the drawing as a template (DWT) or standards (DWS) file, or export a paper space layout to a new drawing.
 Use the new DWG Convert tool to save drawing files to different DWG formats from AutoCAD 2007 back to Release 14. Yes, you can already do that with the regular SAVEAS command, but DWG Convert can do batch conversions of groups of files and entire file folders.
 - Export: Save the current drawing to a variety of Design Web Format (DWF) files, a PDF, a DGN, or other file format. I discuss most of these formats in Chapters 18 and 20.
AutoCAD 2012 exports to FBX format (that's one I don't discuss in this book). FBX is specifically designed to export lights and materials — even animation data (and haven't we come a long way from lines and circles?) from AutoCAD drawings to more specialized 3D programs like Autodesk Maya or Max. In short: If you need this format, you already know about it.
- Publish: Send a 3D model to an outside 3D printing service or create an archived sheet set. (AutoCAD LT doesn't support 3D.) Use eTransmit to create a package that includes all files referenced by the selected drawings, or e-mail the current drawing using your configured e-mail client.
- Print: Print a single drawing or batch plot multiple drawings, create or modify named page setups, and manage plotters and plot styles. I cover most of these operations in Chapter 16.
- Drawing Utilities: Set file properties or drawing units; purge unused blocks, layers, and styles from the current drawing; and audit or recover damaged drawings.
- Close: Close the current drawing or close all drawings. If any drawings have been changed, you're prompted to save before AutoCAD closes the file.
But wait! There's more under the Big Red A
In addition to the Application Menu's actual file menu items, a few other features are worth a mention:
- Recent Documents: If you choose this option, the right pane displays a list of drawings that you recently edited but that aren't currently open. You can show them in a simple list or as thumbnail images, as shown in Figure 2-3. You can also pin them to stop them from scrolling off the list. Naturally enough, clicking one of the icons opens the drawing.
- Open Documents: Choose this option to see what's already open, and click an item to switch to it. This is equivalent to pressing Ctrl+Tab to switch between open documents in any Windows program and works the same basic way as the Quick View Drawings feature, described in the “Looking for Mr. Status Bar” section, later in the chapter.
- Options: Click this button to open the Options dialog box, where you can make hundreds of system settings. You can also open Options by typing OP (the alias for the OPTIONS command).
- Search: If you're not sure of a command name or you want help on a topic, just start typing in the Application Menu's search bar. AutoCAD 2012 very quickly displays a categorized list, complete with links to start commands or to access the online help (see Figure 2-4).

Figure 2-3: Find that drawing you know you worked on yesterday.

Figure 2-4: If you can't find it in the Ribbon or tool buttons, just start typing!
Unraveling the Ribbon
It's a whole new racetrack in AutoCAD 2012. In AutoCAD 2008 and prior releases, you bounced around a bunch of palettes, toolbars, and dashboard panels to find the commands you wanted. Now everything (well, almost everything) lives in one place: the Ribbon.
The primary interface element in the Drafting & Annotation, 3D Basics, and 3D Modeling workspaces is the Ribbon, an adjustable area that contains different collections of tabbed, task-oriented collections of panels. Some panels — those marked with a little black triangle on the panel label — have more tools concealed on a slideout (see Figure 2-5). Click the panel label to open the slideout. You can click the pushpin icon to pin the slideout open — otherwise, it will slide away home after you click a button.
In AutoCAD 2012, you can click and drag a Ribbon panel and pull it into the drawing area. So if, for example, you find yourself doing a whack of dimensioning, but you also want to move away from the Annotate tab to other Ribbon tabs, you can drag the Dimensions panel into the drawing, and it will stay put, even as you switch to other panels or tabs. Just be sure to put it back where it came from when you're finished with it (as your mom used to say).
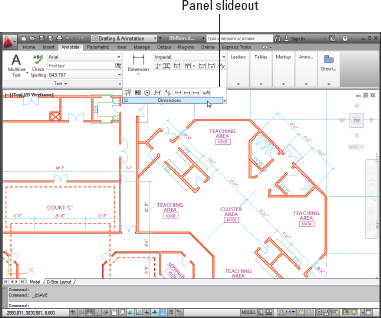
Figure 2-5: More tools than you can wave a Ribbon at.
Autodesk's programmers see the Ribbon as an alternative way of interacting with the program. Theoretically, the Ribbon eliminates the need for menus and separate toolbars, although the change-averse may think otherwise. The Ribbon is fully customizable, but I don't get into customizing AutoCAD in this book. If you want to find out more, click Customization Guide in the AutoCAD 2012 online help Home page.
No Express service?
If your Ribbon doesn't include the Express Tools tab (at the far right in Figure 2-1), you should consider installing the Express Tools from your AutoCAD DVD. (AutoCAD LT does not include or support the Express Tools.)
When you first install AutoCAD 2012, you choose between a Typical and a Custom installation. If you choose Typical, the next screen asks whether you want to install the Express Tools. If you choose a Custom installation, in the next screen, make sure to check the Express Tools item in the list of components. If you don't install the Express Tools during initial setup, you'll have to rerun the setup routine from your AutoCAD 2012 DVD. If you haven't installed AutoCAD yet, I strongly recommend that you choose the Typical installation option — or at least make sure the Express Tools check box is selected checked during a Custom installation.
By default, the Ribbon is docked at the top of the screen, but it can be docked against any edge, anchored to the left or right side of the AutoCAD window, or floated. To gain some screen space, you can click the little white button to the right of the last tab on the Ribbon's tab bar to reduce the amount of space the Ribbon takes, or use the drop-down menu next to the little white button to tailor the Ribbon's display to just the way you want it.
Instead of menus of grouped commands like Draw, Modify, Insert, and so forth, the tabs are organized by task as follows:
- Home: The Home tab contains Draw, Modify, Layers, Annotation, Block, Properties, Groups, Utilities, and Clipboard panels. Some panels may be displayed as collapsed, depending on your screen resolution. As an example, the five panels at the right end of the Annotate tab in Figure 2-5 are in a collapsed state. I cover most of the commands in these panels in other parts of the book.
- Insert: This tab groups Block and Reference panels, as well as point cloud tools, Import commands, and a series of commands for working with nongraphical information, including attributes, fields, and data links. I do cover blocks (Chapter 17) and external references (Chapter 18), but point clouds, importing, and data tools are beyond the scope of this book and aren't covered.
- Annotate: The Annotate tab expands on the minimalist Annotation panel on the Home tab, with many more options for creating text, dimensions, leaders, and tables, as well as markup functions and a few annotation scaling tools.
The new Drawing Views panel on the AutoCAD 2012 Annotate tab contains a group of commands that help you generate 2D views of imported 3D models. This panel is not included in AutoCAD LT, and I don't cover the feature in this book.
- Parametric: This tab is home for one of AutoCAD 2012's most powerful features — parametric drawing. You can apply geometric or dimensional parameters or constraints to drawing objects so that, say, two circles are always concentric or the length of a rectangle is always twice its width. (AutoCAD LT is limited in this department: You can modify or delete existing constraints, but you need the full version to create them.) I introduce parametric drawing in Chapter 19.
- View: The View tab contains tools and panels for controlling drawing display, working with user coordinate systems and viewports, loading various palettes, and organizing Windows functions such as cascading open files or displaying different parts of the application window. I explain most of the features on this tab later in the book.
- Manage: This tab contains panels that access the Action Recorder, CAD Standards (neither of which is in AutoCAD LT), and a set of drawing management and customization tools. I don't cover anything on the Manage tab in this book.
- Output: Panels on this tab allow you to get those drawings off your hands by printing, publishing, exporting to PDF or DWF, or simply sending them electronically to others. I cover some of these functions in Chapter 16.
- Plug-Ins: This new tab is present in both AutoCAD and AutoCAD LT, although in LT, there is only one panel instead of two. Both versions have a Content panel with a single Explore button that runs the new Content Explorer tool. After you let it index your file folders, Content Explorer can winnow through all your drawings looking for specific blocks, layers, layouts, and even text strings. AutoCAD itself also has an Inventor Fusion panel, from which you can edit solids and surfaces in a stripped-down version of Autodesk Inventor.
- Online: This new tab is also present in both AutoCAD and AutoCAD LT, and this time, the tabs are identical. Most of the buttons fire up a log-in screen for the AutoCAD WS service. With an AutoCAD WS account, you can upload drawings to a secure Web site, and then access them on your iPad (you do have an iPad, right?) or on any computer with a Web browser.
- Express Tools: The Express Tools are an invaluable set of custom commands that will streamline your work procedures in pretty well every aspect of AutoCAD. They're officially unsupported, but they've been an install option for many releases now, and mostly, they work very well. You get this tab only if you have the full version of AutoCAD — Express Tools aren't available in AutoCAD LT.