
Get a Grip
Although command-first editing is the most flexible and widespread editing style in AutoCAD, it's not the only way. Grip editing is a useful adjunct to command-first editing, especially when you want to modify just one or two objects. You may have encountered grip editing when using other kinds of graphics programs. But even if you're an experienced user of other graphics programs, you've never seen grips used in quite the way that AutoCAD uses them.
 Anything that you can do with grip editing can be done with command-first editing as well. In some situations, grip editing is a little more efficient or convenient than command-first editing, but command-first editing always gets the job done. If you master only one style of editing, make it command-first style. In other words, feel free to skip this section — at least until you're comfortable with command-first editing.
About grips
Grips are those little square, rectangular, or triangular handles that appear on an object after you select it.
In their simplest guise, AutoCAD grips work similarly to the little squares on graphical objects in other Windows programs. But in AutoCAD, instead of clicking and dragging a grip, you must click, release the mouse button, move the crosshairs, and click again at the new location. (By separating the selection of beginning and ending points into two different operations, AutoCAD allows you to use different techniques — such as different object snaps — to select each point.)
AutoCAD grips are, for sophisticated users, better than the grips found in most other programs because you can do so much more with them. You can, for example, use AutoCAD grips to move, stretch, or copy an object. You also can use them to rotate an object, scale it to a different size, or mirror an object — that is, create one or more reversed copies. Grips also act as visible object snaps, or little magnets that attract the crosshairs.
 In AutoCAD 2012, grips on lines, arcs, and elliptical arcs have become multifunctional. Hovering over an endpoint grip displays a pop-up menu that offers you a choice of lengthening or stretching the object. Hovering over the midpoint grip on an arc offers the choice of stretching the arc by its midpoint (that is, keeping the same endpoints) or changing its radius. Elliptical arcs gain new triangular grips that let you increase the length of the arc without changing its other parameters.
A gripping example
The following sections cover in detail the five grip-editing modes: STRETCH, MOVE, ROTATE, SCALE, and MIRROR. Follow these steps to explore the grip-editing modes:
- Draw some simple geometry, such as the object shown in Figure 10-8.
Here's a great place to practice some of the straight-line object creation tools I describe in Chapter 8!
- Press Esc to make sure that no command is active and no objects are selected, and then click Quick Properties on the status bar to turn off the Quick Properties palette.
The Quick Properties palette is pretty useful for editing the properties of objects, but more often than not, it gets in the way when you want to edit the objects themselves.
AutoCAD displays a blank command prompt — that is, no command is currently active.
- Click an object on-screen to select it and display its grips.
Grips — solid blue squares on the selected object — appear at various points on the object. Note that the AutoCAD command prompt remains blank; you haven't started a command or grip-editing operation yet.
- Click another object.
Both the newly selected object and the previously selected object display grips.
- Click one of the grips on either object.
If a pop-up menu appears when you get close to a grip, ignore it for now and go ahead and click the grip. The blue square turns to a dark red square. This grip is now hot, or selected and ready for a grip-editing operation. Grip-editing options now appear on the command line. The first option to appear is STRETCH.
- Press the spacebar repeatedly to cycle through the five grip-editing options on the command line.
** STRETCH **
Specify stretch point or [Base point/Copy/Undo/eXit]:
** MOVE **
Specify move point or [Base point/Copy/Undo/eXit]:
** ROTATE **
Specify rotation angle or [Base point/Copy/Undo/Reference/eXit]:
** SCALE **
Specify scale factor or [Base point/Copy/Undo/Reference/eXit]:
** MIRROR **
Specify second point or [Base point/Copy/Undo/eXit]:
The grip-editing option displayed on the command line and the dynamic-input tooltip (if Dynamic Input is enabled) changes as you press the spacebar. If you move the crosshairs (without picking) in between each press of the spacebar, the appearance of your selected object changes as you display each option. Choosing STRETCH, for example, causes a stretched version of the object to appear on-screen.
Pressing the spacebar a bunch of times is a good way to become familiar with the grip-editing modes, but there's a more direct way to choose a particular mode. After you click a grip to make it hot, right-click to display the grip-editing menu. That menu contains all the grip-editing options plus some other choices, as shown in Figure 10-8.
Figure 10-8: The grip-editing right-click menu.
If Dynamic Input is enabled, pressing the down-arrow key while cycling through the grip-editing options displays a dynamic menu at the crosshairs from which you can choose options specific to the current grip-editing function. - Press the spacebar until STRETCH (or the option you want) reappears as the grip-editing option.
- Move the hot grip in the direction in which you want to stretch (or otherwise manipulate) your object.
AutoCAD dynamically updates the image of the object to show you what the modified object will look like before you click the final location.
- Click again to finish the grip-editing operation.
The selected object with the hot grip updates.
- Click the same grip that you chose in Step 5 (now in a different location) to make it hot.
- This time, move the crosshairs near one of the grips on the other object. When you see the magnetic pull of the grip on the other object, click again to connect the hot grip with the other grip.
The object point represented by the hot grip now coincides exactly with the grip on the other object.
- Press Esc to deselect all objects and remove all grips.
Figure 10-9 shows a hot (red) endpoint grip of a line being connected to the endpoint grip of another line. The angled line shows the original position of the line being edited, and the thin vertical line shows the new position. Using a grip in this way as a visible object snap offers the same advantage as using Object Snap overrides, as described in Chapter 7: It ensures precision by making sure that objects meet exactly.

Figure 10-9: Using grips to connect two objects.
You can experiment with all the grip-editing options to find out how they affect a selected object. Because MOVE and STRETCH are the most useful grip-editing modes, I cover them in more detail.
Move it!
Back in the days of manual drafting, moving objects was a big pain in the eraser. You had to erase the stuff you wanted to move and redraw the objects in their new location. In the process, you usually ended up erasing parts of other stuff that you didn't want to move and left smudged lines and piles of eraser dust everywhere. CAD does away with all the fuss and muss of moving objects, and AutoCAD grip editing is a great way to make it happen. The following steps describe how to move objects:
- Select one or more objects.
Use any combination of the three object selection modes — single object, window selection, and crossing selection — described in the “Grab It” section, earlier in this chapter.
- Click one of the grips to make it hot.
At this point in your editing career, it doesn't matter which grip you click. As you become more familiar with grip editing, you'll discover that certain grips serve as better reference points than others for particular editing operations.
- Right-click anywhere in the drawing area and choose Move from the crosshairs menu.
- Move the crosshairs to a different location and click.
As you move the crosshairs around, AutoCAD displays the tentative new positions for all the objects, just as it does for the regular MOVE command, as shown previously in Figure 10-9. After you click, the objects assume their new positions.
- Press Esc to deselect all objects and remove all grips.
Copy, or a kinder, gentler Move
If you were paying attention during the section “A gripping example,” earlier in the chapter, you may have noticed while pressing the spacebar that copy was not among the five grip-editing modes. Why not? Because every grip mode includes a copy option (as the command-line prompts show in the “A gripping example” section). In other words, you can STRETCH with copy, MOVE with copy, ROTATE with copy, SCALE with copy, and MIRROR with copy.
The copy option leaves the selected objects in place and does the editing operation on a new copy of the objects.
By far the most common use for the copy option is with the MOVE grip-editing mode. If you think about “MOVE with copy” for about two seconds, you'll realize that it's just a complicated way of saying “copy.” The following steps show how to copy objects quickly by using grip editing:
- Select one or more objects.
- Click any one of the grips to make it hot.
- Right-click anywhere in the drawing area and choose Move from the menu.
- Right-click again and choose Copy from the menu.
- Move the crosshairs to a different location and click.
After you click, new objects appear in the new location.
- Move the crosshairs to additional locations and click there if you want to make additional copies.
- Press Esc twice — once to end the copying operation and once to deselect all objects and remove all grips.
A warm-up Stretch
The STRETCH grip-editing mode works differently from the other modes. By default, it affects only the object with the hot grip on it, not all objects with grips on them. You can override this default behavior by using the Shift key to pick multiple grips and make them hot. Follow these steps to get acquainted with using the STRETCH grip-editing mode to stretch one or more objects:
- Make sure that Ortho Mode is toggled off on the status bar by clicking the Ortho Mode button until <Ortho off> appears on the command line.
Ortho mode forces stretch displacements to be orthogonal — that is, parallel to lines running at 0 and 90 degrees. During real editing tasks, you'll often want to turn on Ortho mode but while you get acquainted with stretching, leaving Ortho mode off makes things clearer.
- Select several objects, including at least one line.
- On one of the lines, click one of the endpoint grips to make it hot.
All the objects remain selected, but as you move the crosshairs, only the line with the hot grip changes. Figure 10-10 shows an example.
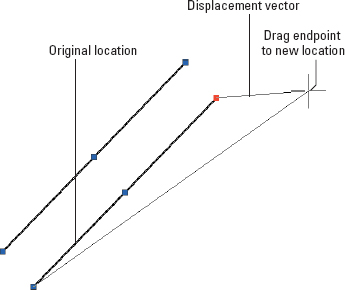
Figure 10-10: Dragging a line's endpoint in the middle of the STRETCH grip-editing operation.
- Click a new point for the hot endpoint grip.
The line stretches to accommodate the new endpoint location.
- On the same line, click the midpoint grip to make it hot.
As you move the crosshairs, the entire line moves. Using the STRETCH grip-editing mode with a line's midpoint “stretches” the entire line to a new location.
- Click a new point for the hot midpoint grip.
The line moves to the new midpoint location.
- Hold down the Shift key. On one of the lines, click one of the endpoint grips to make it hot.
- Still holding down the Shift key, click one of the endpoint grips on a different line to make it hot.
Two grips on two different lines are now hot because you held down the Shift key and then clicked both grips.
You can create more hot grips by holding down the Shift key and clicking more grips. - Release the Shift key and re-pick any one of the hot grips.
Releasing the Shift key signals that you're finished making grips hot. Re-picking one of the hot grips establishes it as the base point for the stretch operation.
- Click a new point for the grip.
All the objects with hot grips stretch based on the displacement of the grip that you clicked in Step 9 (see Figure 10-11).

Figure 10-11: Stretching multiple objects with multiple hot grips.
- Turn on Ortho mode by clicking its status bar button until <Ortho on> appears on the command line. Repeat Steps 2 through 10 to see the effect of Ortho mode on stretching.