
A View by Any Other Name …
If you find yourself repeatedly zooming and panning to the same area, you can probably get there faster with a named view. After you name and save a view of a particular area of your drawing, you can return to that area quickly by restoring the view. You use the VIEW command, which displays the View Manager dialog box, to create and restore named views.
 The View Manager manages shots as well as views. Views have been a part of AutoCAD from very early days, but shots are a recent addition. While views are static, shots are motion-based. (In regular AutoCAD, but not AutoCAD LT, you may have noticed the ShowMotion button on the Navigation bar.) And not only can you create animated scenes, you can even add fancy transitions like jump cuts and fades. I introduce you to shots (the non-potable kind!) and the ShowMotion command in Part V of this book.
Follow these steps to create a named view:
- Zoom and pan until you find the area of the drawing that you want to assign a name to.
- On the Ribbon's View tab, choose View Manager from the Views panel.
The View Manager dialog box appears.
- Click New.
The New View / Shot Properties dialog box appears, as shown in Figure 12-4.
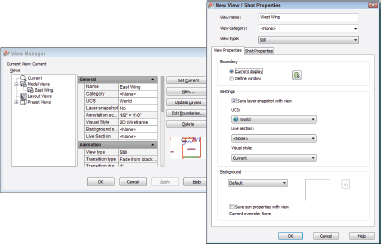
- Type a name in the View Name text box.
- (Optional) Type a new category in the View Category box or select an existing one from the drop-down list.
You create your own View Categories to organize views and certain display characteristics of views. This feature is used mainly in sheet sets. If you aren't using sheet sets, you can leave this box blank.
- Make sure the View Type drop-down is set to Still.
Visit the online help if you want to know more about the Cinematic and Recorded Walk options.
 AutoCAD LT doesn't support view types. The New View dialog box in LT is missing the View Type list box, most of the Settings drop-downs, and the Background area shown in Figure 12-4.
 - In the Boundary area, select the Current Display radio button, if it's not selected already.
- Confirm or change the choices in the Settings area.
If you select the Save Layer Snapshot with View check box, when you later restore the view, AutoCAD also will restore the layer visibility settings (on/off and freeze/thaw) that were in effect when you created the view. (Chapter 6 describes the layer visibility settings.) The Live Section and Visual Style settings are primarily for 3D drawings; these two settings are not included in AutoCAD LT.
- Click OK.
The New View/Shot Properties (New View in AutoCAD LT) dialog box disappears, and you see your new named view in the list in the View Manager dialog box.
- Click OK.
The View Manager dialog box disappears.
To restore a named view, proceed as follows:
- Go back to the Ribbon's View tab and choose View Manager from the View panel.
Alternatively, type VIEW (or V) and press Enter. The View Manager dialog box appears.
- In the Views list, expand either Model Views or Layout Views (depending on where you saved your view).
- Click the name of the view that you want to restore, click the Set Current button, and then click OK to close the dialog box.
 You also can plot the area defined by a named view. See Chapter 16 for instructions on plotting views.
 New in AutoCAD (but not AutoCAD LT) this time around is an extremely handy set of model space viewport controls. There are three of these in-canvas controls at the top left corner of the drawing area:
- [-][+]: Double-click [-] to toggle between a single model space viewport that fills the drawing area and (by default) four equally-sized viewports configured for 3D viewing. Click once to display a menu with options to reconfigure the viewport layout, and to toggle the display of the ViewCube, SteeringWheels, and Navigation Bar.
- [View name]: Click the current view name ([Top], for example) to open a menu listing all default and custom views in the drawing. Click a menu item to switch to a different view. You can also open the View Manager, and switch the view projection between parallel and perspective.
- [Visual Style]: Click the current visual style name ([2D Wireframe], for example) to open a menu listing all the visual styles defined in the drawing (visual styles are most useful in 3D modeling, and I discuss them in Chapter 21). Click a menu item to switch to a different visual style, or to open the Visual Styles Manager palette.
In both AutoCAD and AutoCAD LT, you can set named views current without having to open the View Manager dialog box. Just go to the Views panel on the View tab and choose a named view to restore from the list.