
Working with Slide Masters
PowerPoint is designed to help you achieve a consistent look in your slide presentations. You want your audience to focus on the message and not be distracted by poor and inconsistent design from one slide to the next.
You achieve this consistency by using templates, or pre-designed slide presentations, that coordinate background colors and designs, font styles and placement, and other graphic design elements. A good common use for templates is putting a border with your company's name and logo on every slide in the Master layout.
When you first begin using PowerPoint, you should use the templates that come with the program. As you become an experienced PowerPoint user, you may want to experiment by creating your own templates that meet your specific design requirements.
For information on using design templates or how to change slide backgrounds and color schemes, see "Formatting Slides and Presentations,"
Creating a Design Template
Creating your own design template is as easy as modifying the elements of your slideshow and saving it as a template. To save your presentation as a template, follow these steps:
Choose File, Save As.
In the Save As dialog box, Change the Save as Type to Design Template (*.pot). PowerPoint automatically switches to the template folder.
Supply a File Name; for example, MyShow (you do not need to add .pot).
The next time you want to build a slide presentation based on this template, simply choose File, New, and choose the name of your customized PowerPoint template.
Modifying the Slide Master
Every slide presentation is based on a slide master of some sort. The slide master determines, for example, which font appears on each slide and how it is to be formatted.
To modify your slide master, follow these steps:
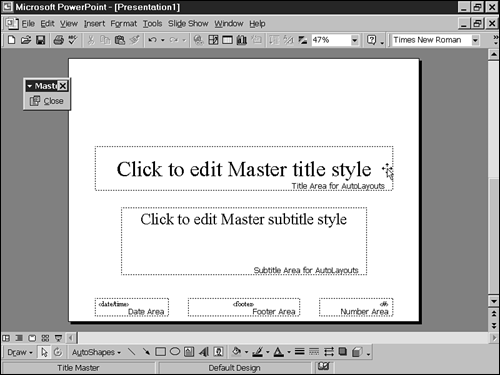
Choose View, Master, Slide Master. PowerPoint displays the Slide Master layout and editing screen (see Figure 20.41).
Figure 20.41. The Slide Master editing screen helps you change the overall look and layout of your custom design templates.

Click the Title Area for AutoLayouts box and change the font, style, color, or other properties of the title text.
Note
All changes to the title or other text while in the Slide Master editing screen apply to all slides in your slide presentation except those based on the Title Master, thus helping you achieve consistency from slide to slide.
Tip
If you choose to relocate text or other objects, you can use the ruler and guides to help you. Simply choose View, Ruler, and View, Guides to display these aids.
Click the Object Area for AutoLayouts box and make similar changes to the font, style, color, bullets, and so on.
Click the Date, Footer, and Number Areas and change font attributes as desired.
Note
Normally you do not add text here, but instead format only the <date/time>, <footer>, and <#> placeholders. This information is added when you edit the Header and Footer (View, Header & Footer). An exception might be the page numbering where you might add and format "Page" before the <#> placeholder.
Choose Format, Background to display the Background dialog box (see Figure 20.42) and to select a preset background color or to create your own custom color combinations or patterns.
→ For more information on customizing background colors, see Formatting Slides and Presentations.
Figure 20.42. Add backgrounds to your custom design templates.

Tip
Use the Preview button to see the effect of your selections before applying them to the Slide Master. However, even if you do apply the changes and don't like the results, you can still use Undo to restore your colors or other changes.
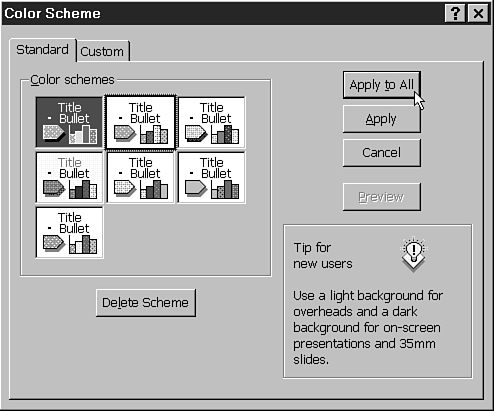
Choose Format, Slide Color Scheme to display the Color Scheme dialog box (see Figure 20.43) and to select a preset or custom combination of text and background colors.
→ For more information on selecting color schemes, see Formatting Slides and Presentations.
Figure 20.43. Color schemes help you quickly apply coordinating colors to text, graphics, backgrounds, and so on.
Modifying the Title Master
The title slide often differs slightly from the other slides in a presentation in terms of font size, location of the title slide elements, and so on.
Unless you are modifying a presentation that uses one of PowerPoint's predesigned templates, you must first create a Title Master. The following steps show you how to create one:
Choose View, Master, Slide Master to access the Slide Master editing view.
Choose Insert, New Title Master; or press Ctrl+M.
If you already created a Title Master or if you are using a predefined PowerPoint template that already contains a Title Master, simply choose View, Master, Title Master. PowerPoint displays the Title Master editing screen (see Figure 20.44).
Note
Make sure you have modified the Slide Master before changing the Title Master. Initially the Title Master uses the same fonts and other attributes as the Slide Master.
If you modified the Slide Master first, perhaps little needs to be changed for the title slide. However, you might make the title font larger, position it differently, or add a graphic object to the screen. Furthermore, you could delete the Date, Footer, or Page area boxes and create a different date or footer for the title slide.
Figure 20.44. Title Masters are edited separately from the general Slide Master.
Tip
You don't need to delete the date, footer, or page number placeholders if you don't want them on the title slide. Instead, when you choose View, Header and Footer to display footers for your slideshow, simply check the Don't Show on Title Slide box.
Modifying the Handout and Notes Masters
In addition to the presentation itself, PowerPoint enables you to modify the Handout and Notes Masters.
To modify the Handout Master, follow these steps:
Choose View, Master, Handout Master. PowerPoint displays the Handout Master editing screen (see Figure 20.45).
Choose the number of slides (or Outline view) you intend to include on each handout page by clicking a slide positioning button on the Handout Master toolbar.
Note
If the Handout Master toolbar doesn't appear, simply right-click any toolbar when the Modify Master window is open and choose Handout Master from the list.
Modify, reposition, or delete the Header, Footer, Date, and Page Area text boxes.
Note
You can easily change the number of slides to be included in the handouts in the Print dialog box when you actually print the handouts.
Figure 20.45. The Handout Master defines the default layout for your template's printed handouts.

The Notes Master can be changed by following these steps:
Choose View, Master, Notes Master. PowerPoint displays the Notes Master editing screen (see Figure 20.46).
Figure 20.46. The Notes Master defines the default layout for your template's printed notes.

Reposition or resize the slide area, depending on how much area you want for the text (notes).
Reposition or resize the notes area.
Note
Although you can change the background colors and color schemes for the Handout and Notes Masters, you probably won't want do so. Handouts and Notes are usually printed, and background colors aren't necessary or desired. You can, however, add a graphic element, such as a company logo, which then appears on each printed page.