Customizing Menu Commands
By default, PowerPoint menus tailor themselves to the way you work. Initially, only the most commonly used commands appear on the menus (see Figure 20.17). If you click the Expand button (the double arrow) at the bottom of the menu or wait a few seconds, the menu expands to include other commands you have used rarely or not at all (see Figure 20.18). If you begin to use a command regularly, PowerPoint then adds that command as a regular menu item.
Note
Although customizing menus is activated by default in PowerPoint, this option can be turned off.
Figure 20.17. By default, PowerPoint displays only the most common menu commands along with recently used commands.

Figure 20.18. Clicking the Expand menu button displays the full range of menu commands.

You can further customize how menus work by changing menu options, by adding or deleting menu commands, and even by adding entirely new menu categories.
Changing Menu Options
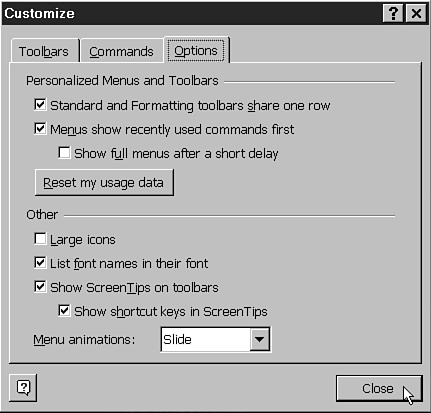
You customize menu options using the same dialog box you use for customizing toolbars. Access the Customize dialog box by right-clicking the menu bar and choosing Customize. Then click the Options tab. PowerPoint displays the following options (see Figure 20.19):
Figure 20.19. PowerPoint offers a wide range of toolbar options.

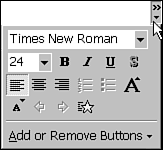
Standard and Formatting Toolbars Share One Row In an effort to save screen space, PowerPoint displays both toolbars on one row. On high-resolution screens (for example, 1024´768), you may be able to see all of the buttons from both toolbars. On other screens, however, the toolbars are collapsed and you must click the More Buttons button to see and use the entire list of buttons (see Figure 20.20).
Figure 20.20. Click the More Buttons button if you want to see toolbar commands that aren't displayed but which are active.

This may be confusing or it may require too much effort to constantly access the More Buttons button. If so, deselect this option so that each toolbar appears on its own row (see Figure 20.21).
Figure 20.21. The Standard and Formatting toolbars can be displayed separately, but they then take up two toolbar rows.

Menus Show Recently Used Commands First The basic commands, along with any commands you have used recently, appear when you first click a menu. If you deselect this option, all commands appear when you click a menu.
Show Full Menus After a Short Delay If you choose to show recently used commands first, this option allows the full menu to appear after a few seconds. Otherwise, you must click the Expand button (the double arrows) at the bottom of the menu to see the entire menu.
Reset My Usage Data Suppose you use a command quite often for a specific project, but don't otherwise use it very much. You can click this button to reset the history of your use of PowerPoint's commands so that only the default menu commands appear. You then begin establishing once again a history of commands as you use them.
Menu Animations If you want to add some pizzazz to the way your menus display, choose Unfold, Slide, or Random (which alternates the first two methods). Slide simply slides the menu down from the top. Unfold slides the menu both from the top and from the left. The default is None, probably because either method can be rather distracting.
Large Icons This option displays the icons about four times larger than usual (see Figure 20.22). You probably won't use this option unless you are visually impaired or you have a very high-resolution screen and have the room required for large icons.
Figure 20.22. Large icons are useful for the visually impaired, but otherwise take up too much of the screen to be useful.

Tip
Although the Large Icons option takes up a lot of space, you can create a custom toolbar with a minimal set of icons that fit on a single row. (See "Creating a New Toolbar" in this chapter.)
List Font Names in Their Font By default, PowerPoint displays font names in the toolbar font list using the actual fonts (see Figure 20.23). This may cause the list to appear slowly, especially on older, slower computers. To list them in a standard Windows font, deselect this option.
Figure 20.23. You can display font lists using the fonts themselves or a standard Windows font.

Show ScreenTips on Toolbars When you point at a toolbar button, PowerPoint dis- plays the name of the button in a small yellow box. This helps identify the button if you can't discern its use by the icon image alone. If you want to turn off this option, deselect it.
Show Shortcut Keys in ScreenTips Believe it or not, lots of people still prefer to use the keyboard whenever possible. This option enables them to see whether a toolbar button command has an equivalent keystroke, such as F5 to View a Slide Show or Ctrl+S to save a presentation.
Tip
Although using the mouse may make it easier to find features and commands you don't often use, usually you can access commands more quickly by using keyboard equivalents. For example, if you're already typing, pressing Ctrl+S to save the presentation is faster than moving your hand to the mouse, then finding and clicking the Save button on the toolbar. Use toolbar button ScreenTips to learn keystrokes that can save you time.
Creating a New Menu on the Menu Bar
If you find using menus easier than using toolbars, you can create and add your own menus to the menu bar. Suppose, for example, you want your own Quick Stuff menu, using the letter Q as the hotkey. On that menu, you intend to add items from the Formatting toolbar because you plan not to display that toolbar.
Note
The menu bar functions and is modified in exactly the same way as toolbars. That is, not only can you add menu items to toolbars, but you can add command buttons or icons to the menu bar. Information in preceding sections about modifying toolbars applies also to customizing menu bars.
To create a new menu and to add items to that menu, follow these steps:
Access the Customize dialog box by right-clicking the menu and choosing Customize.
Click the Commands tab in the Customize dialog box.
Scroll to the bottom of the Categories list and click New Menu.
Drag the New Menu button from the Commands list to the menu bar. You can place the button anywhere on the menu bar, not only at the end (see Figure 20.24).
Figure 20.24. Create new menu items and place them anywhere on a menu or toolbar.

Click the Modify Selection button. PowerPoint displays the Modify Selection menu (see Figure 20.25).
Choose Name and edit the text to change the name from "New Menu" to something more descriptive of the menu's purpose (for example, "Quick Stuff"). If you want to make Q the hotkey, place an ampersand (&) before the letter Q. Press Enter or click anywhere outside of the menu to close the menu.
Figure 20.25. The Modify Selection menu enables you to customize new menus.

Next, locate the first button you want to add to the custom menu (for example, Format, Bold).
Drag the command button to the new menu button (for example, Quick Stuff) and wait until a menu drops down. The first time you do this, the menu consists of nothing more than a blank gray square (see Figure 20.26) .
Figure 20.26. Drag-and-drop commands to the blank square beneath a new menu entry.

Drop the command on the drop-down menu (or blank square). As you drag the button up and down the menu, a horizontal line indicates where you will drop the button.
