Creating and Running an Online Broadcast
The first step in starting a presentation broadcast is to schedule the broadcast. This step prepares PowerPoint to broadcast your presentation, and it sets up a special Web page (called a lobby page) that your audience will use as an online gathering place before the presentation starts.
As part of setting up a schedule, you can also send electronic mail to people whom you'd like to view the presentation, inviting them to the show and telling them how to view it. We'll give detailed directions on how to do all these things later in the chapter.
Creating a Broadcast
The first step is to tell PowerPoint you want to organize a presentation broadcast. Load up the presentation you want to broadcast, and choose Slide Show, Online Broadcast, Set Up and Schedule.
Tip
You can still change your presentation after you've scheduled a broadcast; nothing's chiseled in stone. You can even switch to presenting a whole different file if you want to, without re-doing your broadcast schedule setup. See the Changing Broadcast Settings Later section for details on how to do this.
If this is the first time you've tried to run a presentation broadcast, you'll get the message displayed in Figure 17.1 telling you that PowerPoint needs to install some extra software to enable this feature. Choose Yes to enable PowerPoint to install the software.
Figure 17.1. The first time you try to set up a presentation broadcast, PowerPoint will need to install its presentation broadcast modules.

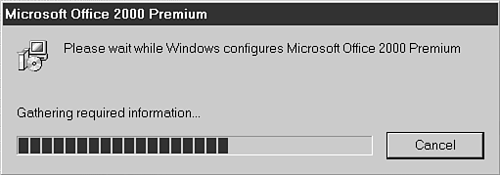
You'll then see a status window (see Figure 17.2) showing you PowerPoint's progress. You can click the Cancel button if you want to stop the install for any reason.
Figure 17.2. Wait while PowerPoint fetches the code it needs from the Office CD or your network server.
What you'll see next is PowerPoint's main Broadcast Schedule window (see Figure 17.3). Here you can choose to schedule a new broadcast, or you can change the file an already scheduled broadcast is going to use. Because you haven't scheduled this presentation for broadcast before, choose the Set Up and Schedule a New Broadcast option and then click OK to get to the Schedule a New Broadcast window.
Figure 17.3. Here you can schedule a new presentation broadcast or change the file an already scheduled broadcast will be using.

Tip
You can schedule your broadcast on a machine different from the one you actually use to make the broadcast. As long as you have your PowerPoint file with you (which contains your broadcast settings inside it), you can use any computer you want to do the broadcast.
Remember, the broadcast computer needs sound and video capabilities if you want to include those features, and it must have PowerPoint 2000 installed and a fast network connection.
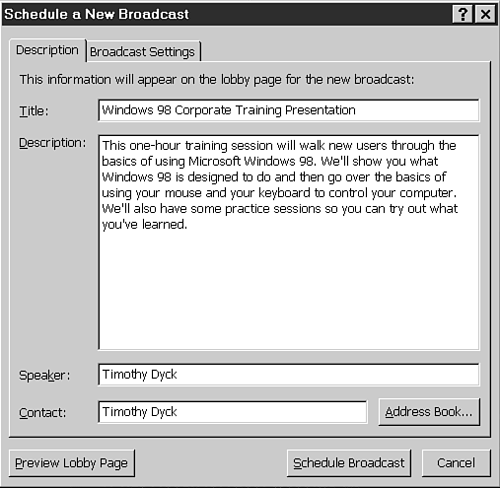
The Schedule a New Broadcast window (see Figure 17.4) sets up the basic information your audience will see in the presentation lobby page, and it enables you to configure more advanced broadcast options.
Type in a title and description for your broadcast, as well as your name and, if you want, the email address of the person organizing the broadcast. You should provide enough information here that potential audience members will know what the presentation will be about and for whom it was designed. Putting in the length of the presentation is also a good idea.
Configuring Broadcast Settings
After you've filled in the information in the Description tab of the Schedule a New Broadcast window, you'll need to set up a few more technical broadcast settings. It's important to do this before you proceed to previewing your lobby page or setting the actual schedule for your broadcast because those features need these settings filled in first.
Click the Broadcast Settings tab of the Schedule a New Broadcast window to see more broadcast options (see Figure 17.5).
Figure 17.5. The Broadcast Settings tab enables you to set various presentation options, as well as to specify where the presentation should be stored for broadcast.

A lot of options are available on this tab. The first group of options (Audio and Video) enables you to specify if you want to have live audio or video information (or both) broadcast with your presentation. Regardless of what you choose here, audio in the presentation itself (such as a saved narration or slide transition sounds) doesn't get broadcast.
If you want to broadcast audio, you'll need to have a sound card and a microphone set up at your broadcast station. If you want to have video (usually a picture of you talking along with the presentation, although you could also use a VCR as a video source), you'll need to have a video camera and video capture card installed at the broadcast station. Remember that the people tuning into your broadcast need to have audio-capable computer hardware to hear any sound.
Tip
If you can't get a broadcast station with this hardware installed (or if your broadcast station is already too busy sending your presentation to your audience members over the network), you can also use another computer as an audio or video input source (click on the Camera/Microphone Is Connected to Another Computer option in the Schedule a New Broadcast window and type the name of the multimedia computer into the box).
You can also add an email address to your presentation so that broadcast attendees will be able to use it later to send in questions during the presentation. You (as the presenter) can put in your email address—or anyone else's.
Tip
If you want to answer questions interactively during the presentation, you might want to put someone else's email address into this box, or let someone check your email for you during the presentation. You'll have your hands full enough giving the presentation!
You can also choose whether to let audience members see your speaker presentation notes by checking off the Viewers Can Access Speaker Notes box.
Setting Broadcast Server Options
Finally, you need to specify where you are going to save your presentation for broadcast. Click the Server Options button to get to the Server Options window (see Figure 17.6).
When the window opens, type a shared network location into the Step 1: Specify a Shared Location box. PowerPoint will store your presentation files in this location when it needs to start the broadcast. This must be a network shared directory that is accessible to all the members of your audience over the network. Network locations are typed in using the format servername sharename (see Figure 17.6 for an example).
Caution
You need to make sure that whatever you type into the location box is accessible to every member of your audience over the network; otherwise, they won't be able to see the presentation. You must use the servername sharename format to enter this information.
In the lower half of the Server Options window, you have a decision to make. As mentioned earlier, PowerPoint can broadcast presentations in two ways: It can run a broadcast presentation by itself, or it can use NetShow, Microsoft's specialized broadcast server. This window is where you make that choice.
Figure 17.6. Type in a shared network location that you and your audience can both access over the network.
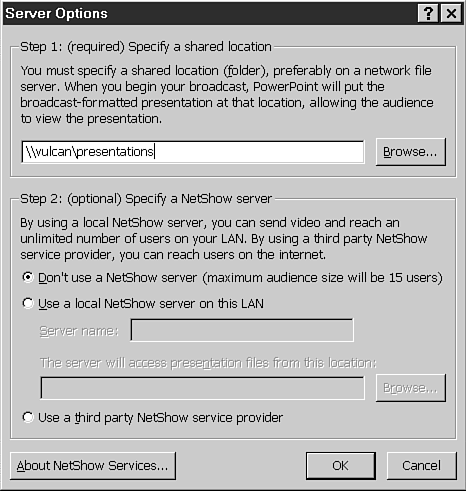
If you are broadcasting to 15 or fewer people (and if you aren't sending video along with your presentation), you don't need to use NetShow; you can just click OK to finish here (leaving the default Don't Use a NetShow Server option selected). You'll go back to the Schedule a New Broadcast window.
Note
It really doesn't work to have more than 15 viewers if you don't use NetShow—we tried! Viewers after the 15th one don't get their slides updated as you go through your presentation.
On the other hand, if you want to use NetShow to show your presentation, you need to fill in the Step 2: Specify a NetShow Server option.
To do this, click the Use a Local NetShow Server on This LAN option, fill in the name of your NetShow server, and provide the NetShow server with the location of your presentation. For simplicity, this should be the same network location you specified in the top part of the Server Options window. See Figure 17.7 for an example of how to fill in NetShow settings.
After you've got the Step 2 options selected, click the OK button to go back to the Schedule a New Broadcast window.
Figure 17.7. If you use a NetShow server to broadcast your presentation, fill in the server's name and the network location where it can access your broadcast presentation files.

Previewing the Lobby Page
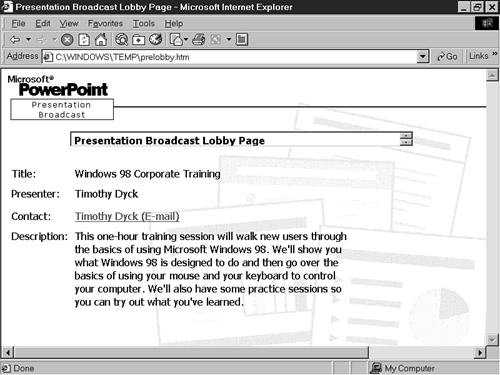
When your audience is ready to view the presentation, they'll use their Web browser to go to a specific Web page, called a lobby page, which is specific to your presentation broadcast. There they'll find out how long it is before the presentation actually starts, as well as the presentation title and description you typed in.
If you want to sneak a peek at what the lobby page will look like to your audience, choose Preview Lobby Page while you're back at the Schedule a New Broadcast window. You'll see something similar to Figure 17.8.
Note
The presentation date and time information isn't filled in because you haven't set that information yet. After that's done, your presentation broadcast lobby page will display a running time countdown showing how long until the presentation starts.
Tip
You can also look at the finished lobby page later (using the Preview Lobby Page button on the Broadcast Presentation window) when you're ready to actually start the broadcast.
Setting the Broadcast Time
After you've finished entering your broadcast description, broadcast settings, and server options, you're ready to actually schedule the broadcast.
Choose the Schedule Broadcast button to continue.
Figure 17.8. The Preview Lobby Page button enables you to get a preview of what your audience members will see when they log on to your presentation lobby Web page.
If you aren't using Microsoft NetShow to broadcast your presentation, you'll be asked to confirm your choice (see Figure 17.9).
Figure 17.9. Choose Yes to confirm that you won't be using a NetShow server with this presentation.

PowerPoint will then start up your email client to send an announcement to the people you'd like to invite to your presentation. If you are using Microsoft Outlook as your mail client, you'll be able to schedule the presentation using Outlook's group meeting facilities (see Figure 17.10).
Now you're finished scheduling your presentation! PowerPoint displays a confirmation message to let you know your presentation broadcast settings have been saved (see Figure 17.11). Press OK to close the message.
Changing Broadcast Settings Later
If you decide you want to change the broadcast time or other settings (such as the PowerPoint file you want to broadcast) before the show actually starts, you can modify your settings easily.
Figure 17.10. PowerPoint can use Microsoft Outlook's meeting scheduling features to book your presentation into your colleague's calendars.
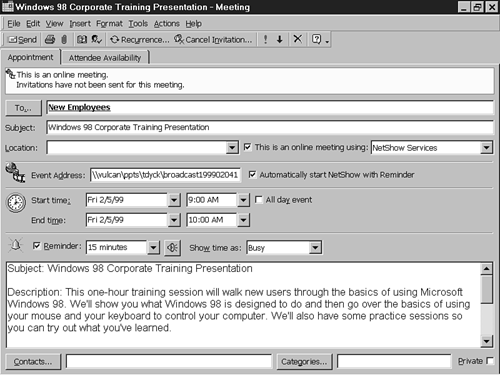
Figure 17.11. Your presentation is now scheduled!

To get to the Broadcast Schedule window, choose Slide Show, Online Broadcast, and Set Up and Schedule, as you did before. You'll notice, however, that the Change Settings or Reschedule a Broadcast option is now enabled (see Figure 17.12).
Figure 17.12. Even though you've already scheduled your broadcast, you still can change your mind later.

If you want to change the time the broadcast is scheduled, choose the new Change Settings or Reschedule a Broadcast option, then choose OK. You'll be presented with a list of upcoming presentations for the PowerPoint file you have open (see Figure 17.13).
Figure 17.13. You can modify the presentation broadcasts'descriptions or start times from this window.

Choose the presentation you want to modify by clicking its name, and then choose Change settings, Reschedule, or Delete, depending on what you want to do. The Change Settings option enables you to change the presentation broadcast's title or description and broadcast settings; the Reschedule option takes you back into Outlook to send a new meeting notice; and the Delete option cancels that particular presentation.
From the Broadcast Schedule window, you can also change which presentation you'll be broadcasting. Suppose a co-worker mails a modified presentation to you that you want to substitute for your original presentation.
Open up the new presentation (not your original presentation!), and then open up the Broadcast Schedule window by choosing Slide Show, Online Broadcast, Set Up and Schedule, as before. Now choose the Replace a File That Is Currently Scheduled for Broadcast option.
You'll see the Schedule window (see Figure 17.14) open up. Choose the presentation broadcast that you want to modify, and then choose Replace. The presentation broadcast will be changed to use your new, currently open presentation.
You'll now get a reminder from PowerPoint (see Figure 17.15) to save your presentation and lock in your changes.
Tip
You can schedule multiple presentation broadcasts for the same presentation file if you have to present the same material several times. You'll notice that PowerPoint remembers your presentation broadcast settings so you don't have to re-enter them each time.
Figure 17.14. Pick the presentation broadcast you want to change and then choose Replace to use a new presentation with a presentation broadcast you've already set up.

Figure 17.15. After you've inserted a new presentation into a scheduled presentation broadcast, save the new presentation to include the schedule information in the file.

Starting the Broadcast
To get ready to start the actual broadcast, open the PowerPoint file you're going to broadcast and then choose Slide Show, Online Broadcast, and Begin Broadcast. You should do this about 30 minutes before you actually want to get started, to allow time for your presentation to be uploaded to the server and so you'll be able to send messages out to waiting viewers before the presentation starts.
Tip
You can tweak your presentation until the moment you give the Begin Broadcast command. After that, your presentation files are copied to the server for broadcast. If you still want to change the presentation, you can close the Broadcast Presentation window by choosing Cancel, making your changes, and then choosing Slide Show, Online Broadcast, Begin Broadcast again.
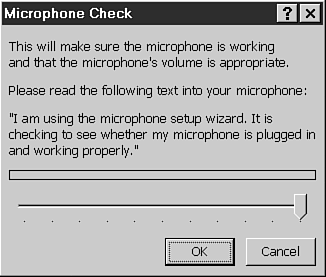
When you give the Begin Broadcast command, you'll see PowerPoint's Broadcast Presentation window open. PowerPoint verifies that the network locations you typed in earlier are valid; then it checks that your audio and video inputs are working correctly (if you enabled those options when you set up the presentation broadcast). Because real-time audio was turned on in our example, PowerPoint displays a Microphone Check window (see Figure 17.16) to verify that our audio levels are set correctly.
After you've read the text out loud (and you've seen the horizontal volume bar move), choose OK to continue.
You're now ready to start your presentation! When the Broadcast Presentation window is flashing "Press Start When Ready…", everything is set to go (see Figure 17.17). As you can see, the window displays a countdown to your scheduled start time. You can also click the Audience Message button to send a message to all waiting audience members (handy if you want to announce a brief delay) and preview the presentation lobby page by choosing Preview Lobby Page.
Figure 17.17. Your presentation has been prepared for broadcast and is now ready to go.

Now, you just have to wait (and review your notes, sip from a glass of water, and practice your delivery)! The presentation will ask you if you want to start the broadcast when the countdown timer runs out, or you can just start anytime you want to by choosing Start. Choose Yes when asked if you want to start, and the presentation slideshow will start.
Conducting the Broadcast
A broadcast presentation won't look any different to you (the presenter) than if you'd just run a slideshow on your computer. Just move through your presentation as you normally would, but remember to not go too quickly. It takes 10-15 seconds for your clients to download each new page.
Tip
You might want to set up a nearby computer and log in as a participant so you can see what your audience is actually seeing. Based on my tests, the time it takes for each slide (and real-time narration, if you're using that option) to reach client systems varies from slow to really slow. Take your time and double-check to make sure you're not getting ahead of your audience.
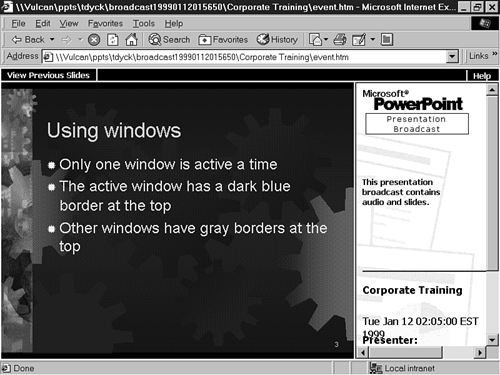
Your audience will see the current slide of the presentation in the left side of their browser (see Figure 17.18) and some status information on the right. They can also move through your presentation on their own by clicking the View Previous Slides link in the top-left corner of their slide window) and then scrolling through the whole presentation.
Figure 17.18. Here's what your audience sees in Internet Explorer. They can also view previous slides (if they came in late) by choosing the View Previous Slides option (top-left corner).
Tip
Take a look at the presentation lessons in Part VII, "From Concept to Delivery". It's harder to hold your audience's attention when you're not physically in front of them.
What audiences see in a Web broadcast is very close to what they would see if they were actually looking at your screen in person.
PowerPoint's pen and pointer features don't work over presentation broadcasts; if you want to use them, consider switching to an online meeting which does support them. Your audience also won't see any slide build effects (points flying in from the side, and so on). It's best to just go with a simple design and presentation format when using presentation broadcasts.
You can go back and forth through the slides in your presentation using your Page Up and Page Down (or Space and Backspace) keys as you normally would.
Ending the Broadcast
When you've finished your broadcast, just press Esc to end it (if any questions have been emailed in during your presentation, you might want to answer them verbally before you wrap things up). You'll be asked to confirm your decision to end the broadcast. Your audience will be sent back to the presentation lobby page, which will tell them that the presentation has ended.
