
55. Viewing and Managing Notebooks
In This Chapter
• Docking OneNote to Your Desktop
• Working with Microsoft Outlook
• Using the Send to OneNote Tool
• Protecting Notebook Sections with a Password
After you figure out how to create a basic notebook and insert notebook content, it’s time to move on to OneNote’s more advanced features. In this chapter, you see how to display Full Page view, dock OneNote to your desktop, integrate with Outlook, use the Send to OneNote tool, protect your notebook content, and view notebook history.
Displaying Full Page View
OneNote’s default view is Normal view, which displays the Ribbon and navigational tabs. Optionally, you can avoid distractions by switching to Full Page view, which displays only your current page.
To switch to Full Page view, click the Full Page View button on the View tab (see Figure 55.1).

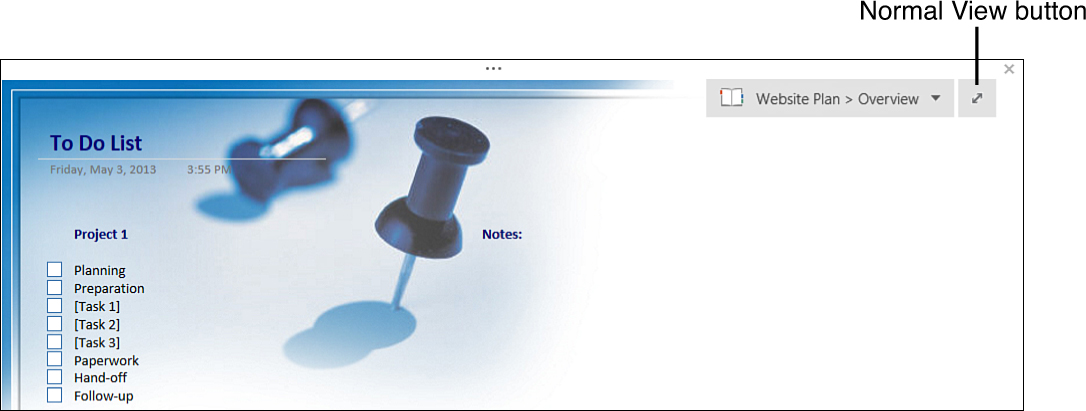
Figure 55.2 shows a sample of this view. When you’re ready to switch back to Normal view, click the Normal View button in the upper-right corner of the screen.
Docking OneNote to Your Desktop
If you want to work in other applications yet keep OneNote open and handy for taking notes and inserting content, you can dock it to your desktop.
To do so, click the Dock to Desktop button on the View tab.
Figure 55.3 displays OneNote docked to the right side of your desktop while you work in Excel.

To return to Normal view, click the Normal View button in the upper-right corner of the screen.
Using Linked Note Taking
Docking OneNote to your desktop activates Linked Note Taking, which creates an automatic link to the content that displays in your main window when you enter a note in the docked OneNote window. For example, if you have a document open in Microsoft Word and enter a note about it in your docked OneNote window, OneNote adds a link to the Word document automatically (see Figure 55.4).

 Note
Note
When OneNote is docked, click the Linked Note Taking Is Enabled button to view a menu of options. From here, you can view linked files, delete links, turn off Linked Note Taking, or go to the Advanced tab of the OneNote Options dialog box where you can specify your Linked Note preferences.
Setting Up OneNote Pages
You can customize the appearance of your OneNote pages using the buttons in the Page Setup group on the View tab (see Figure 55.5). These buttons include the following:

• Page Color—Change the color of your page to one of the pastel shades on the palette that displays. To remove a color, select the No Color check box on the palette (the default option).
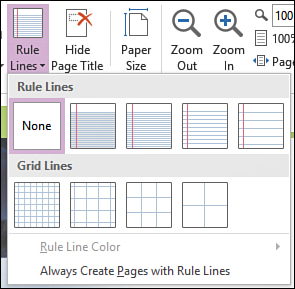
• Rule Lines—Add rule lines (similar to a real notebook page) or grid lines (useful for placing images). If you apply rule lines, the Rule Line Color menu option becomes active, where you can choose from an extensive list of line color options, as shown in Figure 55.6.
• Hide Page Title—If your page title includes content, hiding it deletes this content. To restore the page title field, click the Hide Page Title button again.
• Paper Size—Display the Paper Size pane, as shown in Figure 55.7, where you can specify the page size, orientation, and print margins.

Working with Microsoft Outlook
OneNote offers full integration with another Microsoft Office application: Outlook. You can email pages directly from OneNote and send OneNote to-do lists to your Outlook calendar.
Emailing a Page
You can email a notebook page to someone directly from OneNote by following these steps:
1. On the Home tab, click the Email Page button. An Outlook message window opens (see Figure 55.8) that displays your page content in the message area and your page title as the message subject.

2. Enter the email address of your recipient in the To field.
Note
As with any Outlook message, you can email more than one recipient and copy recipients using the Cc field.
3. Optionally, add any additional text.
4. Click the Send button to send your message.
 Tip
Tip
Another option is to save a notebook, section, or page as a PDF and email it to someone. See Chapter 2, “Working with Office Applications,” for more information.
Sending a Task to Outlook
If you use Outlook to manage tasks, you can send a OneNote to-do list (such as a note assigned the To Do tag) to Outlook as tasks by following these steps:
1. Select the content you want to send to Outlook.
2. On the Home tab, click the Outlook Tasks button.
3. From the drop-down list, select a timeframe, such as Today, Tomorrow, or Next Week (see Figure 55.9).

OneNote inserts flags next to the selected content (see Figure 55.10) and adds the tasks to your Outlook To-Do List.

Using the Send to OneNote Tool
The Send to OneNote tool enables you to send content to a OneNote notebook while working in other applications. Minimized on your desktop, this tool is available whenever you use OneNote. If it doesn’t open automatically when you start OneNote, you can open it by pressing ![]() +N on the keyboard or clicking the Send to OneNote Tool button on the View tab.
+N on the keyboard or clicking the Send to OneNote Tool button on the View tab.
Sending a Screen Clipping to OneNote
If you’re working in another application or find something interesting on the Web, you can send a clipping to a OneNote notebook. To do so, follow these steps:
1. Open the application from which you want to take a screen clipping. For example, you might want to capture something from another Office application or from an external website.
2. Open the Send to OneNote window and click the Screen Clipping button (see Figure 55.11).

FIGURE 55.11 The Send to OneNote tool offers three options for sending content to a OneNote notebook.
3. Select the area you want to include in your notebook using your mouse pointer (which now appears as a crosshair), as shown in Figure 55.12.

4. In the Select Location in OneNote dialog box (see Figure 55.13), specify where you want to insert your clipping.

5. Click the Send to Selected Location button. OneNote inserts the screen clipping in the specified location.
See Chapter 5, “Working with Shapes and SmartArt,” for more information about inserting screen clippings in Office applications.
Sending Content to OneNote
You can also use the Send to OneNote tool to insert actual content from another application (not just a screen clipping).
To send content to OneNote, follow these steps:
1. Open the content you want to send to OneNote. In this example, you send a PowerPoint presentation to OneNote and insert it as a printout.
2. Open the Send to OneNote window and click the Send to OneNote button (refer to Figure 55.11).
3. In the Select Location in OneNote dialog box, specify where you want to insert this content.
4. Click the OK button. OneNote inserts the content in the specified location.
Note
See “Inserting Files” in Chapter 54, “Inserting Notebook Content,” for more information about inserting printouts.
Creating a Quick Note
A third option the Send to OneNote tool provides is sending quick notes to OneNote. Use a quick note when you want to send a note to OneNote without sending a clipping or printout.
To send a quick note, follow these steps:
1. Open the Send to OneNote window and click the Send to OneNote button (refer to Figure 55.11).
2. In the window that opens (see Figure 55.14), enter your note.

Tip
Click the top of the window to display the OneNote Ribbon.
3. Click the Close button (X) in the upper-right corner of the window. OneNote places your note in the Quick Notes section, which is below your notebook list (see Figure 55.15).

You can keep your notes in the Quick Notes section or move them to another notebook.
Protecting Notebook Sections with a Password
Applying a password to a specific section is a good idea if you want to prevent unauthorized people from viewing your content. This feature is particularly useful for notebooks you share with others.
To apply a password to a section, follow these steps:
1. On the Review tab, click the Password button. The Password Protection pane opens, as shown in Figure 55.16.

2. Click the Set Password button.
3. In the Password Protection dialog box (see Figure 55.17), enter and confirm your password and click OK. Passwords are case sensitive.
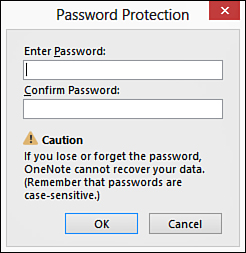

Be sure to keep your password in a safe place. OneNote doesn’t have a “lost password” feature and can’t restore content if you forget your password.
4. If section backups exist, OneNote opens the Existing Section Backups dialog box and prompts you to delete unprotected backups.
Note
After applying a password to a section, the Change Password button and Remove Password button become available on the Password Protection pane in case you want to modify your password settings.
Tip
To lock all sections, click the Lock All button (or press Ctrl+Alt+L on your keyboard).
Viewing Notebook History
The History tab in OneNote enables you to review changes to your notebook content, including recent edits, edits by author, and page versions. These tools are most useful if you’re collaborating and sharing a notebook with others. If you’re the sole author of your notebook, you’re less likely to need these features.
Note
For more information about sharing and collaborating in OneNote, see Chapter 2 and Chapter 6, “Using Microsoft Office on the Web and Mobile Devices.”
The History tab offers the following buttons, as shown in Figure 55.18:
Note
The History tab is new to OneNote 2013. In previous versions, this functionality was available on the Share tab.
• Next Unread—View the next page with notes you haven’t read.
• Mark as Read—Mark this page as read. This button acts as a toggle. Clicking a read page marks it as unread.
• Recent Edits—View recent edits by a specified date, such as today, yesterday, in the last 30 days, and so forth.
• Find by Author—Open the Search Results pane where you can search for changes by a specific author.
• Hide Authors—Hide authors’ initials next to their changes in a multi-author notebook. Also acts as a toggle; clicking again shows authors.
• Page Versions—Displays a list of page versions on the page tab list by author and date. Click the lower portion of the Page Versions button to display a menu, which enables you to delete versions in a section, section group, or notebook. You can also disable history for the open notebook.
• Notebook Recycle Bin—View the notebook recycle bin. OneNote deletes content permanently after 60 days. To empty your bin immediately, click the lower portion of the Notebook Recycle Bin button and select Empty Recycle Bin from the menu. You can also right-click content in the recycle bin to restore it to OneNote.
