
39. Setting Up Accounts and Personalizing Outlook
In This Chapter
• Understanding Email Services and Internet Access
• Adding Email Accounts to Outlook
Before getting started with Outlook’s Mail module, you need to set it up to work with your email account. In this chapter, you find out how to add email services, configure them to work with Outlook, and personalize the Outlook interface.
Understanding Email Services and Internet Access
If you’re using Outlook at work, chances are Information Technology (IT) people or your network administrator set everything up for you. If you’re using Outlook at home or you’re your own network administrator in a small office situation, you’re in charge of setting up Internet access and choosing email services. If you’re the boss of your own connectivity destiny, then like most people, you probably use an outside source to access the Internet. These typically include a cable, satellite, or phone company (home or wireless). Companies that offer Internet access through their giant servers and networks are called Internet service providers, or ISPs. In most instances, these types of connections encompass access to the Internet for web surfing as well as for email. Many offer dedicated storage on their servers, too, so you can back up important files. Email comes in several types of accounts:
• POP3—Post Office Protocol 3; this is the most popular email account type. With it, your email messages are downloaded from the server hosting your account; you read and store them on your computer and not the mail server. This means you can read the messages on your computer only and the mail server keeps your email only until you download it (unless your provider has a web mail interface).
• IMAP—Internet Message Access Protocol; this type of account stores your emails on the mail server without your needing to download them onto your computer. The nice thing about this setup is that you can access your messages from any computer.
• MAPI—Messaging Application Programming Interface; this account type is a lot like IMAP, but with more features, especially if you’re running Outlook with a mail server that uses Microsoft Exchange. MAPI accounts are generally associated with Microsoft Exchange.
• HTTP—This is a Web protocol, and you can use your browser to log on to the site and view mail. Yahoo! Mail, Hotmail, and Gmail are examples of web-based email services.
For a fee, ISPs offer the use of their equipment (giant servers and other computers and networks) and their connection to the Internet. Many include email as part of the package. Basically, this means you can set up an email address with them. On the downside, if you ever switch ISPs, you’ll have to switch email addresses and notify everyone of the change. If this potentially poses a problem, you might consider getting an email account through a free service.
 Tip
Tip
If you have your own website, you can set up Outlook to use an email address that comes with this domain. For example, if you purchase the domain www.annejones.com, you can set up the email address [email protected].
Microsoft offers free email through its Microsoft accounts. So, if you don’t already have an email service, it’s easy enough to set one up through Microsoft. Best of all, a Microsoft account works seamlessly with Outlook. Up until 2013, Microsoft’s free perks included email through its Windows Live and Hotmail services. Users needed a Windows Live ID to sign into things like SkyDrive (cloud storage), Messenger (the instant messaging service), or Windows Phone (smartphone). You had to have another ID to use Xbox Live to play games online. Now the company has merged all these accounts into one service under the umbrella called a Microsoft account. The good news is if you already have an account through Windows Live or Xbox Live, you already have a Microsoft account. They’re one and the same. You can use this account to access your data from any device, whether it’s your Xbox, Windows Phone, or tablet, for example. You can also connect your Microsoft account to services like Facebook, Twitter, and LinkedIn.
If you don’t have such an account yet, here is how to get one. Navigate to www.outlook.com and click the Sign Up Now link. You can then fill in a form and choose an email address, called a Microsoft account name. Figure 39.1 shows what the form looks like. You can even specify whether you want the new email account to use the outlook.com domain, hotmail.com, or live.com.

Your account name can be anything you want. Most people use their actual names or a combination of initials and such to create a unique email address. If you happen to choose something already in use by someone else, Microsoft prompts you to try another name. After you have a Microsoft account established, you can start using it to email with Outlook as long as you tell Outlook what the account is—learn more about adding and editing email accounts later in this chapter.
 Note
Note
You can have all the free email accounts you want, but they don’t do you any good if you’re not connected to the Internet. To find an ISP, check with your local cable or phone company. Cell phone companies also offer wireless connections you can use, such as setting up a hotspot in your house that all your household computing devices can access. If you’re on the go all the time, you can also tap into free Wi-Fi services around town to surf the Internet and access your email accounts. (Wi-Fi stands for wireless fidelity, a technology that uses radio waves to provide high-speed Internet and network connections.) Just be sure to safeguard your computer when you do use Wi-Fi to prevent hacking (firewalls and virus protection, for example).
Adding Email Accounts to Outlook
You can use multiple email accounts with Outlook. This is extremely convenient. You might have a work account, for example, and a home account. Rather than having to check them separately, you can tell Outlook to work with both. Perhaps you have a special email account you use when signing up for online newsletters and advertising information. Or maybe each family member wants his or her own account. You can add additional accounts to Outlook and view your emails using the Mail module.
Outlook automatically configures your email accounts for you. All you need to specify is your email address and password; Outlook takes care of the rest. On the off chance it cannot establish a connection, you might need to gather up some additional information from your ISP and manually configure the account. This can include identifying your server type, the address of the incoming mail server and outgoing mail server, and any passwords required for each. The following sections cover both methods.
Automatically Configuring an Account
To have Outlook automatically set up an email account, you need to switch to Backstage view to get things started. Follow these steps:
1. Click the File tab.
2. On the Account Information screen, click the Add Account button.
3. The Add Account dialog box opens, as shown in Figure 39.2. Fill in your name in the first form field.

4. Type the email address for the account you want to add.
5. Type the account’s password.
6. Verify the password by typing it again.
7. Click Next to continue.
8. Outlooks checks the network connection, finds your settings, logs on to the mail server, and then displays a congratulations prompt. Click Finish (see Figure 39.3).

You can also set up a new account through the Add Account dialog box. On the Account Information screen in Backstage view, click the Account Settings button and then click the Account Settings command. This opens the dialog box listing all of your accounts. Click the New button to display the Add Account dialog box (refer to Figure 39.3).
You can now see your new email account listed in the Folder pane in Outlook’s Mail module. When you click the Send/Receive All Folders button on the Home tab, Outlook checks the account for messages. Any messages received appear in the account’s Inbox; click the Inbox to view the messages. Remember, each account’s Inbox keeps a running list of messages received for that account.
Note
If you mistype any part of your email address or password, Outlook won’t be able to complete the automatic configuration. If you run into additional problems, you can try a manual setup, which is explained in the next section.
Tip
One thing to consider when using multiple accounts is to make sure the correct account for new messages is selected before you send it off. If you’re trying to keep things organized and precise, you don’t want to send a business message from your personal account, for example.
Manually Configuring an Account
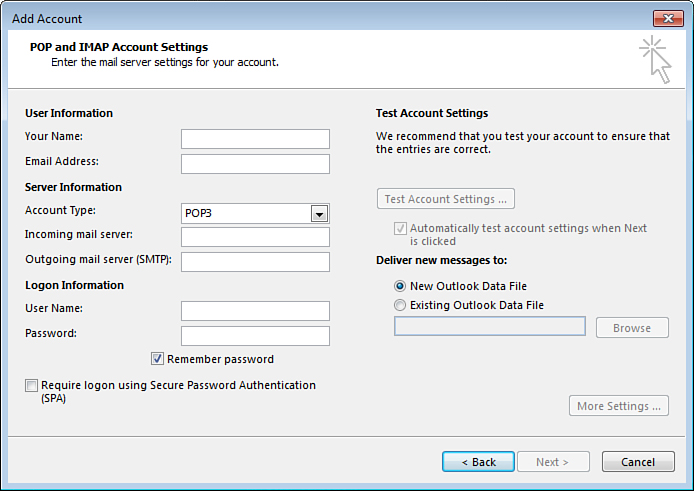
The manual route might be right for you if you know your email provider has some preferred settings or if you decide you want to control the details about the setup. For example, you might need to ascertain special incoming mail server or outgoing mail server info, or you might have to have special logon info. The first step in the manual process is to tell Outlook what type of email service you’re adding. You can choose from a Microsoft Exchange Server (an Exchange account), Outlook.com or Exchange ActiveSync service (use this option if you have a free email through Microsoft), or a POP or IMAP service. If you’re not sure, check with your email provider. They can provide you with all the pertinent info required.
After you’ve gathered all the correct information, you’re ready to set up an account. Depending on which type of email service you’re adding, different configuration steps appear. If you’re adding an Exchange account, Outlook prompts you to close Outlook and use Windows Mail settings in the Control Panel. If you’re adding an Outlook.com account, you must enter your server and logon information. If you’re adding a POP or IMAP account, you need to specify the account type and the incoming and outgoing servers.
To start the process, click the File tab and click the Add Account button. So far, this is the same as having Outlook automatically configure the account. When the Add Account dialog box opens, however, you need to click the Manual Setup or Additional Server Types option, as shown in Figure 39.4. Click the Next button to continue.

Next, select the type of email account you’re adding (such as POP, IMAP, or Microsoft Exchange Server) and click Next.
Depending on what you’re selecting, different options are shown. Figure 39.5 shows the POP and IMAP Account Settings you need to fill in, and Figure 39.6 shows the Server Settings fields for an Exchange ActiveSync service.

Tip
Click the More Settings button, if available, to add additional information.
After you’ve entered all the appropriate fields, you can click Next and Outlook establishes the network connection.
Editing Your Email Accounts
You can make changes to your email accounts through the Account Settings dialog box. This particular box keeps a list of all the accounts you’re using. You can add new accounts from this dialog box, remove accounts you no longer use, or make changes to accounts. You can also reorder the way in which Outlook checks the accounts for new messages.
To access the dialog box, click the File tab to switch to Backstage view. Click the Add Accounts button, then click the Add Accounts command. A dialog box similar to Figure 39.7 opens, with the E-mail tab displayed.

From the Account Settings dialog box, you can do any of the following:
• To add a new account to the list, click the New button and follow the steps for automatically or manually configuring a new email service to work with Outlook.
• To repair an account, select it in the list and click the Repair button. This reopens the setup box containing the information about the account, which includes the same form fields you used to enter information about the email service; you can recheck the information.
• To change an account, select it in the list and click the Change button. This displays detailed information about the account, and you can make changes, such as setting a new password.
• To remove an account, select it and click the Remove button. Outlook warns you that you’re about to delete the account; click Yes to confirm deletion.
• To change the default account—the account listed to send from in the new message window—click the account and click Set as Default.
• To change the order of your accounts, click the up and down arrows to move the selected account up or down in the list.
Working with Outlook Panes
Now that you’ve set up your email account, it’s time to take a look at the common components of Outlook so you know how to navigate them.
A common way to divide a program window into workable areas is to use panes. Most users are familiar with panes from web browsing. Typically, a navigational pane appears on the left or top side of a web page with links that, when clicked, display another page somewhere off to the right or below. Outlook uses panes to divvy up areas of the window. This section covers the various ways you can work with panes to navigate Outlook.
Working with the Folder Pane
The far left side of the program window features the Folder pane. This pane displays different aspects of your Outlook folder structure depending on which module you’re viewing. For example, when viewing the Mail module, shown in Figure 39.8, the pane displays all your email account inboxes and their subfolders.

You can expand and collapse the pane to free up onscreen workspace. Click or tap the Minimize button located in the upper-right corner of the pane, pointed out in Figure 39.9. When collapsed, the pane folds to a skinny columnar display along the left side of the program window, like the example in Figure 39.9. To expand it again, click the Expand button.

Note
Notice when the Folder pane is collapsed, the Navigation bar runs vertically instead of horizontally—but only if the bar is displayed in Compact Navigation mode (icons instead of text labels).
You can also control the Folder pane using the Folder pane drop-down menu on the View tab, as shown in Figure 39.10. For example, you can turn the pane off entirely by selecting the Off option. To turn it on again, revisit the drop-down menu and choose Normal.

You can also resize the Folder pane. Just move your mouse pointer over the pane’s right border and drag it to a new size, wider or thinner. You can do the same thing with any pane in Outlook; drag the pane’s border to resize the pane, whether it’s the Reading pane, the message list, or the To-Do bar.
Working with the Reading Pane
In the main area of the Outlook window, called the Information Viewer, you can also control the view of the Reading pane. The Reading pane, which displays the contents of a selected message from the list, is an optional item. You can turn it on or off, or you can resize it. If you choose to have it on, you can have it display to the right of the message list or at the bottom of the main area. Figure 39.11 shows the Reading pane displayed at the bottom of the viewing area. The pane can be displayed in any module, but it appears by default when using Mail and Tasks.
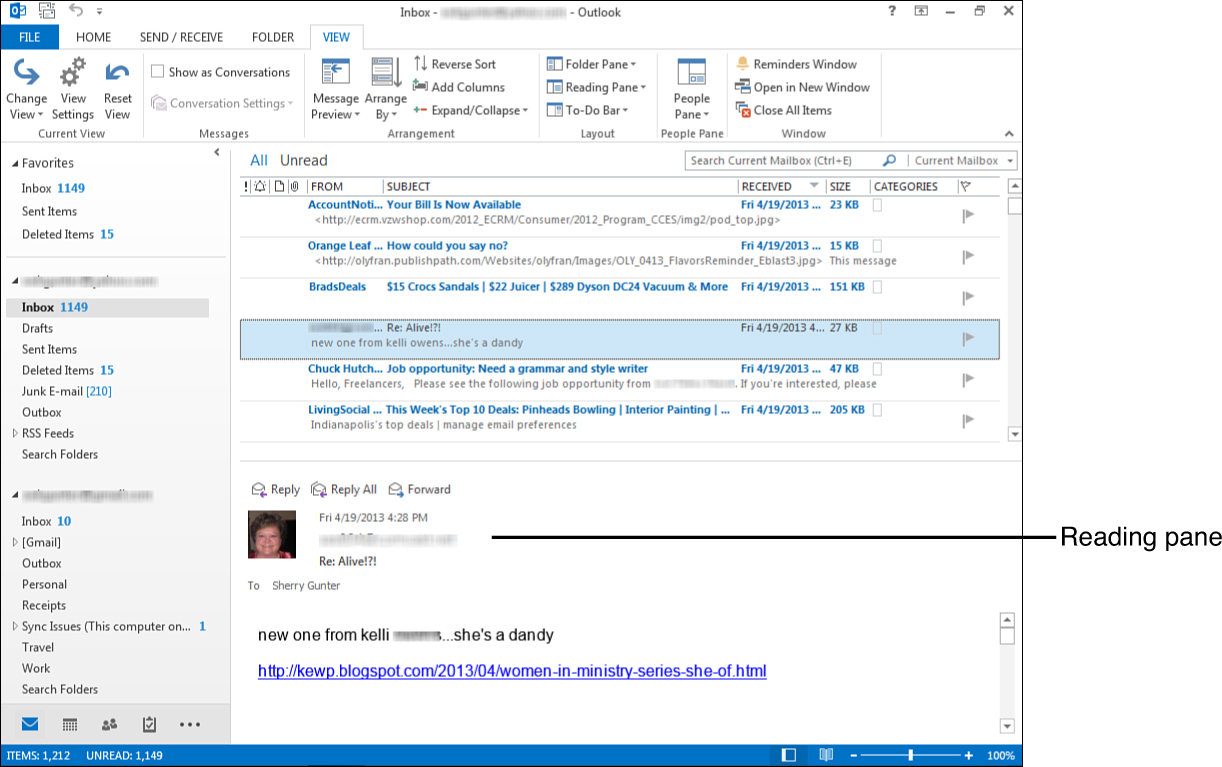
To control the Reading pane, click the View tab and click the Reading pane drop-down arrow. Next, select a setting you want to apply. Outlook immediately changes the window to reflect your selection.
Working with the To-Do Bar and Peeks
You can use the To-Do bar to view sneak peeks of your calendar, people info, or tasks, or all three at the same time. A peek is a quick glance at current content, such as your calendar. Suppose you’re busy typing a reply to an email and need to check your calendar to suggest a date. Rather than having to open the full Calendar module, you can use the peek feature to check the current month. For quick peeks, just hover the mouse over the module item on the Navigation bar, as shown in Figure 39.12.

FIGURE 39.12 Outlook’s peeks enable you to see your calendar, a contact, or a task list at a glance.
The To-Do bar opens a full pane for peeks, as shown in Figure 39.13. The To-Do bar is not turned on by default. To display it, click the To-Do Bar button on the View tab, and click which part you want to view. You can turn on just one peek or all three. A check mark next to the item’s name indicates it’s displayed; no check mark means the item is turned off. To turn them all off, click the Off command. To turn off individual peeks in the bar itself, you can click the peek’s Close button.

Note
You can also turn on a People pane to view details about a particular contact. To learn more, check out Chapter 44, “Working with Contacts.”