
43. Using the Calendar
The Outlook Calendar helps you keep track of your appointments, dates, and other scheduled events with ease. With a digital calendar, you don’t have to worry about making room on your wall or desk for a regular calendar. You can view everything at a glance or with a quick click. As an added benefit, you can view your calendar on the go using your favorite mobile device.
Displaying Your Calendar
With Outlook’s Calendar tool, you can conveniently maintain your calendar on your computer. To get started, click the Calendar icon at the bottom of the Folder pane, as shown in Figure 43.1.

When you switch to Calendar, Outlook presents you with a default view that lays out your digital calendar in an easy-to-read design. Depending on how you want to view your information, Calendar offers several views you can toggle among:
• Day—Displays a single day on the calendar with times listed in hourly increments and subdivided into half-hour increments. (You can change the increments to suit your needs.)
• Work Week—Also displays a week of your calendar, but from Monday through Friday.
• Week—Displays a week view of your calendar, starting with Sunday and ending with Saturday.
• Month—Displays a full month of days.
• Schedule View—Displays your schedule in a horizontal layout, handy for viewing multiple calendars for scheduling meetings with other users.
View modes are available in two places. The Home tab displays the five view modes in the Arrange group (refer to Figure 43.1), whereas the View tab lists them in the Arrangement group. To switch between view modes, click the view you want to display. For example, to see your calendar in Month view, click the Month button.
 Tip
Tip
If you have a different set of days for your workweek instead of the traditional five, you can customize your calendar’s work week display. Click the File tab and select Options to display the Outlook Options dialog box. Next, click the Calendar tab. Under the Work Time heading, choose which days constitute your work week. You can also change the work hours for your Day and Week views, or even change the default first day of the week. After you make your adjustments, click OK to apply the changes.
In addition to the view modes, you can also activate a sneak peek mode and check your calendar from any Outlook module using a pop-up display. To do so, hover your mouse pointer over the Calendar icon located at the bottom of the Folder pane, as shown in Figure 43.2. The sneak peek lets you know if you have any appointments or meetings scheduled for the day, and it clues you into the current date.

Recording Events and Appointments
The true heart of Outlook’s Calendar module is its capability to manage your busy schedule. You can add both events and appointments, and there’s a distinction between the two. Events are all-day activities, whereas appointments earmark both a date and a time on your schedule. You can use a form, which appears as a separate window of tools, options, and fill-in-the-blanks, to include details and specify whether it’s an event or an appointment you’re recording. The form is the same whether you’re creating an event or an appointment, but the outcome differs depending on whether you check one particular box.
Recording Events
It’s incredibly easy to add an event. As mentioned, events are all-day activities, such as a conference, trip, birthday, or anniversary. As such, Outlook displays events a little differently from a scheduled appointment (which occurs at a designated time in the day). In Month view, events appear highlighted in a color bar on the date, whereas in Day, Work, and Work Week view, the event appears at the top of the schedule, also in a color bar. Figure 43.3 shows an example of an event.

The simplest way to record an event is to type it directly on the calendar. To add an event in Month view, click the date on the giant calendar display and type your event title, such as Bob’s Birthday, Sales Conference, or Author Appreciation Day. Press Enter and the event is added.
You can use the same method to add an event in Work Week or Week view, but click the day’s date at the top of the schedule and type the event name, similar to Figure 43.4.

To add an event in Day view, navigate to the date and click the area at the top, just below the day’s date (see Figure 43.5). Type an event name and press Enter.

You can add multiple events to a single day, or make an event span as many days as you need. For example, your sales conference might cover three days of the week, or a vacation might require seven days. If an event requires more details, such as a location or multiple days, you can open the event and add more information.
To utilize the form method of recording an event, double-click the date. If you’re viewing your calendar in Day, Week, or Work Week view, double-click the date at the top of the view, not a time slot in the schedule. By default, the All Day Event check box is already selected for you in the form, as shown in Figure 43.6. This indicates that the item is an event and not an appointment. If you deselect this check box, the item becomes an appointment.

You can tap into additional features and tools in the window’s tabs to customize an event. To fill out the details, click in a form field and type. For example, type a name for the event in the Subject box or a location for the event in the Location box. When you type in a subject, the window’s title bar changes to reflect the event’s name.
If the event spans several days, choose a start and end date. The large notes area lets you jot down any additional notes about the event (such as “Don’t forget to pick up my tux before leaving town for the wedding”). When you finish, click the Save & Close button.
Anytime you want to view information about a particular event, hover your mouse pointer over it to see a quick peek of details, such as whether a reminder is set. (Read more about reminders later in the chapter.) If you click an event, the Appointment tab appears on the Ribbon with tools for setting reminders, recurring status, or tagging the event with priority settings.
Tip
To quickly expand an event from one day to two or more, hover over the left or right edges of the event name in Month, Week, or Work Week view, and then click and drag across the other days you want to include.
You can also use the Event window to remove the event; open the event and click the Delete button on the Event tab to remove it from the calendar. Or, for a quicker delete, right-click the event name and choose Delete.
If you want to create a recurring event—one that happens with regularity, such as a birthday, anniversary, or tax day—you can assign it recurring status using the Event window (see Figure 43.7). With the Event window open, click the Options button on the Event tab and select Recurrence. This opens the Appointment Recurrence dialog box, shown in Figure 43.8.


To change the recurrence pattern, choose how often the event appears on the calendar and then fine-tune the settings based on the type of pattern you choose. For example, if you’re setting a weekly event, such as “Half Price Tuesday” or “Carpool Day,” you can specify on which day of the week the event always occurs. Click OK to save your changes.
Tip
You can also set recurring status using the Appointment tab. Click the event from any calendar view to display the tab. Then click the Recurrence button to open the Appointment Recurrence dialog box.
If you ever need to remove a recurring event, open the Event window again and display the Recurrence dialog box, this time clicking the Remove Recurrence button.
 Note
Note
The Calendar module does not show any holidays. You can add them though, with a few easy steps. Click the File tab and select Options to open the Outlook Options dialog box. Click the Calendar category and scroll down to the Calendar Options group. Click the Add Holidays button. Specify a country and click OK. Outlook then populates your calendar with the appropriate holidays.
Recording Appointments
Appointments in Outlook are any item you add to your calendar that require a designated date and time, such as doctor appointments, lunch dates, meetings, a project deadline, and so forth.
You can use a special form to fill out appointment details and save it to your calendar. To open the Appointment window, click the New Appointment button on the Home tab or press Ctrl+N.
The Appointment window, as illustrated in Figure 43.9, offers the same tools and options as the Event window. If you click the All Day Event check box, the form becomes an Event form, but if the box is unchecked, the window is the Appointment form.

You can fill out as many details about the appointment as you need. For example, click in the Subject box and type a title or description of the appointment. Assigning a title can help you quickly see what type of appointment it is from any of the calendar views. Brief titles work best, such as Staff Meeting or Dentist Appointment. When you type a subject, the window’s title bar changes to reflect the new title.
If your appointment needs to specify a location to help you keep track of where you need to be, click in the Location box and include information such as a conference room number, address, building, restaurant, street, or city.
Next, specify a start and end date and time for the appointment. To change the date, type directly in the fields or click the tiny calendar icon at the end of the box and choose a date from the pop-up calendar. If you already double-clicked the correct date for the appointment, Outlook displays the date in the Start Time and End Time boxes.
You can set both a start time and an end time for the appointment to specify a duration. To change the time, click the time drop-down arrows and choose a time from the list, or just type the time directly into the boxes. By default, time is listed in increments of 30 minutes, so you can set an appointment for 11:30, for example. If you want to use 15-minute increments, type the specific time, such as 11:15. If you’re sharing your calendar information with others, the appointment time appears as “busy” in your schedule.
You can type any notes about the appointment in the wide-open notes area. For example, you might want to jot down items you need to bring to the appointment, such as an insurance card your dental office may require, or information about what you’re going to do at the appointed time.
When you’re finished filling out appointment details, click the Save & Close button. Outlook closes the form and adds the appointment to your calendar, as shown in Figure 43.10. The time span you indicated when setting a start and end time show up as a block of light-blue color.

To revisit the appointment details, double-click the appointment to reopen the form. For even quicker details, you can also hover your mouse pointer over the appointment in your calendar to see a quick peek. Also, when you select an appointment, which just takes a click, Outlook displays an Appointment tab on the Ribbon. This tab is the same as the Appointment tab in the Appointment window. You can use the tools to help you work with the appointment, such as setting a recurrence, tagging it, or setting up a reminder.
You can quickly print your appointment’s details to take with you or hang on a bulletin board for a reminder. Right-click the appointment and choose Quick Print from the pop-up menu.
If you need to move an appointment, you can click and drag its left edge and drop it where you want it in the schedule, whether it’s a new time slot or a new date.
Setting Reminders
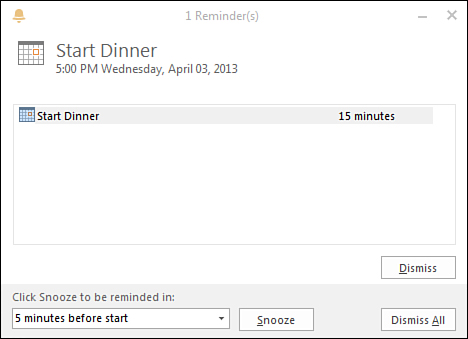
If you need some help remembering appointments and events, you can assign a reminder. When you set a reminder, Outlook displays a pop-up alert box, similar to Figure 43.11, telling you that it’s time for the appointment or event and even plays a special sound. You can set reminders as far out as a week before the appointed date, or you can set a reminder to appear 5 minutes before the appointment. You decide how much lead time you need. The only caveat to reminders is that you need to have Outlook open and running in the background on your computer system; otherwise, you won’t hear or see the reminder alert until the next time you open the Outlook program window.
By default, Outlook automatically adds a 15-minute reminder to your appointments, but no reminder is added to events, so if you want one, you have to add it. Here are several ways to handle reminders:
• To add a reminder from the window, click the Options button and choose when you want to be reminded by clicking the Reminder drop-down arrow and making a selection.
• To add a reminder to an existing appointment or event already on your calendar, click the item to display the Appointment tab on the Ribbon. Next, click the Reminder drop-down arrow and make a selection.
• When the reminder alert appears, you can turn it off by clicking the Dismiss button, or you can put it off for a little longer using the Snooze button (just like the button on your alarm clock). You can even specify when you want to be reminded again.
Setting Up Meetings
Using Outlook’s emailing capabilities and contacts list, you can set up meetings with other people and keep track of who is attending and who is not. You can view other users’ calendars and schedule meetings at the most convenient time for everyone. For example, if you have a sales meeting with Joe on Friday, and you know Joe’s email address or he’s already one of your Outlook contacts, you can create an email invitation to let Joe know about the meeting. A great thing about this is that you can do all of it from within the Calendar module’s screen.
Sending an Invite
To create a meeting and send an invite, you can use the Meeting form, a special window for both emailing a message and scheduling the meeting on your calendar. Figure 43.12 shows an example of the window, which looks like the other windows used to create events and appointments. A meeting is just like an appointment, but it involves more people and emailing features.

To create an invite, follow these steps:
1. On the Home tab, click the New Meeting button.
2. Add the email addresses for the people you want to invite. If they happen to be Outlook contacts, you can click the To button and specify attendees from your address book.
3. Type a title for the meeting in the Subject field.
4. Type a location for the meeting.
5. Indicate a start and end date and time for the meeting.
6. Type your email message text.
7. Click Send.
Outlook sends the email and adds the meeting to your own calendar.
Tracking Invites
You can keep track of people who respond to your meeting request or manage their attendance using the Tracking feature in Calendar. You can find the tool on the Meeting tab, a special tab that appears when you click a meeting on your calendar. The tab offers tools to help you manage the meeting, including adding or removing attendees, canceling the meeting, or following up with additional emails.
To open the Tracking feature, click the Tracking button, as shown in Figure 43.13. You can use the list box area to make changes to the status of your attendees. Click the Response box to display a drop-down menu and choose whether the person has accepted, declined, is tentatively coming, or you’ve received no response (None). The tabs at the bottom of the window also let you see the status for a particular response at a glance.

You can use the tools in the Meeting window’s Tracking display to send out more emails, such as a reminder or date change; you can also cancel the meeting entirely. Here are a few actions you can take:
• To email a particular person in the list, hover the mouse pointer over the person’s name and click the Email icon that appears.
• To email everyone, click the Contact Attendees button on the window’s Meeting tab.
• To cancel the meeting and email everyone, click the Cancel Meeting button on the Meeting tab.
• To invite more attendees, click the Forward button and email others.
• Another way to invite someone else is to type the person’s name at the bottom of the list. Outlook prompts you to save the changes and send the user an invite.
• To view your original invitation, click the Appointment button on the Meeting tab.
To reopen the Meeting window anytime, double-click the scheduled meeting on your calendar.
Tip
If you use Microsoft’s OneNote program, you can create meeting notes and share them with others. Click the Meeting Notes button on the Meeting window’s Meeting tab.
Sharing Your Calendar
The Calendar module offers several ways to share your calendar with others. An obvious way is to email it. You can choose which part of your calendar to include, such as a range of dates, the current date, and so on. Outlook then places the specified calendar portion in an email window, similar to Figure 43.14, which you can then address and add any additional message text. Your calendar appears not only in the message area, but also as a file attachment.
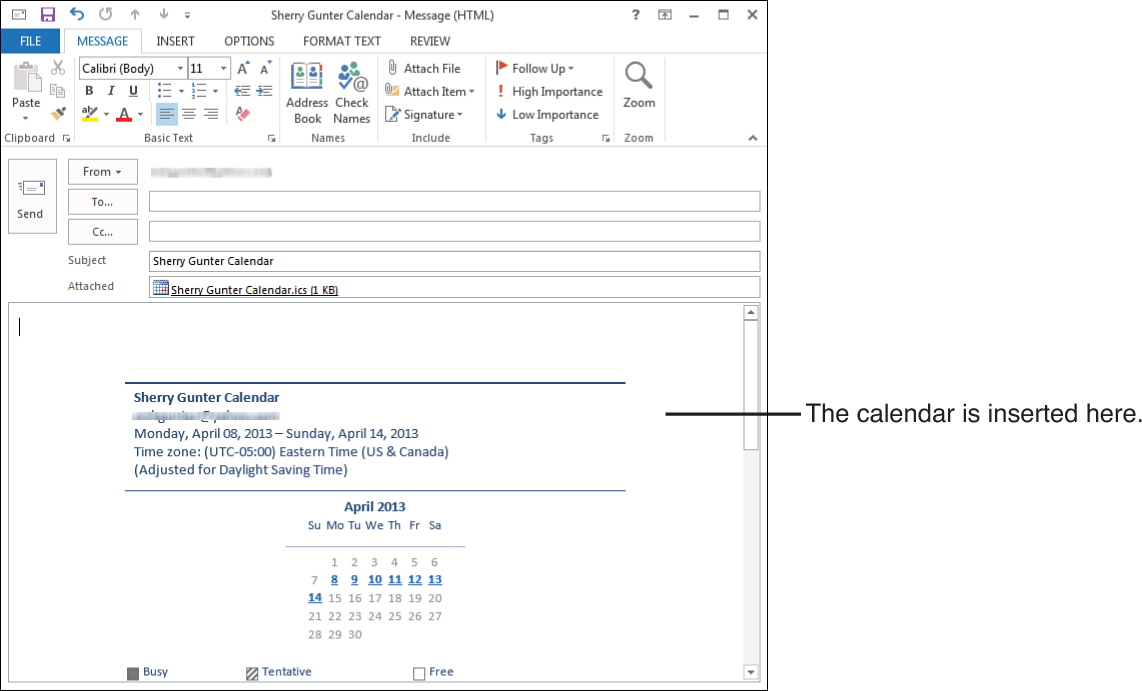
To email your calendar, click the E-mail Calendar button on the Home tab. The Send a Calendar via E-mail dialog box appears, as shown in Figure 43.15. A message window opens with the calendar included. Now you can fill in the rest of the information to create your email message.

To publish your calendar online, you first need to know the WebDAV server address—that’s a server that supports Web Distributed Authoring and Versioning protocols. Check with your server administrator to find out the details, but if you’re good to go, click the Publish Online drop-down arrow on the Home tab and click Publish to WebDAV Server. The Publish Calendar to Custom Server dialog box opens, as shown in Figure 43.16. Type in the web address for the location of the server and choose the date range you want to publish. Click OK to post the calendar online.

You can save your calendar to another folder or drive, or export it as a file. For example, you might save it on a USB flash drive to share it with a colleague. To save your calendar to another location, click the File tab and select Save Calendar to open the Save As dialog box. Navigate to the folder or drive you want to save to and click Save. Calendars are saved in the iCalendar Format (.ics). To export a calendar, click the File tab and select Open & Export. Choose an export action and follow the onscreen prompts to complete the process.