
28. Formatting and Organizing Objects, Slides, and Presentations
After you create a presentation, you most likely will want to modify its appearance. Fortunately, it’s easy to modify slides, objects, and entire presentations in PowerPoint.
PowerPoint offers numerous ways to manage and format slide objects, including several automatic formatting options and the optional use of gridlines and guides. You can also organize entire presentations using tools such as Slide Sorter view.
Manipulating Objects
In PowerPoint, an object refers to any of the components you include on your slides, such as shapes, pictures, text boxes, placeholders, SmartArt, charts, WordArt, and so forth.
You can easily cut, copy, paste, move, and resize PowerPoint objects.
Cutting an Object
To cut a selected object, click the Cut button in the Clipboard group on the Home tab or press Ctrl+X. To cut more than one object, hold down the Shift key while selecting objects, or drag a selection box around all the objects with the mouse.
 Tip
Tip
If you cut something by mistake, click the Undo button to retrieve it.
Copying an Object
To copy a selected object, click the Copy button on the Home tab or press Ctrl+C.
Tip
To copy the attributes of one object and apply them to another object, use the Format Painter button on the Home tab. For example, if you select an object with 3-D effects, click the Format Painter button and then select another object so that the new object gets the same 3-D effects.
 Note
Note
When you copy an object, it displays on PowerPoint’s Clipboard. To view the Clipboard, click the down arrow to the right of the Clipboard group on the Home tab to open the Clipboard pane. You can also select which item to paste on this pane.
Pasting an Object
To paste a cut or copied object, follow these steps:
1. Click the down arrow below the Paste button to open the Paste Options box, as shown in Figure 28.1, where you can preview the appearance of the pasted object on your slide. If you don’t want to preview, click the Paste button directly (or press Ctrl+V) and skip to step 4.

2. Pause your mouse over each option button to preview what the pasted object would look like on your slide before actually pasting it into your presentation. Depending on what you paste and the context in which you paste it, any of the following option buttons could display in the Paste Options box:
• Keep Source Formatting—Format the object as it was formatted in the location from which you copied it. This displays only when your destination slide has a different theme than the source.
• Use Destination Theme—Apply the current theme formatting to the object. This is the default when you paste the object directly.
• Picture—Convert the pasted item to a picture. To select a specific picture format, click the Paste Special link in the Paste Options box and choose a format from the Paste Special dialog box.
• Keep Text Only—Remove all formatting from pasted text. This displays only when you paste text without having a text placeholder open first. PowerPoint creates a placeholder for the text as it pastes it.
3. Click a button in the Paste Options box to paste using the selected paste option.
4. After you paste an object, the Paste Options button displays to its lower-right. If you aren’t satisfied with the initial paste option you selected, you can click this button and select another option.
Tip
If the Paste Options button doesn’t display below a pasted object, verify that this feature is active. To do so, click the File tab, select Options, and go to the Advanced tab on the PowerPoint Options dialog box. Select the Show Paste Options Button When Content Is Pasted check box and click OK.
You can resize an object using resizing handles, which display around an object’s edges when you select it. Figure 28.2 illustrates these handles.

Drag the handles with the mouse to make the object smaller, larger, or a different shape. Notice that depending on which sizing handle you select—a corner or interior handle—you can either enlarge the entire object or change its shape. To resize the object proportionately so that it keeps its shape, press the Shift key and drag a corner handle.
Arranging Objects
If your presentation includes multiple objects, you might need to order, group, align, or rotate them to achieve your desired effect. Using the tools available when you click the Arrange button on the Home tab, you can maintain complete control over the appearance of your presentation objects.
These tools are also available on the contextual Drawing Tools – Format tab that displays when you select an object.
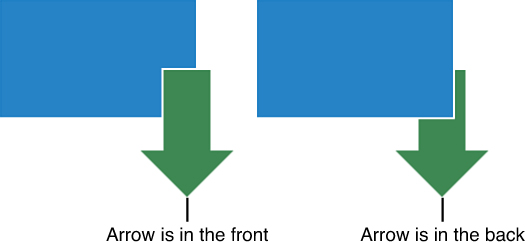
Layering Objects
When you place two or more objects on a slide, you might want part of one to display on top of part of another. This is called layering the objects. You can do this for pure visual effect or to indicate that the overlapping objects have a relationship to each other. PowerPoint lets you control each object’s layering, so if two objects are layered and you want the one below to display on top, you can change it.
To specify an object’s layer order in relation to the other objects on a slide, follow these steps:
1. Select the object whose order you want to arrange. If the object you want to select is hidden from view, press the Tab key to cycle through all objects to find the one you want.
2. On the Home tab, click the Arrange button and choose one of the following options: Bring to Front, Send to Back, Bring Forward (one layer), or Send Backward (one layer).
3. Click the order option you prefer from the menu. PowerPoint applies it to your selected object.
Figure 28.3 shows two sets of layered objects.
Tip
You can also access these layering options if you select an object, right-click, and choose from the submenu options that display.
Grouping Objects
It’s difficult to move several objects on your slide and keep them positioned in proportion to each other. Fortunately, you can group two or more objects so that PowerPoint treats them as one object. For example, if you combine WordArt with a clip art image to create a logo, you can group these objects so that they stay together when you move them. A grouped set of objects moves in unison, always remaining in the same relative positions.
When you format grouped objects, the formatting applies to all the objects. For example, let’s say you have two grouped objects that were originally different colors. If you now recolor them, the new color applies to both objects, not just one. To make individual changes, you have to ungroup the objects.
To group multiple objects on a slide, follow these steps:
1. Select the objects you want to group by pressing the Shift key and clicking individual objects.
2. On the Home tab, click the Arrange button.
3. Select the Group option on the menu that displays.
The object handles now treat the objects as one, as shown in Figure 28.4.

If you don’t like the way you grouped objects and want to remove this grouping, click the Arrange button and select Ungroup from the menu. To revert back to the grouping, click the Arrange button and select Regroup.
Aligning Objects
To align and distribute objects relative to each other or to the slide, follow these steps:
1. Select the objects you want to align by pressing the Shift key and clicking individual objects.
2. On the Home tab, click the Arrange button, and choose Align. A submenu displays.
3. If you want to align or distribute relative to the slide itself, select Align to Slide. If you want to align or distribute relative to the objects, select Align Selected Objects. For example, let’s say you select several objects and want to align them to the left. If you choose Align to Slide, all the objects move to the leftmost edge of the slide. If you choose Align Selected Objects, they align to the left side of the leftmost object.
4. Specify how you want to align the selected objects. You can align to the left, right, center, top, middle, or bottom. Optionally, you can also distribute objects horizontally or vertically, spacing them evenly. PowerPoint aligns your objects based on the direction you specify.
Alternatively, you can also select an object and use the arrow keys to nudge the object in the direction of the arrow.
Rotating and Flipping Objects
Many times when you add a shape or clip art image, it ends up facing the wrong direction. For example, you might add a callout to draw attention to specific text, but the callout is pointing the wrong way.
Tip
To rotate or flip a single object in a group, you need to ungroup the objects first and then regroup the objects when you finish.
To quickly rotate an object, follow these steps:
1. Select the object you want to rotate.
2. Place the mouse pointer over the green rotation handle that displays at the top of the object, as shown in Figure 28.5.

3. Drag this handle to rotate the object. Pressing the Ctrl key while rotating changes the rotation angle 15° at a time.
You can also select rotation options by clicking the Arrange button on the Home tab and selecting Rotate from the menu. From here, you can choose to rotate right or left 90°, flip vertically or horizontally, or open the Format Shape dialog box.
Using the Selection Pane
Using the Selection pane, you can reorder slide objects and specify their visibility. Choosing to hide a specific object is temporary. This action doesn’t delete it from the slide, and you can choose to make it visible again at any time.
To open this pane, click the Selection Pane button on the Drawing Tools – Format tab. Figure 28.6 shows the Selection pane.

Working with Gridlines and Guides
Another way to align slide objects is to use gridlines and guides. These useful tools help you align objects on the slide or place objects in a precise location.
Gridlines display on your slides as small squares. Select the Gridlines check box on the View tab to display gridlines.
Guides divide your slide into quarters. Select the Guides check box on the View tab to display guides.
You can drag a guide to reposition it up, down, left, or right.
If you want to add another guide, right-click your slide and select either Add Vertical Guide or Add Horizontal Guide from the menu.
Note
Gridlines and guides are invisible during a slide show and don’t display on a printed presentation.
Using Smart Guides
By default, PowerPoint uses smart guides to help you align objects. When you start to reposition an object in relation to another object, PowerPoint recognizes this and displays temporary guides to help you align correctly. To deactivate—or activate—this feature, right-click your slide and select Grid and Guides, Smart Guides from the menu.
Using the Grid and Guides Dialog Box
Using the Grid and Guides dialog box offers several advanced alignment features. To open this dialog box, shown in Figure 28.7, right-click your slide and select Grid and Guides from the menu.

In the Grid and Guides dialog box, you can snap objects to a grid, specify grid spacing, activate gridlines, display smart guides, and more.
Organizing Slides
In addition to organizing and formatting slide objects, you can also organize slides. Organizing slides is easy in PowerPoint: Select the slide you want to move and drag it to a new location.
You can organize and rearrange slides using three different PowerPoint views:
• Normal view—A good choice if you know exactly what you want to move and want to do it quickly.
• Slide Sorter view—Suited to major slide reorganizations, this view enables you to see thumbnails of multiple slides on a single page.
• Outline view—Read the content of your slides as you reorganize.
See Chapter 26, “PowerPoint 2013 Basics,” to learn more about PowerPoint views.
Using Slide Sorter View
To open Slide Sorter view, click the Slide Sorter icon on the lower-right corner of the PowerPoint window, or click the Slide Sorter button on the View tab. Figure 28.8 displays Slide Sorter view.

In this view, you see smaller versions of your slides in several rows and columns. By viewing the basic content of each slide, you can more easily rearrange their order.
To move a slide in the Slide Sorter, select it and drag it to a new location. To view a particular slide in more detail, double-click it. To delete a slide in Slide Sorter view, select it and press the Delete key. To select multiple slides to delete, press Ctrl, select the slides, and then press the Delete key.
Copying and Moving Slides from One Presentation to Another
Using the Slide Sorter view, you can copy or move slides from one presentation to another. To do so, follow these steps:
1. Open both the source and destination presentations in Slide Sorter view.
2. On the View tab, click the Arrange All button. PowerPoint displays both presentations in different window panes in Slide Sorter view, as shown in Figure 28.9.

3. To copy a slide, select it and then drag it to the desired location in the other presentation. PowerPoint places the slide in the destination presentation, but it also remains in the source.
4. To move a slide, select it, press Ctrl+X, position the mouse in the new destination location, and press Ctrl+V. The slide is removed from the source presentation and inserted in the destination presentation.
5. To move or copy more than one slide at a time, press Ctrl as you drag slides from the source presentation.
6. If each presentation uses a different theme, the slide changes to the formatting of the new presentation, and the Paste Options button displays. If you want to retain the formatting of the source presentation, click the down arrow to the right of the Paste Options button and choose Keep Source Formatting. To go back to the formatting of the target presentation, choose Use Destination Theme.
 Caution
Although you can combine multiple themes in a single presentation, think carefully before doing so. Combining can make your presentation confusing.
7. To remove the dual-window view, click the Close button in the upper-right corner of the presentation you no longer want to view.
8. Click the Maximize button in the upper-right corner of the presentation you want to keep active.
If more than one presentation is open at a time and each is in a maximized window, you can press Ctrl+F6 to cycle through them. This helps when you want the full-screen view and want to copy/move from one presentation to the next without having to use the Window menu.
Deleting Slides
If you no longer need a slide or make a mistake and want to start again, you can delete it. You can delete slides in Normal view, Outline view, or Slide Sorter view.
To delete a slide, select the slide or slides you want to remove and press the Delete key. To delete multiple consecutive slides, press the Shift key and then select the slides. To delete multiple nonconsecutive slides, hold down the Ctrl key and then select the slides.
Changing Slide Size
In addition to rearranging slides, you can also change slide size. In PowerPoint 2013, the default slide size is widescreen (16:9) to match the dimensions of most computers and projectors. If you prefer, you can change your slide size to the former default (4:3) by clicking the Slide Size button on the Design tab.