
2. Working with Office Applications
Spending some time mastering the basics of Microsoft Office pays off in the long run, particularly if you’re new to Office or could use a refresher.
First, explore how to perform Office’s most common tasks: opening, saving, renaming, closing, deleting, and printing files. Next, explore the Backstage view options for sharing and exporting files. Finally, spend a few minutes customizing Office defaults to suit your own work style and preferences.
Although these tools and options should be familiar if you’re upgrading, Office 2013 does include some changes and new features.
Working with Files
This section applies primarily to Word, Excel, and PowerPoint. Working with files is similar in OneNote, but it doesn’t include the Start screen options. Because the goal of Outlook isn’t to create a file, many of these options don’t apply.
Creating a New File
To create a new file, click the File tab and select New. In the New window, you can create a blank file, select a template, or search online for a template. The exact content of this window varies by application. For example, the New window in Word offers the option to create a blank document or select from one of many templates (see Figure 2.1).

 Note
Note
The Start screen also enables you to create a blank document or choose from a template.
Opening a File
Office offers a variety of ways to open a file, including the following:
• On the Start screen, select one of the files in the Recent list or click the Open Other [file type] link to open the Open dialog box (see Figure 2.2). The exact wording of the Open Other link varies by application, such as Open Other Documents, Open Other Workbooks, or Open Other Presentations. This option isn’t available for OneNote or Outlook.

FIGURE 2.2 The Open dialog box includes many additional features, including file management and search capabilities.
• Press Ctrl+O to open the Open dialog box.
• Click the File tab and select Open to display the Open window where you can open recent files or open files stored on SkyDrive or your computer.
• Double-click the name of an Office file in Windows Explorer.
If you choose a method that displays the Open dialog box, select the file you want and then click the Open button.
Renaming a File
To rename a file, select it in the Open dialog box and perform one of the following actions:
• Press F2.
• Right-click and select Rename from the shortcut menu.
• Click the Organize button and select Rename from the shortcut menu.
• Click the filename, wait a second, and then click it again.
Office converts the filename to an edit box in which you can overwrite the existing name.
1. On the Quick Access Toolbar, click the Save button. Alternatively, press Ctrl+S. If this is the first time you’ve saved the file, the Save As window opens, as shown in Figure 2.3.

2. On the left side of the window, specify where you want to save your file, such as on your computer or on SkyDrive.
3. Click the Browse button to open the Save As dialog box (see Figure 2.4).

 Tip
Tip
Optionally, you can save time by selecting one of the options in the Recent Folders list. If you often save your files to the same folder, pause your mouse over that folder name and click the Pin This Item to the List icon to ensure that this folder is always at the top of the list for easy convenience.
4. Select the folder in which to save your file. Office automatically selects your default folder, but you can change this if you want. You can customize the default folder on the Save tab in the Options dialog box. (Choose Tools, Save Options from the Save As dialog box.)
5. In the File Name field, type a name.
6. Choose the file format from the Save as Type drop-down list. If you want to save as a PDF or XPS document, see “Saving as a PDF or XPS Document,” later in this chapter.
7. Click the Save button to save the file.
Tip
After you save a file for the first time, press Ctrl+S or click the Save button to save new changes without opening the Save As dialog box. If you want to save an existing file to a new location or change its name, click the File tab and select Save As.
Closing a File
At times, you might want to close a file without exiting the application itself. This is particularly useful if you have many files open and want to save memory.
To close an open file, you can do one of the following:
• Click the File tab and select Close. If you haven’t saved your file, Office prompts you to do so. If your file has been saved, Office closes it immediately.
• Click the Close (x) button in the upper-right corner of the screen to close an open file. Note, however, that if this is the only file you have open, this action also closes the application itself.
• Use the shortcut key Ctrl+W.
Deleting a File
If you no longer need an Office file, you can delete it. To delete a file you no longer want, select it in the Open dialog box and press the Delete key on your keyboard. A warning dialog box appears, verifying that you want to delete the file and send it to the Recycle Bin. Click Yes to confirm the deletion.
Printing a File
The Print window in Backstage view enables you to specify print settings as well as preview and print your documents. Click the File tab and select Print, as shown in Figure 2.5.

Before you print, apply any special print settings. The Settings section includes several boxes with drop-down lists where you can specify these options. The text that displays in each box varies depending on the last selection you made.
Select your printer (if it doesn’t display in the Printer section by default), specify the number of copies, and click the Print button.
Note
See Chapter 12, “Printing Documents,” Chapter 22, “Preparing Workbooks for Distribution and Printing,” and Chapter 36, “Creating and Printing Presentation Materials” for more information about application-specific print options in Word, Excel, and PowerPoint.
Sharing Files
Office offers numerous ways to share your documents with others, including several that are new to Office 2013. You find a variety of sharing options in the Share window in Backstage view.
Preparing to Share Files
Before you share an Office file with others or post it online, you should consider doing several things: protect it, inspect it for confidential information, validate its accessibility, and check for compatibility with previous versions.
The Info window in Backstage view enables you to accomplish all these tasks in one place. To open the Info window, click the File tab.
On this window, you can do the following:
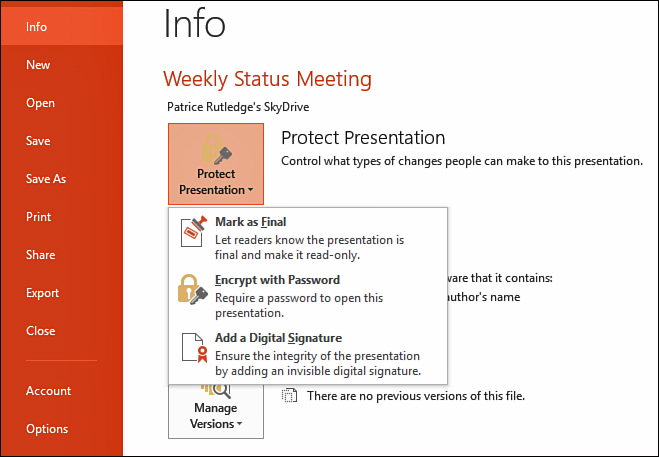
• Protect files—Click the Protect button to open a menu of options, shown in Figure 2.6, for protecting a file. For example, you can apply a password, make it read-only, or apply a digital signature to control access. Whether you choose to protect your Office files depends on the group of people you work with, your need for security, and your audience. Obviously, if you post a document in a public location directed at a wide audience of viewers, you wouldn’t want to protect with a password or otherwise limit access.
• Check your file for issues—Click the Check for Issues button to open a menu of options that enables you to inspect files, check file accessibility, and check file compatibility. For example, you can:
• Inspect a file for hidden data and personal information such as comments, notes, author name, or document properties (see Figure 2.7).

FIGURE 2.7 Use the Document Inspector to find and remove hidden and personal information before sharing.
 Caution
Because you might not be able to undo changes the Document Inspector makes, it’s a good idea to run the Inspector on a copy of your original.
• Review and fix potential accessibility issues based on the comments in the Accessibility Checker pane. For example, the Checker might identify missing alt text or find issues with the reading order of your content, problems that would cause difficulty for someone with a visual impairment who uses a screen reader.
• Check for compatibility issues if you want others to be able to open your files in a previous version of Office. You could lose features that weren’t yet available in that version.
Sharing Files with Others
You can save your Office files to SkyDrive and then invite other people to view, edit, or collaborate on them.
Tip
See Chapter 6, “Using Microsoft Office on the Web and Mobile Devices,” for more information about SkyDrive, Microsoft’s online storage and collaboration solution.
To share a file with others, follow these steps:
1. Click the File tab and select Share.
2. In the Share window, select Invite People to display the Invite People section on the right side of the window (see Figure 2.8).

Note
If you haven’t saved your file to SkyDrive yet, Office prompts you to click the Save to Cloud button to do so.
3. Enter the names or email addresses of the people you want to share with.
4. By default, Office enables the people you share with to edit your files. Select Can View from the drop-down list if you want to restrict this to viewing only.
5. Optionally, select the Require User to Sign In Before Accessing Document if you want to require a sign-in.
6. Click the Share button.
7. Click the Proceed button in the warning dialog box to confirm that you want to share. Office notifies the people about the file you want to share with them.
Note
Co-authoring is an Office feature that enables you to work on the same document simultaneously with other colleagues no matter where they’re located. Co-authoring requires either a SkyDrive account or Microsoft SharePoint. To activate this feature, more than one person needs to open the same file in either SkyDrive or SharePoint.
Sharing via a Link
If you’ve saved your file, you can share it with a link. To create a link, follow these steps:
1. Click the File tab and select Share.
2. In the Share window, select Get a Sharing Link to display the Get a Sharing Link section on the right side of the window (see Figure 2.9).

Caution
The Get a Sharing Link option doesn’t display if you saved your file only to your computer.
3. Click the Create Link button next to either View Link or Edit Link, depending on the rights you want to provide.
4. Copy the link provided and share with the appropriate people.
To disable a link, click the Disable Link button next to the link you no longer want.
Sharing on Social Networks
You can share your online Office documents on social networks such as Facebook, Twitter, and LinkedIn. To share a file on a social network, follow these steps:
1. Click the File tab and select Share.
2. In the Share window, select Post to Social Networks to display the Post to Social Networks section on the right side of the window (see Figure 2.10).

Caution
The Post to Social Networks option doesn’t display if you haven’t saved your file online.
Note
If you haven’t connected with any social networks yet, click the Click Here to Connect to Social Networks link to do so. You’re prompted to log into your Microsoft account and connect with your preferred social sites.
3. Select the check box next to each social site on which you want to share.
4. By default, Office enables the people you share with to view your file, but you can choose Can Edit from the drop-down list if you want to provide editing functionality.
5. Optionally, add a personal message about the file you’re sharing.
6. Click the Post button to post on your selected social sites.
Sharing via Email
Office provides numerous options for sharing your files with others via email. To do so, follow these steps:
1. Click the File tab and select Share.
2. In the Share window, select Email to display the Email section on the right side of the window (see Figure 2.11).

3. Choose from one of the following options: Send as Attachment, Send a Link, Send as PDF, Send as XPS, or Send as Internet Fax. See “Saving as a PDF or XPS Document” later in this chapter for more information about saving in PDF or XPS format.
Exporting Files
In the Export window in Backstage view, you can save a file as a PDF or XPS document as well as change its file type.
Note
The Export window in PowerPoint also includes options to create a video, package your presentation for a CD, or create handouts, all covered in the PowerPoint section of this book. The Export window in OneNote enables you to export pages and sections as well as entire notebooks.
Saving as a PDF or XPS Document
Office enables you to save directly as a PDF or XPS document without requiring an add-in.
Tip
Be sure to save your file before you save as a PDF or XPS documents.
To save as a PDF or XPS, follow these steps:
1. Click the File tab and then click Export to open the Export window (see Figure 2.12).

2. On the left side of the window, select Create PDF/XPS Document.
3. Click the Create PDF/XPS button to open the Publish as PDF or XPS dialog box (see Figure 2.13).

4. Select the folder in which to save your document.
5. In the File Name field, type a name.
6. In the Save as Type drop-down list, select either PDF or XPS Document.
7. Select the Open File After Publishing check box if you want to open your PDF or XPS document after saving.
8. If you want to create a document that’s suitable for both online viewing and printing, select the Standard option button. If you just want people to view it online, select the Minimum Size option button.
9. Optionally, click the Options button if you want to customize your document, such as specifying a specific page range.
10. Click the OK button to return to the Save As dialog box.
11. Click the Publish button to publish your document based on your specifications.
Changing to Another File Type
If you save your file in one format and want to convert it to another, you can easily do so. For example, you could convert a PowerPoint slide to an image, a Word document to a text file, or a file to a previous version of Office.
To change file type, follow these steps:
1. Click the File tab and select Export to open the Export window (refer to Figure 2.12).
2. On the left side of the window, select Change File Type.
3. On the right side of the window, select one of the available file types, which vary by application (see Figure 2.14).

4. Scroll down to the bottom of the list and click the Save As button to open the Save As dialog box (refer to Figure 2.4).
5. Enter a new filename, if desired.
6. Click the Save button. Office saves your file in the format you specified.
Customizing Office
Although you can use Office as is without any customization, it’s worthwhile to review Office’s customization options at least once to verify the default settings suit your needs. In this section, you find out how to customize Office, including the Quick Access Toolbar and Ribbon tabs.
Customizing the Quick Access Toolbar
The Quick Access Toolbar is a customizable toolbar that contains popular commands you might use regardless of which tab currently displays. By default, the Save, Undo, and Repeat buttons are available from the Quick Access Toolbar, shown in Figure 2.15.

Moving the Quick Access Toolbar
The toolbar’s default location is in the upper-left corner of the screen. If you prefer, you can move the toolbar to just below the Ribbon. To move the toolbar, click the down arrow to its right, next to the Repeat button, and select Show Below the Ribbon from the menu that displays.
Note
There are only two options for placing the Quick Access Toolbar. You can’t move it to any other location on your screen.
Adding and Removing Quick Access Toolbar Commands
To quickly add the most popular commands to the toolbar, click the down arrow to its right and choose from the available options, including New, Open, Quick Print, and more.
A check mark is placed before each active command on the toolbar, such as the default commands Save, Undo, and Repeat. To add another command from this menu to the toolbar, click it. To remove one of these commands from the toolbar, click it again and the check mark disappears.
To add a command button from another tab to the toolbar, right-click it on the Ribbon tab and select Add to Quick Access Toolbar from the menu that displays. For example, let’s say you want to add the New Slide button to the Quick Access Toolbar. To do so, go to the Home tab, right-click the New Slide button, and select Add to Quick Access Toolbar. The New Slide button is placed on the Quick Access Toolbar to the right of the Repeat button.
To remove a button, right-click it on the toolbar and choose Remove from Quick Access Toolbar from the menu that displays.
Tip
You can perform advanced customizations to the Quick Access Toolbar in the Options dialog box, described in the next section of this chapter.
Customizing Office Options
Office offers numerous customization options in the Options dialog box. The name of this dialog box varies by application, such as the Word Options dialog box, Excel Options dialog box, and so forth. Although many of the customization options are similar, others are specific to a particular application. Changes you make in the Options dialog box become your new default settings until you change them again.
To access the Options dialog box, click the File tab and choose Options. Figure 2.16 shows the Word Options dialog box.

The Options dialog box includes seveal tabs. The tabs cmmon to all Office applications are:
• General—Customize the most popular Office options, including the mini toolbar, Live Preview, ScreenTip styles, the default Ofice background and theme, startup options, and your user name.
• Proofing—Specify AutoCorrect and spelling options. AutoCorrect is a useful feature that can help save time and automatically correct mistakes you frequently make. By default, Office includes AutoCorrect substitutions for common misspellings, such as correcting “teh to “the,” but you can also add your own.
• Save—Specify save options including automatic saves and backups, default file format, default local file location, and more. This tab is called Save & Backup in OneNote.
• Language—Select languages for editing, display, help, and ScreenTips. These options are most useful if you plan to create documents in a language other than English or want to enable a different version of English, such as English for the UK or Canada if your default is the United States.
• Advanced—Specify advanced options for editing, printing, and formatting.
• Customize Ribbon—Customize the Ribbon by adding and removing tab commands. Figure 2.17 shows the Customize Ribbon tab.

• Quick Access Toolbar—Perform advanced customizations to the Quick Access Toolbar, such as adding commands not accessible from the toolbar and rearranging the order of toolbar buttons.
• Add-Ins—View and manage Office add-ins, which offer supplemental features that enhance your Office experience. You can also download add-ins from the Microsoft Download Center (www.microsoft.com/downloads). Go to the Add-Ins tab on the Ribbon to access the features of the add-ins you’ve activated.
• Trust Center—Specify security and privacy settings.
Note
Depending on the application you’re using, the Options dialog box might include other tabs. For example, Word and OneNote include a Display tab for display options. Excel offers the Formulas tab where you can customize how Excel handles formulas. Outlook offers several additional tabs for customizing its specific features: Mail, Calendar, People, Tasks, and Search.
Setting File Properties
As you create and modify your files, you automatically change many of their properties. To view and modify properties, click the File tab to open Backstage view. On the right side of the Info window, you can view basic details about your file properties. To view more information or edit properties, click the Properties button (it’s just below the thumbnail image) and select Show Document Panel from the menu. Office opens the Document Properties dialog box.
In this dialog box, the name of the file author displays by default. (Change this by clicking the File tab, selecting Options, and entering a new user name.) You can also optionally enter a title, subject, keywords, category, status, and comments.
Tip
To remove this data from a file before sharing, use the Document Inspector (File tab, Info, Check for Issues).
For more options, click the down arrow to the right of Properties and choose Advanced Properties from the menu. A dialog box with the name of your file appears. This dialog box enables you to specify file details, enter a custom summary, display detailed statistics, and create custom properties.