
6. Using Microsoft Office on the Web and Mobile Devices
Even if you’re away from the computer where you installed Office 2013—or away from any computer, for that matter—you can access your Office documents. In this chapter, you find out how to access Office on the Web and from mobile devices. You also discover how to make the most of Office’s integration with SkyDrive and Office Web Apps.
Using SkyDrive
By default, you can store and share your Office files on SkyDrive, Microsoft’s online storage solution. SkyDrive offers several gigabytes of free online storage that you can use to collaborate with colleagues anywhere in the world using a PC, Mac, or mobile device (such as a smartphone, iPad, or other tablet). SkyDrive requires a free Microsoft account to access. If you have an existing account with another Microsoft application such as Hotmail or Messenger, you already have an account. If you don’t, you can sign up for a free account when you access SkyDrive.
 Caution
Because SkyDrive is a web-based application, be aware that it could change or include new features in the future.
 Note
Note
You can also share Office files on SharePoint. Because installing and deploying SharePoint is normally the domain of a corporate information technology (IT) department, it’s beyond the scope of this book. To learn more about SharePoint, go to http://sharepoint.microsoft.com.
Getting Started with SkyDrive
To log in to SkyDrive, go to http://skydrive.com (see Figure 6.1) and enter the username and password for your Microsoft account. If you don’t have a Microsoft account, sign up for a free account by clicking the Sign Up Now link.

On SkyDrive, shown in Figure 6.2, you can perform the following tasks:

• Create new folders by clicking the Create button and selecting Folder from the menu. You can share folders with everyone (a public folder), only people in your network, or select people you have provided access to. Alternatively, you can make your folder private so that only you can access it.
• Add files to your folders by clicking the Upload button. From here, you can browse your computer and select the files you want to upload. You can upload files up to 300MB on SkyDrive.com or up to 2GB from the SkyDrive app that you install on your computer. See “Uploading Files to SkyDrive,” later in this chapter, for more information.
• Open individual files by clicking a folder icon and then clicking the file’s icon.
• Manage an individual file by right-clicking it and selecting a menu option, such as Sharing, Embed, Rename, Delete, Move To, and so forth.
• Create a new file by clicking the Create button and selecting the type of file you want to create. See “Creating a New File Using Office Web Apps” later in this chapter.
• Share folders and files by right-clicking them and selecting Sharing from the menu. From here, you can send a link by email, share on social sites such as Facebook and Twitter, and share a link that enables others to view or edit your content.
• Create groups of people to share and collaborate with by clicking the Groups link.
• Increase your storage capacity by clicking the Manage Storage link in the lower-left corner and choosing a paid storage plan.
• Get free SkyDrive apps by clicking the Get SkyDrive Apps link in the lower-left corner. Options include a Windows desktop app as well as apps for the Windows phone, iPhone, iPad, or an Android device. See “Using SkyDrive Mobile Apps” later in this chapter for more information.
 Tip
Tip
This chapter covers just a subset of what you can do on SkyDrive. For more details, go to http://windows.microsoft.com/en-US/skydrive/help-center.
Uploading Files to SkyDrive
Although you can save your Office files to SkyDrive by default or in the Save As window (refer to Chapter 2, “Working with Office Applications,” for a reminder on how to do this), you can also upload them manually.
Tip
Adding files to SkyDrive isn’t limited to those you create in Office. You can also store any other files on SkyDrive, such as photos, PDFs, and so forth.
To upload an existing file to SkyDrive, follow these steps:
1. In the SkyDrive main window (refer to Figure 6.2), select the folder where you want to store your file.
2. Click the Upload button.
3. Navigate to the file you want to upload and then click the Open button. SkyDrive uploads the file to the selected folder.
Using SkyDrive Mobile Apps
If you want to access SkyDrive from your mobile device, Microsoft offers three mobile apps that enable you to view, share, and upload files on the go. These include
• SkyDrive for Windows Phone (http://bit.ly/WindowsPhoneSkyDrive)
• SkyDrive for iPhone, iPod touch, and iPad (http://bit.ly/iPhoneSkyDrive)
• SkyDrive for Android (http://bit.ly/AndroidSkyDrive)
Because the URLs to these SkyDrive apps are lengthy, this section offers shortened Bit.ly links for your convenience.
Using Office Web Apps
Microsoft Office offers web-based versions of its most popular applications, including PowerPoint, Word, Excel, and OneNote. To use Office Web Apps, you need either Microsoft SharePoint (primarily for use in large organizations) or a SkyDrive account (for use by anyone with web access).
With Office Web Apps, you can view and edit Office documents from any computer or mobile device. It’s important to note, however, that the app’s editing features comprise a subset of the features available in the desktop version of Office. You should plan to perform only basic edits in the Office Web Apps.
Note
This section focuses on accessing Office Web Apps on SkyDrive. Installing and deploying SharePoint is normally the domain of a corporate IT department, and someone from that department would set up your access rights via SharePoint.
Creating a New File Using Office Web Apps
You can create Microsoft Office files directly in Office Web Apps, including the following: Word documents, Excel workbooks, PowerPoint presentations, OneNote notebooks, and Excel surveys. You can edit these files in the app or download them later for use in the desktop version of Office.
To create a new file, follow these steps:
1. In the SkyDrive main window (refer to Figure 6.2), select the folder where you want to store the file you create.
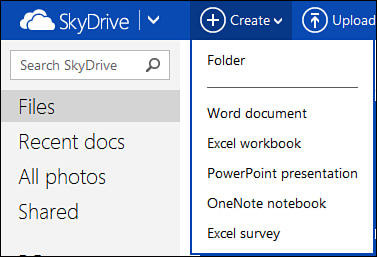
2. Click the Create button and select the type of file you want to create, as shown in Figure 6.3.
3. Enter a filename and then click the Create button, as shown in Figure 6.4.

The relevant Web App opens in edit mode, where you can add, edit, and format content. See “Editing Files in Office Web Apps,” later in this chapter, for more information.
Exploring Office Web Apps
The menu options available in each Web App vary. These include:
• Excel Web App—File, Home, Insert, View, Open in Excel
• OneNote Web App—File, Home, Insert, View, Open in OneNote.
• PowerPoint Web App—File, Home, Insert, Design, Animations, Transitions, View, Open in PowerPoint
• Word Web App—File, Edit Document, Share, Find, Comments
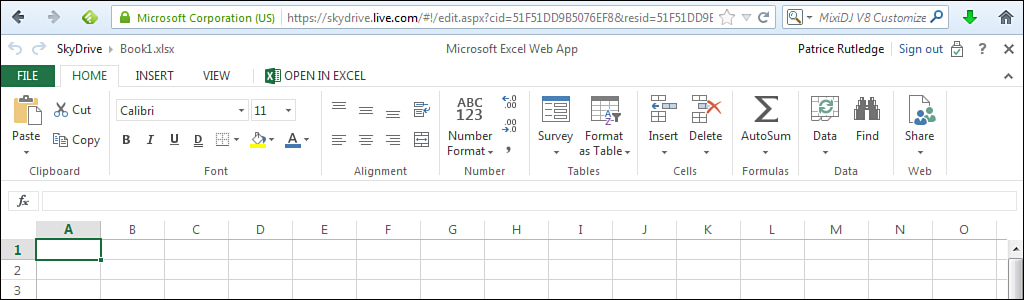
Figure 6.5 displays a sample Web App, the Excel Web App.
Tip
Clicking the File tab opens Backstage view.
Note
Word is the only Web App that doesn’t have an option to return to the desktop version on the main menu. To do so, select Edit in Word from the Edit Document menu. To edit in the Web App, select Edit in Word Web App from the Edit Document menu. The Web App opens with new menu options: File, Home, Insert, Page Layout, View, and Open in Word.
To return to SkyDrive, click the SkyDrive link in the upper-left corner of the screen.
Editing Files in Office Web Apps
You can edit any Office file that you create or store in SkyDrive. To edit a file, click it. The selected file opens in its associated Web App. Figure 6.6 provides an example of editing a Word document in the Word Web App.
