
52. Working with Views
Outlook contains a lot of data, including all your email, contacts, appointments, and tasks—often several years’ worth of data. If you send and receive a lot of email, you could have thousands of messages in your Inbox to sort through. Views can help you manage your email, calendar, and contacts, making it easier to find the information you need. You can use Outlook’s default views or create your own custom views, with conditional formatting to color code items or filters to show only the item you want to see.
Managing Views
The View tab in Outlook 2013, shown in Figure 52.1, makes it easy to select a view and to create your own customized views.

FIGURE 52.1 The View tab has the commands you need to change the view and arrangement of your email messages.
Changing Views
Changing the view in Outlook is simple: On the View tab, click the Change View button and select a new view from the menu (see Figure 52.2).

Outlook includes several predefined views for each folder type, such as the monthly calendar view for the calendar folders and the business card view for the contacts folders. One or more list views are available for each folder type.
Items in a list view can be grouped together by the category, date, subject, or several other fields. Outlook 2013 refers to this as arrangement. The fields you can arrange by vary with the folder type, but you have category and date arrangements available in each folder type (see Figure 52.3).

Applying Views to Folders
After you change a view on one folder, you can apply the view to many other folders at once. You need to view the folder whose view you want to apply to other folders.
To apply views to any or all folders of the same folder type, follow these steps:
1. Open the folder whose view you want to apply to other folders.
2. On the View tab, click the Change View button.
3. Select Apply View to Other Folders.
4. In the Apply View dialog box, select the folders you want to apply the view to.
5. Select the top-level folders and select the Apply View to Subfolders check box to apply the view to all folders of that type within your mailbox or data file.
6. Click OK when you are finished selecting folders. This applies the current view to all the selected folders (see Figure 52.4).


When you use a list view, if you press and hold Shift as you click field names, you can sort by multiple fields.
Resetting Views
Although a rare occurrence, occasionally one or more views become corrupt and prevent Outlook from displaying the folder contents. To fix it, press the Reset View button on the View tab, as shown in Figure 52.5.

Copying Views
Imagine this scenario: You spent an hour creating a number of conditional formatting rules in one of Outlook’s default views. Because Outlook does not offer an easy way to lock a view, you accidently reset the view and lost all your hard work.
Although you can’t lock views to prevent changes, you can make copies of custom views to use as backups if the original is lost or changed.
Create a copy of the current view from the View tab by clicking the Change View button and selecting Save Current View as a New View.
If you want to copy other views, select Manage Views and use the Copy button in the Manage All Views dialog box to create a copy of the view you select.
Creating Custom Views
You can use customized views to show or hide Outlook items meeting certain conditions. You can use custom views to filter contacts before doing a mail merge. If you use the same search queries over and over, you can use a custom view as a more permanent instant search.
Views offer seven areas you can customize:
• Columns—Add the fields you want to see in your view.
• Group By—The default setting is to Automatically Group According to Arrangement.
• Sort—Change the sort order of your Outlook items.
• Filter—Create filters to show or hide Outlook items. Choose from preselected options or use the Advanced tab (and Structured Query Language (SQL) tab, when available) to create your own filters using any available field.
• Other Settings—The options available in Other Settings depend on which folder you view. Use this dialog box to change fonts and customize your layout.
• Conditional Formatting—Conditional formatting changes the color or font of an item in List view when the item meets the conditions in the conditional formatting rule. Not all views support conditional formatting.
• Format Columns—Use this to change the format used in columns containing dates or numbers or to change Yes/No fields to check boxes or words.
To create a custom view, you need to switch to the View tab. Click View Settings to customize the current view or click Change View, Manage Views to create a new custom view.
To create a new custom view, follow these steps:
1. On the View tab, click the Change View button.
2. Select Manage Views.
3. Click New.
4. Enter a name for your view.
5. Select the type of view.
6. Select who can see the view.
7. Click OK.
8. In the Advanced View Settings dialog box, select the Columns (fields) to use in the view (see Figure 52.6).

9. Configure the other options, including filters and conditional formatting.
10. Click OK to close the Advanced View Settings dialog box.
11. Click OK to close the Manage All Views dialog box.
Using Conditional Formatting
Use conditional formatting to format messages or other Outlook items that meet specific conditions. For example, messages from your boss can be shown in the message list with a larger red font, and messages from friends can use a smaller purple font (see Figure 52.7).

Conditional formatting rules are part of a view; if you change the view, you lose the conditional formatting rules.
 Note
Note
Outlook includes default conditional formatting rules for read, unread, expired, and overdue messages. The formatting can be changed, but the conditions cannot be changed.
To create a conditional formatting view, follow these steps:
1. On the View tab, click the View Settings button.
2. In the Advanced View Settings dialog box, click the Conditional Formatting button.
3. Click Add to create a new Conditional Formatting rule.
4. Enter a name for the rule (see Figure 52.8).
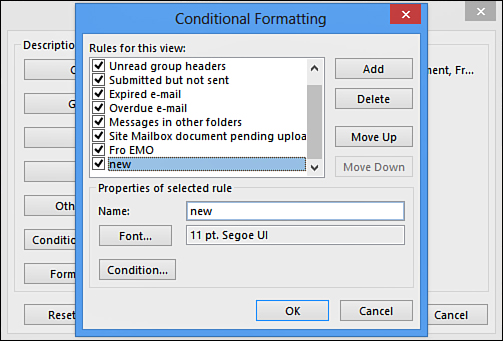
5. Click the Font button to open the Font dialog box. Select a color, font, and font size and click OK to close.
6. Click the Condition button to open the Filter dialog box. Create your filter and click OK to close.
7. Click OK to close the Conditional Formatting dialog box.
8. Click OK to close the Advanced View Settings dialog box.
Note
To create a filter for an email address or part of an address, use the From field on the Messages tab. To use the display name, use the Advanced tab and select the From field from the list of fields.