
Scoring Points
I thought about not covering points in this book, but I didn't want you complaining that AutoCAD 2012 For Dummies is pointless.
 The word point describes two different things in AutoCAD:
- A location in the drawing that you specify (by typing coordinates or clicking with the mouse)
- An object that you draw with the POINT command
Throughout this chapter and most of the book, I tell you to specify points — that's the location meaning. This section tells you how to draw point objects.
A point object in AutoCAD can serve two purposes:
- Points often identify specific locations in your drawing to other people who look at the drawing. A point can be something that displays on the screen, either as a tiny dot or as another symbol, such as a cross with a circle around it.
- You can use points as precise object snap locations. Think of them as construction points. For example, when you're laying out a new building, you might draw point objects at some of the engineering survey points and then snap to those points as you sketch the building's shape with the PLINE command. You use the Node Object Snap mode to snap to AutoCAD point objects.
What makes AutoCAD point objects complicated is their almost limitless range of display options, provided to accommodate the two different kinds of purposes just described (and possibly some others that I haven't figured out yet). You use the Point Style dialog box, as shown in Figure 9-7, to specify how points should look in the current drawing.
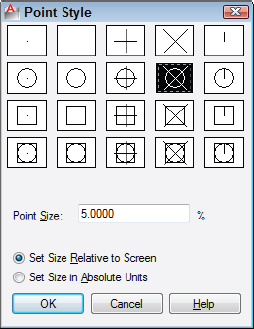
Figure 9-7: The Point Style dialog box controls the way point objects appear on-screen.
The Point Style dialog box can be found on the Home tab's Utilities panel slideout, or by typing its command name — which happens to be about the least intuitive command name in all of AutoCAD: DDPTYPE (pronounced ddptype). The top portion of the dialog box shows the available point display styles. Most of the choices do pretty much the same thing. Just click one of the squares that says, “Hey, that's a good point!” to you.
The first choice, a single-pixel dot, is hard to see on the screen, and the second choice, invisible (a stealth point?), is impossible to see. Avoid these choices if you want your point objects to show up on the screen and on plots. The single-pixel dot, which is the default display style, works well if you use point objects as object snap locations and don't want obtrusive points on your plots.
The remaining settings in the Point Style dialog box control the size at which points appear on the screen at different zoom magnifications. The default settings often work fine, but if you're not satisfied with them, click the Help button in the dialog box to find out how to change them.
![]() After you specify the point style, placing points on-screen is easy. The following example shows you how; just type POINT and press Enter.
After you specify the point style, placing points on-screen is easy. The following example shows you how; just type POINT and press Enter.
Command: POINT
Current point modes: PDMODE=0 PDSIZE=0.0000
Specify a point: pick or type the coordinates of a location
            in the drawing
 The PDMODE and PDSIZE items listed in the command window are system variables that correspond to the point display mode and display size options in the Point Style dialog box. If you want to know exactly how the system variables correspond to the dialog box choices, you have all the makings of a successful CAD nerd. Click the Help button in the Point Style dialog box to find out more (about the system variables — not about yourself).