
Using the Pack and Go Wizard
The Pack and Go Wizard enables you to package your presentation for delivery on another computer. You can also simply copy your presentation to a disk or move it to a network location and then present it on another computer (if you're sure that the other computer has the same version of PowerPoint and the same fonts as your original computer). But if you're not sure, the Pack and Go Wizard can verify that you have everything you need.
Choose File, Pack and Go to open the Pack and Go Wizard, shown in Figure 7.25.
Figure 7.25. With the Pack and Go Wizard, you can deliver your presentation on another computer.

Click the Next button to continue to the next step of the wizard (see Figure 7.26).
Figure 7.26. You can package the active presentation or choose another.

Specify whether you want to package the Active Presentation or another presentation.
If you select Other Presentation(s), you can enter its name in the edit box or click the Browse button to locate it in the Select a Presentation to Package dialog box (see Figure 7.27).
Figure 7.27. Choose the presentation you want to package in this dialog box.
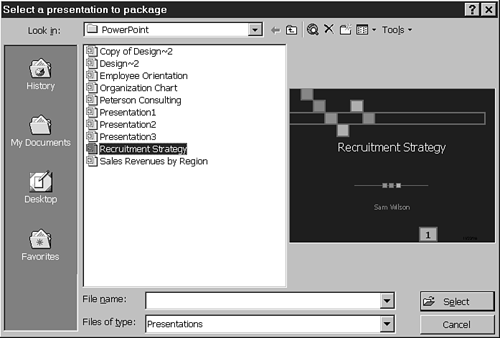
If you use the Select a Presentation to Package dialog box to locate your presentation, choose it and click the Select button to return to the wizard. The path name you selected displays in the edit box.
Click Next to continue to the next step, shown in Figure 7.28.
Figure 7.28. Save the file to any drive you specify.

Specify where to save the packaged presentation. Options include drive A:, drive B:, or another drive.
Caution
The Pack and Go Wizard compresses numerous additional files with your presentation. If the final presentation package is too large for a single disk, you'll receive a message prompting you to insert additional disks.
Tip
If you want to save on another drive—one on a network, for example—you can click the Browse button and choose this drive from the Specify Directory dialog box.
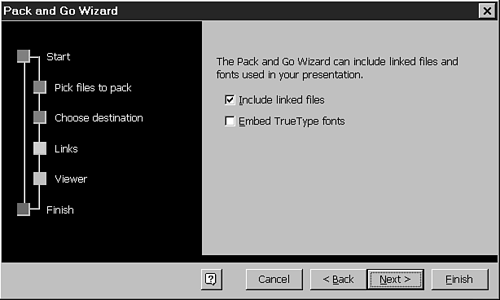
Click Next again to continue (see Figure 7.29).
Indicate whether you want to Include Linked Files and to Embed TrueType Fonts. Choosing both these options ensures that all external clip art images, media clips, sounds, and special fonts are included in the package.
Tip
You can embed TrueType fonts that come with Windows. You can embed other TrueType fonts that you install only if they aren't license- or copyright-restricted. You'll receive an error message if you try to embed a restricted font. To embed fonts directly in a presentation before using the Pack and Go Wizard, choose File, Save As and then choose Tools, Embed TrueType Fonts from the Save As dialog box.
Figure 7.29. Include linked files and fonts to form a complete package.
Caution
Embedding fonts makes the file you're saving larger.
Click Next to continue to the final step, as shown in Figure 7.30.
Figure 7.30. You can also include the PowerPoint Viewer.
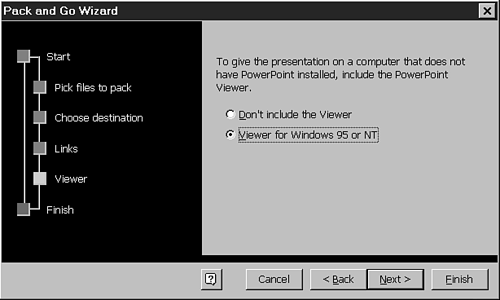
If you're going to present on a computer that doesn't have PowerPoint installed, you can include the PowerPoint Viewer within the package. Choose either Don't Include the Viewer or Viewer for Windows 95 or NT, as appropriate.
→ To learn what this viewer is and how it works, see "Using the PowerPoint Viewer,"
Click Next to advance to the summary step (see Figure 7.31).
Figure 7.31. The final step summarizes your actions.
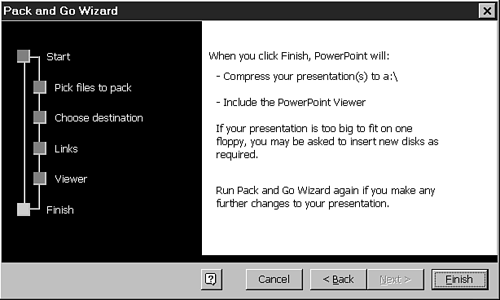
This step summarizes what the wizard will do, such as compress the files to a specific drive and potentially include the PowerPoint Viewer. Click Finish to complete.
PowerPoint compresses your file to its target destination in a file called PRES0.PPZ. It also includes an application file called PNGSETUP.EXE. When you're ready to deliver your presentation on the new computer, run PNGSETUP.EXE, which extracts the presentation and runs it.