Creating a Macro
It's as though you've turned on a video camera that watches your keystrokes, mouse movements, and command selections—the macro recorder notes every move you make and converts your actions to programming code. After you name your macro and perform all the steps you want to automate, you stop the recorder, and by using the name you've given the macro, you can run it at any time. A macro enables you to perform a virtually unlimited series of steps in just seconds.
Note
In earlier versions of Office, the Word, Excel, and PowerPoint programs didn't have features such as AutoCorrect and AutoText. Before these features existed, users created macros to correct common misspellings and turn abbreviations into words, phrases, and paragraphs. As Office evolves, the number of common tasks you'll need to automate yourself will continue to decrease.
Recording a Macro
Before you begin to record a macro, do some planning. Think about where you are in the process of developing or running a presentation when the macro you're about to create is invoked. What situation must exist for the macro to be successful? If the macro formats existing slide content, the content must be displayed and selected before the macro is run. If the macro runs a slide show, the presentation must be placed in the same folder where the macro was recorded. In short, set the stage for your macro to begin, and record it only when the scenario is appropriate.
After you set the stage, record your macro by following these steps:
In the Record Macro dialog box (see Figure 19.1), enter a macro name to replace the default name. Your macro's name may not contain any spaces.
Figure 19.1. Give your macro a short, yet descriptive, name.

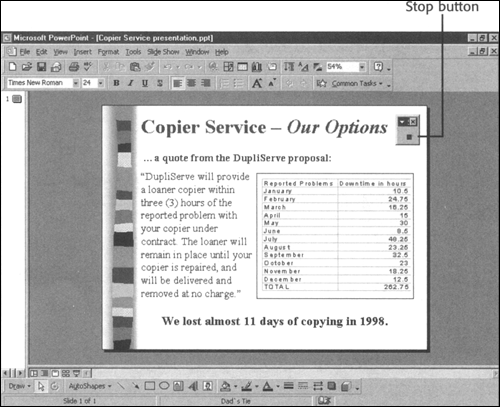
Click OK. A floating Stop button appears onscreen (see Figure 19.2).
Figure 19.2. As needed, you can move the floating Stop button out of the way by dragging its title bar.

Perform the steps you want to record, using the mouse or keyboard to issue commands.
When your steps are complete and you reach the end of the procedure you want to automate, click the Stop button on the floating toolbar.
Tip
If your macro name is more than one word, use the underscore to separate the words—don't use spaces.
Caution
Try to test your macros immediately, especially if you've developed them for others to use. This will prevent any unpleasant surprises when you or another user attempts to use the macro, and allows you to edit it as needed while the procedures are fresh in your mind. The process of running a macro is discussed later in this chapter.
Creating a Macro in the Visual Basic Editor
If you're familiar with VBA (Visual Basic for Applications), you can build a macro without recording your steps as described in the previous section of this chapter. Instead, you can type the macro programming code directly into an editing window provided by Office 2000's Visual Basic Editor (see Figure 19.3).
Figure 19.3. Even a novice VBA user can learn a lot from building and editing macro code in this window.

To enter the editor, select Tools, Macro, highlight the macro name, and click Edit. The editor window consists of three separate windows, each designed to assist you in the creation and editing of a macro:
Project The project window shows a hierarchical tree, displaying the various modules of your macro. A simple macro will probably only consist of one module.
Properties This window again lists the modules involved in the project, but in this window, they're listed alphabetically or by category.
Module The macro code appears in this central window. Type new or edit existing VBA code in this window.
Figure 19.4 shows the Module window with the parts of a simple formatting macro identified.
To create a macro in the Visual Basic Editor Window, follow these steps:
Choose Tools, Macro, Visual Basic Editor.
Click inside the Module window to make it active.
As needed, choose Insert, Module. This creates a blank module for you to begin writing your code (see Figure 19.5).
Type Sub followed by the name of your macro and press Enter. Your End Sub statement is added automatically (see Figure 19.6).
Figure 19.4. A knowledge of VBA is required for building a macro from scratch in the Visual Basic Editor window.

Figure 19.5. The Visual Basic Editor opens with a blank module, ready for you to begin creating your macro.

Figure 19.6. If the name of your macro includes spaces, use the underscore character to represent them, as in Format_Title.

Type your lines of code for the steps your macro should perform.
Choose File, Close and Return to Microsoft PowerPoint.
Note
If you want to learn more about writing Visual Basic code or using VBA, we suggest Sams Teach Yourself Visual Basic for Applications in 24 Hours.
