
Creating and Editing Web Scripts
The Microsoft Development Environment is a powerful new tool for HTML and Web Script editing that provides a high level of functionality and ease of use for the experienced developer as well as the novice. Please note that this chapter is not intended to teach you the VBScript or JavaScript languages, and assumes you already possess some prior knowledge of both scripting and HTML.
The Microsoft Script Editor gives you the capability to view and edit the HTML files you generate when saving your presentation as a Web page. From here you can add scripts, whether they are VBScript or JavaScript.
Thanks to the comprehensive Document Object Model (DOM) supported by Microsoft products, with Script Editor you can create event handlers for virtually any element in a PowerPoint presentation. Event handlers are scripts that run in response to actions taken by the user, such as mouse-clicks or the browser's loading of the document.
Editing features are not limited to event handlers. The Microsoft Development Environment can also be used to create independent blocks of script to contain any script you choose. Refer to the Troubleshooting section at the end of this chapter for tips to avoid common scripting errors.
Caution
Use the Script editor to edit only .htm or .asp files. If you edit other files (such as .doc files) in the Script Editor, ID parameters, <SPAN> and <DIV> tags, and some VALUE parameters may be changed when you save or refresh the file.
From PowerPoint you enter the MS Development Environment by following these steps:
Name your file and select a folder in which to save it.
Click Save.
With your presentation onscreen, choose Tools, Macros, Microsoft Script Editor. This opens the Microsoft Development Environment, as shown in Figure 16.1.

The Web page you are viewing in the Script Editor is actually a separate copy of your document. If you make changes to this copy of the Web page while in the Script Editor, the changes are out of sync with the copy of your Web page in PowerPoint. Any changes made to the presentation in PowerPoint while the Script Editor is open are out of sync, as well. To update the unchanged copy of your Web page with the changes you made, be sure to click Refresh on the Refresh toolbar when you return to the unchanged copy.
Scripting in the Microsoft Development Environment
The Microsoft Development Environment consists of four primary windows for working with Web scripts: The Script Outline, Source view, Project Explorer, and Properties windows.
The Script Outline window uses a hierarchy tree similar to that seen in Windows Explorer to represent the scripts within a document. The Source view window is the repository of the hard code for the presentation you're working with. Like the Script Outline window, Project Explorer uses the same tree metaphor to display the associated files in a presentation. The Properties window is where certain HTML and scripting attributes are set.
Script Outline Window
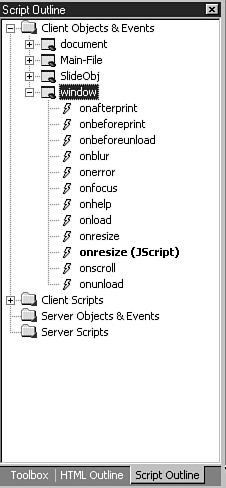
The Script Outline window provides a graphical display of the object model for your presentation (see Figure 16.2). From here, you can
Display a tree view of all elements in your presentation that have already had their ID or NAME attributes set
Display the events for each element
Quickly navigate to any script in the page
Generate new event handlers for any element in the presentation
Figure 16.2. The Script Outline window is broken down into folders, or nodes, representing the object model of the open file.
Note
The Script Outline does not include elements that are added to a page using an INCLUDE file.
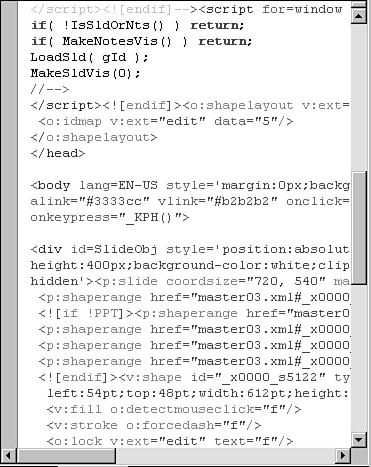
The Source View Window
The Source view window (see Figure 16.3) enables you to view and edit scripts in the page. Source view is designed for working with the raw code of a Web document, allowing for more precise control over the attributes in a given page. Source view allows you to switch between visual and text representation of all controls on the page using the Design and Source tabs.
Figure 16.3. Edit and view code in the Source view window.
Note
Design view is not available for pages created in Microsoft PowerPoint or any other Office application. You can use Source view to modify the script, but design changes must be made in the Microsoft Office program. Design view is available only for pages that are opened from within the Microsoft Script Editor.
To take advantage of Design view's capabilities and having already invoked the Microsoft Development Environment through PowerPoint, close the Source view window and select File, Open File. From here you can navigate to the folder containing the associated files for your presentation in the Open File dialog box.
By enabling Design view in this manner, you are able to extend the WYSIWYG attributes of the editing environment. From here you can more easily attach scripts to individual elements within a page, by right-clicking an object within the page as it is displayed in Design view. Choose Edit Script from the shortcut menu. This switches you to Source view and inserts the cursor at the appropriate position within the code. In addition, a new node is generated in the Script Outline window, as seen in Figure 16.4, enabling all potential event handlers for the object.
Figure 16.4. To associate a new script with an object in Design view, right-click the desired object.

If you are using design-time controls in your page, Source view allows you to see both the generated scripts from those design-time controls as well as the object information that the design-time control uses to coordinate with other controls.
Caution
In general, you should not directly edit generated script or object information created by a tool (such as a design-time control) because doing so can cause the page to stop functioning properly.
The Project Explorer Window
The Project Explorer displays the associated file in the folder created when you save your PowerPoint presentation. From here, double-clicking on a file's icon opens its source code in the Source view window. You can add the individual .htm files of the presentation you generated by saving the file as a Web page and simply repeating the steps outlined above to enable Design view for your presentation.
The Properties Window
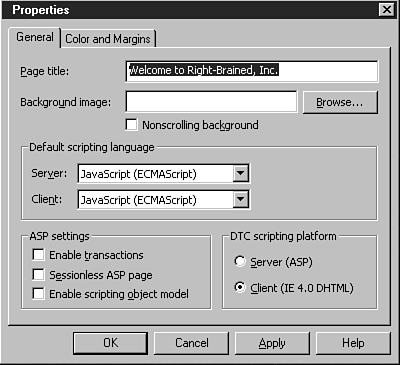
The Properties window displays the various HTML and scripting properties within the Web page. From here you can change default settings like Client and Server script types. This window provides three tool buttons with which to view and edit page attributes, as shown in Figure 16.5.

The Property Pages button opens the Properties dialog box shown in Figure 16.6, which allows you to input your choices. You can also click in the far right column that displays the individual properties and make your selections there.
Figure 16.6. The Properties dialog view box allows you to select HTML and scripting attributes.
Navigating to Scripts
You can use the Script Outline window to move between scripts by clicking the appropriate node to expand the Script Outline tree until you see the script you wish to go to, and then click the script's name. The insertion point in the Source window moves to the script's location in the file.
If you are working on a script in the Source window, you can match up your location in the Script Outline window to see where you are in the context of the overall page.
To synchronize your position with the Script Outline window, right-click anywhere in the Script Outline window (as shown in Figure 16.7), and then select Sync Script Outline.
Figure 16.7. You can right-click and select Sync Script Outline or select View, Sync Script O utline to synchronize your position.

Adding Web Script Commands to Your Tools Menu
To facilitate scripting in PowerPoint, Microsoft has provided you with three specialized commands you can add to your Tools menu:
Insert Script
Remove All Scripts
Show All Scripts
To insert these items follow these steps:
In PowerPoint, choose Tools, Customize. This opens the Customize dialog box, as shown in Figure 16.8.
In the Categories box, click Tools.
Scroll down in the Commands box until the scripting commands become visible.
Drag Insert Script from the Commands box over the Tools menu. From here, drag down to the Macro submenu. When the Macro submenu opens, drag to where you want the Insert Script command to appear, then release the mouse button.
Repeat steps 3 and 4 for the Show All Scripts and Remove All Scripts commands.
Click Close.
Figure 16.8. From the Customize dialog box, you can drag new tools to your menus.

The Insert Script command invokes the Microsoft Development Environment, placing the cursor at the insertion point you've selected. The Show All Scripts command provides a toggle that displays what Microsoft refers to as a glyph to mark the location of a script while still in PowerPoint. As the name suggests, Remove All Scripts removes the scripts from a presentation.
If at any time you wish to remove a command from the Tools menu, simply select Customize and reverse the process by dragging the undesired command off the Macro submenu.
Creating Event Handlers
The Script Outline window shows you all scriptable elements in your page, and for each element, the events for which you can write handlers. The Script Outline window divides the elements and scripts into those that will run on the client and those that will run on the server.
When you expand an object node in the Script Outline window (as shown in Figure 16.9), a list of potential event handlers for that object is displayed. If the event name is bold, a handler already exists for that event.
To create a new event handler, follow these steps:
Expand the appropriate object node until you see the event name for which you want to create a script.
Double-click the name of the event. When you double-click the event name, the editor performs the following actions:
Figure 16.9. Click the plus sign next to the node to see the available event handlers.

Creates or moves to one of the following script blocks at the top of the document, depending on where the script will run and what language it will be in:
clientEventHandlersJS
clientEventHandlersVBS
serverEventHandlersJS
serverEventHandlersVBS
If the script will be in JavaScript, adds an event attribute (for example, onclick=) to the element.
Next, the editor inserts a new script block for the event you selected with a bare handler function that you then must flesh out to suit your needs.
The handler is created in the default language for the current context. For example, if you are creating a server script, the handler is in the default language for the server, as set in the Property Pages dialog box for the current document.
For VBScript functions, the format is
Sub elementID_event
{insert code here}
End Sub
For JavaScript functions, the format is
function elementID_event(){
{insert code here}
}
When creating JavaScript event handlers, the editor also adds the following attributes to the HTML element itself:
event="return elementID_event()"
Setting the Default Script Language
In the Properties window, scroll down until the defaultClientScript and defaultServerScript categories are visible in the bottom-left column, as shown in Figure 16.10. To change the default settings, select the category in the left column and then click on the facing cells of the far right column to display a drop arrow. Clicking this arrow displays the options JavaScript and VBScript.
Figure 16.10. VBScript has been chosen instead of the default language, JavaScript.

Creating Standalone Scripts
In addition to creating event handlers, you can create standalone script blocks. This is useful if you want to create procedures (subroutines or functions) called by other scripts, or if you want to create a global script that runs as soon as the browser loads the page.
To create a new standalone script block, follow these steps:
Switch to Source view.
Position the cursor where you want the new script to appear.
From the HTML menu, choose Script Block, Client, or Server.
The Script editor then generates a new <SCRIPT> block. If you choose Server, the script tag contains the attribute RUNAT=SERVER. The script block's LANGUAGE attribute is set to the default language for the client or server.