APPENDIX A
Top 30 Production Tips
WHEN OUR FIRST TITLE WAS released in 2006, we included a list of our top 20 production tips. They represented the top 20 things we believe anyone in a production environment should be familiar with. This time around we’ve knocked off a few of those tips that have since been bested by other techniques we’ve developed and added to those an additional 10. Most of the techniques we presented in 2006 still hold true today as practical and productive, and we are confident that the tips presented here will be equally viable for many years to come.
Students who learn 3ds Max in a classroom environment often believe they have all the tools needed to be viable in a production environment. Unfortunately, many learn the program from training centers that don’t dedicate their programs to visualization. This inevitably results in students being familiarized with features that have no place in visualization, and if you believe in the Law of Diminishing Returns as we do, you would probably agree that the added material only reduces one’s chances of retaining the worthwhile material.
There aren’t many computer programs that can rightfully claim to be more complex or more difficult to learn than 3ds Max. Learning the program itself is challenging enough, but learning how to use the program in a production environment can be beyond the reach of many users. Like many technical fields, the visualization industry presents countless challenges that make simple program knowledge insufficient. Our industry is changing and advancing as rapidly as any other and knowing the program well is not enough. Once you jump into a production environment, you soon learn tricks of the trade that you often cannot find in any textbook or classroom discussion. The more 3D visualizers you interact with, the more likely you are to pick up these tricks that would normally take many years to develop on your own. If you manage your own business, the difficulties are even greater, and you must learn creative ways to work within 3ds Max as a user, and ways to improve your production output from a business point of view.
Many of the tips presented here cannot be found in any training document, and they highlight subject matter that we suggest users at all skills levels be familiar with while working in architectural visualization. Although it’s difficult to compare the viability of one tip to another, we made our best attempt to list them in order of importance to give added weight to those placed at the top of the list. And while some may seem too simple and obvious to even be placed on anyone’s top 30 production tip list, they are too often ignored or overlooked by even experienced users. We should all attempt to learn something new every day and with the speed at which our industry changes, this is for all practical purposes a necessity. By learning each of the following tips, you can implement procedures that normally take years for the typical user to develop in the workplace.
1. Build a network of subcontractors
2. Create a pricing presentation
3. Inspect the architectural drawings
4. Conserve system resources
5. Master the keyboard shortcuts
6. Use the Boolean/Cut/Split feature
7. Use the Loft and Sweep feature
8. Write a good contract
9. Create a mask and use in Photoshop
10. Write a good script as soon as possible
11. Use a professional renderfarm
12. Question poor designs
13. Use deductive reasoning to solve problems with scenes
14. Break up projects
15. Use custom furniture only
16. Save incrementally and save often
17. Model simple elements first
18. Purchase the best available model and material libraries
19. Create an assembly line for doors and windows
20. Use additional input devices
21. Use a standard background rig
22. Use material and model libraries
23. Use the top 3rd-party plug-ins
24. Exclude objects from GI whenever possible
25. Use the Scatter command and Spacing tool to create vegetation
26. Use a 3rd party vegetation solution
27. Use artificial shadows
28. Use simple camera paths to reduce required sampling
29. Render high and convert down
30. Be active in the 3D community
1. Build a network of subcontractors
If you’re a freelancer or the owner of a small firm, projects will always come along that are too large or have a deadline too short for you or your firm to handle. Turning away any visualization project can be disheartening, especially when a large amount of money is involved. But because of staffing limitations, freelancers and smaller firms are often forced to turn away large projects with higher profit yields. Likewise, clients will be hesitant to give a large project to a small outfit without some clear and visible assurance that the project can be completed on time.
Hiring employees can be a risky move for small firms. Even more difficult might be the task of finding qualified employees who live locally. The solution is to build a network of subcontractors. By subcontracting your work out to others, you can accept larger jobs and complete any job in a shorter amount of time. Even as a freelancer, you can accept the largest of projects and complete them in a reasonable amount of time. In this way, you can compete with the larger visualization firms and win contracts at which you would otherwise have no chance.
Because of the unique nature of our industry, we can subcontract work out to anyone in the world while communicating completely through e-mail. Quality subcontractors can complete an entire visualization project with minimal guidance, turning the finished product over and leaving you with nothing more to do but bill the client. Depending on where your subcontractors are located, you may find that they charge much lower hourly rates than what you charge your clients, leaving you with a potentially large profit margin. 3ds Max is used worldwide and quality subcontractors can be found in any corner of the world.
To find a quality subcontractor, you can start by exploring the galleries of some of the top visualization websites such as www.cgarchitect.com, www.vismasters.com, or the official Autodesk 3ds Max discussion forum, located at http://area.autodesk.com/. At these and other websites, you can see who does great work and simply send a message asking if they are interested in doing any subcontracting work. Another way is to post a message on a classified message board stating that you’re looking for freelancers or firms interested in subcontracting work.
When dealing with subcontractors outside your home country, you always risk business dealings going bad and not having any legal recourse. However, by doing good research and communicating your needs clearly, the risk is minimal. Before engaging subcontractors in any large project, we highly recommend giving them a very small job to determine how well they can live up to your expectations. Some can produce fantastic work but have poor communication skills that make working by e-mail alone difficult. Others may display a great portfolio but be disgruntled employees of firms that produced the images and lack the skills needed to complete the work to the level of quality their images imply. You may also find that they cannot work with AutoCAD drawings.
One of the best ways to employ subcontractors initially is to give them the sole task of modeling a project. To model an architectural scene, a 3ds Max user should need nothing more than the architectural CAD files and some basic instructions. Hiring a subcontractor to complete the materials, lighting, or animation portion of a project can present many challenges you may want to avoid until both of you are familiar with working and communicating with each other.
Until you make the leap of hiring full-time employees, subcontracting your work is the only way to compete with large firms and win the big visualization projects. Even if you only work on small projects that can be completed in just a few days, subcontracting your projects, even just the modeling portion, means that you can take in more work, turn around your work quicker, and keep your clients happier by not turning away work.
2. Create a pricing presentation
When trying to decide where to place this tip in the list of 30 tips presented here, it was suggested that a pricing presentation has to be at the top of the list, at least for business owners, because without landing work, none of the other tips means much. And since price is one of the first things potential clients inquire about, it is often your first (and sometimes only) chance to make a great first impression. Every business owner should have a presentation ready at all times to present to anyone who inquires because without it, you run the risk of looking unprepared, indecisive, and as an opportunist who might attempt to exploit clients when the opportunity presents itself.
It will not always be to your advantage to disclose your prices to those whom you present your work. If you are asked to give a presentation to a more public audience or to a firm whose employees are present, then showing a presentation without pricing is more appropriate. In this situation, it would be to your advantage to make a second version of your presentation, which could be identical except for the prices being removed.
Appendix J provides a discussion on these presentations and presents a sample presentation you can use as a starting point for developing your own. Appendix F also provides a thorough discussion on ways to develop your own pricing and things to consider when trying to navigate this critical subject.
3. Inspect the architectural drawings
Most architectural visualizations begin with what we consider to be the foundation of 3D—the 2D line work. Sometimes, you may need to produce a visualization from nothing more than some simple hand-drawn elevations, in which case your best course of action is to trace the sketch in a 2D CAD program to produce some rough 2D line work. In most cases, however, you will begin a project with 2D CAD drawings already in hand, even when their creation is not finalized. These CAD drawings may be produced solely by the architect, by a freelance CAD drafter, or by numerous different firms working to complete their part of the final set of construction documents. Whatever the case may be, all have their own style for creating drawings and leave their own mark on their drawings. If you’re lucky, you will receive a complete set of perfectly created drawings, but most of the time there are things in the drawings that, while not apparent on paper, may cause you hours of time to fix before the linework can be used in the creation of 3D models. These imperfections in the drawing process can eat away valuable production time and significantly impact your profits.
Preparing architectural drawings for use in a 3D visualization can be a very time-consuming process, and until you explore the drawings you’re given, you can never be sure how much time you’re going to have to spend on preparation. Before quoting the cost of a visualization, you should either insist on seeing the drawings or let the client know you have to bid high to account for the possibility of poor drawings. Not doing so can be a costly and time-consuming mistake. Before becoming wise to these problems and covering ourselves during the bidding or contracting process, we often found ourselves spending endless hours fixing problems with the drawings. On a few occasions, the drawings we received were missing entire elevations and the clients expected us to deal with it at no additional cost to them, believing we should have accounted for that in the bid or contract.
The bottom line is that you must cover yourself by either refusing to start the visualization without good drawings or by pricing your work higher to account for the worst-case scenario. For a thorough discussion of what some of these scenarios might be, refer to Chapter 2.
4. Conserve system resources
Few technical issues are more important for a 3D artist than conserving one’s system resources. Without using good workflow procedures that allow you to do things such as minimizing RAM consumption and maximizing viewport refresh rates, you are bound to take much longer to complete your work than your more trained peers and your render times are bound to be longer.
Chapter 19 illustrates the answers to some very common questions you simply must know the answer to, if you want to work at the highest level of speed and efficiency. Some of these include:
• Should I collapse an object after completing its construction?
• What’s the difference in memory consumption between a parametric object, versus an editable mesh object, versus an editable poly object?
• What happens to the operands of a compound object when the final object is created?
• What has a greater impact on file size; the total vertex count or polygon count?
• When should I create copies, instances, XRefs, and proxies?
• Do modifiers increase file size and/or memory consumption? Why or why not?
If you do not know the answer to all of these questions, you should invest some time in learning their answers, and a good place to start would be a thorough reading of Chapter 19.
5. Master the keyboard shortcuts
Keyboard shortcuts are the single most important interface element for efficient work in a 3D program. Veteran 3ds Max users, many of whom started 3D in the pre-Max days of DOS, will usually agree that keyboard shortcuts are a critical part of their work. In the days of 3D Studio for DOS, users depended more heavily on inputting commands from the keyboard. Keeping one hand on the mouse and the other hand on the keyboard was common practice, and as stated in numerous places throughout this book, it’s a good practice to get into if you haven’t already. Proper use of the keyboard can shave many hours off your larger projects and a significant amount of time off even your smallest.
6. Use the Boolean > Cut > Split feature
Most of the tips and tricks listed in this appendix deal more with workflow and technique than simply identifying features that even fundamental level users should be familiar with. There aren’t many features in 3ds Max we would feel the need to highlight in this way, but the Boolean > Cut > Split feature would certainly be one of those. This feature is simply invaluable in the creation of 2D and 3D sites, and as of this latest release of 3ds Max, there is nothing that can do what it can do as well as it does, which as its name implies, is cut and split polygons.
The Shape Merge feature is very unreliable unlike the Boolean, which will always work when used properly. The ProBoolean also fails to yield the same great results of the Boolean when it comes to site creation. For all its advances over the Boolean, the ProBoolean does not allow you to cut and split polygons. The best the ProBoolean feature can do to simulate the cutting and splitting of polygons is to imprint new edges in them. However, this doesn’t generate new elements within an object and the user is left without a practical way to select the polygons lying within the imprinted edges.
Perhaps in a future release of 3ds Max, Autodesk may incorporate this power into the Pro-Boolean, but until then the Boolean > Cut > Split feature remains at the top of our list of most valued 3ds Max features. This does not mean that it should be used in lieu of the ProBoolean for other operations, such as subtracting a volume of area from a wall in which to place a window, because in many other operations like this, the ProBoolean will always be the better choice. If you want to read more about why this feature is so great, refer to Chapter 7.
7. Use the Loft and Sweep features
Like the previous tip, we’ve included use of the Loft and Sweep features to highlight what we consider two of the very best features in 3ds Max. The reason they are both mentioned as part of the same tip is because they are so similar in function and used to basically do the same thing; to project the profile of a spline along the path of another spline. In the area of modeling, we have found the Loft and Sweep to be two of the most productive and useful features.
In visualization, both features can be used to model numerous object types, such as curbs, columns, trim, and furniture, just to name a few. However, each has a distinct advantage over the other in certain situations. Perhaps the most valuable use of a loft is in the creation of a wall. With a loft you can quickly and easily create complex and highly detailed walls from two shapes or splines, and you can modify the loft by making changes to either. You can also apply Multi/Subobject materials to a loft using material IDs. The sweep can create the same end product, but because it doesn’t respect the pivot point of the projected shape, it makes precise creation far more tedious. The one downside to the loft is that you cannot use a path that contains multiple, non-continuous splines. This is where the sweep comes in.
The only thing the sweep can do that the loft cannot is work with multiple, non-continuous splines. So if you want to create hundreds of individual parking stops using the loft, you would have to create hundreds of individual lofts, which would obviously be a waste of time. With the Sweep modifier, however, you can do this in just a few seconds.
Chapters 3, 4, and 7 explain the use of lofts and sweeps in great detail. We highly recommend taking advantage of these tremendous features and exploring some of the many ways they can save you valuable production time.
8. Write a good contract
This tip ties into tip 4, in which it’s suggested that you cover yourself with higher prices to account for the possibility of working with poor drawings. Writing a good contract is a crucial step in most visualization projects. You might feel the urge to do away with a contract for certain clients, but caution should be taken in these situations. Obviously, if you’ve known your client for a long time and trust their way of doing business, doing without a contract is a reasonable option for most projects. However, even for these clients, large projects with large price tags should usually include a contract.
When working with new clients, contracts should be used for even small projects, because sometimes only when the details of the scope of services are laid out in writing will the client truly understand what you are going to produce for them. Good contracts prevent you from incurring the cost of additional services not explicitly set forth in writing. They also explain in detail what is expected from each party and the limitations of your services. You do not need to have a lawyer write or review your contracts to have them upheld in court, but they should be well written to avoid any chance of misinterpretation.
A sample contract is available with the support files for this book, and Appendix H discusses this sample contract at length. This contract covers all the bases and should help give you an idea of some of the ways a contract can protect you. Feel free to use this as a template for your own work.
9. Create a mask for use in Photoshop
Perhaps the best tip we can provide that deals with software outside of 3ds Max is the creation of a mask that allows you to change the colors of a visualization in real-time within Photoshop. In a nutshell, you can use the Matte/Shadow material to create an alpha channel for a particular object(s) and turn that alpha channel into a mask in Photoshop that allows you to change the color of just the object for which an alpha was created.
The benefits of being able to change colors of select objects in real-time, without negatively affecting the GI, shadows, or detail, are quite far-reaching. To learn how to use this procedure, refer to Chapter 17.
10. Write a good script as soon as possible
Clients will often not know what they want the final product to look like. When they see the final product before them, they will always know if they like it or not; however, it’s not viable to keep making changes and reproducing the final product until they decide it’s acceptable. By following tip 8, writing a good contract, you can minimize your risk of redoing work for free until the client accepts it, but a better approach would be to give the client a good final product the first time. When the final product is an animation, writing a good script is critical to ensuring you can do so.
A script is a play-by-play account of an animation sequence that tells the reader exactly what the viewer will be seeing and hearing every step of the way, as shown in Figure A-1. To be able to write a script, you or your client must know exactly what the final product should look like and sound like. By insisting on a script before proceeding to the animation phase of a project, you can force the client to give you all the information you need to produce exactly what he or she wants. Consider a script mandatory before the animation phase of a project and never proceed with setting up camera paths until you have it in hand. Failing to get a script ironed out will almost always lead to wasted time and reworking.

Figure A-1. A simple animation script.
Instead of waiting until the animation phase of a project, you would be wise to try to obtain a script early on in the project. Having a script before doing any work at all is the ideal situation, because by knowing exactly what the viewer should see at every step in the animation, you can also know exactly what objects should receive more detail and the objects where the detail can be left out.
With a script, you can even determine if objects need to be created or inserted in the scene at all. Take, for example, a sequence in which a camera captures the view from only the front of a house. If the camera never views the back of the house, there’s no reason to model those features and place objects in the scene that won’t be viewable. Doing so will only waste time and increase your file sizes.
The earlier you obtain a script, the less time you will spend performing the same work over and over again and the less time you will waste working on parts of your scene that will never be viewed.
11. Use a professional render-farm
We learned long ago that keeping hardware within a 3D visualization company up-to-date is a difficult, time-consuming, and expensive way of life. But at the same time, if you’re in the business of creating animations, you know how difficult it can be to produce them with a small number of computers. Rather than spending so much of your resources on maintaining an internal render-farm, we suggest a different approach; using your company’s computers to conduct small test renders of animations but conducting large scale production renders with the use of a render-farm.
Render-farm services provide you an opportunity to send your complete 3ds Max scene to a third party, tap the resources of several hundred computers and render your animations in a fraction of the time. Although using a render service is not always the best option, being able to render long and complex animations when time is short can be invaluable. There are several companies that provide such a service, but ResPower (www.respower.com) is the company we like to mention because they have proven to us to be a reliable company that provides great service at a great price. At the beginning of 2006, they began a new program called ‘Unlimited Rendering’, whereby users can pay a flat fee for unlimited rendering each month. For a smaller fee, you can use unlimited rendering during a four-day period each month.
12. Question poor designs
One of the most practical uses a client has for 3D visualization is being able to see their project before it’s built and change a poor design before construction begins. Your work may begin while a project is still in its design development stage, in which case its design is not set in stone and construction documents have not been produced. In this situation, you may find yourself modeling a portion of the project that appears poorly designed. Sometimes architects or drafters will create drawings based on their interpretation of what their client wants or what their client’s sketches show. These drawings do not always represent what their clients have in mind. Sometimes their clients don’t even know what they want.
You may be asked to model a poor design when your client, whether it’s an architect, a developer, or the owner himself, jumps the gun and has you begin your work before the design has been thoroughly analyzed by all the necessary personnel. In any case, whenever you come across a drawing that appears to be a poor design or a design that simply doesn’t make sense, you should question it and stop working until a resolution is found.
Before continuing work, you should also question drawings in which different parts conflict. This problem is very common especially with drawings that haven’t been completely finalized. An example would be a floor plan that shows a window not shown on the elevations, or vice versa. Another example is when the front elevation shows one roof height, and a side elevation shows a much different roof height. These types of problems should be questioned before continuing work, and if you manage to find numerous problems like these before you accept a job or quote a certain price, you should cover yourself by not accepting the drawings from your client or by explaining that you will have to charge more to account for these problems. You will probably regret not doing so later.
13. Use deductive reasoning to solve problems with scenes
To know 3ds Max well, you have to know how to trouble-shoot a scene and be able to figure out what the cause of any particular problem is. It doesn’t take much time on any of the many community forums to see that many users don’t use a deductive approach to solving problems that arise. On any of these forums, you can see users discussing a problem they are having with a scene and some of the things they have tried to fix the problem. Far too often, however, their approach is to tackle a problem the hard way. By taking a deductive approach instead, you are far more likely to solve a problem when computer software is involved.
For example, if you are trying to determine what is causing noise in your scene, you’ll probably want to start your search with materials or lighting. However, you shouldn’t be testing material settings at the same time you’re testing light settings. Unless you are confident you know the source of the problem, you should try to eliminate all of the possible things that could be causing the problem, and by the process of elimination, you can eventually determine the source. So in this example, you should either eliminate materials or lighting altogether as the cause, and to do that, you simply need to take them out of the equation. If you want to see if materials are the cause, simply apply the same generic material to every object in your scene and if the noise remains, then it cannot be because of the materials. If you suspect the lighting is to blame, you could try removing all the lights in your scene and illuminating your scene with default lighting or with environment lighting. If you determine that lights are to blame, simply turn off lights one at a time to see if the noise still remains after each is turned off.
It may seem to go without saying that everyone should be using this approach when troubleshooting, but it’s clear that it is too often ignored.
14. Break up projects
Large 3D projects can be difficult to manage and complete on schedule. The further you get into a project, the more harrowing the adventure gets, and with deadlines looming, you can easily begin to wonder how it’s all going to be finished in time. Breaking your projects into smaller jobs can help you manage them and keep production on schedule. Regardless of the project size, and whether you work on it by yourself or with the help of others, a project should be broken up into several smaller and more manageable jobs. Doing so helps you keep track of what’s finished and what remains to be finished. Breaking up a project can also help you better estimate the time and staff that will be needed to complete it, and aid in the development of a contract.
You can start the process by breaking up a project into the major areas of 3D work such as drawing preparation, modeling, materials, lighting, animation, and post production. Some firms assign specialists to perform work solely in these specific areas, and in this way, projects can be easier to manage. Modeling should be broken up further because of the large amount of time this area requires. When we begin the modeling phase of a project, we usually break the work into major scene elements, save the files separately, and merge them together later when all of the modeling is complete. In Figure A-2, for example, the building was modeled in one file and in a completely separate file the site elements were modeled, which included terrain, streets, sidewalks, curbs, and so forth. The entry signage was created in a separate file as was the vegetation. Lastly, miscellaneous objects, such as cars and people, were created and all of these elements were merged together to finish the modeling phase of the project. At any point along the way, we could have determined that we were falling behind and needed help to get back on schedule. In this situation, we could have subcontracted part of the modeling, such as the site, to another person or firm. Had we tried working on all of the elements at the same time, subcontracting out work would not be a practical option.

Figure A-2. A finished scene built as separate smaller elements.
By breaking up your projects, you can better gauge how much time is required for each component and for the project as a whole, and at any point along the way, you can determine how well production is staying on schedule. Finally, by breaking up your project, you can send work out to others the same way a network manager sends out work to servers during a network rendering.
15. Use custom furniture only
For many years, the most agonizing aspect of any of our interior projects was working with clients to populate a scene with suitable stock furniture. Getting clients to take the time to look through thousands of stock images and see past the generic colors or materials applied to the furniture was something many of them were not willing or able to do. Furthermore, as the quality of 3D has progressed from the early days of scanline, the need for custom furniture has also increased. Today, we make every attempt possible to steer the client clear of using stock furniture and use it only as a last ditch effort to reduce a project’s pricing when the client is simply unable to afford the higher cost associated with creating custom furniture.
When we present work to a potential client, we always highlight the fact that we produce custom furniture and don’t even present the use of stock furniture as an option. Our contracts reflect this as does our pricing. If, however, a client is simply unwilling to budge on the price we have set forth, and we can go no lower in our pricing, we will offer stock furniture as a way of making the project a reality that both sides can afford.
If you would like to learn more about the use of custom furniture, please refer to the introduction of Chapter 6.
16. Save incrementally and save often
We all hate to lose work when our computers or 3ds Max crashes or when your files become corrupted in some way. Restarting the computer and interrupting your workflow is bad enough, but having to backtrack and redo work can be downright painful. Equally as bad is having to go back to a certain point in your work to retrieve a scene (or objects) in a previous state, only to find that you didn’t save a copy of the scene at the right time. The solution here is to save incrementally and save often.
When you click the Save As command in the File menu, the Save As dialog box opens and displays a + symbol to the left of the Save button. Clicking this button saves a copy of the file and places a number at the end. The first time you save a file with this button, the number 01 will be placed at the end of the file name (unless a number is already used at the end of the name). Each additional click of the + button will cause an additional file to be saved with the next number: 02, 03, and so on. In the course of any project, we make dozens of incremental saves, which allows us to go back to just about any point in the creation process and retrieve objects in a previous state, such as before being collapsed or before Boolean operations are performed. Before performing a critical procedure that cannot be undone, we always save our work. Figure A-3 shows an example of the incremental saves made during a past project. Notice the numerous versions of different scene elements. Notice also the names of the files: clubhouse, entry_signage, room, site, and vegetation. As suggested in tip 14, each of these elements was created separately and merged together at the end.
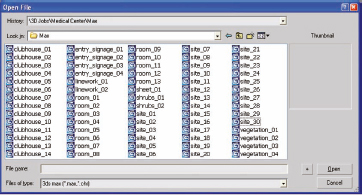
Figure A-3. Incremental saves made throughout the course of a 3D project.
Good file management is critical to efficient production and is nonexistent in a large percentage of the 3D firms with which we have worked. Saving incrementally and saving often are two good practices that can go a long way toward improving your production output.
17. Model simple elements first
Anyone who has ever taken a test in school has probably heard at one time or another to answer the easiest questions first. There are some very good reasons for this. It helps build confidence in the harder questions, it gives you time to access that part of your brain that is for some reason hiding the answer you may know, and it ensures that you don’t compromise your opportunity to answer the questions for which you definitely know the answers.
The same basic approach holds true in the creation of 3D visualizations. Modeling is usually the most time-consuming phase in a project and the more complex the structure, the more this holds true. It is wise to put some thought into how to build an object before you actually start and it’s probably wise to have a complete understanding of every step you will need to take to complete a model. However, there are numerous things that can make modeling objects difficult even when you know the exact path you need to follow. The biggest problems you are bound to run into include inaccurate drawings and complex designs. Regardless of how well you know 3ds Max and how familiar you are with the techniques you will eventually use, these things won’t help you understand what you’re looking at when inaccurate drawings or complex designs are involved. This is where experience in architecture comes in handy and when calls to the architect may be necessary.
When experience escapes you and no one is available to help with your understanding of a project’s drawings, your best choice is to work on the simple elements first. Perhaps this might mean to work on the site before tackling the building(s), or to work on the furniture before tackling the interior walls. Regardless, the same approach you heard teachers tell you in school can help you in the world of 3D visualization.
18. Purchase the best available model and material libraries
The importance of a good model and material library cannot be overstated. Like so many other components of a 3D scene, good models and materials are critical to the final product. Being able to populate your interior scene with knick-knacks or your exterior scenes with common elements such as cars, people, lamp posts, or street signs is critical to making your work believable and the projects look lived in. Owning good model libraries is especially critical when you have to rely on populating an interior scene with stock furniture.
The quality of your libraries is dependent on the quality of the individual models or materials, and the quantity of each. If you have a very small number of either, you are bound to spend more time than you care producing models or materials that your project’s budget doesn’t allow for. Without an extensive selection to choose from, it’s difficult to provide the exact look your client desires.
It is not enough to have good materials and models. You must have an easy and efficient way for you or your clients to find what’s needed. If you spend an extensive amount of time looking for a specific piece of content, you are usually wasting time. Adding content to any scene can be simple if your libraries are arranged and labeled in a logical and easy-to-understand manner. On the other hand, if your content is not categorized logically and labeled correctly, you can easily spend days adding models and materials to your scenes.
To develop great model and material libraries, you will probably have to make a sizeable investment in the purchase of each. Avoid relying on free content, as it is often of questionable quality and quantity. The following two companies sell some of the best content available on the market, and we have purchased most of our model and material content from these two companies alone; Marlin Studios (www.marlinstudios.com) and Evermotion (www.evermotion.org).
19. Create an assembly line for doors and windows
Windows and doors comprise a significant portion of the modeling required for most buildings and homes. Many 3ds Max users choose to create these two building elements separately in CAD programs such as Revit or using the Doors or Windows feature within 3ds Max; however, both methods have big downsides.
The main problem with the Doors and Windows features in 3ds Max is that the available types are very limited and rarely provide the flexibility to create all the types needed for even the simplest building or home. The main problem with modeling these elements in other programs such as Revit is the amount of time needed to initially set up all the different window and door types needed for your projects. If you used the same standard types for each project and didn’t need to create any custom types, then modeling in other programs might be an option. If you work in an architectural office and need to create construction drawings anyway, then perhaps creating your windows and doors in these other programs is the best option. If you don’t need to produce CDs, then we suggest modeling doors and windows (along with the walls they rest in) in 3ds Max, using the imported 2D line work.
After years of trying countless ways of creating these critical building elements, we have found one way that stands out above all the other methods we have tried; the assembly line. It worked for Henry Ford in the production of automobiles, and it can work just as well in the creation of windows and doors in 3ds Max. The best part about this method of creation is that you can create all of the window and door types at once. After positioning the line work for each window and door type side by side, and importing into 3ds Max if necessary, you can isolate the linework needed to create each component (Boolean, frame, glass, and so on) and create each component at the same time. You can even attach all of the lines together for each type, use the Extrude, Edit Mesh, or Edit Poly commands to create the mesh or poly objects, attach each finished object type together, and then detach the entire window or door as an individual object (comprised of the individual elements).
20. Use additional input devices
In recent years, several great input devices have been developed that can significantly increase your speed and improve your efficiency in 3ds Max. Two of our favorites are the keypad and 3D motion controller. Both of these have streamlined our inputs to the program, and we highly recommend investigating their potential with your work.
The keypad, shown in the left image of Figure A-4, is a device similar to the keyboard with keys that can be programmed to execute a command or display text with a single key press. As outspoken supporters of keyboard shortcuts, we believe that programming and learning a keypad can significantly improve anyone’s speed and efficiency. Efficiency in 3ds Max requires rapid input and few devices compare to the input capability a programmable keypad has. Hot keys offer the shortest path to action, and the keypad provides a clearly labeled, physical location for these complex or redundant functions, so you don’t have to think about them. Keypads come in many different shapes and sizes, but should you decide to purchase one, make sure you choose one that contains enough keys for all the commands you wish to use with it. Two added benefits of the keypad over the keyboard are the ability to write the names of the commands on the keys and to input text with a key.
The second input device that can be a tremendous asset is the 3D motion controller, shown in the right image of Figure A-4. With six degrees of freedom, you can navigate comfortably with one hand while editing with your mouse in your other hand. This device gives you unparalleled view navigation control, allowing you to zoom in and out and rotate your view with an easy-to-use controller cap. View navigation commands are, for many 3ds Max users, the most commonly used commands. Anything that can aid in their execution can save a tremendous amount of production time and should be considered for use.
The keypad can be purchased at www.xkeys.com and the 3D motion controller at www.3dconnexion.com.

Figure A-4. The keypad (left) and 3D motion controller (right)
21. Use a standard background rig
One of the most common scene elements 3ds Max users make unnecessarily difficult for themselves is the background. In actuality, it should be one of the most simplistic things to add to a scene and often requires nothing more than merging objects in from another scene and deciding which background image to use. There are numerous reasons why you shouldn’t use the Environment channel as the source of your background, and why you should instead use what we call the ‘background rig’.
The background is so critically important to scene that we decided to dedicate a chapter to it. For more information on the subject, refer to Chapter 9.
22. Use material and model libraries
Creating the same materials and models over and over again for each project would be a complete waste of time. Rather than doing this, you should borrow objects and materials from other scenes whenever possible.
Working with materials in 3ds Max can be a long and arduous process, made more difficult if you don’t use material libraries. Material libraries allow you to store and retrieve your favorite and most frequently used materials in easy-to-access files. Hopefully, your image library, which you use as maps for materials, contains tens of thousands of images. However, if this is the case, the simple act of locating an image to apply to a map channel can end up being not so quick and simple. For scenes with dozens of materials, this can translate to large amounts of wasted time.
The solution is to create and maintain good libraries. If you create a material that you think you will want to use again in the future, take a moment to give the material a relevant name and add it to a library. If you’ve never spent much time creating libraries, try opening some of your best scenes, reviewing the materials you applied, and putting the best ones in your library.
Like the application of materials to your scene, placing common and everyday scene elements can be a laborious and time-consuming process if not done wisely. Using objects from past projects, can be time-consuming if you must open numerous large or hard-to-find files to locate the objects you’re looking for. Just as with material libraries, you should create and maintain object libraries containing these common and ordinary objects. Your libraries should not, however, be limited to just the ordinary objects you tend to use for all your projects; rather, they should include virtually all well-created objects you would be proud to display in future projects. These can be furniture, vegetation, picture frames, or kitchen accessories, as shown in Figure A-5. How you organize the files that contain your objects is not important as long as you can keep track of them and locate them in the future.

Figure A-5. A library of kitchen accessories saved as individual files for later use.
As in other areas of 3ds Max, a little time spent in program maintenance can save you a tremendous amount of production time and help you meet your deadlines.
23. Use the top third-party plug-ins
Another great characteristic of 3ds Max is its ability to allow the use of plug-ins, which offer expanded or specialized functions, such as advanced rendering or the creation of trees. While 3ds Max provides tremendous power and capability through a seemingly endless list of features, some plug-ins provide unequalled power and capability in select areas of 3D.
Over the years that 3ds Max has been around, some plug-ins have become so ubiquitous and so successful, that they have been acquired by Autodesk and fully integrated into the program. Freelancers or small firms should take caution and conduct research to ensure a particular plug-in is truly needed. Purchasing plug-ins can quickly become expensive, and if you don’t perform adequate research beforehand, you may regret making a purchase. However, if a plug-in can shave enough time off the production process or significantly improve the quality of your work, then the price should not stop you.
Be sure to check out Appendixes B and C for a list of free and commercial plug-ins.
24. Exclude objects from GI whenever possible
The calculation of global illumination is an immense part of the typical rendering process that uses advanced lighting and whenever you exclude objects from that calculation, you will reduce render times. Good candidates for this technique are usually high-polygon objects whose aesthetic contribution to the GI in a scene is minimal, as is the need for the objects to be illuminated with GI. These can include 3D trees, furniture, cars, people, and many other object types that can often contain a large number of polygons. Ideally, this exclusion from GI should be kept at a minimum and used primarily with objects relatively far away from the camera’s view, but when used properly, it can greatly reduce your render times without any discernible reduction in image quality.
After you exclude an object from GI, you will have to light it in another way that fakes the look of GI. The best way to do this is to use four direct lights positioned around your scene and pointing inward. Three of these lights should be instanced and set to about 1/3 of the strength of a fourth light, which should be positioned in the same general area as the sunlight in your scene. Having one light stronger than the other 3 will keep the proper balance of illumination and using a total of 4 lights positioned around a scene will ensure that all sides of the object will be illuminated properly. Also, when using this technique, you have to be careful to have the 4 lights only create illumination for the objects you excluded from GI and no other objects.
25. Use the Scatter command and Spacing tool to create vegetation
In a 3D scene, one of the most difficult elements to simulate realistically is vegetation. This is especially true when your scenes are animated, and your cameras move in and around the vegetation. Whether a scene contains 2D vegetation, 3D vegetation, or a combination of both depends on numerous factors, such as rendering time available, your vegetation libraries, distance of the vegetation from the camera, camera paths, and available RAM. Too many 3D plants or trees can lead to extremely large files sizes and rendering times, which is why we recommend using a combination of 2D and 3D vegetation in most scenes. When you do decide to use 3D vegetation, one of the ways you might want to create your plants is with the Scatter command.
Using the Scatter command to create copies of one object over the surface or within the volume of another object gives you a quick and easy method to create realistic 3D plants for an entire project, regardless of size. Creating plants this way can produce effective and realistic results with minimal burden on your computer.
It’s often unimportant to the client exactly what type of plants they see in their visualization, and since landscape drawings are usually one of the last things created during a project’s planning, landscaping will often not even be decided by the time your work begins. When this is the case, the client may want you to play landscaper and tell you to simply create something that looks good. This can be a double-edged sword. Although it is nice to not be constrained by placing the exact required vegetation type throughout your scenes, the client may not like what you use. Good communication about landscaping requirements and exactly how you will meet them cannot be overstated. In fact, if anything should be highlighted in your contract, it should be details regarding the landscaping. Whenever possible, try gaining flexibility from the client in this area.
Regardless of the landscaping constraints detailed in your contract, another great tool that facilitates the placement of landscaping throughout your scenes is the Spacing tool. You can use a spline (path) or two points separated by a certain distance to specify exactly where your vegetation is placed.
26. Use a third-party vegetation solution
As just mentioned, vegetation is usually not the focus of most 3D visualizations; however, when created improperly it can often be the only thing the viewer focuses on. For years, 3D vegetation was the most difficult type of object to use in a scene because of its extremely high polygon count relative to other objects in scene. Oftentimes, an entire building might contain fewer polygons than a single tree, and it wasn’t long ago that this was too large of a problem for most users to deal with.
With the increase in computer power in recent years, 3D vegetation has become the norm rather than the exception, and you should attempt to use it over 2D vegetation whenever possible. However, not all 3D vegetation is created equal. There are numerous software packages that give you the ability to create beautiful vegetation and while we must admit that we have only experimented with a few of them, the Onyx and Bionatics plug-ins provide arguably the best solutions. Whichever software you use, make sure it gives you all the realism and flexibility you want. If it does not, you haven’t chosen the right software because there are several that provide everything top visualization firms need. Above all, don’t rely completely on free models, 2D vegetation, or 3D vegetation you create from scratch. Those days are long gone.
27. Use artificial shadows
Another one of the things that makes vegetation difficult to work with is the creation of realistic shadows. Vegetation can be simulated in 2D through the use of photographs and alpha channels, or it can be modeled with a wide variety of detail. Regardless of which method you use, each has pros and cons and tricks that can make working with it easier.
Tip 25 made the suggestion of creating vegetation using the Scatter command. By creating shrubs and plants this way, you can create fairly accurate shadows, depending on the size of the leaf object being scattered. When using 2D shrubs and plants, the shadows are not completely accurate but will suffice in most situations if the camera is not too close, because the shadows are usually small and closely surrounded by other shadows.
The real difficulty in shadow creation comes with the use of 2D trees. Because trees are larger and more sparsely placed, their shadows stand out more and their detail, or lack thereof, is more noticeable. The advantage of using a 2D tree is clear because it requires only a few faces, or polygons, per tree object, and therefore it renders quickly. This type of 2D object, however, casts poor shadows. By creating artificial shadows, you can dramatically improve render times as well as reduce RAM consumption. Creating artificial shadows can be beneficial for 2D trees and 3D trees. Rather than having a high-polygon tree create its own shadows, you can disable the shadow-casting ability of a tree, and create a fake shadow for the tree and save system resources in the process.
Vegetation is a vital component of most 3D scenes. Poor vegetation can ruin an otherwise great scene, and when not used wisely can be a tremendous burden on your computer. For more information regarding the use of artificial shadows, refer to Chapter 10.
28. Use simple camera paths to reduce required sampling
There are two primary methods of implementing GI in an animation. One is a brute-force approach that involves calculating the GI of each frame independently of every other frame. This method is very accurate but also very slow. In most cases, a much better approach is to calculate GI completely for one frame, conduct a small amount of samples in subsequent frames, and then after a certain number of frames have passed, create another complete GI calculation with more samples added in subsequent frames, and so on. This approach can greatly reduce the total time needed to calculate GI in a scene.
The biggest determining factor in just how many frames you can skip before creating another complete GI map, and therefore, how much time you can ultimately save, is the movement of your camera. If your camera moves very little, such as a slow sideways motion, then your view doesn’t change much and you don’t need to update your map with GI samples as often. You don’t need to keep taking samples on surfaces you have already sampled sufficiently in previous frames. However, if your camera moves fast and moves in and around your scene quickly, then you need to update your GI map more often to account for all the new surfaces you see. The faster you move and the more new surfaces you see, the more often you need to update your GI map, and therefore, the longer it will take to create your animation.
With all of this said, you should try to avoid sacrificing quality for the sake of speeding up your GI calculation; however, when push comes to shove and deadlines loom, this is a handy way to shave valuable time off the rendering process.
29. Render high and convert down
In the 3D world, render engines use a process known as image sampling to improve the quality of rendered output by decreasing the effect of aliasing. Aliasing is a term to describe imperfections in the rendering process caused by color changes that are too drastic, and occur over too small an area of screen space to be adequately depicted by the pixels that define that space. In a single still image, aliasing is certainly noticeable and can reduce realism, but if the same scene is set in motion, the results can be downright distracting and can ruin what would otherwise be a great animation. Two examples of these antialiasing side effects are flickering and texture crawling.
Flickering occurs during animations when materials have a speckled appearance with drastic changes in color occurring over a small number of pixels. In these cases, the computer cannot accurately determine which color to assign a given pixel, because the edge of two colors exists in the middle of a pixel. When scenes with these textures are animated, the difference between the two can be dramatic.
Texture crawling occurs in animations in areas along the edges of thin lines. This undesirable effect happens because there are not enough pixels available on a typical monitor to properly display mathematically smooth lines and polygon edges. When a 3D scene is transposed onto a monitor’s pixel grid, or raster, each pixel is colored according to whether it is covered by an object in the scene. Aliasing occurs because the raster system does not properly handle the case in which a pixel is only partially covered. Partially covered pixels occur along the edges of objects and are referred to as edge pixels or fragment pixels. The mishandling of fragment pixels results in harsh, jagged color transitions between an object’s edge and the background. Examples of materials in which texture crawling is prevalent are bricks in a wall, pavers in a walkway, and fascia on a roof. In animations, these edges appear to crawl, whether they are the edges of an object or the edges within a material applied to an object.
Using higher image sampling settings can greatly reduce the effect of flickering and texture crawling, but often come at an expensive price. Another entirely different way to improve image sampling, and one we use at 3DAS when time and budget allow for it, is to render a scene at a higher resolution than what the final output is actually going to be, and then scale it down to that final output. This is, in effect, increasing your image sampler settings without having to do anything but increase your resolution. Movie studios use this same process to deliver unbeatable quality with absolutely minimal antialiasing side effects. If you’ve ever wondered how fully animated movies appear so stunning and so free from artifacts despite being broadcast at standard DVD quality (640x480), it’s because the final color assigned to every pixel is near perfect. And the reason it’s near perfect is because they render their animations at a much higher resolution, 2K (2048x1080) or 4K (4096x2160), and convert down to the final output.
You can use this same technique to deliver stunning, artifact-free animations to your clients as well. However, these resolutions are impractical for most of us, and the low end of the high definition spectrum (1280x720) would be a good place to start.
30. Be active in the 3D community
Many of us in the 3ds Max community, new and experienced, fix some of our most difficult 3D problems with the help of others in the 3D community. To find this help, we often post our questions in 3ds Max online forums and review the replies at a later time. Because of the expertise of the readers in these forums, few problems go unsolved. As long as the question is relevant and posted in a professional manner, it will almost always be answered by one or more readers.
Online forums and chat rooms offer all of us a limitless pool of knowledge from which to draw information, and they are often the only places users can turn to for answers to difficult problems. This is especially true for freelancers or sole proprietors who work on projects alone and don’t have other experts working by their side.
Two of the best forums in the 3ds Max community are the official 3ds Max forum administered by Autodesk at www.autodesk.com and the forum hosted by CGarchitect at www.cgarchitect.com. Both sites are monitored by industry experts.
This tip simply highlights the fact that website forums should play an important role in the work of the 3ds Max user, especially the less-experienced user. When a deadline is fast approaching, and you have a problem affecting your production, turn to the experts of a 3ds Max online forum or chat room.
In addition to participation in online communities, it is highly beneficial to participate in live community events. On several occasions each year, the 3D community gathers together to participate in trade shows to display and learn about the latest technological advancements in 3D. Vendors of all types of 3D software, hardware, and media exhibit their most advanced products, while others explore and seek out the products that can aid their production. To maximize your production capabilities, you usually need to use the latest and greatest, and by attending trade shows, you can stay informed and know what that is. Otherwise, you may take quite some time to stumble upon the newest products that can help your production.
Seminars and classes offer all of us the opportunity to improve our work practices and increase our productivity. Generally, the more experienced 3ds Max users are, the less willing and able they are to change their habitual ways of doing things. But the fact remains that everyone will always have room for improvement, and with the way 3D technology advances, you have to be willing to learn new things or eventually you will fall behind your peers. Even certified instructors and specialists learn new tips and tricks when attending seminars and classes taught by other experts. When you have the opportunity, you should give some of these a try. The largest 3D gathering in the United States is SIGGRAPH, a weeklong trade show held each summer in one of a number of different metropolitan cities. While SIGGRAPH is the largest gathering of 3D users, the densest gathering of architectural visualizers is the annual VisMaster’s Design Modeling and Visualization Conference.

Figure A-6. DMVC 2007.
Summary
Our business demands innovation and creativity. Every year that goes by, the software we use makes creating stunning visualizations easier and easier. But at the same time, our clients expect a better product. That combined with increasing competition, refusing to learn innovative ways to improve our own business will eventually lead to lower profits or even business failure.
The tips and tricks presented here are the result of many years of trial and error by numerous individuals, often at great expense and grief. Hopefully these ideas will help you avoid some unnecessary expense and grief of your own.