
CHAPTER 19
Managing System Resources
A FRUSTRATING REALITY OF WORKING in any 3D program is waiting on the computer to process information. In the ideal 3D world, you could build all your scenes without regard to file size, available RAM, CPU speed, rendering times, or any number of things that complicate the design process. However, since most of us have to be aware of our computers’ limitations, we have to manage the way we build objects and assemble our scenes. To work efficiently, we should do whatever we reasonably can to minimize our wait.
At 3DAS, we’re often asked what kind of hardware we use to create and render our scenes. Students are often surprised to hear that for many years now we’ve relied primarily on average speed computers. At the time this book was published, the typical computer in our office is a Core 2 Duo with 2 to 4 GB of RAM. Many new users entering the field of architectural visualization have misconceptions that producing good work requires top-end hardware, and while that may have been true in the early 1990s, today it’s simply not the case.
There are several different situations in which the 3ds Max user is forced to wait on the computer. Three of these, in particular, are situations in which good procedures and practices can spare you from long and unnecessary waiting: transferring files, refreshing viewports, and rendering. Most other times, 3ds Max is waiting on the user for input, but for each of these you are forced to spend at least some time waiting on 3ds Max and your computer, depending on how you manage your scenes.
So what are the attributes of a scene that affect each of these three situations, and what can you do to minimize your wait during each of these processes? In this chapter, we’re going to take a close look at some tools and procedures that can improve system resource management so your scenes don’t become unnecessarily large or consume an unnecessarily large amount of RAM.
After completing this chapter, some fundamental questions you should know the answers to are:
• Should I collapse an object after completing its construction?
• What’s the difference in memory consumption between a parametric object, versus an editable mesh object, versus an editable poly object?
• What happens to the operands of a compound object when the final object is created?
• What has a greater impact on file size; the total vertex count or polygon count?
• When should I create copies, instances, XRefs, and proxies?
• Do modifiers increase file size and/or memory consumption? Why or why not?
These are just a few of the many questions you will need to know the answer to if you want to maximize scene efficiency and conserve system resources as much as possible. To illustrate the answers to these and other questions, let’s jump right into a simple exercise that illustrates some fundamental concepts of system resource management.
As a supplement to this chapter, you can refer to the file entitled Scene_Assembly.pdf. This is Chapter 17 from 3ds Max 2008 Architectural Visualization – Beginner to Intermediate. In this chapter, you’ll find several ways to minimize the time you wait on your computer during each of the 3 situations previously mentioned.
Managing File Size
An immensely important part of good scene management is what you do with individual objects beyond the visual characteristics they display during the rendering process. Looking at a rendering, it’s impossible to know how a scene is constructed and what the final configuration of each object is. But a scene where objects are configured properly will always render faster and consume less system resources than objects that are not configured properly; even when the final rendered image is unaffected.
This first exercise illustrates some important concepts about how information is stored in 3ds Max and how you can control a scene’s file size. As an indirect result of reducing file size, RAM consumption is reduced, render times tend to be improved and system crashes become less frequent.
Parametric objects vs. Editable Mesh objects vs. Editable Poly objects
The intent of this first exercise is to demonstrate how information is stored for parametric objects, editable mesh objects, and editable poly objects. It should be noted that the same files saved with different versions of 3ds Max will yield slightly different sizes.
1. Reset 3ds Max.
2. With no objects in your scene, save the empty file with the name empty.max.
3. In Windows Explorer, look at the size of the file. It should be approximately 270KB, although earlier versions of 3ds Max might result in sizes close to 200KB. Even completely empty scenes contain a considerable amount of data, most of which are settings, such as units, viewport levels, time configuration, etc.
4. Create a teapot of any size in Perspective view with 4 segments.
5. Press the keyboard shortcut 7 to turn on the Show Statistics feature. Notice that there are just over 1000 polygons in the scene.
6. Save the file and name it teapot-parametric4.max.
7. In Windows Explorer, look at the size of the file again. The size should be approximately 20KB larger.
8. Change the number of segments to the 3ds Maximum value of 64 and save the file with the name teapot-parametric64.max. Notice that there are now over 262K polygons.
9. Check the size of the file again and this time it should be unchanged. It is unchanged because the only new information that has to be saved with the scene is the new segment count. No additional information has to be stored because the teapot is parametric based, which means that its structure (the lid, handle, spout, etc.), is controlled and generated through parameters. So 3ds Max doesn’t have to store the information for each polygon because the location, size, and orientation of the polygons are all derived from algorithms.
10. From the Edit menu, select the Hold feature. We will return to the scene in its present form in just a moment.
11. Collapse the object to an editable poly. Notice that the Show Statistics feature now shows half the number of polygons, or approximately 131K polygons. As we’ll see in a moment, this is misleading data.
12. Save the file with the name teapot-poly.max.
13. Check the file size again. The file balloons to a size of approximately 19MB. The reason for the increase is that now 3ds Max can no longer define the teapot’s structure by algorithms or formulas. Instead, it must store the X, Y, and Z position value of every individual vertex, such as the one shown in the next illustration. For an object with this many vertices, it shouldn’t be hard to see why the file size is now 19MB.
14. Collapse the object to an editable mesh. When you do, notice that the total polygon count goes back to 262K faces.
15. Save the file with the name teapot-mesh.max.
16. Check the file size again. Strangely enough, even though the Show Statistics feature shows twice the number of polygons, the file size decreases to approximately 11.5MB. How could this be? The reason is that both files have the exact same number of vertices, yet an edit poly object contains far more information than the edit mesh object. The vast majority of file space for both files is used to store the X, Y, and Z position values for every vertex. However, because the Edit Poly object contains far more functionality, it requires far more space to store the default values of that functionality. Incidentally, if you were to save the editable mesh version of this file as a 3ds Max 9 or 2008 file, it would still be 11.5MB. However, if you were to save the editable poly version of this file as a 3ds Max 9 file it would only be 15MB and a 2008 version would be somewhere in between the Max 9 and Max 2009 versions. This could be an indication of how the editable poly is changing and growing in complexity with each new release while the editable mesh remains largely unchanged.
17. From the Edit menu, select the Fetch feature. This returns the teapot to its pre-collapsed configuration.
18. Add the Edit Mesh modifier to the teapot. Notice that the polygon count stays at 262K polygons.
19. Save the file with the name teapot-mesh_modifier.max.
20. Check the file size again. The file is the same size as it was before the modifier was added. Adding the Edit Mesh modifier to an object is not the same as collapsing an object to an editable mesh. If you simply add the Edit Mesh modifier, you haven’t really added any information because until you start making changes to sub-objects within the added modifier, the vertices won’t require new position information. The display of the object will still be completely based on the root object, which in this case is still a parametric object.
21. Remove the Edit Mesh modifier and add the Edit Poly modifier. Notice that the polygon count is again cut in half to 131K polygons. This is once again, not a legitimate indication of the amount of information stored for the object.
22. Save the file with the name teapot-poly_modifier.max.
23. Check the file size again. Notice that it is approximately 100KB larger than the same scene with the Edit Mesh modifier added, as shown in the next illustration. The size increased for the same reasons as mentioned before.

Now to see another quality of how information for an object is stored, let’s look at another scene.
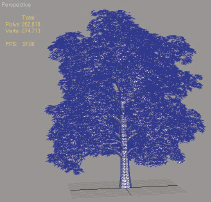
24. Open the file oak_tree.max. This scene contains a single editable mesh object (in the form of a tree) comprised of 262K faces, just like the teapot in the previous exercise.
25. Look at the scene’s file size. Notice that the tree creates a file size of 21.3MB. Even though the editable mesh tree has almost exactly the same number of polygons as the editable mesh version of the teapot, the file size here is almost doubled from that of the editable mesh teapot. The reason the two file sizes are so different even though they contain the same number of polygons is that the teapot contains half as many vertices. And the reason it only needs half as many vertices as the tree with the same number of polygons is because almost all of the polygons in the teapot share 4 vertices with adjacent polygons. Notice in the following illustration that the selected vertex is only shared by 2 polygons, as are many vertices in the tree. This doesn’t mean that the rendering times will be any different because rendering times are determined more by polygon count. So the vertex count drives a scene’s file size and polygon count drives render times. As an additional note, render times are also derived by less noticeable things such as the amount of space the rendered object takes up in the render window. In other words, if you zoom out away from the tree, the render time for the tree will decrease.
Now let’s look at one final aspect of the editable mesh and poly objects.
26. Open the file chandelier.max. This is a scene containing one object (in the form of a chandelier) whose polygon count is approximately 198K.
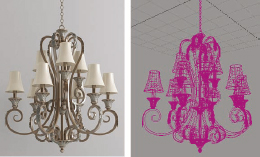
27. Look at the scene’s file size. Notice that it is 26MB.
28. Add the Edit Poly modifier and enter Element sub-object mode.
29. Select and delete every part of the chandelier except the wire support, as shown in the right image of the following illustration.
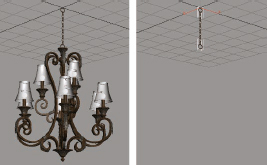
30. Save the file with the name chandelier-empty.max.
31. Check the scene’s file size. Notice that even though you deleted almost all of the vertices in the scene, the scene actually grew in size, as shown in the following illustration. The reason for this is because you just added the Edit Poly modifier, rather than collapsing to an editable poly. The original editable poly is still stored in its unmodified condition, and adding an Edit Poly modifier only adds to the amount of information 3ds Max has to store with the scene. However, the file size only increased a very small amount because the only thing 3ds Max has do to store the object in this new configuration is assign a deleted notation to each of the deleted vertices. It doesn’t have to actually store new vertex locations. Incidentally, the file sizes shown in the next illustration represent those of a 3ds Max 9 version, since all the files for this book are provided in this version. A 3ds Max 2009 version of these files would be about 7MB larger.
![]()
32. Delete the current Edit Poly modifier and add a new Edit Poly modifier.
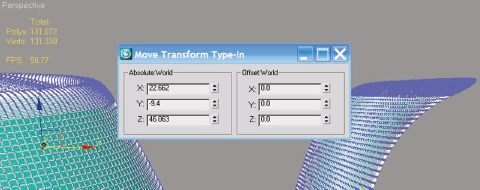
33. Enter Vertex sub-object mode and open the Move Transform Type-in dialog box.
34. In the Offset section, type 12 for each of the X, Y, and Z fields. This simply moves every vertex 12 units in each direction.
35. Save the file and check the resulting file size. Notice that while adding the Edit Poly modifier doesn’t increase the file size much, moving vertices within that modifier does. Approximately 6MB of new information is generated. This time, a completely new set of X, Y, and Z position values must be stored for the object. Because all the vertices were moved in the same fashion, there is some borrowing of information, which is why the file size didn’t double.
36. Collapse the object to an editable poly and save the file again. Notice that the file size returns to what it was before, because the information for the vertices’ original location has been purged from the file.
This concludes the exercise.
Managing RAM Consumption
While managing file size is clearly an important aspect of good efficient workflow, perhaps an even more important aspect is managing RAM consumption. Unlike the hard drive on a computer, which is capable of handling inefficient scenes of enormous sizes, a computer’s RAM is far less forgiving of poor workflow. However, since the amount of RAM consumption is so closely tied to the way individual objects are treated and the file size they generate, it is all but impossible to manage RAM consumption without simultaneously managing file size as well. That being said, the remainder of this chapter discusses some additional concepts that deal directly with RAM consumption while simultaneously affecting file size.
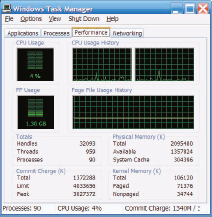
Critical to efficient workflow is an understanding of what is going on behind the scenes within your computer during the times when you are forced to wait on it. No other interface provides a better indication of what’s going on than the Windows Task Manager, so for the remainder of this chapter we will keep this feature open. Within the Windows Task Manager are several different tabs, one of which displays 3 very important values you should always keep an eye on when working in large, resource hungry scenes: the processor usage, the page file, and the available RAM.
Parametric objects vs. Editable Mesh objects vs. Editable Poly objects
The intent of this first exercise is to illustrate how RAM is used in 3ds Max and to demonstrate some techniques on how to minimize its consumption during critical points in your workflow.
1. Open the file oak_tree.max. As we saw before, this scene contains one object with 262K polygons.
2. Change the view to Top view.
3. Change the display of the tree to a box. Since the object contains so many polygons, displaying it as a box will make viewport navigation much easier.
4. Make 15 additional instances of the tree and place them in 4x4 grid, as shown in the next illustration. Making copies of an object with this many polygons would not be a good idea unless they absolutely had to be unique.

If you select one individual tree, you’ll notice that the Edit Mesh modifier is displayed in bold, indicating it is an instance of another object. In a moment, we will collapse each tree to an editable mesh, thereby breaking the connection while greatly increasing the file size and RAM consumption. Before we do this, we need to open Windows Task Manager to keep an eye on RAM consumption.
5. Open Windows Task Manager and take note of the available RAM. The computer used in the writing of this chapter contains 2GB of RAM, as shown in the next illustration.
6. Select all 16 instances of the tree and collapse them to an editable mesh. When you do, the link between them is broken and each is stored individually in RAM. The amount of RAM consumed to perform this operation is approximately 450MB.
7. Save this file with the name 16-trees-collapsed.max. Notice that the save take a few moments and consumes an additional 200MB of RAM. This is only temporary and the RAM returns to what it was before the save, but it’s important to realize that with large files, the simple act of saving a scene can cause your computer to run out of memory and crash.
8. Look at the scene’s current file size. Notice that it has ballooned to approximately 340MB, which not surprisingly is 16 times the file size of one collapsed tree.
Before we render this out, let’s look at one more important thing about RAM consumption.
9. Deselect all the trees and reselect just one of them.
10. While taking note of the current amount of RAM available, attach one single tree to the tree you have selected. After the attachment, you should have approximately 120MB less RAM available.
11. Attach an additional tree to the current object. Approximately 140MB more should be consumed. Each time an additional tree is added, a greater amount of RAM is consumed than with the previous attachment.
12. Continue attaching more trees until you have less than 300MB. Do not continuing attaching beyond this point or you will run the risk of crashing 3ds Max. The next illustration indicates the amount of RAM consumed during my execution of these steps.

The attach commands we just executed were extremely memory-hungry because essentially, 3ds Max has to store the original version of all these trees as individual objects and an additional version with some of the objects attached together. Needless to say, more complex operations usually require more memory and can often crash the program if you don’t pay attention to the available RAM.
If we were to start rendering these 16 collapsed trees right now, we would be doing ourselves a disservice because we would be giving 3ds Max less memory to work with, and it would almost certainly crash during the render process. We should instead free up this memory that was consumed by the numerous attach commands and then render the scene. If you right-click the Undo icon, you would see the last 20 commands you executed. Of course, you can go back to an earlier step before the trees were attached together, but this won’t free up any memory because the attach commands you executed would only be moved to the Redo list. To free up this memory, you could reset 3ds Max and load the scene again, but since the scene file size is so large, this will take longer than necessary. So instead, let’s do something a little easier. All we need to do is create an object and change one of its parameters several times until the memory heavy attach commands are purged from the undo list.
13. Create a sphere of any size anywhere in Top view.
14. While monitoring the available RAM displayed in Windows Task Manager, change the Radius value 20 times or more until you see the available RAM return to the level it was before the attach commands were used. This helps demonstrate why you should always keep a close watch on your system resources and why you should always purge your RAM prior to render or even before doing something as simple as saving a large file.
Having covered a few fundamental concepts about how 3ds Max stores information, it’s time to look at the different ways objects can be handled and the reasons why different objects should be treated differently. Many users simply create the objects they need, apply the necessary modifiers, and give little thought to what those objects do to their workflow and efficiency. For small scenes, you might be able to get away with working this way, but as scenes grow in size, so does the need to consider the following questions for each individual object.
• Should the object be collapsed or left with modifiers intact?
• Should the object exist as an instance, XRef, or neither?
• Should the object be attached to other objects or be left as is?
Let’s continue with another exercise that looks at each of these questions closely and the factors that should guide your decision on how to answer them.
2. Open Windows Task Manager.
3. Turn on Show Statistics.
4. In Perspective view, create a teapot of any size and with 64 segments.
5. While monitoring the available RAM, apply the MeshSmooth modifier. This modifier consumes about 500MB of RAM.
6. Save the file with the name teapot-highpoly.max.
7. Look at the size of the file you just saved. It should only be a few KBs more than what an empty scene would be.
8. Reset 3ds Max. Notice that the available RAM returns to what it was before you applied the MeshSmooth modifier.
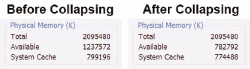
9. Reopen the scene. Not only does it consume 500MB again during the loading process, it also takes a few moments to load. The file is almost as small as an empty scene, yet it takes far longer to open because 3ds Max has to create the reapply the modifier during the loading process. No matter what you do, you will have about 500MB less RAM available as long as this modifier is left turned on in the modifier stack. The best you can do to reduce the amount of RAM consumed would be to turn off the modifier, which will make approximately 200MB of RAM available again.
10. Convert the object to an editable poly. During the conversion, several hundred MBs of additional RAM are consumed.
11. Save the file with the name teapot-poly.max.
12. Reset 3ds Max. The available RAM returns to normal.
13. Open the file you just saved. After the RAM stabilizes, which will take a few moments, you should see that the available RAM does not decrease 500MB as it did when you opened the file with the MeshSmooth modifier applied. Instead, it only decreases about 200MB.
14. Convert the object to an editable mesh. Once again, several hundred MBs of RAM are consumed.
15. Save the file with the name teapot-mesh.max.
16. Reset 3ds Max. The available RAM returns to normal.
17. Open the file you just saved. After the RAM stabilizes, which will again take a few moments, you should see that the editable mesh version of the teapot file consumes about 100MB less memory than the editable poly version. This is despite the fact that the Show Statistics feature says that the editable poly contains half as many polygons as the editable mesh.
18. Look at the size of the two files you just saved. Notice that the editable poly version is approximately 25% larger than the editable mesh version. Despite its greater power and functionality, the editable poly object is more of a strain on your computer’s resources than the editable mesh. Because of this, if you determine that you need to collapse or convert your object to one of the two types, it is probably best to choose the editable mesh version. You can always convert an object to an editable poly later in order to use the features unique to this type of object, but when you are finished working on an object, either permanently or temporarily, it is best to store it as an editable mesh.
This concludes the exercise.
Object Management
All of the workflow concepts discussed in this chapter, and many of those discussed throughout this book, can be summarized by answering three simple questions. For any given object you work with or create, you should know the answers to these questions, which can vary from one scene to another.
• Should the object be collapsed or left as is?
• Should the object exist as an instance, XRef, or neither?
• Should the object be attached to other objects or left as is?
The remainder of this chapter looks to answer each of these questions for some of the different situations that apply.
Collapsing Objects
Should the object be collapsed or left as is?
If you collapse an object to an editable mesh or editable poly, all modifiers listed in the modifier stack are lost. The obvious downside to this is that you lose the ability to change parameters within any of the modifiers in the modifier stack. If you know that making further modifications to the object is unlikely or if you decide that you can simply retrieve an original uncollapsed version of the object saved in another file, then collapsing the object isn’t a problem. Another downside is that you may significantly increase the scene file size the same way the parametric teapot increased the file size when it was collapsed. For some modifiers this won’t be an issue, but for others, such as MeshSmooth or TurboSmooth, collapsing the object with these modifiers means the object will have a far greater number of vertices to account for individually, rather than through algorithms.
One not so obvious advantage to collapsing objects is the reduced time it takes to load the scene file. When 3ds Max loads a file, every object has to be rebuilt with the modifiers applied to them, meaning that if you apply a modifier to an object and that modifier takes 10 seconds to be computed, that object alone will increase the file load time by 10 seconds because it has to be reapplied during the loading process. To see this clearly, reset 3ds Max, create a simple teapot with the default 4 segments, add the Tessellate modifier and change the Iterations to 4. Notice that when you change the iterations to 4, it takes about 10 seconds to tessellate the teapot (depending on the speed of your computer of course). Now save the file and reload it. When you do, you should see that it takes about that same amount of time longer to load the file than it would to load an empty scene. With 4 iterations in the Tessellate modifier, the teapot should contain just over 250,000 faces. If you collapse the teapot now and save the file, you’ll have a much larger file size but the file will open in just a second or two. So clearly, some thought should go into how to handle certain objects in your scene, especially the most complex, high-poly objects.
Another type of object that can significantly increase the time it takes to load a file is the Compound Object. This type of object includes the Boolean, Scatter, ShapeMerge, etc. Whenever you create a compound object, the original objects are still stored in the file’s memory and can be retrieved at any time. What you perhaps didn’t know is that every time you load a file with a compound object, that object gets recreated just as an object with a modifier does. Many compound objects can take a good deal of time to calculate, so if your scene contains a large number of them, then be warned your scene may take a long time to load. In most cases, it’s better to collapse the compound object and incur a slightly larger file size, than it is to leave the compound object as is and incur a longer load time. So if a scene takes an excessively long time to load, check for these types of situations. In many cases, your file size will actually decrease by collapsing a compound object, because instead of having to store the information for both of the objects involved, 3ds Max only has to store the result of the operation.
Instances vs XRefs
Should the object exist as an instance, XRef, or neither?
The more complex an object, the more likely it becomes a candidate for an instance or an XRef. If you have 2 high-poly objects, such as 2 of the same kind of tree, it may be desirable to keep them unique so that one can be modified without affecting the other. But remember that file sizes can quickly get out of control when duplicating high-poly objects as copies rather than instances. With XRefs, you don’t have to worry so much about the main scene file-size getting out of control, but you will likely run into equally challenging problems, such as longer load times and more difficulty in sharing files over a network.
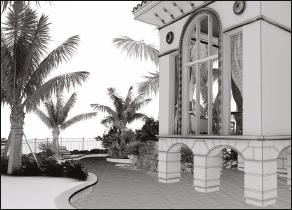
If you’re a mental ray or V-Ray user, you can (and almost certainly should) use the respective proxy features on high-poly objects. With these features, you can literally render a forest of trees like the one shown at the beginning of this chapter. You can render thousands of these trees, consisting of billions of polygons, without having to worry so much about excessive files sizes and load times, or running out of RAM.
In Chapter 17 of 3ds Max 2008 Architectural Visualization – Beginner to Intermediate, several different scenarios are discussed for when you might choose to make instances rather than copies and vice versa, but one disadvantage to creating instances is that you cannot attach instanced objects with any other object. You can certainly group instanced objects together, which can help in object selection and display, but you cannot attach instanced objects.
Attaching Objects
Should the object be attached to other objects or left as is?
There are two important benefits of attaching objects together. First, by attaching one object to another, you will only have to manage one object instead of two. That can make things like applying materials and mapping much easier and can facilitate selecting and displaying objects. This is especially true when multiple users work on the same project. Few things are as aggravating in 3D as opening a dialog box only to see thousands of objects listed, most of which are labeled as unintelligently as Line01, Box03, Rectang32, etc.
A second advantage is that you reduce the total scene object count, which can help reduce rendering times as well as the total RAM consumed. For large scenes with many objects, you may notice that the very first message that appears when you render says Preparing Objects. You might not see this for small scenes if the message only lasts for a fraction of a second but when a scene contains a large number objects, depending on how the objects were created, the Preparing Objects phase of a rendering can take several minutes to process. This is simply an unnecessary aggravation that can be avoided by attaching similar objects with similar materials together. Grouping objects does not change the number of objects in a scene, so other than facilitating management of objects, grouping objects has no bearing on workflow.
32-bit vs. 64-bit
Arguably the best overall improvement in the last several releases of 3ds Max is support of 64-bit operating systems and the Microsoft DirectX 10 platform. The memory-handling characteristics of the 64-bit version of 3ds Max simply cannot be overstated, and even though it is likely that all the concepts mentioned in this chapter will be applicable for many years to come, being able to take advantage of a 64-bit version of 3ds Max is simply fantastic.
The 64-bit version of 3ds Max is capable of handling scenes of, for all practical purposes, limitless size. This does not mean that you shouldn’t exercise all of the resource conscience techniques described in this chapter or that you shouldn’t manage your scenes as you would in a 32-bit version. It simply means that a 64-bit version of 3ds Max is capable of handling larger scenes with more objects and a greater polygon count. Your scenes won’t render any faster in 64-bit than they will in 32-bit, except of course in cases where RAM is completely exhausted with 32-bit. They also won’t load any faster. The ability to create, assemble, and most importantly, render immensely large scenes is what makes using 64-bit 3ds Max worthwhile.
Another great advancement in the software was its capability to support DirectX 10. Quite simply, DirectX is a Windows-based platform that enables software providers to achieve much greater performance in graphics and sound on a PC. DirectX 10 is only supported by Windows Vista, which alone makes Vista worth looking into. Unfortunately, the migration to Vista has been painful for many 3ds Max users, so some caution should be taken when the jump is made. Nonetheless, DirectX 10 on Vista is likely what we will all find ourselves using within a few years. Incidentally, 3ds Max 2008 was the first full release of 3ds Max to officially support Windows Vista as well as a 64-bit operating system and DirectX 10.
Summary
This chapter illustrated a few examples of why it’s so important to know how to build and assemble a scene without excessive file sizes or polygon counts. Someday, we may no longer have to be concerned with such issues, but for the foreseeable future we should always try to use the tools available to allow for efficient workflow and prevent wasted time. I suspect that no matter how fast computers become, software developers will always fill your plates with more and more processor-hungry and memory-consuming programs and resources. If this is true, then the topics covered in this chapter will always apply.