CHAPTER 9
Creating Backgrounds
FEW OTHER SCENE COMPONENTS ARE as simple to create and yet so often compromised as are backgrounds. Often consuming more than half of the area of a visualization, backgrounds are as critical as any other scene component and deserve as much care and attention as any other area of scene creation. Although backgrounds are a relatively simple element to add to a scene, they can just as easily be a source of frustration and problems for 3ds Max users.
There are three primary methods in which 3ds Max artists create backgrounds for a visualization. Sadly, it seems that the best method is also the least ubiquitous. One method is to apply a background through the Environment Map channel. A second is to apply a background with 3rd party software. The third method, and the one I recommend for most visualizations is to apply a background image to a 3D object.
Each of these methods has distinct advantages and disadvantages and neither provides the best solution for every type of scene. The following discussion explains each of these methods and the various ways they can be implemented.
Image Types
Before beginning a discussion on the different ways in which backgrounds can be applied to a visualization, it would be appropriate to cover the different types of images that can be used for backgrounds. All background images can be categorized in one of two ways; cylindrical or spherical. Cylindrical images are nothing more than undistorted images stitched together to form a panoramic view. These images can be captured and created by specially designed cameras, specially designed software, or manually using photo editing software. They are essentially undistorted images that can be used to create up to a full 360-degrees of background for a scene, and because they are distorted, they are the ideal type of image to use as a background. Figure 9-1 shows an example of a cylindrical image that represents 180 degrees of horizon.

Figure 9-1. An undistorted cylindrical image.
Spherical images are distorted images that provide a complete 360-degree representation of an entire hemisphere or an entire sphere of background. They are captured with special spherical cameras or created with special software and appear distorted in image form and relatively undistorted when applied as a spherical or hemispherical environment background to a 3D scene. Figure 9-2 shows a spherical image with obvious distortion similar to a Mercator Projection map. This image is a representation of an entire 360-degree full spherical environment and shows everything that could be seen if you were standing in the same spot from which this image was taken.
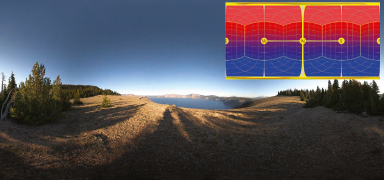
Figure 9-2. A distorted spherical image.
There are many flavors of spherical and cylindrical images used as backgrounds for 3D scenes. Some cylindrical images show land below the horizon and sky above, while others only provide a view of the sky. Typical FOVs (field-of-views) are 180, 270, and 360 degrees while in terms of image resolution and aspect ratio, there are no typical values. Image resolutions from leading vendors can be found well over 10,000 pixels across and depending on the FOV and your rendering size, you may need every one of these pixels to achieve clear and realistic backgrounds. Later in this chapter we will look closely at how to determine what resolution is needed for any given situation.
As an additional note, almost all of the bitmaps shown in this chapter come from the Marlin Studios collection (www.marlinstudios.com). Many years ago, we purchased their entire collection of imagery and even though we use only a small percentage of their product, their collection is wonderful and having such a large variety is important when trying to find the right background. Other leading vendors include Dosch Design (www.doschdesign.com) and Hyperfocal Design (www.hyperfocaldesign.com). All three provide very high resolution imagery suitable for backgrounds.
Environment Channel Backgrounds
The first background type we’ll look at is a background created with the Environment Map channel. This is the simplest type of background to implement, yet often the most difficult to make look good. It is nothing more than a color or a map applied in a fixed orientation, although a video file can be applied as well. By default, 3ds Max uses a black color swatch in the Environment and Effects dialog box to provide a black background. This type of background is a poor choice regardless of the color, but black is particularly bad even for test renders because of how it can hide the boundaries of an object. Regardless, using a single color for a background is not realistic, and therefore, maps are really the only acceptable alternative.

Figure 9-3. The Environment and Effects dialog box.
If you load a map into the Environment Map channel, you are telling 3ds Max to override the background color and display the map to the extents of the rendered window, regardless of how large the rendered image may be. The only real advantage of using the Environment Map channel over the other 2 options mentioned is that it’s quick and easy to implement. However, this single advantage suddenly becomes the greatest disadvantage whenever you decide to manipulate the mapping, and since maps loaded in the Environment channel are mapped to fit the dimensions of the render window by default, manipulation of their tiling and placement is usually required. For example, without adjusting the placement of a bitmap loaded in the Environment channel, you would have to find a background image whose horizon line closely matched your scene’s horizon line. And without adjusting the tiling of a bitmap, you would have to use a bitmap whose aspect ratio closely matched the aspect ratio of the rendered image. Figure 9-4 shows a scene with a background image that lacks both of these qualities, as most would. The background image is squashed to fit the render window and the horizon lines certainly do not match. Finding a suitable bitmap is difficult without editing the original image so the only solution, of course, is to adjust the placement and tiling.

Figure 9-4. A bitmap unsuitable for use as a background with default placement and tiling.
If you want to adjust the placement and tiling of a map loaded in the Environment Map, you have to load an instance of the map in the Material Editor and make the adjustments there. To load an instance, drag the map from the Environment Map channel into any sample slot of the Material Editor and choose the Instance option. Doing this causes the sample slot to show a map instead of a material and that map will automatically be using the Environ option with Screen mapping, as shown in Figure 9-5.
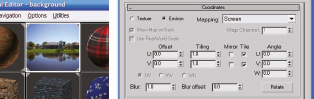
Figure 9-5. The Screen mapping enabled for an Environment based bitmap.
Within the Mapping drop-down list are four different options for the mapping of an image that is used as an environment, as shown in Figure 9-6. Each of these options provides a unique way for the map to be placed in the background. Let’s look at the differences of each type, but before we do, let’s first look at a feature that can significantly improve your ability to work with background images loaded in the Environment Map channel by controlling their display in viewports.
Figure 9-6. The four mapping options for a bitmap used as an enviroment background.
In the View menu, there is an option to open the Viewport Background dialog box (hotkey=Alt+B) shown in Figure 9-7, which allows you to load an image or video into a viewport’s background. This can serve as an invaluable visual reference in many different situations, whether you are trying to superimpose 3D models with video (i.e., camera tracking), or simply trying to model a piece of furniture with an image of the furniture in the background.
Inside this dialog box are some additional controls not available through the Material Editor. The Animation Synchronization section provides controls for implementing animated backgrounds, while the Aspect Ratio section lets you match the background image or animation to the aspect ratio of a viewport, the render window, or to keep the bitmap unchanged. Regardless of which options you use in this dialog, the one that matters most is the Display Background option, which enables the background in a viewport.
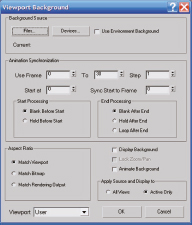
Figure 9-7. The Viewport Background dialog box.
Screen
The default Screen option places the map to the extent of the rendered view. While this option is suitable for single renderings, it’s not suitable for multiple views unless you change the map with each new view. In Figure 9-8, for example, the background image alone diminishes the believability of the sequence. It should be noted that the contributor of these images did not actually do this for this project; this background was intentionally used for both perspectives here to illustrate a point.
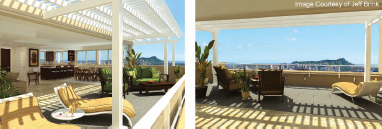
Figure 9-8. An unrealistic use of the same background image for two different perspectives.
Because the background is a fixed image when the Screen option is enabled, you cannot use this type of background with animations unless the map loaded is an animation itself. Needless to say, with great camera tracking available, this is a futile way to work.
One choice you do have with the Screen option is to use a gradient map. Figure 9-9 shows a gradient map used as a background to simulate a sky just after sunset. Since the image only changes in the vertical direction, you do have the option to make this the background of an animation provided the camera’s vertical orientation doesn’t change at all. This restriction makes using a Target Camera impossible unless the target stays at the exact same elevation as the camera throughout the entire animation. If this restriction is acceptable, then a gradient map is a possible alternative to the next 3 environment types. There are 3 clear advantages to this type of background. One is that it can be set up in just a few seconds. The 2nd is that you don’t have to worry about the resolution of the map as you would if you were using a bitmap. The 3rd is that it renders faster than any other type of background where a bitmap is used.
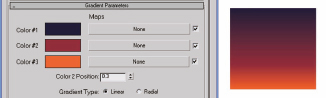
Figure 9-9 A gradient map used as a background.
Spherical Environment
The Spherical Environment option wraps a map around an infinitely large virtual sphere that surrounds your scene. The primary benefit of this option is that if you use a proper spherical map, you can allow your camera to look anywhere in the sky and expect to see a background image without having to worry about distortion or revealing a seam. If you do not use a spherical map, the distortion will be more severe the higher up in the sky the camera looks.
The left image shown in Figure 9-10 is a cylindrical image, meaning that it cannot be used for spherical mapping. The right image shows what the map would look like if the camera were pointed straight up in the sky.

Figure 9-10. An undistorted cylindrical map (left) and a heavily distorted view when looking straight up (right).
The left image in Figure 9-11 is a distorted spherical map, which when used as a background with spherical mapping results in virtually no distortion, even when looking straight up, as shown in the image on the right.

Figure 9-11. A distorted spherical image (left), and an undistorted view of when looking straight up (right).
Cylindrical Environment
The Cylindrical Environment option wraps a map around an infinitely large virtual cylinder that surrounds your scene. The problem with this particular type of mapping is that all images are going to have some noticeable distortion because an infinitely large cylinder means that the top of the image will be infinitely far away. Figure 9-12 shows the inside of an extremely long cylinder (with normals flipped) whose top vanishes into infinity. If you imagine an image of any kind mapped onto this cylinder, the top of the image would wrap around to a single point that diverges off to infinity. For this reason, I don’t recommend this mapping type. In fact, if you were to use the map shown in Figure 9-10 with cylindrical mapping, the result would be almost identical to the image shown on the right.
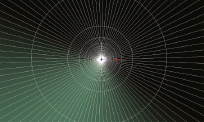
Figure 9-12. A view looking straight up when using cylindrical environment mapping.
Shrink-Wrap Environment
The Shrink-Wrap Environment option wraps the map around an infinitely large virtual sphere so that all four corners of the map wrap around and meet at the same point. This mapping type creates more distortion than spherical mapping but the one benefit of using it is that it has only one point where a seam is noticeable. If the mapping is adjusted so this point occurs below ground where it won’t be seen, then using this mapping type might be an option for you.
Summary of Environment Maps
With the possible exception of the Screen option, I believe environment maps are far too difficult and restrictive to even consider as an option for a background. You will find that in order for a bitmap to look good as an environment map, it must be of a high enough resolution or it must be tiled. If you decide to use the Spherical Mapping option, which is the best possible option for animations or for projects where multiple rendered views are needed, the bitmap you use should be approximately eight times larger than the final rendered output. The reason for this is that the typical camera used has approximately a 45-degree field of view and sees only one-eighth of the 360-degrees with which the environment has been stretched to. Therefore, that one-eighth segment should be at least as high a resolution as the final rendered output.
The spherical bitmap shown in Figure 9-13 contains 9000 pixels in the horizontal direction and 2300 pixels in the vertical direction. Such a large resolution image is necessary when it is stretched to cover an entire spherical background; or in this case a full hemisphere.

Figure 9-13. A spherical map with a 9000x2300 resolution.
If a bitmap doesn’t contain enough pixels in either direction to provide a sharp background your only choice is to tile the map. If you tile a bitmap twice, you are telling 3ds Max to stretch the bitmap through 180 degrees of the environment (both vertically and horizontally) and therefore the bitmap has to only be twice as high in resolution to look as sharp. The problem with tiling, however, is that you have to be careful to keep the seams (caused by tiling) out of view. This will often prevent you from being able to look around very much in a horizontal direction and also prevent you from looking very high in the sky.
Unless you use the perfect type of bitmap image, tiling the background is almost always going to be a necessity. Because tiling and placement of a background map is so much more difficult with only the viewport background image as a guide, I highly discourage the use of maps in the environment channel. Nonetheless, a discussion of why was warranted.
In 3ds Max 2009, the mr Physical Sky map is the default map type for the Daylight system. This terrific new feature is an environment map and is certainly an exception to our recommendation of not using environment maps within 3ds Max.
Geometry Based Backgrounds
The background types discussed so far have all been those created through the Environment Map channel. Geometry-based backgrounds are those where a map used to represent the background is placed on geometry. This type of background is by far the most widely preferred in our industry, and for good reason. Although it requires more than simply loading a map into the environment channel, it is actually far easier to work on a background using geometry as a guide than it is to use the viewport background image as a guide. Placement and tiling of the map becomes much easier using an object like this, rather than having to do it through the use of a viewport background. Using an object, you can use the viewport navigation controls to quickly move around and see all areas of the map and any problems that may exist.
There are three primary types of geometry used as background objects: hemispherical objects, cylindrical objects, and angular objects. The following discussion describes how each type can be used.
Cylindrical Environment Objects
A cylindrical environment object is nothing more than a cylinder whose top and bottom faces have been removed and whose remaining face normals have been inverted so that the cylinder is visible from the inside. Figure 9-14 shows a cylinder surrounding an entire 3D scene with an image of a background placed on the cylinder so that it’s seen behind the other 3D objects.
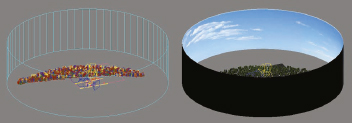
Figure 9-14. A cylindrical environment object used as a background.
The primary advantage of using this type of geometry object for backgrounds is that there is absolutely no distortion of the map placed on the object if you use a map with an aspect ratio that matches the cylinder. This advantage probably makes it the most commonly used background type. An easy way to make a cylinder with an aspect ratio that matches a bitmap you want to use is to create a plane in Front view with a length and width that exactly matches the bitmap. Apply 1 length segment and approximately 50 width segments, and then use the Bend modifier to bend the plane 360-degrees. The result will be a perfectly undistorted background every time.
The primary disadvantage of using a cylinder as a background object is that if your camera looks high enough into the sky, it would eventually see the top of the cylinder and the environment channel background color behind it, as shown in Figure 9-15. Obviously, this is not acceptable, but most 3D scenes don’t require the camera to look so high up into the sky. When it is necessary to do so, you can move the vertices at the top of the cylinder higher. Of course, you can only do this to a certain point before the distortion becomes too great. If the cylindrical environment option will not work you can use a hemispherical object, as discussed next.
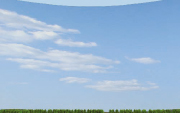
Figure 9-15. The top of a cylinder environment object visible when looking too high in the sky.
Hemispherical Environment Objects
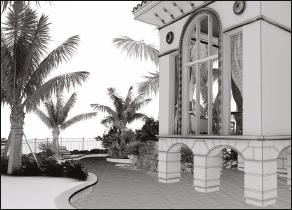
Like the cylinder background object, a hemispherical background object is nothing more than half of a sphere whose face normals have been inverted so the object is visible from the inside. When such an object is scaled large enough to surround an entire scene of objects, it can serve as a great type of background. In Figure 9-16, a hemisphere is placed on a plane representing the ground, thus creating the possibility of a 3D scene, completely sealed from the view or from the effect of the background channel.

Figure 9-16. The hemispherical environment object.
When you place the hemispherical object in your scene, you should ensure that it completely surrounds the objects in your scene, with the one exception of the object that represents the ground stretching out to the horizon. In Figure 9-16, you can see that the ground extends beyond the limits of the hemisphere, and therefore, there should be no gaps between the 2 objects through which the environment background can be seen. This of course assumes that the base of the hemisphere rests on the ground rather than floating above it.
Background objects and the ground do not have to join to form a completely sealed environment. Depending on camera placement and other objects that obscure the background object and background color, you may have your background object floating above, penetrating through, or much larger than the ground object in your scene. The important thing to remember is to keep the environment background color hidden from view at all times. This applies to any geometry type you use as a background.
Just like spherical objects, hemispherical objects require the use of properly constructed bitmaps. When a non-spherical bitmap is used on a spherical object, as shown in the left image of Figure 9-17, severe distortion can result, thereby negating the real benefit of using a spherical object in the first place. However, even when a proper spherical bitmap is used, a curving effect can appear in the bitmap, as shown in the right image. This effect is difficult to avoid and is more prevalent in bitmaps with more clouds visible. This is one reason why many artists elect to use images with very few clouds in the sky. Notice also that no trees or ground objects are visible in either image. As mentioned, this is because the curving effect would make this part of a bitmap look noticeably bad. It is for these reasons that many in the visualization industry don’t use spherical objects as a background object. In just a moment, we will see what the real benefit is of using spherical background objects.
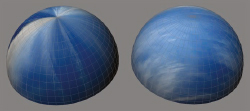
Figure 9-17. The hemispherical environment object.
Angular Environment Objects
Angular environment objects are background object types that only cover a certain angle of the scene. Unlike spherical and cylindrical object types, they do not provide a background for an entire 360-degree view. They can be something as simple as a single polygon, as shown in Figure 9-18, or an extruded arc that covers a larger field of view.
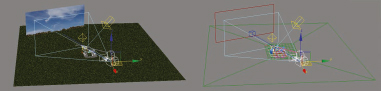
Figure 9-18. The angular environment object.
The primary advantage of this type of background object is that it is very quick and easy to set up. You can create a polygon with the same aspect ratio as the bitmap you want to use on it and then simply scale and position the object so it covers the entire field-of-view for the camera you want to render.
The primary disadvantage is that you cannot easily use a single background object for multiple rendered views or animations. Because of this disadvantage, it would only be practical to use this background object type if you knew beyond any doubt that your final product was going to be a single rendered view. You could actually use more than one of these object types for different rendered views, as long as you use different bitmaps to prevent the same background from being seen in multiple views.
Using Multiple Background Objects
You are not confined to using one background object type to produce a nice background. Sometimes you might find it useful to combine two different bitmaps to provide the look you want to achieve, such as one bitmap for the sky and a second bitmap for the land. In the left image of Figure 9-19, you can clearly see that 2 objects were used in the background of this scene. In the image on the right, you can see that one represented the sky and one represented the land, or more specifically, the trees. To mask the sky in the image showing the trees, an alpha channel had to be used. Two objects were used in this scene because we wanted a certain look for the trees in the background and did not have the appropriate image that contained both the trees and sky we wanted. We could have created such an image in Photoshop using the combination of both bitmaps; however, we find it easier to use this method.
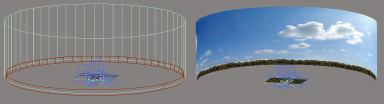
Figure 9-19. Multiple background objects used for scenes.
Illuminating Backgrounds
Just like other objects in your scene, background objects must be illuminated. You can choose to illuminate your backgrounds with the same lights that illuminate your other objects; however, this method is not recommended. The best way to illuminate a background is with a single omni light, centered within the background object and used to only affect the background object and no other objects. There are two advantages of using this method. First, an omni light casts an equal amount of light in all directions and, therefore, all parts of the background object would be illuminated the same, unlike a direct light, a sunlight system, or any other light type you use to illuminate the objects in your scene. The second advantage is that you can control the illumination of your background without affecting other objects in your scene, and vice versa. Both of these advantages are extremely important to creating realistic backgrounds.
Backgrounds in Reflection
It was mentioned earlier that spherical objects are often difficult to use because of distortion and curving that often occurs with the bitmap image. For this reason it is not the preferred background object type. However, there is one very nice benefit of using spherical background objects. Whenever you use a cylindrical or angular background object, you have to be careful not to show the top of the cylinder or the background color beyond. But you have to be just as careful so that they don’t show up in the reflections in your scene. Often, you will have a background object that works great as the background, but because of the position of your camera and the direction it looks, the reflections in your scene may make using that object unacceptable. For example, the left image in Figure 9-20 shows a lake reflecting the cylindrical environment and the top of the cylinder is clearly visible in the lake’s reflections.
The simple solution is to use a cylindrical or angular object for the background image and a spherical object for the background reflections. This means that you see a different background object in reflections than you see directly through your camera. This is probably the most preferred type of background setup in visualizations. The image on the right shows the same lake with the cylinder’s reflections disabled and a spherical object used for reflections in its place. No matter where you look in the scene, you will never see the sky improperly reflected.
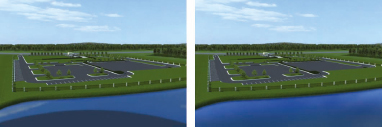
Figure 9-20. Reflecting a cylinder environment (left) and a spherical environment (right).
To use this method follow these 2 simple steps:
1. In the Object Properties dialog box of cylindrical / angular background objects, disable the Visible to Reflection/Refraction option.
2. In the Object Properties dialog box of spherical objects, disable the Visible to Camera option.

Figure 9-21. Disabling the visibility options for certain environment objects.
The main reason why this is a good way to set up your background is that you will see undistorted maps directly through your camera and regardless of where you look, you won’t see the edges of your cylindrical/angular background objects or scene’s background color in reflections. Even if a spherical map appears to be somewhat distorted when applied to a spherical environment object, this effect will almost always be unnoticeable in reflections. This is because when you do see reflections, you usually only see a small area of the sky reflected and what you do see is often obstructed by blurriness applied to the reflections or obstructed by some other object.
The importance of using two background object types like this is also very apparent when you look up at the windows of a building, as shown in Figure 9-22. Here again, the top of a cylinder background object might clearly be visible.
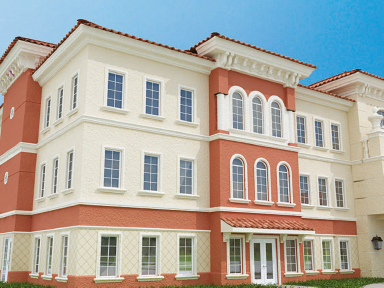
Figure 9-22. Reflections of a spherical environment while looking up at windows.
If you would like to use the background rig shown in Figure 9-23, open the file typ_background_rig.max. Remember that whenever you add a light to your scene, especially a light representing the sun, you have to exclude these 3 objects from the light.
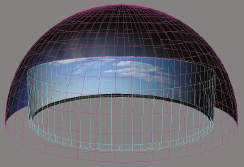
Figure 9-23. The typical background rig used at 3DAS.
Applying Backgrounds with 3rd Party Software
An additional method of applying backgrounds to a scene is through the use of 3rd party software; either a plug-in that runs inside of 3ds Max or software that runs outside of the program. This can include image editing software such as Photoshop or video compositing software such as Combustion.
Image Editing & Video Compositing Software
Many 3ds Max artists prefer to use software like Photoshop to create backgrounds for their visualizations. This is certainly a viable solution and one that provides quick and easy changes to a background. There are a few different ways to set up an image or animation to allow for this type of workflow, but one that is perhaps most widely used is the application of the Matte/Shadow material on an object to create an alpha channel. Applying a Matte/Shadow material to the window glass in Figure 9-24 causes an alpha channel to be created automatically, which can be used in other programs to place a background image.
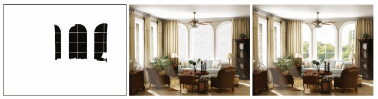
Figure 9-24. Window glass rendered with a Matte/Shadow material to allow background placement outside 3ds Max.
More about the use of these programs will be discussed in the chapters dealing with advanced animation, effects, and Photoshop techniques.
Plug-Ins
There are several choices available that allow 3ds Max users to automatically generate backgrounds based on parametric input. but one stands out from all others. The Vue xStream suite of plug-ins from e-on software allows you to create amazing 3D atmospheric environments that go well beyond the application of simple background images to a scene. The following description from the www.e-onsoftware.com website is not an advertisement, as the company was not made aware of my mentioning their product. I simply feel that with a discussion about creating backgrounds, and other site objects in other chapters, mentioning this amazing software is appropriate.
“True to its purpose as a complete solution for natural environments, Vue 6 features an elaborate atmosphere engine that does much more than mere backgrounds. Vue’s atmospheres provide an accurately simulated environment that affects all the elements of the scene, and behave according to nature’s rules. The appearance of an object in a Vue scene is directly affected by the position of the sun, the cloud cover, the amount of dust in the air, or the humidity level.
However, different projects require different approaches to the simulation and rendering of atmospheres. This is why Vue 6 offers no less than four different atmospheric models, ranging from simple background skies to photo-based environments and physically accurate atmospheres. Within this wide choice you will find the solution that best fits your project’s needs.
Upon rendering, xStream kicks-in its own render engine, which works in parallel to the native renderer. This assures that the Vue elements will look exactly as if they were rendered inside Vue, and also helps speeding up the rendering of polygon-heavy elements such as terrains and EcoSystems.
However, this is a completely transparent process. There is no need to deal with the xStream renderer. Parameters such as render resolution and anti-aliasing quality need only to be set for the native renderer.”
While we have not yet integrated this product into our workflow at 3DAS, through use of a trial version of the software we have determined that integration of the product in certain types of projects is probably in our near future.

Figure 9-25. The Vue xStream plug-in.
Other Considerations
• Whether you use one object for your background or multiple objects, it’s important to remember to turn off the Cast Shadow option for your background geometry. There is no reason why your background objects need to cast shadows, and doing so will cause them to block your scene from any light placed outside them. Even though the only light that should affect your background objects is the single omni light placed in their center, it is good practice to disable shadows for these types of objects.
• If you use global illumination, be sure to exclude these objects from advanced lighting or global illumination. These objects are the largest objects in any scene and their effect on the light that bounces around a scene is tremendous. Allowing these objects to bounce light will essentially paint your scene with a large amount of blue light.
• Make sure you use enough faces in the creation of your background objects. Using too few will cause facets to appear on your background. Relative to the rest of your scene, the background object has a negligible effect on rendering times and refresh rates so you shouldn’t skimp on this object.
• If you have a background image that shows up pixilated in a viewport, try enabling the Match Bitmap Size As Closely As Possible option, within the Preferences > Viewports > Configure Driver dialog box.
Summary
Backgrounds are an immensely important part of almost every 3D scene. Whether you just see the background itself, reflections of the background, or the effects of the background through global illumination, this particular part of a 3D scene must be done correctly to achieve a convincing and realistic look. Especially for exterior scenes, where backgrounds can often comprise half of what is seen in a rendering, the importance of an effective background can’t be overestimated. This discussion has only brushed the surface of some of the important considerations and methods of implementing great backgrounds. Like all areas of 3D, your ability to explore other methods is limited only by your imagination.