CHAPTER 18
The Animation Process

EVERY VISUALIZATION PROJECT IS UNIQUE and every firm takes its own approach to producing the end product. Regardless, most firms tend to execute many of the same major steps along the way, although not always in a logical progression or with the same prudence of veteran firms that have learned a proper execution the hard way. For example, many firms learn the hard way the importance of inspecting architectural drawings before pricing a project.
Most firms seem to experience the same general problems and pitfalls that plague our industry and many eventually employ the same general techniques to mitigate these problems. With this in mind, the intent of this chapter is to provide some insight to some of the major steps of a typical animation project from the first meeting with a client, through post production and delivery of the final product. The goal is to identify the major steps and outline a logical order in which those steps should be executed and to present some tips and tricks that can aid in their execution.
Whether the end product is a still rendering(s) or an animation, the production process is often the same up until the time the rendering phase begins. So, the following is a list of some of the major steps of a typical animation and some of the strategies you can employ to avoid the problems that are likely to arise.
1. Market your services
2. Talk/meet with client
3. Do not disclose price
4. Determine end product
5. Learn as much about project as possible
6. Request drawings
7. Make contact with other companies
8. Receive and inspect drawings
9. Question poor designs
10. Determine what will be seen and the level of detail
11. Create production timeline
12. Write proposal / PSA
13. Receive signed contract and deposit
14. Create project folders
15. Ensure you have latest drawings
16. Break up project
17. Clean and prepare CAD linework
18. Import linework
19. Model building elements
20. Model site elements
21. Create an assembly line work flow
22. Save incrementally and save often
23. Merge background rig
24. Use material libraries
25. Merge scene elements
26. Load lighting preset
27. Create animation paths
28. Create copy of maps in project folder
29. Create test renders
30. Fix / change animation
31. Create production render
32. Post production
1. Market your services
For detailed insight to numerous marketing strategies, refer to Appendix E.
2. Talk/meet with client
A big decision freelancers and small business owners struggle with in their first few years of operation is whether to lease or buy office space and move their business out of their home. Such a decision cannot possibly be made lightly and by anyone else but the individual(s) involved, but if a majority of your clients are locally based, there is a decisive advantage in having office space clients can walk into. Landing large projects from big name developers is an enormous challenge without such an office space. Although many clients will understand that good work is simply good work, regardless of where your business is based, many clients will not see past the fact that you have not obtained the financial means necessary to secure an office, and interpret your company as a here today, gone tomorrow business. Even worse, they may expect you to charge less for your work because of your smaller overhead costs and might believe they can take greater advantage of your position during the negotiation process.
When you market your services to a potential client, something you should have ready to present at any time is a detailed slideshow of what you do and how you do it. Demo DVDs are obviously a great form of marketing media, but nothing can replace the simplicity and effectiveness of a PDF or PPT document to showcase some of your best work while simultaneously presenting an overview of the 3D process and the range of your services. This becomes even more important when you conduct your presentation in person or need to send the potential client something by email. When a potential client calls or emails and you can instantly direct them to a webpage that contains such a presentation, you don’t run the risk of losing the client to someone else while your DVD or brochure is being mailed. And unlike a DVD, which can be very time consuming and expensive to update, a PDF or PPT document can be updated in just minutes.
A few sample slides of the presentation 3DAS uses are shown in Figure 18-1. For more information about this type of marketing media, see Appendix J.
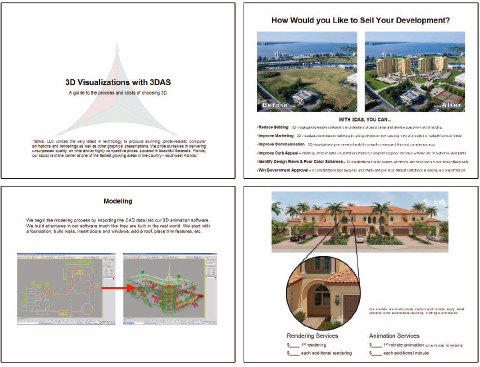
Figure 18-1. A few pages from our 3D CAD brief.
3. Do not disclose price
One of the very first things a potential client will ask is, “How much does a rendering or an animation cost?” It is generally in your best interest to avoid directly answering this type of question until you have a thorough understanding of every detail involved. Obviously, if the client is persistent and demands a ‘rough idea’, then a range of prices would be appropriate, but only after you have been provided answers to some basic questions, such as:
• When is the final product due?
• Is custom furniture needed?
• Are there CAD files?
• Are the drawings finalized?
• Is there a landscape plan?
4. Determine end product
It may seem to go without saying that both you and the client should know what the final product is, but this is truly a step of the 3D animation process that is continually neglected by many new businesses. Knowing that the client wants an animation is not enough. You should know as many details about the final product as the situation allows. You should know answers to questions like, ‘What is the length of the animation in raw form and in edited form? Who is editing the video? Are stills needed? If so, how many and what resolution? What kind of music or narration will the video need?’ The list can be endless and to find the real answer to some of these questions, you might have to do some digging. Take the following question, for example – ‘When do you need the animation?’ Clients will often see this question as a way to expedite your work and give you an answer that really doesn’t tell you what you want to know. When presented with this type of question, your client may simply throw out a date or timeline on the spot without really telling you that the timeline is flexible. If you instead ask, ‘What is the drop-dead date?’, a client is far more likely to give you the answer you’re looking for, or at least an answer that won’t lead you into an unnecessary position.
Likewise, the client should have as thorough an understanding as you do about what will be provided. As mentioned several places in this book, a contract is most valuable not for the legal protection it provides, but rather for the clarity it provides both you and the client as to each person’s responsibilities. By listing the details of what the client must provide you and what you will provide for the client and when, both you and the client can be comfortable in the knowledge that each of you understands what the end product is, and when it is due. Finally, when the details are presented in a contract, it is much better to assume that your client knows as little as possible about the process and you should over explain what you will be providing.
5. Learn as much about project as possible
Try to gain as much insight about your project as you possibly can. Doing so makes other steps of the animation process much easier, such as pricing the project, determining timelines, etc. This step, like all others, should also be factored into the final price you provide.
6. Request drawings
Some clients take excessive lengths of time to obtain the latest set of drawings, so request them at the earliest opportunity. When you do, you should make the process as painless for your clients as possible, so as to not discourage them from coming to you with future projects. So rather than requesting an entire set of drawings, which can often make architects and engineers leery, request only those drawings you really need. Do not overlook important drawings such as the landscape plan, furniture plan, cabinet elevations, etc. These are examples of drawings that are commonly overlooked during the initial request that can cause major delays down the road.
7. Make contact with other companies
During the course of just about any project, you usually have access to each of the companies involved in the creation of the project, and hence, a great marketing opportunity. Take advantage of every opportunity to communicate with these new potential clients as it may be your best chance to gain their attention. For a typical project, you might have the opportunity to work with several architects, landscape architects, civil engineers, interior designers, real estate agents, investors, and many others. Each of these individuals might sell your services to others in their network, so meeting or speaking to as many of these individuals as possible is invaluable.
8. Receive and inspect drawings
Most architectural visualizations begin with what I consider the foundation of 3D – the 2D line work. Sometimes, you may need to produce a visualization from nothing more than some simple hand-drawn elevations, in which case your best course of action is to trace the sketch in a 2D CAD program to produce the necessary 2D linework. In most cases, however, you will begin a project with 2D CAD drawings already in hand, even when their creation is not finalized. These CAD drawings may be produced solely by the architect, by a freelance CAD drafter, or by numerous different firms working to complete their part of the final set of construction documents. Whatever the case may be, all involved have their own style for creating drawings and leave their own mark on their drawings. If you’re lucky, you will receive a complete set of perfectly created drawings, but most of the time there are things in the drawings that, while not apparent on paper, may cause you hours of time to fix before the linework can be used in the creation of 3D models. These imperfections in the drawing process can eat away valuable production time and significantly impact your profits. For these reasons, you should always try to avoid giving your clients a price until you’ve had a chance to inspect the drawings you’re going to be working with.
For more insight on the inspection of drawings, refer to Chapter 2 and Appendix A.
9. Question poor designs
One of the most practical uses for a 3D visualization for a client is being able to see their project before it’s built and change a poor design before construction begins. Your work may begin while a project is still in its design development stage, in which case its design is not set in stone and construction documents have not been produced. In this situation, you may find yourself modeling a portion of the project that appears poorly designed. Sometimes architects or drafters will create drawings based on their interpretation of what their client wants or what their client’s sketches show. However, these drawings do not always represent what their clients have in mind. Sometimes their clients don’t even know what they want.
You may be asked to model a poor design when your client, whether it’s an architect, a developer, or the owner himself, jumps the gun and has you begin your work before the design has been thoroughly analyzed by all of the necessary personnel. In any case, whenever you come across a drawing that appears to be a poor design or a design that simply doesn’t make sense, you should question it and stop working until a resolution is found.
You should also question drawings that contain contradictory information before continuing work. This problem is very common, especially with drawings that haven’t been completely finalized. An example would be a floor plan that shows a window not shown on the elevations, or vice versa. Another example is when the front elevation shows one roof height, and a side elevation shows a much different roof height. These types of problems should be questioned before continuing work, and if you manage to find numerous problems like these before you accept a job or quote a certain price, you should cover yourself by not accepting the drawings from your client, or by explaining that you will have to charge more to account for these problems. You will probably regret not doing so later.
10. Determine what will be seen and the level of detail
A critical part of efficient workflow is determining as early as possible what in your scene will be visible by the camera and the level of detail you need to maintain. Doing so helps you avoid modeling features that won’t be visible to the camera and placing excessive detail in objects that are farther away from the camera. Creating a detailed script with camera paths as early as possible is a great tool that makes your entire project much easier to manage.
11. Create production timeline
This is probably one of the most poorly addressed steps in the animation process. We have all been guilty at one time or another of establishing an unrealistic production timeline and underestimating the amount of time it takes to create an animation. For some, this is more of a norm than an exception. There are so many reasons why production can drag on beyond our expectations, and no matter how much we think we have learned from the previous project, we often find ourselves in the same position over and over again – continuous late nights trying to meet a deadline.
12. Write a proposal / PSA
Writing a good PSA (professional services agreement) is a crucial step in most visualization projects. You might feel the urge to do away with a contract for certain clients, but caution should be taken in these situations. Obviously, if you’ve known your client for a long time and trust in their way of doing business, doing without a contract is a reasonable option for most small projects. However, even for these clients, large projects with large price tags should usually include a contract.
When working with new clients, contracts should be used for even small projects, because sometimes only when the details of the scope of services are laid out in writing will the client truly understand what you are going to produce for them. Good contracts prevent you from incurring the cost of additional services not explicitly set forth in writing and also explain in detail what is expected from each party and the limitations of your services. You do not need to have a lawyer write or review your contracts to have them upheld in court, but they should be well-written to avoid any chance of misinterpretation.
A sample contract is available in the support files and is discussed in greater detail in Appendix H. This contract covers all the bases and should help give you an idea of some of the ways a contract can protect you.
13. Receive signed contract and deposit
No matter how good you feel with a particular project or the companies involved, it is always a good idea to wait on a signed contract and deposit before beginning work. Additionally, we recommend always building the project’s timeline, as specified in the contract, based on events rather than specific dates. For example, Figure 18-2 shows a project timeline from a PSA in which the first draft renderings were guaranteed to be provided not by a specific date, but rather by a specific number of days from the time a signed contract, deposit, and all project information are provided. Further events are specified in days from the previous step in the timeline. This prevents you from failing to meet your obligations in the event of a delay that is out of your hands, and have to explain why you’re not at fault.
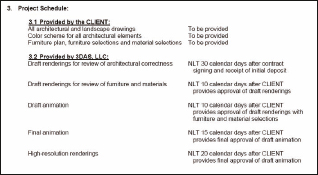
Figure 18-2. A typical project schedule from a PSA.
14. Create project folders
Create a simple and efficient project folder structure. Below is an example of one.
• Docs
• Dwgs
• Images
• Maps
• Max
• Renders
• Videos
15. Ensure you have latest drawings
Never assume that a project’s drawings haven’t changed without your knowledge. Continuously ask if revisions or changes have been made that would affect your work; especially if there have been long delays in between different stages of the process. It is not unusual for clients to provide architectural drawings right from the start, take excessive lengths of time to sign a contract and provide the initial deposit, and not tell you that the drawings have changed once you are ready to begin work.
16. Break up project
Large 3D projects can be difficult to manage and complete on schedule. The further you get into a project, the more harrowing the adventure gets, and with deadlines looming, you can easily begin to wonder how it’s all going to be finished in time. Breaking your projects into smaller jobs can help you manage them and keep production on schedule. Regardless of the project size, and whether you work on it by yourself or with the help of others, a project should be broken up into several smaller and more manageable jobs. Doing so helps you keep track of what’s finished and what remains to be finished. Breaking up a project can also help you better estimate the time and staff that will be needed to complete it and aid in the development of a contract.
17. Clean and prepare CAD linework
The importance of adequate attention to this step cannot be overemphasized. Many peers we speak to are surprised to learn how much time our company spends on this step of the production process, which for the typical project is approximately 25% of the total time we spend on a project. As mentioned before, we consider 2D linework to be the foundation of efficient 3D workflow and by spending the appropriate amount of time preparing the 2D linework, we minimize our 3D work.
More information about the cleaning and preparing of files can be found in Chapter 2.
18. Import linework
How you import your linework is a matter a personal preference. Rather than linking 2D drawings to 3D scenes, our preferred method is importing linework a few elements at a time. For example, if we are building a 3D site, we will import the linework representing the curbs, model the curbs, import the linework representing the mulch beds, model the mulch beds, etc. This allows us to build scene elements with minimal screen clutter and allows us to identify problems on one element before working simultaneously on other elements. For very small scenes, such as the one developed in Chapter 7, importing all the linework at one time is certainly reasonable. When done properly, importing linework only takes a few seconds.
19. Model building elements
Everyone has his or her own style of work and own way of modeling the various objects that make up a 3D scene. However, one of the most asked modeling questions is, ‘What is the best way to model walls?’ Like most areas of scene creation, it’s a matter of personal preference and what method works best for you. Regardless, most veteran users seem to rely on one of two methods for modeling this critical scene element. Some choose to use the ‘box modeling’ method made possible with the Edit Poly command. Our preferred method is the loft, which allows us to create trim features, reveals, soffits, and fascia at the same time the walls themselves are generated. It also allows us to embed material IDs into the loft and since the loft object is linked to a shape, we can update the individual wall lofts at any time during the creation process by updating their individual shapes.
Some users rely on parametric modeling features in programs like Revit to create building elements outside of 3ds Max. This approach has come a long way in recent years; however, it is still hindered by two important factors. First, the modeling capability of such programs is often not powerful enough to enable the creation of complex building elements, such as intricate trim features or windows details. Second, even when the programs allow for such creation, the time needed to create the individual wall, window, door, and trim styles, etc. does not usually justify their use.
For more information on techniques for creating building elements, refer to Chapters 3-6.
20. Model site elements
Creating realistic site elements usually presents far greater challenges to the typical 3ds Max user than creating building elements. Unlike most buildings, 3D sites can quickly grow out of control and beyond the capability of 3ds Max or your computer to handle when not built efficiently. For more information on techniques for creating site elements, refer to Chapters 7-10.
21. Create an assembly line work flow
When creating multiple types of the same building or site elements, you should utilize an assembly line approach. This approach works well for the creation of doors and windows as well as furniture, vegetation, and countless other object types. It worked for Henry Ford in the production of automobiles, and it can work just as well in the creation of 3D objects.
For instance, by using an assembly line to create doors and windows, you can reduce the creation time per door and window type to a fraction of what it would take to create each using other methods. If you decide to try this method, the first thing you need to do is line up a single copy of each door and window type in a row, as shown in Figure 18-3. If your linework originates in AutoCAD or another 2D CAD program, simply make the copies somewhere off to the side and import the linework. If you don’t have 2D CAD linework, and instead have to create the windows and doors from scratch in 3ds Max, create the linework off to the side in your 3ds Max file. Figure 18-3 shows a project that contained 14 different styles, which would have been extremely time-consuming to create one by one.
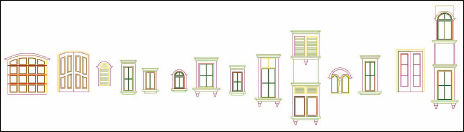
Figure 18-3. An assembly line of windows.
22. Save incrementally and save often
Few things in the animation process can be more frustrating than losing your work when your computer or 3ds Max crashes, or when your files become corrupt in some way. Restarting the computer and interrupting your workflow is bad enough, but having to backtrack and redo work can be downright painful. Equally bad is going back to a certain point in your work to retrieve a scene (or objects) in a previous state, only to find that you didn’t save a copy of the scene at the right time. The solution here is to save incrementally and save often.
Before performing a critical procedure that cannot be undone, you should always save your work. Figure 18-4 shows an example of the incremental saves made during a past project. Notice the numerous versions of different scene elements. Notice also the names of the files: clubhouse, entry_signage, room, site, and vegetation. As previously suggested in the step regarding breaking up a project into smaller sub-projects, each of these elements was created separately and merged together at the end.
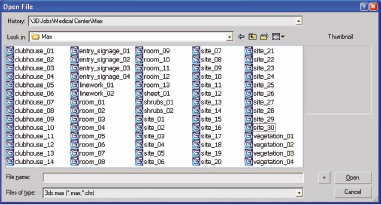
Figure 18-4. An example of the many files of a typical project.
Good file management is critical to efficient production and nonexistent in many 3D firms. Saving incrementally and saving often are two good practices that can go long way toward improving your production output.
23. Merge background rig
Nearly every 3D scene requires the use of a background image. Whether creating an interior still rendering or an exterior animation, we recommend using a model based background. When doing so, you should avoid recreating the same objects over and over again. Instead, simply merge the same background rig (such as the one shown below) into your scene and make adjustments to the image and the mapping as necessary.
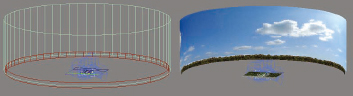
Figure 18-5. Use of a cylinder object for a background.
For more insight on the creation and use of backgrounds, refer to Chapter 9.
24. Use material libraries
Working with materials in 3ds Max can be a long and arduous process, made more difficult if you don’t use material libraries. Material libraries allow you to store and retrieve your favorite and most frequently used materials in easy-to-access files. Creating the same materials over and over again for each project would be a waste of time. Hopefully, your image library, which you use for materials, contains tens of thousands of images. However, if this is the case, the simple act of locating an image to apply to a map channel can end up being not so quick and simple. For scenes with dozens of materials, this can translate to large amounts of wasted time.
The solution is to create and maintain good libraries. If you create a material you think you will want to use again in the future, take a moment to give the material a relevant name and add it to the proper library. If you’ve never spent much time creating libraries, try opening some of your best scenes, reviewing the materials you applied, and putting the best ones in your library. Like other areas in 3ds Max, a little bit of time spent in program maintenance can save you a tremendous amount of production time and help you meet your deadlines.
25. Merge scene elements
Like the application of materials to your scene, placing common and everyday scene elements can be a laborious and time-consuming process if not done wisely. Most scenes contain ordinary elements such as lampposts, street signs, houseplants, TVs, and so on. Creating these objects for each project is not a viable option for you or your client, and therefore using objects from libraries or earlier projects is usually the only reasonable alternative. Since the focus of a visualization is usually other elements such as buildings, interior or site design, clients will often not care one way or another how you populate your scenes with ordinary objects, as long as they do not distract the viewer from the focus of the scene. For these reasons, I highly recommend using objects from past projects to populate your scene with ordinary scene elements.
26. Load lighting preset
Although the need for experimentation is all but guaranteed in every project, most veteran users still rely on a typical lighting configuration or preset as a starting point. Most advanced render engines provide you the capability to save such a preset, like the one shown in Figure 18-6 used with V-Ray.
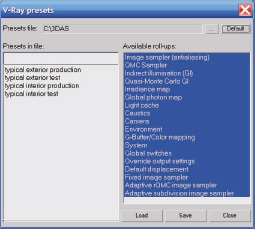
Figure 18-6. Examples of lighting presets.
27. Create animation paths
Although the complexities of camera movements in visualizations do not usually compare to those found in the entertainment industry, the need for precise control of cameras is just as important to our work. The creation of animation paths can occur at any time during the animation process, although the sooner the better. Even if you can only create a very rough draft of camera movements, the sooner you determine what is going to be seen through your cameras, the better you can determine which areas of your scene need more detail than others. However, it’s usually not possible to finalize camera movements until every piece of geometry is in place.
As a rule, I always inform the client that he or she has the option of specifying the exact camera paths to be used in the final animation. The client often declines this opportunity but it is a useful way of safeguarding the choices you make. The wording from our contracts regarding this matter reads as follows:
The CLIENT shall be allowed to provide a detailed script for camera movements throughout the project. If the CLIENT fails to provide a detailed script of camera movements within 30 days of contract signing, then 3DAS, LLC will use its best judgment to provide a pleasing script for camera movement and will not be responsible for changes which may be reasonably considered unnecessary.
For an example of an interior animation sequence, download a sample scene contains numerous cameras animated along the same active time segment. This file can be found in the scene files for this article. All materials and lights have been removed.
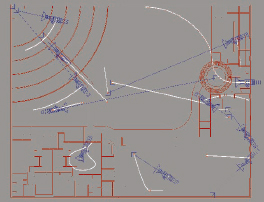
Figure 18-7. Various camera paths for an interior project.
28. Create copy of maps in project folder
If you render to a network of computers, you can improve the overall speed of the rendering process by making a copy of all maps used in a project and placing them on each computer involved in the rendering. This reduces the time required to transfer maps from a central server location to each individual computer. It can also facilitate archiving scenes and ensuring the integrity of a scene is not disturbed by the loss of network connection or the renaming or removing of maps in your maps library down the road.
The easiest way to create a copy of the maps in a project is to archive a scene, unzip the archive, search for all files within the archive, and copy all the bitmaps to a new folder.
29. Create test renders
Test renders should be created throughout the entire course of a project, but there are a few critical points at which you should and shouldn’t send test renders to your clients. Naturally, when a client hires you, they want to see the final product as soon as possible. The longer a project takes to complete, the more anxious clients can become in wanting to see and inspect your progress. Many firms make the mistake of sending test renders to their clients too early in the process, when doing so does absolutely nothing to appease the clients and everything to question the progress made. Many clients do not understand enough about the production process to know how some portions of the process take a very long time to complete and others a relatively short time. The very first test renders you send to a client makes a tremendous first impression, and sending the client renderings too soon can create difficult situations, regardless of what you tell him in advance of the renders.
I recommend sending the client test renders at four distinct stages along the production process: after modeling is completed, after materials and lighting have been perfected, after camera paths have been created, and just prior to final renders being generated.
The first set of renderings should be made in grayscale without materials and with one very specific purpose made perfectly clear to the client; to verify the structural correctness of a scene, and perhaps a secondary purpose of verifying camera angles in the case of still renderings being the final product. If you send the first test renderings with materials or colors applied, two problems can arise. First, the client might focus more on the materials and colors and overlook the more important issue of verifying the physical correctness of the structures in the scene. Second, the client will likely begin critiquing materials and colors before you have even begun a serious application of them, which can lead to the client thinking you are going to be charging for extra work when the changes are made, or that you didn’t understand what was asked for.
The second set of test renderings should be sent when all materials and colors have been properly applied to the best of your ability per the information provided. Any sooner and you are likely to be wasting time with little gain.
There are two methods we have found that work great for producing these first two test renders. The first is a QuickTime panorama at critical perspectives that provide the best views of a scene. Figure 18-8 provides such an example, with the left image showing the first panorama sent to the client, after the modeling process was complete, and the right image showing what was sent after the scene was completed to the best of our ability. In both cases, we were looking for client approval of the work completed thus far. These panorama files can be found in the support files and are entitled Dining_test01.mov and Dining_test02.mov.
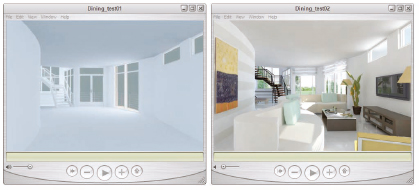
Figure 18-8. QuickTime panoramas created as test renders.
The third test rendering that should be sent, and one that would only apply to animations, is a shaded preview animation whose sole purpose is to allow the client to approve the camera paths you create. For this type of render, the client has already seen the test renders with good materials and lighting applied, yet we still make it perfectly clear that the only thing the client needs to comment on is the path of the cameras. This type of render can be best provided using the Make Preview feature.
The fourth and final set of test renderings we provide for an animation are full-sized renderings in finished form at approximately every 50th frame of the animation. Doing so enables the client to see exactly what the animation will look like at about every 1 to 2 seconds along the path. Since the renderings are in finished form, with materials and lighting finalized, it also allows the client to see the quality of the final product and to identify last minute changes or revisions.
Changes and revisions are inevitable for most projects and each tends to require new test renders over and over again. Regardless, the four types of test renderings mentioned should serve as a guide in your determination of exactly when it is appropriate to send the client your work.
30. Revise animation
One of the most difficult aspects of running a 3D visualization business is knowing when and how to charge the client for additional work. It may seem a simple matter, but without careful and candid discussions with the client as well as the proper protection built into your contracts, you can easily find yourself persuaded to perform work free of charge. Creating a visualization is as much an art as it is a science and your artistic interpretation of the client’s project can easily be viewed by the client as a mistake rather than a matter of artistic interpretation. Furthermore, no matter how much you explain the process and the difficulties in making certain changes, some clients will simply never understand what it takes to make some of the changes they request. To prevent any awkward situations regarding this matter, ensure the client knows from the beginning what can and cannot be changed for free and what types of changes incur additional expenses.
The following two paragraphs are examples of wording that can be used in a contract to help prevent misunderstandings regarding changes to an animation.
3DAS, LLC will provide the CLIENT with a draft version of the 90-100 second animation sequence to review. 3DAS, LLC will revise, within reason, any elements of the sequence which were overlooked or elements which do not conform to the architectural data provided. Colors and textures may be altered after the draft animation submission, at the request of the CLIENT, at no additional charge. The CLIENT may elect to make changes to the design not specified in CAD files at the hourly rate specified in Exhibit B.
Client understands that the 3D visualization process is not perfect, that “gray areas” will exist, and some information may be missing if not clearly and precisely specified in the CAD drawings. For the process to be cost effective for both parties, Client will allow 3DAS, LLC to use its experience and judgment to create the best possible animations and images given time, financial and informational constraints. 3DAS, LLC will also allow Client opportunity to make reasonable changes as long as they significantly improve the presentation.
31. Create production render
For information regarding the creation of final rendered outputs, such as resolution sizes, typical file types used, and tools that can facilitate the rendering process, refer to the file entitled Rendering.pdf. This is Chapter 16 from 3ds Max 2008 Architectural Visualization – Beginner to Intermediate.
32. Post production
If you have never tried post production compositing tools such as Fusion, Combustion, or After Effects, you might not know what you are missing. These types of tools allow you to add things to your animations that would otherwise not be possible without great effort and time. For example, if you wanted to create an animation showing a light changing in intensity over time, you could always render each frame of the sequence showing the light’s changing intensity. A far easier way to accomplish the same task would be to render a single lighting pass in 3ds Max that incorporates the light’s effect on the rest of the scene and animates the light’s intensity in real-time using the post-production software. The difference in time and effort between the two different methods is almost unbelievable.
Unlike the name implies, the process of post-production actually begins well before the rendering process starts, because using the appropriate software (such as Fusion shown in Figure 18-9) requires the user to have a scene set up in a certain way, to have certain types of material applied and to use the Render Elements feature. For more information about how compositing software is used, refer to Chapter 16. Unfortunately, a proper discussion on the subject of post-production and compositing warrants the dedication of an entire book, but the material presented in Chapter 16 should serve as a guide of what is possible in this final stage of the animation process.

Figure 18-9. Example of the Fusion compositing software in action.