CHAPTER 17
Photoshop Techniques for Visualization
FIRST RELEASED IN 1990, Adobe Photoshop continues to be the market leader for commercial image manipulation. It seems that no one in the 3D visualization industry can do without this program, so we felt it appropriate to illustrate some of our best techniques for integrating Photoshop into our workflow at 3DAS. Realistically, you could fill a book with all of the things you can do with the program to benefit our type of work, but rather than try to do that, we are presenting some of our most widely used techniques we simply couldn’t do without from day to day.
A few times throughout the book, we mention that it is our preference to minimize the amount of post production work in Photoshop, Fusion, or any other program, when that work can be just as easily done in 3ds Max. We prefer to have completely independent scenes whenever possible and minimize our reliance on having to touch-up or edit our work in post production. While this is true, there are numerous reasons why we are forced to rely on Photoshop and other programs from time to time. The previous chapter is a testament to the power and usefulness of post production work outside of 3ds Max and when the need to perform post production in Photoshop arises, the following techniques are just a few of the tools you should have at your disposal to get your work done as efficiently as possible. They do not, in any way, represent all the things you should know or need to know about Photoshop. Instead, they are presented to help illustrate the usefulness of post production software and some of the ways you can use other software besides 3ds Max to save time with a project. They are presented in no particular order of usefulness and require a basic understanding of Photoshop. The Photoshop version used in this chapter is CS5.
• Paste-Into
• Ready…Set…Action Script!
• Cloning Done Fast and Effective
• Using 2D Images in 3D Scenes
• Photoshop Masking
• Photoshop Depth of Field
• Adding Effects
Before We Begin
• Although this chapter focuses on CS5, most of these tools can be used in earlier versions of Photoshop.
• Photoshop CS5 has multiple workspaces available. If you have not done so, make sure to set your workspace to the default settings. To do this, go to Windows > Workspace > Essentials (Default).
Paste-Into
The paste-into feature allows a user to paste one image into a very specific area of another image. When this command is used, the pasted image is confined to that area and will not extend beyond the limits of the predefined selection area. Some examples of when you might want to use this technique include:
• Adding an background image into a particular area of another image
• Superimposing a 3D rendering with a real aerial photo
• Duplicating objects in a very specific area (i.e., trees, shrubs, cars, etc.)
• Restricting your image manipulation to specific areas without needing an active selection
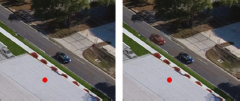
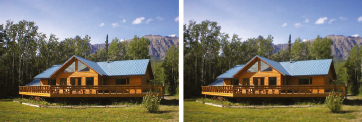
In this exercise, we will load the right image of the following illustration into the left image while allowing it to only be displayed through the windows.

1. Open Photoshop and load the file Alaska.jpg.
2. Press the keyboard shortcut Ctrl+A to select the entire image. Keyboard shortcuts are just as practical in Photoshop as they are in 3ds Max.
3. Press Ctrl+C to copy the image to your computer’s clipboard.
4. Load the file study.psd.
5. From the Select menu, click on Load Selection command. The Load Selection dialog box opens.
6. From the Channel drop-down list, select Alpha 1 and click OK to complete the command. This causes the single alpha channel embedded in the file to be turned into a selection.
7. Press Alt+Shift+Ctrl+V. This executes the Paste Into command, which simply pastes the contents of the clipboard into whatever selection is currently loaded. In this case, a background image is added to the area seen through the windows. You could have also selected the Paste Into command from the Edit menu; however, keyboard shortcuts usually make the same tasks quicker to perform. The result should look like the following illustration. The real benefit of this technique is that you can move the background image around without worrying about it leaving the predefined selection area.
Ready…Set…Action Script
The Action Script feature allows a user to execute a series of commands with one click of the mouse. If you need to execute the same steps over and over again, action scripts can save you a lot of time, and some examples of when you might want to use this technique include:
• Applying filters to a series of images to change the look of each image in the same way
• Reapplying the same procedures from one layer/document to another
• Converting a series of images from one file type to another
In this example, we will apply the Auto Levels feature to a sequence of images, followed by a blur filter, and then we’ll scale down each image to a different size. Of course, you can do all of this in video editing software, and to some degree in 3ds Max. However, if you or your company does not use video editing in-house, or does not want to spend the time or money to send it to a professional video editing firm, the ease and speed of being able to do this in Photoshop can be very appealing. The only way this can be done in Photoshop efficiently is through the use of action scripts.
Before you can automate the steps, though, you will need to first create the action.
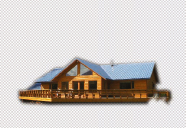
1. Open Photoshop and open the file Kidskids0001.jpg shown in the following illustration.
2. Click on the Actions palette (on right side of screen next to Masks palette) and then click on the Create new action icon (1st icon to the left of the trash icon). The New Action dialog box opens.
3. Name the new action Levels-Blur-Scale and click Record to complete the command. Notice that the sphere icon at the bottom of the palette turns red, which indicates that any command you use will now be recorded. The next time you open the New Action dialog box, notice that you can assign a function key to execute the script with one press of the key.
4. Press the keyboard shortcut Shift+Ctrl+L to execute the Auto Levels command. This feature effectively increases the contrast in an image by clipping the darkest pixels (pure black) and the brightest pixels (pure white) and redistributing all other pixels over the 0 to 255 color range.
5. From the Filter menu select Blur > Blur. This could be used to reduce the antialiasing side effects that often plague animations. Sometimes, it’s not until after you’ve created and played an animation that you realize there are too many artifacts due to the antialiasing filter used.
6. Press the keyboard shortcut Alt+Ctrl+I. The Image Size dialog box opens.
7. Enable the Constrain Proportions and Resample Image options (if not already enabled).
8. Change the Width from 720 to 320. Click OK to complete the command. Since the image aspect ratio is constrained, the image height will automatically change. The images are currently at NTSC resolution and 320X__ is a common size used for sending clients previews and posting on the Internet.
9. Create a new folder anywhere on your computer where the new images will be saved.
10. Press the keyboard shortcut Ctrl+Shift+S and save the image to the new folder you created.
11. Press the keyboard shortcut Ctrl+W to close the image.
12. In the Actions palette, click the Stop recording icon at the bottom of the palette (far left). When you do, commands will no longer be recorded.
13. From the File menu, select Automate > Batch. The Batch dialog box appears.
14. From the Action drop-down menu select Level-Blur-Scale and with the Source drop-down set to Folder, click the Choose button and navigate to the folder that contains all of the images you want to convert. Click OK twice to complete the command. When you do, the 30 images stored in the folder are converted.
Using action scripts can greatly reduce the many mundane tasks of an animation. So, when you need to convert file formats, optimize graphics, adjust colors, resize, and/or add effects to an animation, automating with action scripts is a quick and easy way to do it without having to use expensive and complicated video editing software. For other creative ways to action script, conduct an online search for Photoshop action scripts. Not only will you find some clever ideas, they are usually free.
Cloning Done Fast and Effective
When people tell you, “I Photoshop’d that out”, their work probably involved the use of the Clone Stamp tool. The Clone Stamp tool is useful for duplicating an object or removing a defect in an image. It is wildly popular, but there are ways to make the process much faster than the traditional Clone tool. Traditional versions of Photoshop have included the Spot Healing Brush, Healing Brush Tool, and the Patch Tool. Introduced in CS5, the Content Aware tool seamlessly fills the selection with similar image content nearby. There are other tools, but are not as effective in the 3D architectural visualization production environment.
Clone Stamp Tool
The Clone Stamp tool takes a sample of an image, which you can then apply over another image or part of the same image. Some examples of when you might want to use this technique include:
• Removing an area like an oil patch on a road
• Duplicating objects in an image, such as cars, trees, people, etc.
• Replacing an object with another
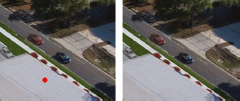
1. Open the file called aerial.psd. This file contains 2 layers. Notice on the road that runs along the right side of the development that there seems to be parts of trees erratically located in the middle of the road. These are actually just the tops of trees in the original image on which the 3D image was superimposed. Therefore, a 3D road was also modeled and is also superimposed. The 3D road, however, is on a separate layer that is currently turned off.
2. Turn on the road_and_car layer. We placed the road on a separate layer to make this exercise a bit easier to perform.
3. Zoom into the area shown in the following illustration.
4. Create an empty layer just above the layer road_and_car and call it red car. You can double-click the name of a layer to rename it.
5. Click on the layer road_and_car. Choose the Clone Stamp Tool located in the toolbar just above the History Brush tool, or press the keyboard shortcut S to activate the tool.
6. Hold the Alt key and click once on the blue car, as shown in the left image of the following illustration.
7. Click on the red car layer you created and then, with the Clone Stamp Tool still active, paint your duplicate car somewhere else on the same road. In the right image, you can see a duplicate created just behind the blue car, with an additional step added to change the car to red. You can use the blending features described elsewhere in this chapter to change the color of duplicate objects like this.
8. Keep this file open for use in the next exercise.
Spot Healing Brush Tool
The Spot Healing Brush tool quickly removes blemishes and other imperfections in your photos. It does this by using samples around the imperfection, and some examples of when you might want to use this tool include:
• Removing dirt on roads, birds in the sky, or any other small object in an image
• Blurring noise out of a small area
9. Select the Spot Healing Brush Tool (just above the Brush Tool) or press the keyboard shortcut J to activate the tool. In this file, we are going to use the tool to remove the small red dot shown just below the blue car.
10. In the top-left corner of the screen just under the Image menu, adjust the size of the brush so it is larger than the blemish.
11. Click on the layer called Background.
12. Click once on the red dot. The dot should disappear.
13. Keep this file open for use in the next exercise.
Patch Tool
Another great tool for cloning is the Patch Tool. This tool allows you to create a selection area around the area you want to edit, and then drag that selection to another place on your image from which to borrow pixels. Those borrowed pixels are then placed in the original selection area to cover what was there. Some examples of when you might want to use this technique include:
• When you want to add objects into a scene like a row of trees or cars
• To duplicate objects and have them blend seamlessly with their surroundings
14. Zoom into the area shown in the following illustration.
15. Click and hold on the Spot Healing Brush Tool to reveal a flyout and then select the Patch Tool icon.
16. If not already set, enable the Destination and Transparent options for the Patch Tool. The effect of these options will be apparent in a moment.
17. Create a circular shaped selection around the left tree as shown in the left image of the following illustration.
18. Click and hold inside the selection you just created and drag that to the area between the left and right tree, as shown in the middle image. Do not release until you have moved the tree to the final location where you want the duplicate to be created.
19. Release the left mouse button and the duplicate is made, as shown in the right image. Not only is the duplicate made, it is blended in with the background. Notice in the middle image that the selection that is dragged over is actually covering a small area of the parking lot, yet when the mouse button is released, the parking lot is not clipped out; it is instead blended with the duplicate tree. Even more, a small shadow is visible on the parking lot because of the blend. The Transparent option allowed the parking lot to be shown through the copied tree, which prevented the tree from appearing to grow out of the concrete. If the Destination option were not used, you would have had to create your selection in the open space and then drag it to the tree; just the opposite of what you did.
Content Aware
Introduced in CS5, the Content Aware tool easily removes image elements and replaces them with similar content close to the area you removed. For the best results, create a selection that extends slightly into the area you want to replicate. (A quick lasso or marquee selection is often sufficient.) Some examples of when you might want to use this technique include:
• Removing an image but wanting to fill it in with the background
• Fill in the edges of your document with similar content instead of cropping them

1. Open the file Hotel.jpg.
2. Sometimes when you rotate images, there are areas that show up as the background color. As shown in the figure above, we will concentrate on fixing those two areas – the sky and the grass.
3. With your rectangular marquee tool, select the white area around the sky. Press Delete.
4. A dialog box will come up and ask you what you would like to replace it with. Under Contents, use Content Aware. The sky area will now be filled in.
5. Sometimes Content Aware does not do such a good job. Select the grass area as shown in the illustration above. Repeat steps 3 and 4.
6. As you can see, Content Aware does fill in the area with grass. But it is repeated too much. In this case, it is suggested that you use the clone brush and/or spot healing brush to remove the repeating patterns.
7. Content Aware can remove images and replace them with the background. As an example, select the bushes in the foreground area located in the lower-left corner. To select those bushes, use the lasso tool but try not to select any of the building. Repeat steps 3 and 4. As you can see, the bushes are gone and replaced with the grass and road areas.
Using 2D Images in 3D Scenes
Have you ever tried using 2D images (mapped on a plane) in a 3D scene, only to find out that you see white/colored edges around it? This is caused by antialiasing, which in this case is the borrowing and blending of pixels between the edge of a foreground object and the white/colored background that it’s cut out of.
In the left image of the following illustration, the image of a tree lies on a white background. If the tree is cut out from this white background and set against a colored background, as shown in the middle image, the result would be a very noticeable white halo around the entire tree, as shown close-up in the right image.
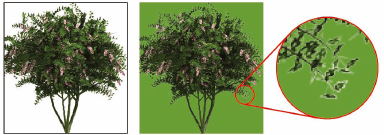
To avoid this, you should always make sure that your backgrounds are similar in color to the foreground object being cut out. There are dozens of ways to do this, but perhaps the easiest way is to create your selection to be cut out, inverse the selection, and fill that selection with a solid or gradient color that closely matches the average shade of color found around the perimeter of the foreground object. In the case of the tree shown in the previous illustration, a soft muted green color would do the trick. Unfortunately, when you create your fill, you will still see this halo shown in the right image because the selection you filled will also employ antialiasing.
The solution to complete the transition to a colored background would be to slightly alter the light colored pixels around the edge of the tree. There are several different ways to do this but the best tool is Refine Edge. This tool is found in the Select menu and serves one basic purpose; as the menu name implies, to help you select the pixels you need to perform a certain task. In this case, the task is to alter the color of the white pixels around the edge of a tree. Included are the major components of Refine Edge:
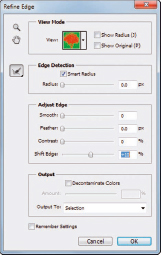
• View Mode – Click the thumbnail to view your selection as a mask, marching ants and other display types. Show Radius only displays your selection. Show Original displays your selection without any adjustments.
• Edge Detection > Smart Radius – Automatically adjusts the radius for hard and soft edges found in the border region. This option is usually used when your edges are soft and hard throughout your entire selection (Ex. Hair and vegetation).
• Adjust Edge > Smooth – Reduces irregular areas in your selection. If your selection is defined to many parts, smoothing out the edges can help.
• Adjust Edge > Feather – Makes hard edges into soft edges. Feathering is often used for faking anti-aliasing and vignette photos.
• Adjust Edge > Contrast – Hardens the soft-edge or feathered borders.
• Adjust Edge > Shift Edge – Adjust the edges and amount of your selection.
• Output > Output to – In most cases you will leave the output to Selection. However, it does come in handy for making masks on a new layer if you plan to use it later.
In the following exercise, we’ll look at the Refine Edge tool in action.
1. Open the file crape_myrtle.tga.
2. From the Select menu, click on Color Range. The Color Range dialog box opens and your cursor turns into the eye dropper tool.
3. Adjust the Fuzziness to 100 and click on the whitest pixel you can find, such as the one indicated in the following illustration. The Color Range window should indicate which pixels lay within the fuzziness range of the selected pixel, and therefore, which will be selected.
4. Click OK to complete the command. When you do, all the similarly colored pixels will be selected. Note that because of antialiasing running behind the scenes, the pixels you see selected are not the only pixels that will be affected by a color change you apply. The next step illustrates this point.
5. Set the foreground color to pure red and use the Edit > Fill command to fill the selected pixels with the red foreground color. This will help show you the true effect of the selected pixels. You should see the entire boundary of the tree surrounded by red-shaded pixels.
6. Undo the previous Fill command and repeat the previous step using a light muted green color as the fill color for the selected pixels. This will effectively remove any appearance of brightly colored pixels around the boundary of your tree.

Be careful with the Color Range Fuzziness. Too little fuzziness can show too much of the background. Too much and you will lose details in the leaves and branches. You can also make adjustments, by using the Refine Edge command just before the fill command, and you can further adjust the select pixels (before or after the fill) using tools found in the Image > Adjustments menu. Also make sure to use the highest resolution version of the image.
Converting for Printing Purposes
Two very common questions asked within the visualization industry sound something like ‘Why do my renderings look so different on a computer than when printed?’ and ‘What image resolution should I render to if I want to print my renderings?’ The first question highlights some of the problems of color space between computer monitors and printed ink. The second question highlights some of the problems of printing images at too low a resolution. This next section in the chapter aims to address these problems and some solutions.
CMYK vs. RGB
Professional printing firms traditionally use CMYK colors (Cyan, Magenta, Yellow, and Black) rather than RGB (Red, Green, and Blue) colors used by most consumer printers. RGB has a larger color spectrum than CMYK does, which means it can produce colors CMYK cannot. When you convert to CMYK, you will notice that some of the colors will change because Photoshop is finding the next-closest color to match in the CMYK spectrum, or gamut.
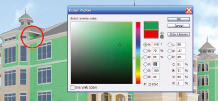
The following illustration shows the Color Picker dialog box. With it, you can see which colors are in gamut and which ones are not. Select a color and see if there is a triangle with an exclamation mark inside in the upper right corner of the dialog box. If there is, you are in the RGB spectrum (out of gamut). If it is not there, you are in the CMYK spectrum (in gamut) and can typically print that color.
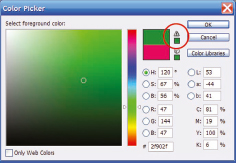
If you look carefully at the individual C, M, Y, and K values in the dialog box, you’ll notice that a selected color falls out of gamut when just one of the 4 colors reaches 0% or 100%. This indicates that in order to produce the color you have selected, you will need more than 100% or less than 0% of the individual color component, which of course is not possible and is why the selected color is out of gamut.
To ensure that your printed products closely match your monitor’s display, you should convert your images to CMYK before sending to print. Although every monitor is different, the RGB to CMYK conversion will show you, through your monitor, the closest match to what will be printed by most commercial printing firms. Converting an image also allows you to tweak any colors before sending a project to print.
To really see the effect of this conversion, perform the following exercise.
1. Click on the foreground or background color in Photoshop. This opens the Color Picker dialog box, shown in the previous illustration.
2. Click anywhere inside the dialog box to activate it as the active window and press Alt+PrintScreen to copy that dialog box to the clipboard. Close the dialog box.
3. Create a new file, making sure to select RGB Color mode while doing so, and paste the dialog box from your clipboard into the new file. Before completing the next step, pay close attention to the rainbow of colors that run vertically in the window.
4. From the Image menu, select Mode > CMYK Color. You can click either Flatten or Don’t Flatten to complete the conversion. Notice how the colors in the vertical spectrum completely change in appearance. The colors now visible are all part of the CMYK spectrum and can be printed by commercial printers.
As a final note about RGB vs. CMYK, try pressing the keyboard shortcut toggle Shift+Ctrl+Y to toggle on the Gamut Warning feature. When enabled, this feature will show you just how much of your image falls out of gamut by replacing all non-CMYK colors with gray.
Printing Resolution
Rendering a 3D image in high resolution is usually necessary whenever you want to print your image for professional display in a magazine, on a billboard, or in any media of substantial size. Knowing what size to render your image is critical for producing a proper end-product for your client.
To determine the size that you need to render an image, determine the actual size of the printed final product in inches, and multiply the length of each side by the dpi you want. For example, if your image is going to be a 36-inch-wide and 24-inch-high print, and you need 300 dpi, your file output size should be 36x300 by 24x300, or 10,800 pixels wide by 7,200 pixels high. If you do not have the great deal of RAM required to render such a high-resolution image, you can render the image in segments and splice the segments together in Photoshop.
Many inexperienced users, and their clients, mistakenly think that 300dpi is necessary for even large billboard prints. Usually, this could not be further from the truth. From our experience, most billboards are not going to be viewed from less than a foot away like most magazine images would, and therefore, you usually don’t need anything even close to 300dpi. In most cases, 150dpi would be excessive and 75dpi closer to the norm. At just 75dpi, an 8’x4’ billboard image would still require a whopping 7200x3600 rendering, which might still require printing in segments.
If you need to print a 3X3-inch image for a magazine advertisement or a brochure, 300dpi would be the minimum resolution you should use, but ideally you should try to produce at 600dpi, since RAM and time should not be as big a factor. This is the maximum resolution the average human eye can detect and anything larger would be a complete waste. Some additional tips are:
• When you save your file, choose JPEG and make sure the compression is set on Maximum (this range is usually 10-12). Although this is a subjective manner for many, JPEG compression has the most benefits to printing. First, and most importantly, it is universal. Not only can printers read this format it can be reviewed by almost everyone. Second, this compression algorithm has much more overall efficiency and is much smaller than the other traditional file types (such as TIFF, PICT, and EPS). Lastly, it has great longevity. Since JPEG is known as a universal format, most computers should be able to recognize it many years from now.
• Make sure to remove any paths and alpha channels. You can do this by accessing the Path Palette and/or the Channels Palette. To remove the additional path/channel, drag it to the trash icon. If you save as a JPEG, the alpha channel will be discarded automatically.
• Always flatten your image. To do this, select Flatten Image from the Layer menu.
• Talk with your printing company. Many printers have their own guidelines not discussed above. Always check with your printing company and make sure they know exactly what you are sending them. As with most businesses, communication is the key to delivering your projects on time and on budget.
Pricing can vary quite a bit when dealing with printing companies. Local printers will usually cost more than large, national printers. But, if you have quick deadlines and more of a budget, go with a local printer. Just make sure to send your local printer a few smaller jobs before you send them a big one. It is always good to test out vendors before you rely on them with a large project. As for the national companies, they are great if you want printing done cheap and with reasonable quality.
Photoshop Masking
Would you like an easy way to show your clients some different color schemes for your 3D interiors and exteriors, without having to create a new rendering for each new color? Photoshop masking allows you to modify colors (among other things) of very specific areas of an image without affecting other areas. Because of this, you can change the colors of a particular object (or many different objects) in a 3D image with one click of the mouse while your client watches. Furthermore, you can do this without negatively affecting GI, shadows, reflections, or anything else.
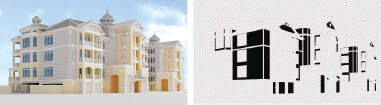
The following exercise demonstrates how to create your own exterior masking system so you can change colors for your clients quickly and efficiently. The file that will be used in this demonstration is a rendering of one of the buildings for a large condominium development. The client wanted to test multiple colors for different parts of the building in real time and the best way to do this is with the use of masks. For the purpose of simplicity, we are only going to demonstrate the masking and color changing of just one area of the building.
1. Open the file called sample_mask1.psd.
2. Notice in the Layers palette that the main rendering is on the base layer and there are two additional layers. The base rendering is currently visible, as shown in the left image of the following illustration.
3. Turn off the base layer and turn on the layer called siding mask. The result should look like the right image. This is the area of the building covered with vinyl siding and this is the material whose color we want to change. The black portion of this layer will serve as the masking area.
Incidentally, to create a layer like the one shown in the right image of the previous illustration, you can apply a Matte/Shadow material within 3ds Max to the selected object whose color you want to change in Photoshop. Render the image out a second time and save the image as a TGA with the 32-bit option, which forces the alpha channel to be saved as well. In the case of this building, the alpha channel will look like the right image of the previous illustration. Next, load the TGA file in Photoshop, go to the Channels palette, select the alpha channel and click the Load channel as selection icon. This causes the alpha channel (the white pixels) to be selected. Delete the white pixels of the alpha channel and you are left with just black pixels on a transparent background.
4. Continuing with the exercise, turn on all three layers. The top layer is nothing more than a layer filled in with a red/pink color. This is the color we want the siding to become initially.
5. Select the siding mask layer and change its blending mode from Normal to Color. This is done through the drop-down list directly below the word Layers inside the Layers palette.
6. Right-click the layer called Red/Jovial and select Create Clipping Mask. The result is a re-coloring of the mask layer, as shown in the following illustration.
7. By creating multiple layers, each with different colors, you can quickly switch from one layer to another and show your client a series of pre-selected colors. However, you can take this one step further. If you want to change colors on the fly and not have to rely on preselected colors, you can do a few additional steps.
8. Right-click the layer called Red/Jovial and select Blending Options. The Layer Style dialog box appears.
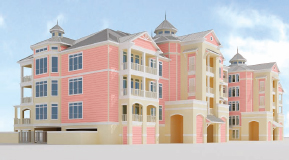
9. From the Styles list on the left-hand side, select Color Overlay. Rather than just clicking on the checkbox to enable it, make sure you actually go to the Color Overlay style by clicking on the words. When you do, a color swatch should appear at the top of the dialog box, which you can click to open the Color Picker dialog box. Inside the dialog box, you can change the colors of the siding in real-time. Notice in the following illustration that a fairly dark green color has been selected. This represents the darkest color you would find anywhere in the material. In the following illustration, this area is found in the darkest shadows, as shown by the area highlighted by the red circle.
This technique can be invaluable in providing your clients the ability to see any possible range of colors they have in mind for their project. Because it’s so quick and simple to set up, it’s arguably the best way to provide such flexibility. It is sometimes still helpful to create a series of pre-selected colors on individual layers, and if you want to see such an example, open the file sample_mask2.psd.
Depth of Field
Depth of field can provide a wonderful touch of realism to your work when applied in moderation. It can also help viewers focus in on a certain area of an image or animation. Applying depth of field in 3ds Max can dramatically increase render times; however, you can often accomplish the same results in a fraction of the time using Photoshop.
1. Open the file called corridor.jpg.
2. Using the Elliptical Marquee Tool, create an elliptical selection around the names SMITH and ZAJAC, similar to that shown in the left image of the following illustration.
3. Press the keyboard shortcut Shift+F6 (Select > Modify > Feather) to activate the Feather command.
4. Type a value of 30 and click OK to continue. Although you can’t see it, the selection edge has just been softened by being spread over 30 pixels.
5. To see the area you now have selected, press the keyboard shortcut Q. This is a toggle button that allows you to switch back and forth from Standard Mode to Mask Mode. It is also the same as clicking the Edit in Quick Mask Mode icon shown highlighted in the right image of the following illustration. The red area is the area unaffected by the selection.
6. Press Q to leave the mask mode.

7. Press Shift+Ctrl+I to invert the selection.
8. From the Filter menu, select Blur > Gaussian Blur.
9. Enter a Radius value of 0.7 and click OK to complete the blur. The amount of blurring is simply a matter of taste; however, it’s just best to add such effects in a subtle fashion.
You can also use these same methods to create a vignette effect whereby the focal point of an image, such as the house in the following illustration, is made to stand out dramatically by having everything else around it blurred heavily. This effect can be seen in the right image.
10. Open the file house.psd. There are two layers in this file. The hidden layer is the original image and the visible layer is a copy of the house. Notice that the visible layer has the background removed with a soft edge, as shown in the following illustration. This was accomplished with the Feather command and was done so the transition from sharp to blur wouldn’t cause an aliased look.
11. Turn on the background image and apply a Gaussian Blur to it using the default 0.5 radius.
12. Press the keyboard shortcut Ctrl+F to repeat the command and keep repeating until you have the desired vignette effect. Repeating the command about 10 times provides a nice effect.
Adding Effects
The true power of Photoshop is sometimes not apparent until you start adding effects to your work that would take tremendous time and skill to add in 3ds Max. Photoshop can often accomplish in seconds what it takes you several hours to set up and what it takes 3ds Max just as long to render. Examples of these types of effects are caustics, motion blur, depth of field, fog, displacement, and volume light, to name a few. Sometimes, the time it takes to render these effects is not worthwhile and sometimes the sheer effort it can take to set up the effects along with all the added experimentation is not worthwhile.
There are seemingly endless ways to add effects to an image with Photoshop, but two different areas of the program seem to stand out above the rest in terms of utility; filters and brushes. The exercise in this section of the chapter will help illustrate the power of both of these areas of Photoshop.
With each release of the program, Adobe adds more and more filters to extend our creative abilities. There are so many filters these days that it’s difficult to remember what all of them do; perhaps, even if you make a living out of photo editing. As we’ll see in a moment, they can really speed up your 3D workflow and allow you to do things you simply might not have the time or skill to do in 3ds Max.
Anyone who has ever used Photoshop has undoubtedly spent a good portion of the time using the brush tool. However, it’s likely that most users don’t take advantage of one of the best characteristics of the brush tool; its capability to be created from scratch. There are hundreds of brush styles available after the program is installed and tens of thousands more available for free online. Once downloaded, you can load these free brushes by clicking the Options arrow highlighted in the following illustration and then selecting Load Brushes.

Using free brushes certainly extends the possibilities of what you can do with the default brushes; however, the real power of the brush tool comes when you make your own brushes to accomplish a specific task. The following exercise demonstrates the power and usefulness of a custom-made brush and adds to that a demonstration of the usefulness of filters.
Before we begin, most effects done in post production require an artistic approach. And, many of these effects should be barely noticeable in your scene. Remember the saying “the best effects are the ones you never see”? This quote should apply to most of your 3D architectural visualization effects.
With that being said, let’s look at a great way to add caustics to an image using the brush tool, and a great way to add ripples to water using a filter.
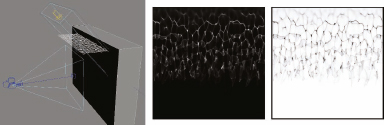
1. Open the file caustics3.jpg. This is a rendered image of refracted caustics, as shown in the middle image of the following illustration. The image was created quite simply using the scene shown in the left image. The scene created in 3ds Max contains a single light that shines through a high-polygon plane object with a Noise modifier applied. The light shines through the plane and the refracted caustics fall onto the black box. Because there is no other light in the scene, you can capture the Caustics component of the rendered image using the Render Elements tab within the Render Setup dialog box. When you do, the result is a nice black and white image that can be easily used to create a Photoshop paint brush. Creating nice Photoshop brushes is often best accomplished by rendering images like this.
2. Press the keyboard shortcut Ctrl+I to invert the black and white colors in the image.
3. From the Edit menu, select Define Brush Preset.
4. Name your new brush Caustics3 and select OK to continue. You can now use this brush to paint.
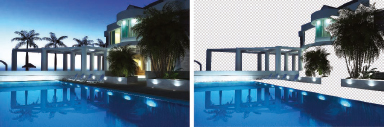
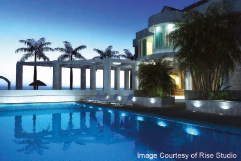
5. Open the file pool.psd. This file contains three layers. The first is the initial image, shown in the left image of the following illustration, and the other two layers are copies of the pool water and the objects on which caustics are going to be applied, as shown in the right image. The layer called Caustics_Copy has a mask applied. This was accomplished using the Paste Into feature mentioned elsewhere in this chapter. With the image of the wall copied onto the clipboard, a selection was made around the wall and the copy of the wall was pasted into the selection. Therefore, whatever you do, this layer will be confined to the limits of the wall.
6. Turn on the Base_Image layer.

7. Press the keyboard shortcut B to enable the Brush Tool. If the Caustics3 brush you made earlier isn’t currently loaded, load it now. In most cases, it will be the last brush in your brush presets.
8. Change the Foreground color to white.
9. Select the Caustics_Copy layer and change the Opacity to 25%. This ensures that the caustics you paint aren’t too strong. If you determine at any time that they need to be reduced in strength, simply decrease the opacity of this layer.
10. With the Caustics3 brush active and without dragging the mouse, click a few times around the various objects where you think caustics should be placed. If you feel that the caustics are too strong everywhere you can reduce the opacity of the caustics layer. If you feel that the caustics are too strong in one particular area, you can use the Eraser Tool to remove caustics gradually in precise locations. Once you are finished, you can achieve a decent looking caustics effect in just a few seconds, as shown in the following illustration. Remember to think about what surfaces the caustics should and shouldn’t be able to strike. Simply erase the caustics from those surfaces on which they shouldn’t be found.
11. Select the Pool_Water_Copy layer.
12. From the Filters menu, select Distort > Ripple.
13. Set the Amount to 150% and the Size to Small. Click OK to complete the command. The water should now have a nice rippled appearance, as shown in the following illustration. You could make minor adjustments now, such as cutting off the few pixels on the bottom and right edges of the pool water that get pushed too far out of their normal position.
By creating unique paint brushes, you can create wonderful effects like the caustic effect demonstrated here. Anytime you create a unique brush like this, you might want to create a few different versions of it while you’re at it. For example, three different images were rendered for the caustic brush, as shown in the following illustration. This was accomplished by simply changing the scale of the Noise modifier and the intensity of the light. All three of these images are available for you to use if you like (caustics1-3.jpg) as well as the scene used to create them (caustics.max). The scene used was rendered with V-Ray, but can easily be made to work with mental ray.
Summary
The goal of this chapter was to illustrate some useful Photoshop techniques that can improve your 3D workflow by reducing the amount of time you need to spend in 3ds Max. In some cases, Photoshop can completely replace some of the phases of scene creation in 3ds Max, and allow you to spend more time on the artistic side of your work and less time on the technical side.
With Photoshop there is essentially no limit to the number of new techniques yet to be invented to improve our work. There were only 8 techniques outlined in this chapter and it would be foolish to argue that these are all you need to maximize your efficiency. Nevertheless, they each have something significant to offer for the typical visualization user, and are a good foundation for further experimentation.