
Chapter 18
Nonlinear
The Digital Workstation
I slip into my ergonomic workstation seat with self-adjusting hydro lifts to support my back and correct my posture. I flip on the system. My liquid helium hard drive cylinders glow to life. My system is not considered to be bulked up with memory, but I do like to have 30.5 terabytes of instant access, especially on the larger feature films. At times I can remember when we still struggled with 24-byte 96-kHz sampling rate sound files. Drive management was so much more difficult then—only a couple of terabyte drives at our disposal. That was when data was stuck on rigid surfaces that spun at high rates of speed. Now with liquid helium, fragmentation doesn't exist anymore because nothing moves, in the old sense of the word, and thus the concept of a computer crash has ceased to exist.
I slip on the infrared wristband and boot up the newly installed Pro Tools 14.2 software. The blue laser of my optical computer drive flashes to life and stabilizes.
The Neurosine plug-in is becoming easier to work with. Its creative freedom has taught me to just lean back, relax my head into the neck pad of my ergo lounger, and simply think through the process. I do not have to manipulate a track ball or use a freehand pencil pad to articulate my DSP wishes, as we had to do a few years back. Just a short time ago, I used to have to watch each process unfold on my plasma monitor screen, but I have learned to trust my hearing more than my vision, so I simply close my eyes to begin my day's work.
The wristband interfaces with my nervous system straight into the audio software linkages, and the computer instantly extrapolates what I think. It took awhile for the computer and me to bond—I even chose the Hal alert kit that Apple had included in this custom package—so now I really feel like I belong to the world of a space odyssey— at least the one that I get work in now. The personal filter files disregard the vast amount of brain noise, allowing only the focused solution-seeking elements of neurotransmission. In short, I am a creative person with a busy brain stem who also tends to be a little scatterbrained, but the Neurosine plug-in has really helped me focus when I need to.
I call up an old recording Dr. Regusters of the Jet Propulsion Laboratory had made in the Congo many years ago. I go to work on separating the loud and hashy presence of the atmospheric insects from the distant cry of a Mokele-mbembe, a fascinating sauropod recording from deep in the Congo jungle.
Within an instant, the holographic dynamic pattern hovers over the center of my workstation as well as in the center of my mind's eye. I study it carefully. Sound technology has changed so much with the advent of select timbre analysis. The traditional two-dimensional thinking had gone as far as it could. Now we realize that the three-dimensional study and manipulation of sound have changed everything.
I see the insect noise in my head and wish an overview of the exact components. Suddenly, color values are applied to all points in the timbre analysis, rendering what looks like a magnificent galaxy filled with trillions of multicolored stars. My brain rotates the overview so I can study the interwoven blends of colors. Like peeling an onion, my thought pattern separates and assigns to the digital clipboard each color value that does not fit the desired outcome. Bit by bit the insect hash layers diminish.
I invert the audio envelope, like turning a positive into a negative, much like how the old re-recording sound mixers used a universal dip filter to isolate and then revert to ferret out the precise scope of an offending noise.
The insect hash is totally gone; now all I hear is the gentle sway of tall dried grass, the lap of the lakeshore water, and every so often the mournful cry of the Mokele. My mind sweeps in closer on the image of its timbre. Now it is easy to isolate it from the grass and water lap. I do not want to lose the other sounds completely, so I mentally ask the computer to Save As and file it away under Africa, Grass, Regusters, and Water.
There, rotating in all its glory, is the undulating timbre wave of one of the most magnificent and lonely cries that natural history has probably ever heard. My wish to do so prompts the enrichment plug-in to fill in the missing gaps the algorithm note was lacking. “Yes, please save.” I mentally thought. The revised audio file disappears into the vast molecular storage structure of cold liquid helium.
I feel a hand on my shoulder. I open my eyes to see my good friend and dialog editor, Dwayne Avery. Oh, I must have been napping. I rub my eyes and wonder what happened to my wristband. I see that I was sitting in my stiff so-called lumbar-support chair. I swear, whoever does invent the ergonomic editing chair will make a fortune— and where did my Pro Tools 14.2 go? Oh yes, we are still some years away from that but these very technologies are in development right now. Some of it is a lot closer than you may think.
PRACTICAL PHILOSOPHY
Each chapter of this book could easily be expanded into a complete book of its own; therefore the focus is toward the practical art form and technique to empower you, whether you are the writer, director, producer, or picture editor beginning to venture into the hands-on applications of working with sound, or you're simply fascinated by the audio arts.
With that in mind, I turn the focus toward a basic overview of the nonlinear digital audio workstation and a few software programs that will launch you in the right direction.
At first glance, the tidal wave of hardware and software can be daunting and intimidating, even to the experienced craftsperson. With very few exceptions, those individuals who truly understand digital applications and can work software proficiently do not necessarily make artistically talented sound artists. Those who are great sound editors or create audio works of art often struggle just to move around in the vastly complex world of computer technologies. It is a very odd phenomenon, but one I have seen time and time again—it goes back to the issue of left-brain/right-brain function.
I have had film school students who had taken a course in Pro Tools and had been taught all kinds of tricks and shortcuts, but not the basic sound-editing disciplines and techniques. Yes, I use some simple keystroke shortcuts with digital software, but readily acknowledge that I shun the super-shortcut tricks. Those who have the most trouble with edit sessions and especially with exactitudes to synchronization can trace the roots of their nemesis directly back to the use of super-shortcuts. These techniques only work in ideal situations, where each preceding step is followed exactly and everyone does his or her job correctly. As has been demonstrated repeatedly, just the opposite prevails. The very art of editing is to problem solve in addition to asserting one's own creative voice. How can one possibly hope to use super-shortcuts in a flawless manner amid the production and postproduction tempest?
NONLINEAR EDITING PLATFORMS
With few cosmetic differences, most nonlinear sound editing platforms work pretty much the same way. Many have their own proprietary something or others and a few excel in exceptional signal processing prowess over their competitors. But when it comes right down to it, if you understand the basic techniques of how to set up sessions, what drives sync for these sessions, and how to route a signal path and the basic principles of audio signal processing, then you can move back and forth through the various manufacturers fairly easily.
Think of the nonlinear audio workstation as a digital Moviola, a digital synchronizer, a digital Rivas splicer, and all the other audio tools used by sound craftspeople through the decades since Alexander Graham Bell invented the telephone. For the sake of streamlining this chapter as we discuss the nonlinear world of sound editing, and because Pro Tools is the dominant nonlinear audio workstation platform in the motion picture business, we will discuss the nonlinear issues through the procedures and protocols of Pro Tools.
This book does not try to instruct in the full use of this software program; that would be a big fat volume of its own and not what the mission of this book is about. This chapter is a basic get-started primer to get you on track and heading in the right direction. By the time you finish digesting this chapter you should be ready to tackle the owner's manual and/or the Digidesign Pro Tools PDF versions on line. Check them out; they are a great source of information and detailed explanation of your nonlinear system, and after reading this chapter, it will actually start to make sense.
Remember that virtually all audio software and hardware have been designed and text manuals written for music users. The vast majority of the consumer market for these products is not the sound editing market, but music composers, music editors, and music developers and the thousands of hope-to-be music composers. Hence, the user manuals talk in music terms.
A reason that user's manuals are seemingly impossible to read and understand is that they are written with the supposition that you are a computer-techie who already knows how to use computers or basic software. Most problems I hear include “I can't get it open!” or “How do you get the software to see a file?” or “How do I get from here to there?” and the proverbial, “someone has deleted my session!” Therefore, I include basic highlights that should problem solve many of the get-started questions.
This book is not going to deal with the volatile and ever-changing keeping-up-with-the-digital-Joneses syndrome. As for this chapter, before you jump in the deep end, you first have to learn how to swim. Once again, let me remind you that a computer is only as smart as you tell it. When you call it stupid, you are really calling yourself stupid. You were the one who did not set the disk allocation logically. You were the one that did not set the session set-up window correctly, and who was it that forgot to target where to put the Save As option and now you can't find it? … I think you get the idea.
Nonlinear Audio Signal Path
As touched on briefly in Chapter 11, you must create a clean signal path from your audio file source, through your sound interface (whatever system you decide to use that requires a hardware interface; some do not), through the computer, back through the interface, out through your workstation mixer, out to your speaker amplifiers (if you are not using self-powered speakers), and ultimately to the monitor speakers.
You must have a clean input path where you can digitize (record) monaural, stereophonic, quadraphonic, or as many tracks as you have interface inputs to accommodate—bringing an analog world into the digital realm as an audio file format that your workstation recognizes and uses. You also must have the ability to transfer material digitally (known as D-to-D) from DAT cassettes, such as a DAT recorder, using AES/EBU ins and outs or a coaxial digital processing cable or digital optical cable. Many beginners do not understand that they must use a high-quality digital coaxial cable for D-to-D work, often mistakenly using common RCA connectors.
When it comes to your signal path, whether it is a digital or an analog signal— spending a few extra dollars to have the best quality connectors and speaker cable for your gear can only make the signal path cleaner and easier to listen to and allow you to relax and be assured that you are not adding noise and audio gunk to your recordings or downloads.
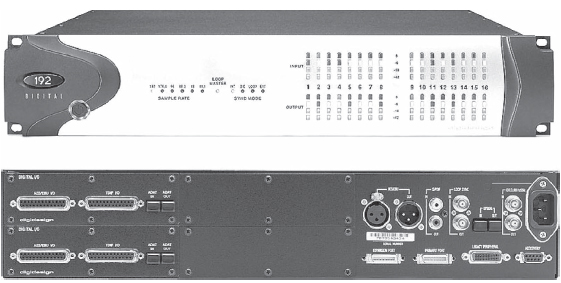
Figure 18.1 The Digidesign Interface 192 Digital. One of several variants of interface units available for postproduction sound work.
The Interface I/O
The 192 I/O, the flagship of the Pro Tools HD interface family, is the best-sounding audio interface ever offered from Digidesign. In addition to support for up to 16 channels of analog and digital input and output, the 192 I/O features a wide range of analog and digital I/O options to choose from, including 8 channels of high-definition, pristine-quality analog I/O, 8 channels of AES/EBU, 8 channels of TDIF, 16 channels of ADAT, and 2 additional channels of AES/EBU or S/PDIF digital I/O. The Pro Tools HD Interface handles 8 discrete channels of either analog or digital audio signal.
In designing the Pro Tools HD environment, Digidesign offers a work environment that not only supports today's common standards of 48 kHz and 44.1 kHz, but the emerging use of 96 kHz, all the way up to a stunning 192 kHz. In addition, Pro Tools HD 192 I/O also supports 176.4-kHz and 88.2-kHz sample rates.
You already know that with 24-bit resolution, and now with the higher sampling rates, you will be able to capture every nuance of sound with the utmost clarity and precision.
192 Expansion Cards
Along with its outstanding sonic specs, 192 I/O includes an additional I/O option bay, allowing you to add more inputs or outputs, and making it one of the most unique and flexible audio interfaces on the market. To expand the analog I/O capacity of 192 I/O, you can add either a 192 AD card, providing 8 more channels of high-definition analog input, or the 192 DA card, which gives you 8 additional channels of analog output. 192 I/O can also be outfitted with the 192 digital card, which adds 8 channels of AES/EBU, TDIF, and ADAT I/O connections.
Speakers
Choose your speakers carefully. This is where so many sound designers and sound editors make a common mistake. You can beef up your workstation suite with powerful subwoofers and all kinds of tricked-out gear. When you play your sessions, you are rocking and rolling, literally sending earthquake-like shudders through the studio's framework. You finish cutting your helicopter chase sequence, absolutely convinced that you aced a sequence that will garnish an Academy Award nomination. Then you get to the re-recording stage and experience total shock when it does not play back anything like you remember cutting it.
The reason is simple. You colorized your workstation environment to have acoustical fun, not to develop and cut serious sound for film and video applications. You must think transparent. I say this to designer and editing colleagues alike. You want a workstation environment that reproduces your work as identically as possible to how it will sound when you get it to the re-recording stage. Keep all your ultra-subwoofer toys at home for personal use and fun, not at work when you are developing serious product. On the other hand, you do not want a speaker system lacking the rich low ends your material must have.
SETTING UP AN ORGANIZED DESKTOP
I can always tell how organized a sound editor is by looking at how he or she sets up the desktop of the computer. The ones with troubles tend to have a cluttered desktop. Poor desktop layout slows down your work and frustrates you. I keep my desktop divided into two basic parts. The hard-drive icons always boot up on the right side of the screen; therefore I leave that side strictly for hard drives and nothing else.
I make a folder that I leave on the left side of the desktop and name it “Sessions.” Each evening, before shutting down for the day, I copy the sessions on which I have worked into this folder, giving each session a current date or code designation. The first time your external hard drive crashes with irreparable damage or melts down, you adopt this technique instantly. I make a couple of other work-in-progress-type folders, which hold word-processing documents regarding work, sound design layout charts, spotting notes, EDL lists, and so forth. I keep all other folders in the lower center of my screen. The desktop is organized, easy to read.
Keep an organized desktop and drive management routine, and you will lose very little work and endure a lot less anguish.
DRIVE MANAGEMENT
The oft-repeated adage “garbage in, garbage out” also applies to the building and maintaining of your internal and external hard drives.
One of my hard drives on Starship Troopers was named 149 A. No matter what project, I always placed my Pro Tools edit sessions on the first drive of my SCSI chain. I placed some sound files on this drive, but basically kept the bulk of the sound library files on the following drives. I made individual folders that designated the reel of the project, using an abbreviation of the project, followed by the reel number. In the example displayed in the 149 A chart in Figure 18.2, I have opened the folder for reel 5 of Starship Troopers. In naming the file, I held down the Option key and pressed the 8 key to make a bullet prior to the name. Using bullets ensures that bullet folders group together when read under the View menu designation of By Name. This gives the folder the name of STR R05 (Yewdall—all).

Figure 18.2 Drive 149 A. Fast and efficient work starts with good disk management. Neat, efficient layout makes it easy to find things and helps to defeat drive conflicts and corruption.
149 A Hard Drive
Because we had quite a team of sound editors on Starship Troopers, with many specialty assignments, I needed to make it clear that the materials in this folder were my sessions and not those of Warren Hamilton, Jr., Charles Maynes, or Greg Hedgepath.
One of the most important things you must consider when organizing work and designating files is working on the heart-attack principle. Here you are, working on a motion picture with a production budget in excess of $150 million. After a grueling day's work, you have a heart attack, a stroke, an auto accident, and you are in the hospital in a coma or otherwise incapacitated. As cold and unfeeling as it may sound, someone must be able to boot up your computer with as little trouble as possible and carry on with your work with little lost time. Developing good disk management technique and discipline goes a long way toward helping others, should the need arise.
Inside the STR R05 (Yewdall—all) file is where I keep all my Pro Tools sessions involved with reel 5. Starship Troopers was such a gargantuan project that I needed a dedicated external hard drive just to keep the fade files from bloating up my session drive. This is not the case for most projects, as you keep your fade file folders in the Pro Tools session folder.
The second folder from the top is named YEWDALL FX tank. This is the first of several folders, as well as external hard drives, where I kept sound effect audio files.
Tones Folder
Inside the tones folder are the basic audio files ensuring consistently clean head and tail pops, correct line-up tone, ADR blips, and a slug of blank (an audio file with no sound that sound editors often use for making notes to themselves or other editors on the Pro Tools session). This note will show up on the computer-generated cue sheet and is perfect for making editor's notes to the re-recording mixer.
Carefully measure the pop audio file. As discussed earlier, many editors do not think that a video (30 fps) session shows frames shorter than film sessions (24 fps). Before you commence using someone else's tones folder and are not intimately familiar with the material, take the time to drag the pop audio file into your session, set the feet.frame designation under the Display menu, and actually check the precise length of the pop.
You should also drag the 1 kHz at -18 line-up tone out on the session, then digitally output the signal to your DAT recorder. It is important that you output the signal digitally, to ensure that you can calibrate properly. You will not be able to assure yourself of signal path impedance if you output the signal in analog.

Figure 18.3 The tones folder holds your pop frames, line-up tones, and other everyday insert files at both 44.1-kHz and 48-kHz sample rates.
If the line-up tone audio file is advertised at -18, then it should read exactly -18 on the digital meter of your DAT recorder. If it does not, you should find out why. As discussed in Chapter 6, -18 dB is not necessarily an industry standard, but whatever the house standard, the line-up tone audio files in the tones folder should reflect that.
Notice that there are two sets of pops as well as two sets of 1-kHz tone; each has been made in both 48-kHz and 44.1-kHz sampling rates so that you can work in either sample format. We place a 1-kHz tone in every channel of your session, usually placed at the end of the session several seconds after the tail pop. Many of us use the technique of staggering these tones 2 seconds apart, so that the machine-room engineer can scan the meter and watch each channel pop up to -18 on the peak meter and confirm that the signal path is playing at the correct level.
We also have a track of ADR blips. I make my ADR blips by taking 1 frame of 1-kHz tone and then I make an extremely short fade-in and fade-out on the tone, thus taking the digital harshness off the blip. I then import the softened blip into a Pro Tools session where I set the counter to feet and frames (and not time code). I place three rhythmic blips in a row, exactly 1 foot (24 frames) apart. I then highlight from the leading edge of the first blip through the three blips and to the leading edge of 4 feet. This will yield three rhythmic blips with 23 frames of silence before the end of that audio file. I then bounce to disk (see Bounce to Disk later in this chapter) to make a new file (i.e., ADR blips).
Building Your Audio File Drives
To make your audio files efficient and easy to access, you must plan to make them so. Some editors simply make a file folder they call “Load,” which is supposed to hold all the audio files needed for the particular reel on which they are working. This method works fine if you are working on only one reel and if you have a precise cut list to work from with no deviations.
If you are working on more than one reel, if you have been given creative license, if you think creatively rather than methodically, you will desire the alphabetical file system. I set my drives up in such a manner that the main library resides in an alphabetical format.
Sound Library Drive
The most important way to facilitate smooth, efficient performance of your hard drives is to practice good drive management techniques. For those confused by conflicting advice regarding the use of an optimization program, nonlinear picture editing platforms such as Final Cut Pro or the Avid work more efficiently if the files are fragmented, thus the contradictory advice from those who might tell you not to defragment your audio workstation hard drives. The contrary is true when it comes to Pro Tools and how it functions. I defragment my hard drives at least every other week, and, when I am working on extremely complex sound effects pictures, I let my Norton Utilities speed disk function defragment my hard drives every few days.
Sometimes, defragmenting hard drives with Norton Utilities has led to damage or data loss in the audio file directories. A good maintenance software very useful in protecting audio file directories is DiskWarrior. Run this application before you defragment your drives, and you will notice dramatically less file corruption.
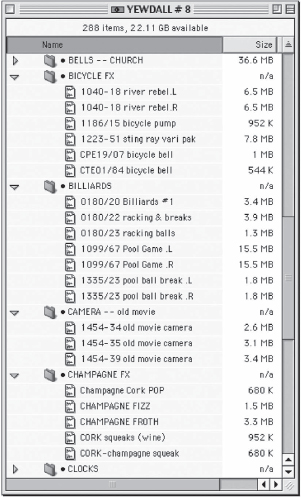
Figure 18.4 A typical sound effect access drive. This is the alphabetical file system. Personally, I use a bullet and a space prior to the file name. This guarantees that all of these file folders will line up to the bottom of the list.
For a step-by-step narration of the Pro Tools get-started presentation outlined above, you can interact with the DVD provided with this book—choose button number nine on the main menu, STUDIO FACILITIES -&- SYSTEMS. The second button on the submenu will take you through the presentation.
This chapter is meant only as an introduction. One could easily fill an entire book trying to properly discuss and review the use and techniques of Pro Tools and Nuendo software. There is a lot more information on the Interactive DVD that is included with this book. Go to button number nine—NONLINEAR EDITING & MIXING on the main menu. For a more extensive version of this chapter, see the book's website at www.elsevier.com.
The first button on the submenu will take you to another submenu regarding EUPHONIX -&- NEUNDO USER PROFILES. You can view four really informative user profile videos. Button two will take you through a narrated step-by-step tour of Nuendo software and a few of the plug-ins Nuendo offers. Button three will take you through a narrated step-by-step tour of Pro Tools 7.2 as well as an overview of many of the plug-ins available. Button four will take you on a short but fascinating narrated overview of the Pro Tools Icon system.
Nuendo 3—Media Production System
After you read this section on Nuendo, you really need to review the four video demos on the interactive DVD that accompanies this book with user profiles of three master craftspeople in Hollywood and London who are using Nuendo software in conjunction with the Euphonix Mixing console.
Nuendo 3 is one of the most flexible and technologically advanced postproduction, recording, and surround systems available on the market today. Extraordinary sound quality and a host of unrivalled features, paired with a totally open architecture engineered to accommodate the audio industry's prevailing software and hardware standards, make Nuendo the system of choice for discerning professional users. Its system performance is readily scaled using any standard computer components. This gives you the computing power you need to rise to the challenge of handling complex projects entailing hundreds of tracks, innumerable effects and even the most intricate mixer configurations, all at a remarkably affordable price.
• Recording, editing, and mixing with up to 192-kHz/24-bit processing power (pristine 32-bit floating-point internal resolution)
• Intuitive handling and extensive customization options to accelerate workflow
• Projects port readily to and from all standard audio and video cutting systems
• Powerful multichannel capability throughout the signal path
• Awesome-sounding 32-bit audio engine optimized for multiprocessor operation
• Up to 192 physical inputs/outputs alongside freely selectable audio hardware
• Smooth, seamless integration into LAN and WAN environments
• Cross-platform product (Mac OS X/Windows XP)
Like many DAW systems, Nuendo has two main windows, an Edit window and a Mix window. Figure 18.5 is an example of an Edit window. On the top left is a blue hardware control button which allows for multiple sessions being open at the same time; the session that has this button highlighted actually is controlling the hardware, but all open sessions have full editing capability and cut and paste functionality among each other, a great tool for reconfirming a picture.
Below this button is an inspector panel that gives an overview of all the details that belong to the current highlighted track.
To the right of the inspector panel are the track names and track headers, which show and control automation states, locking and unlocking, solo control, mute control, all the sublevels of automation, and level indication. The view above is a collapse view only showing the minimal amount of detail.
The Transport window shows you your basic tape-machine-style transport buttons as well as jog and shuttle controls, in and out markers, pre-/post-roll amounts, sync status, memory location points, and computer performance.
As this program is a host-based system, the power of the host computer is of great significance.
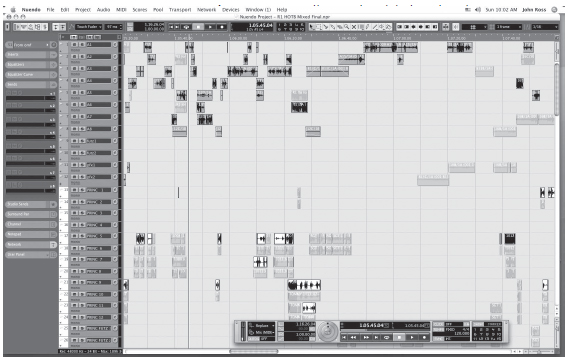
Figure 18.5 Sound library drive.
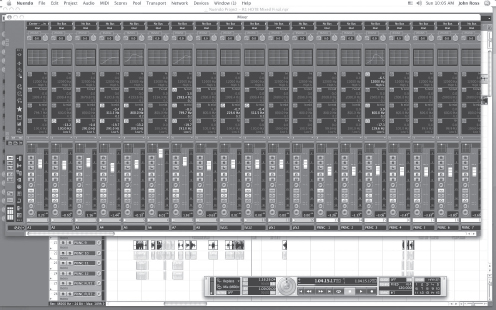
Figure 18.6 New session warning.
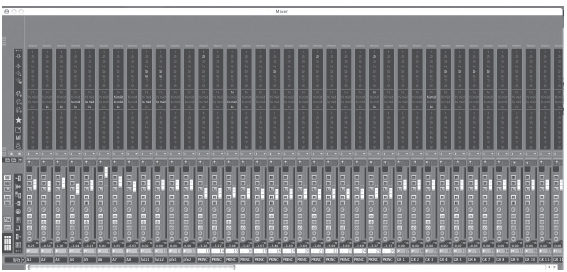
Figure 18.7 New session menu.
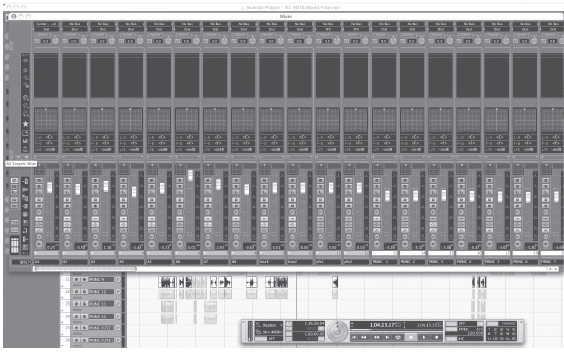
Figure 18.8 New tracks.
One can control the amount of DSP type functionality by using better and faster computing power, which is moving like a runaway train today.
With a dual-core AMD system, today track counts well over 200 with a plentiful amount of plug in are not uncommon on a single system.
Below is the Mixer window. This window can be viewed in many different ways; here are a few of many examples.
The Mixer from the top down first shows your input source, the amount and configuration of which are set up in the VST connections page, or I/O page as some systems call it. Below that are the output assign and the trim and phase knob, consistent with what you would find on any high-quality mixing console.
The section below this can display EQs (in a few view types), plug-in insert points 1–8, aux sends 1–8, or elaborate metering and panning. Below this panel is the fader panel that has metering, panning, automation states, record arming, input monitoring, plug-in, and EQ bypass switches mute and solo. There are many sublevels and far more detail in these windows than what I am currently describing, but for a basic overview these are the main points.
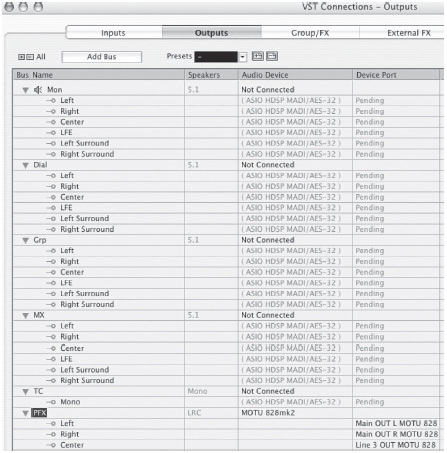
Figure 18.9 New track creating.
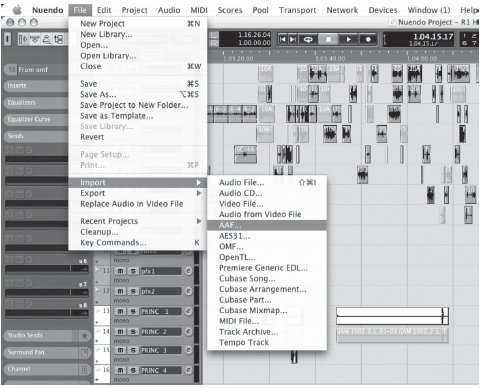
Figure 18.10 Rename track.
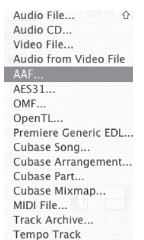
Figure 18.11 Track header.
Figure 18.9 shows the VST connections or I/O page that allows you to create and map inputs and outputs to the hardware you have in your system, as well as create bussing for FX, groupers, and I/O for external processing boxes. The amount of physical I/O or inputs and outputs is determined by the choice of hardware. It can be as small as the 2-channel system on a laptop or as elaborate as a multi-card Madi system with 192 inputs and outputs.
Here are the Import Selection options (Figures 18.10 and 18.11). This system can import and export AAF and OMF for working with other editing systems and picture editing workstations as well as AES31 and a host of options, including HD picture when paired with a Decklink card for picture I/O.
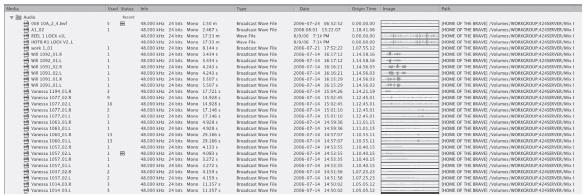
Figure 18.12 Import session 15414.
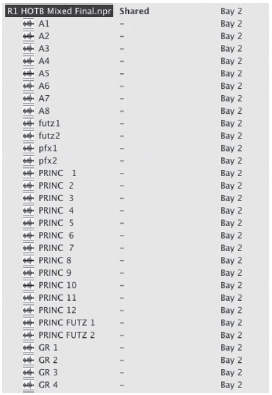
Figure 18.13 Import audio window.
Above is a view of the Pool window (Figures 18.12 and 18.13). This is where all the media for a project is housed and managed; you can insert media from here as well as format convert and search and audition. This system will search as well as play media across a network allowing for extensive sharing capability across networks and facilities.
A view of the specific project-sharing window is shown in Figure 18.14. This allows you to publish a project on a network and for other people who are allowed by the owner of that project to access and work on that project in real time.
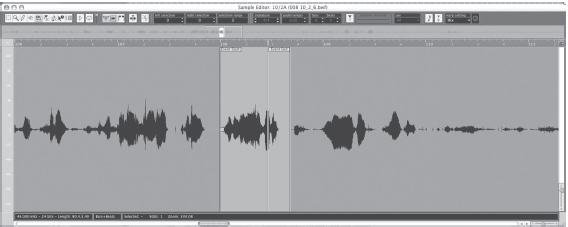
Figure 18.14 Workspace window.

Figure 18.15 Set-up menu.
Above are shots of both the extensive waveform editor and the cross-fade editor (Figure 18.15). Nuendo 3 marks another milestone advance in the evolution of Steinberg's celebrated Media Production System. It offers a multitude of new features, including AAF support, optimized media management, Pull Up/Down, and Warp to Picture, as well as numerous new recording and surround production functions. And with the release of version 3.2, Nuendo even boasts a full-fledged control room section unlike anything found on any other software mixer.
Figure 18.16 Hardware set-up.
Control Room and Headphone Bus
Nuendo 3.2 sports dedicated output busses for control room and headphone monitoring. Control room settings do not influence the main mix output.
Four Separate Monitor Set-ups
Four freely configurable monitor set-ups let you quickly toggle among different auditioning systems. Options include fold-back as well as useful solo functions such as Solo to Center and Back to Front for surround environments.
Inputs for External Sources
You can quickly select up to six playback inputs for external signal sources such as DAT, CD, and tape decks, and route them to any desired studio, headphones, or control room bus.
Four Studio Busses
You are free to create individual submixes for up to four separate studios. Every audio, group, or effect channel in the Nuendo mixer offers new studio sends with dedicated volume and panorama controls as well as a Pre-Fader/Post-Fader switch.
Talkback Function
The talkback circuit lets you communicate directly with speakers or artists in each of the connected studios. Automatic dimming prevents feedback. You also have a switch available for manual dimming. Simply press it to instantly reduce the control room level.
Separate Click Bus
A dedicated click bus lets you patch the metronome signal to any studio, headphone, or control room bus, whereby volume and panorama may be adjusted individually.
Key Command for Main Mix to Studio Bus
A simple key command is all it takes to route the main mix to each studio. Once this is accomplished, you will find it easy to accommodate the speaker/artist's wishes and adjust the mix accordingly.
In the interactive DVD provided in this book, choose button #9 on the main menu, NONLINEAR SYSTEMS. The first button on the submenu, EUPHONIX & NUENDO USER PROFILES, will take you to another submenu. You have five choices:
• 15-minute video user profile of John Ross
• 20-minute video user profile of Richard Meredith
• 13-minute video user profile of Steve Tushar
• 8-minute video user profile of Fernand Box
• Step-by-step narrated panel presentation of the material presented in the text