
Chapter 13
Sound Editorial
Sync-Sync, Chop-Chop
“Think about sound effects as though they are music—find the
right ‘note’ for every sound event, then build a ‘chord’ around
it, choosing sounds in higher and lower registers that
will support that key ‘note’.”
– Dave Whittaker, M.P.S.E.
All through a film's evolution, sound endures uneven recordings, mismatching formats, missed opportunities, temp voices, temp music, and temp sound effects. It suffers clipped lines, radio interference, line static, digital zits, dramatic level shifts, noisy backgrounds, fluorescent ballast, power hums, and just about every other insult and shortcoming a sound engineer can imagine—not to mention ignorance, carelessness, and mindlessness. The project experiences noncommunication, miscommunication, misinformation, improperly entered data in the code book, improperly transferred material, lack of notations in the production sound report, let alone physical misplacement or total loss of materials. Just because the negative and original sound rolls are vaulted at the laboratories and sound transfer facilities does not mean something unexpected cannot happen to them. Murphy's Law is ever-present and devilish in thwarting creative and idealistic expectations. All during this time, one person or another inevitably will say, “Oh, don't worry about it; we'll fix it later in post.”
Guess what. Post is here! The production sound and locked picture will be turned over to sound editorial. You can have no “fix-it-later” attitude here. Sound editorial must gather the various broken pieces of the production sound process and put them back together again, in addition to creating the sound effects and ambiences that creatively bind the entire soundtrack together.
The head of the sound editorial team is the supervising sound editor; in the case of a big, complex feature project, two editors team up as co-supervising sound editors. Like a field commander carefully deploying forces, the supervising sound editor divides the work, assigning a specialist to each aspect of the sound tasks.
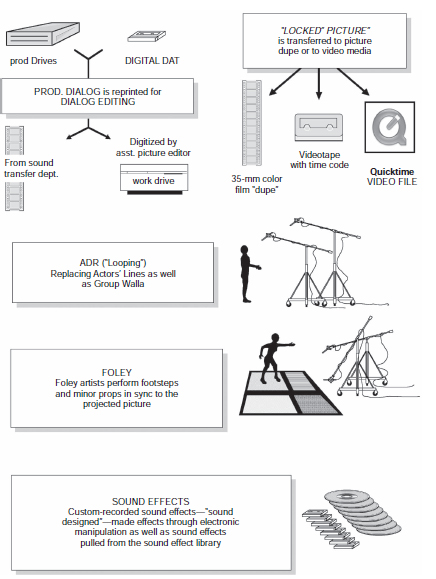
Figure 13.1 Sound editorial crew flow chart: basic phases of edit.
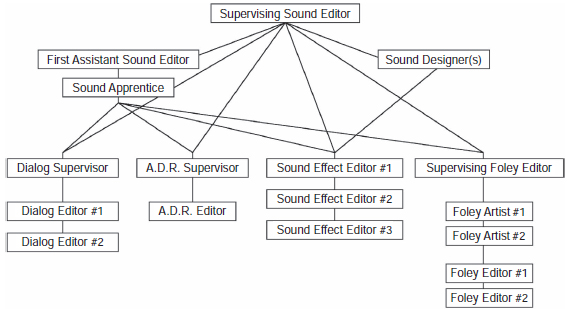
Figure 13.2 This sound crew structure is a typical crew for a medium-to-big-budget feature project with an average schedule and temp dub requirements.
The supervisor organizes and coordinates each editor's efforts, focusing the creative work so that when various components of the sound elements are brought together in the re-recording process, the result is a seamless audio experience performing with a transparency of reality.
WHO's WHO IN SOUND EDITORIAL
Figure 13.2 illustrates the sound editorial structure of a typical medium-budget action picture. (This same sample crew was outlined in the budget breakdown in Chapter 4.)
Sound Editorial Crew Tree
Supervising Sound Editor
The supervising sound editor is the creative authority of the sound preparation process, working hand-in-hand with the director, picture editor, and producer(s) in realizing the audio potential of the film. The supervisor's shoulders bear far more than the recognition limelight of the title. His or her taste in sound and choice in sound crew— sound editors, sound designer(s), Foley artists, transfer department crew, ADR and Foley stage mixers, as well as choice of final re-recording stage and mixing team—are pivotal factors that focus the combined efforts of all toward an artistically successful soundtrack. Such expert guidance vastly increases the production value of the film.
Conversely, inappropriate taste in sound or choices of team members can lead headlong to disaster, plunging the project into a budgetary hemorrhage and irreparably destroying the chances of a quality sound experience. Directors and producers are well aware of this.
The supervising sound editor enters into a series of meetings with the director, picture editor, and producer(s), covering a wide range of audio concepts and concerns. As discussed in Chapter 4, unwise clients decide what mixing facility to use without including the input and professional experience of the supervising sound editor.
As today's postproduction schedules become increasingly complicated and more outrageous, the supervising sound editor literally is becoming a tactical field commander whose talent assignment and schedule problem-solving skills are often considered more important than the ability to sound design or cut sound. After all, these chores can be assigned to specialists hired as needed. In simplistic terms, the supervising sound editor's job is to hold the hands of the director and producers through an often arduous and anxiety-filled postproduction process.
The supervising sound editor holds the promise of a wonderful and inspiring soundtrack to come, all the while scrambling to deliver these promises without budget overruns. On top of all of this, the supervising sound editor must deliver these promised audio ingredients to the re-recording stage on time, while enduring the inevitable hail of changes, both in the film and the director's heart and mind.
From the outset of consideration, the supervising sound editor receives a script from the production company considering him or her to head the project. The supervisor reads it carefully, breaking out all the audio events and potential challenges to be addressed. Budgeting and bidding on a project based solely on reading the script is extremely difficult, however.
As soon as the supervising sound editor is asked to consider a show, research must be done. The supervisor first should determine who the director and producer(s) are, and then look them up in the Annual Index to Motion Picture Credits published by the Academy of Motion Picture Arts and Sciences, gleaning any information about screen credits and earlier work. Sometimes the supervisor charts the projects, especially for someone unknown, showing the evolution of a first-time director who rose through the ranks of cinematographer, picture editor, or producer. This kind of information lends a feel for a director's expectations with regard to sound. If the director has previous projects listed, the supervisor takes time to review them on various video media to determine the style of sound exhibited in other work. Likewise, the supervisor does the same in regard to the producers, especially noting if and on what project(s) the director and producer(s) have worked together before.
The supervising sound editor may want to trace the present project back to either commencement of principal photography or announcement in the trades (Hollywood Reporter and Variety), where back issues can yield any publicity information on creative or political footnotes. The Internet has also become a valuable resource, providing nearly instantaneous information. All of this lends the necessary information for developing a philosophy and tactical strategy that helps the supervisor better serve the project at hand.

Figure 13.3 The supervising sound editor carefully charts out the use of labor requirements for the most efficient use of budget dollars.
Next, the supervisor insists on personally listening to raw daily recordings in a playback environment that accurately reveals any problems impacting the scope of work to be done. Experience has taught me that a picture editor's opinion on the quality of the dialog track is not always an accurate determination, though it can be a weather vane of expectations to come. The supervisor immediately gets a feel for not only how difficult the dialog preparation is liable to be, but how much ADR is needed, how much Group Walla is necessary, how broad and detailed the sound effect editing will be, and how much Foley should be scheduled. The supervisor then makes up an asset plot chart, mapping out in a timeline what labor should be hired at which point and for how long. In a relatively short period of time, with much experience from previous projects to help assess the new project, the supervisor arrives at a cost-to-complete.
Sound Editorial Crew Flow Chart
Once the supervisor is chosen by the client for the project, he or she must carry out the tasks of developing, cutting, and overseeing the mixing of the project soundtrack, while staying within the boundaries of the contracted budget and schedule. Schedules and budgets, as well as changes and renegotiations, are an entire science unto themselves, and this book is not designed to address those issues.
First Assistant Sound Editor
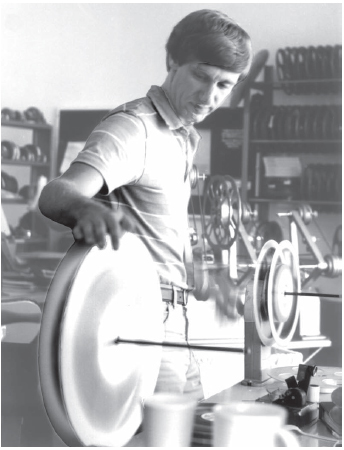
Figure 13.4 First sound assistant Peter Cole rewinds a 1,000-foot transfer onto a projection reel for the Foley editor. The first assistant is the first to be hired by the supervising sound editor and the last to be laid off. His or her work literally makes or breaks the ability of the sound editorial team to successfully mount and complete a project, in addition to helping keep editorial costs from rising unnecessarily.
The first assistant sound editor is the supervising sound editor's secret weapon in the war of organization and technical discipline. The first assistant is the direct conduit from the picture editorial department. Picture dupes, videotapes, change notes, code books, sound reports, EDLs, and all transferred materials pass through the first assistant's domain and control before the editors receive them. If they do not, the first assistant cannot vouch for the material being current, correct, and viable. The first assistant is the organizational foundation on which the entire sound editorial project rests.
Sound Apprentice
Shortly after the first assistant sound editor commences work, the sound apprentice is hired. This position is not to be confused with the second sound assistant. The term “sound apprentice” is being used less in the industry, replaced by the term “intern,” as more editorial facilities try to sidestep a potential union position. In past years the apprentice was the break-in position, but as union domination slowly ebbed, so has the structured ways of entering the industry's work force.
Regardless of this position's name, the apprentice is an assistant to the assistant, and, working at the job, he or she will begin to learn and understand the process—why we perform tasks a certain way. What is one of the most important factors in building a strong base of technical and procedural discipline? Unless you understand why, you will never appreciate the procedures to achieve the desired result.
Sound Designer
Depending on the postproduction schedule restrictions as well as the complexity of the project, the supervising sound editor may want to contract a sound designer to create sound effects, ensuring the continuity and efficiency that will satisfy the director's taste and vision. This is especially true for high-concept projects. This work used to be done by the supervising sound editor, but since the late 1980s the supervising sound editor has shifted the ever-growing sound development needs to sound designing talent on a full-time basis. (Review Chapter 12 for more detailed information on the role of sound designer.)
Dialog Supervisor
On some projects, the dialog supervisor is called the co-supervising sound editor; on others, the ADR supervisor. Regardless of the title, the task is of primary importance. Music and sound effects may be used or discarded in the mix, but dialog almost never is discarded. When the actors’ lips flap, vocal utterances must surely be heard. Hence strict attention must be given to the preparation of dialog tracks; whether original production recordings or ADR “looped” lines, they must be seamlessly edited so that the audience is unaware of the editing process. (See Chapter 14 for an in-depth review of the importance and editorial philosophy of the dialog editor.)
ADR Supervisor
For weeks prior to turnover, the picture editor, director, and producer(s) become increasingly aware of the quality shortcomings of their production track. On some pictures, the ADR supervisor is hired separately from the supervising sound editor and sound editorial crew. Often the ADR supervisor is the political trade-off to secure a project. The ADR supervisor, more than any other postproduction craftsperson, interfaces and works with the acting talent. When temperamental or difficult talent is involved, the producer's first concern is who is going to handle the ADR politics and responsibilities.
A special talent exists for cutting ADR lines. Most of the time, an ADR line never just lays into the actor's mouth. The actor or director has signed off on the line because of the performance, more than anything, so it falls to the ADR editor to massage (cut) the actor's words in such a way as to lend a seamless and natural delivery, yet still fit the lip movements. This is not so easy a task! (Review Chapter 15 for more detailed information on the role of ADR supervisor/editor.)
Sound Effects Editors
The experienced supervising sound editor will know the editing style and talent of the sound effects editors with whom he or she works. Almost all sound effects editors tend to lean toward their own favorite tasks or specialties. Some are more talented in cutting animal vocals; others are better versed in cutting vehicles and mechanical devices. Few sound editors can truly say they are proficient at cutting all sounds. Understanding how to sync up sound and make it work is one thing; it is far and away another to know how to massage the material and make a special audio event from a handful of common audio cues.

Figure 13.5 Wendy Hedin, a New York-based supervising sound editor working at her nonlinear workstation. She has helmed such projects as Purity, Chinese Coffee, You Can Count On Me, and The Autumn Heart, to name just a few.
With today's digital nonlinear systems, a supervisor can assign a particular type of sound to a single sound effects editor to cut throughout an entire picture. Some supervisors call this “horizontal editing.” This lends a greater precision in continuity to a picture. The sound effects editor who cuts the windshield wipers on the car in reel 2 is the same editor who cuts the windshield wipers in reel 9, thereby guaranteeing a matched particular style and rhythm.
This mishap befell Raiders of the Lost Ark during the track chase sequence. As the truck barreled through the water duct, the driver turned the wipers on. The sound effects editor interpreted the material one way and cut the windshield wipers “swish-thunk, swish-thunk, swish-thunk.” The chase crossed over into the next reel, and the sound effects editor who cut his portion of the chase had certainly checked with the other sound effects editor to make sure he was using the same windshield wiper sound effect, only he had neglected to ask the interpretation. He cut it “thunk-swish, thunk-swish, thunk-swish.” This certainly was not the end of the audio world, but a little humorous “oops,” recounted as a valid example of techniques and thinking that must be addressed.
Foley Supervisor
Some pictures do not have a Foley supervisor. Each sound effects editor (or sometimes the supervising sound editor) marks up the Foley cue sheets, noting cues to be performed in each reel. The advantage of having a dedicated Foley supervisor, especially on a picture where thorough and complete coverage is expected, is that the style and design of the layout are consistent from reel to reel.
The best intentions of the supervising sound editor to mark up the Foley sheets and oversee the Foley walking are often distracted by other demands, such as future client meetings, having to sit on another stage for the previous project's M&E or airplane version, or unscheduled emergencies seemingly always arising.
Some Foley supervisors not only mark up the Foley cues, but also serve as lead Foley artists on the stage. This is an added bonus, as they lay out the cue assignments in the most logical ways, develop a working relationship with their Foley mixers, knowing how the two of them like to work, and help make the flow of work most efficient.
Foley Artists
The term “Foley artist” has become the preferred designation of the Foley walker, which even earlier was known simply as the “stepper.” These people perform the footsteps, cloth movement, and prop work as requested on the Foley cue sheets. Foley artists work on a Foley stage, performing footsteps and props while they watch the action in real time as projected on a screen or television monitor in front of them. (See Chapter 16 for a thorough overview of Foley.)
Foley artists are often hired for their strengths and specialties. If the supervising sound editor is working on an important feature project, he or she may hire a Foley artist known more for the ability to give texture and characterization to the footsteps, rather than just providing common footfalls. The trade-off, however, is usually that the footsteps are not walked precisely in sync. If the footsteps are performed to frame-accurate sync, then texture and character are sacrificed, and vice versa. A good supervisor always opts for texture and character, knowing full well the sync issue can be fixed by good, disciplined Foley editing. The last thing the supervisor wants is common, clunky Foley.
I do not endorse the hang-and-pray technique. I have heard many producers say they would prefer to have their Foley walked-to-sync and hung-in-the-mix. They really are saying that they do not want to incur the costs involved in transfer and precision sync editorial. When you get on the mixing stage, all the practical trade-offs are quickly forgotten when they grumble that the sync is rubbery and the performance does not seem to be what it should be, a performance always helped out by the Foley editor.
Other Foley artists are known more for creative prop work and not so much for good footsteps, just as others are not skilled at prop work but specialize in footsteps. Of course, one should have a relationship with a number of Foley artists, with a thorough knowledge of their strengths and weaknesses, so that appropriate Foley artists for a project can be contracted.
THE STRATEGY BREWS
The director engages the supervising sound editor in sweeping concepts for the soundtrack rolling around in his or her brain for months, now bursting at the seams to manifest itself into dramatic and bold audio events. The producer meets with the supervising sound editor in private and bemoans the fact that the picture is overbudget, overschedule, and teeters on the edge of disaster. Of course, they are counting on sound to save it.
Large calendar pages are taped to the wall in monthly progression, with dozens of yellow sticky notes showing the turnover date of latched reels, various progress screenings, spotting sessions, ADR and Foley stage bookings, temp dub(s), test audience screenings, commencement of predubs, and when finals start. This is the battle map upon which the supervising sound editor will deploy forces. Start talent too soon, and no money will remain to maintain the crew through to the predubs; hold back too long, and the supervisor risks delivering to the stage late or compressing necessary creative time for properly producing the work.
The biggest danger is from the director and producer themselves. In their zeal to develop a temp soundtrack to commence test screenings, they all too often deplete and exhaust precious time and financial assets. Although one or more temp dubs are scheduled and budgeted, invariably the project is sapped by the little “nickel-and-dime” needs that irreparably detract from the final product. The experience of veteran supervising sound editors pays off here, for they have been in this situation numerous times, dealing with the same old requests that weaken the sound editorial assets inch by inch.
To cut corners and save costs, both client and inexperienced postproduction supervisor will hire cheaper labor. Experienced veteran talent does not work for a union rate card minimum. For good work, you must hire good talent with experience, which costs more than the skills of the aspiring apprentice. Producers and production accountants with bean-counter mentalities look at the higher paid, experienced craftsperson as just a more expensive craftsperson. However, those who have been around the block a few times themselves understand how the industry works and realize that the extra cost for veterans actually saves money because of their ability to do the job better and faster than apprentices.
This is not to say that get-start apprentices should never be used. On the contrary, as an industry, we have a responsibility to train and build a work force to fortify the veteran ranks. The best way that new talent learns their craft is from the veteran craftspeople.
The Turnover
When picture editorial begins to turn over material to sound editorial, it turns over a fairly standard set of materials, which is received by the first assistant sound editor. Nothing should be picked up and used by the supervising sound editor or other department sound editors until the first assistant has logged it in and prepared it for use.
A binder should be kept to record materials received. The day and the exact time it was received should be recorded. You will be surprised how many times you need to prove what time something was received to avert misunderstandings, untrue warranties by third parties, and even court action. Keep a binder also tracking materials that leave sound editorial. The listing should show what materials were removed from the premises and who ordered the removal of said materials. This person usually is responsible for the materials while they are off-site, but, if not, the person who is responsible for the materials also should be listed. The log should also show what date and time said materials left the premises and where the materials were destined. As with the receipt binder, this tracking binder also proves invaluable in keeping the sound editorial firm legally safe.
Dupe Picture and Video Dupes
In the old days we received 35-mm black-and-white dupes of the editor's color work-print. Oh, you missed a lot of fun! Many dupe prints were brittle and would break easily or you would find yourself standing on the end of a loose piece of film that was being fed into your Moviola and suddenly it would rip perforations! I think I learned some of the most creative and bizarre curse words; even editors who could not bring themselves to use a classic four-letter word would blurt out, “You fornicating harlot!!” By the late 1980s, 35-mm color dupes were becoming more affordable—we could see the image better, but it was only a passing phase as videotape editing, first using analog 24-track machines before giving way to the approaching nonlinear technologies.
Even when we were still cutting much of our material on 35-mm mag film with Moviolas, we still required videotape transfers for many other reasons—everything from running reels with your editors, spotting sound effects at home after hours, and especially when you would go to the traditional sound facilities to conduct ADR and Foley sessions.
When we stepped up to videotape transfers and cut with digital workstations, instead of 35-mm dupes on Moviolas, a supervising sound editor almost always would ask for two formats of videotape transfers. Most sound editors worked on ½” VHS tape (usually VHS), but many sound facilities (where ADR and Foley stage work was done) preferred to use ¾” Umatic tapes.
With today's nonlinear technology, virtually all postproduction sound work is now done on QuickTime video files (usually output at 720 × 480). Before our computers really became accelerated, if an editor wanted to work in QuickTime, he or she almost always had to have the image output in a low-res level, so that the computer would have less digital information to process in real time. Today, high-speed Mac G4s and especially G5s and the Mac Pro computer systems run so fast that we are working with full resolution with no problem at all, even if the project was shot in hi-def.
Most editors understand that to make their computers work more smoothly and not hang up as much, we always put our QuickTime picture files on a dedicated external hard drive. For myself, I prefer using an Avastor HDX-800 Portable Hard Disk Drive with triple output capability (USB, FireWire 400 and 800), using the FireWire 800 port for the fastest data transfer possible from the drive, which is great for high-resolution, high-edit density, and high-track count Pro Tools HD sessions. I keep my audio library and edit sessions on separate external drives using FireWire 400s chained together.
Because picture editorial can easily make their own picture and guide track outputs from their nonlinear systems (such as Final Cut Pro or Avid), tremendous savings in telecine costs are obviously being realized in the postproduction budgets. You have to be careful, though. If you are making videotape outputs, for whatever reason, the disciplines of input, file management, and EDLs are not strictly adhered to, and the assistant editors do not understand frame rates and other quirky anomalies that sometimes arise; a videotape transfer from a nonlinear system can suffer all kinds of inaccurate sync issues.
Think of them as a pool of constantly undulating tide. They lose and gain time, drifting along on the average. Nonlinear systems do not sync to time code, contrary to general perception. They are run by time stamp, a completely different discipline. The only absolutely accurate way to make videotape copies from the nonlinear editor's cut is to take the system drives to a video telecine equipped to read these drives and precisely resolve the time stamp to the time code equivalent.
From the outset, establish a very clear understanding with picture editorial that if you are using or in need of videotape outputs, you will accept video transfers made directly from a nonlinear system for spotting and temp effect development only. When hard sync cutting is being done for final work, however, let picture editorial know you will only accept video transfers done by a legitimate telecine facility that will resolve their drives.
When working with QuickTime video outputs, we do not suffer so many sync issues. Clearly, there can always be something that can ambush you, if the beforementioned disciplines have not been properly exercised. Actually, in order to protect myself from having to suffer financial loss from the sloppy (and often ignorant) part of both inexperienced picture assistants and editors, I would call up Wade Coonfer (at the time he was head of postproduction at UCLA), a practical and experienced authority in how to oversee and handle outputting the picture and OMF files correctly the first time. I would make a time that we could take our portable drives over to picture editorial to extract the final-cut reels so we could commence our sound work.
Once, in fact, I had to tell the picture assistant to remove his hands from the keyboard and place them on the wall and patiently stand by while Wade sat down and sifted through his horribly disorganized hard drive structure and saw to it that the session settings were correct and that our OMF outputs would be properly made with the correct information that was vital to our editorial success. I cannot tell you how valuable and comforting it is to have a consultant at the ready to step in and keep both the project and yourself from going off the budget cliff of wasted efforts.
Traditional cutting reels are approximately 900 feet long. We refer to them as “thousand footers.” When we say reel 1, reel 2, reel 3, we are referring to the traditional configuration. These reels are mixed in thousand-foot configurations; then the supervising sound editor and assistant sound editor join them to make the 2,000-foot AB configurations that are ultimately sent to movie houses around the world for theatrical presentation.
With nonlinear technology, most work is turned over to sound editorial in prebuilt theatrical presentation. These are known as reel 1AB, reel 2AB, reel 3AB, and so on. Traditional 1,000-foot reels 1 and 2 are combined to make a 2,000-foot projection reel known as reel 1AB. This means that the cut reels combine as follows: reel 1 and reel 2 become reel 1AB; reel 3 and reel 4 become reel 2AB; reel 5 and reel 6 become reel 3AB; reel 7 and reel 8 become reel 4AB; reel 9 and reel 10 become reel 5AB. You can always tell the difference between theatrical film and television postproduction craftspeople. Television editors rarely refer to the cut reels as “reels”; instead, they refer to them as “acts.”
Never have more than one reel transferred onto a single videotape cassette. Because of the logistics of sound editor specialists who need access to different reels simultaneously and because changes are made to some reels and not others, it is wise to have each reel of the film transferred to its own dedicated videotape. In addition, ask for more than one copy of each tape. The number of copies you request depends on budget and needs, but it always seems like never enough copies are around when you need them.
Production Audio Source
You must take possession of the original production sound tapes, whether they be DATs, ¼” tapes, or audio files generated by the digital field recorder that the production mixer used on the set. Prepare the dialog by utilizing the OMF option (see Chapter 14). Regardless of whether you can successfully use OMF, you still need to access the original audio source at some point, if for no other reason than to run an “A-B” comparison between the OMF audio file as resurrected into a Pro Tools session and the original recording to be sure that the dailies had not been “quashed” or equalized in the Log and Capture originally done by the assistant editor.
Make certain that the client has a precise inventory accounting when the material is delivered to you. This information is listed into the receipt binder. Rarely does a film have every roll accounted for when the material is delivered to you. If you sign for the material blind to any shortcomings, you are the responsible party; and the last thing you want is to find yourself in some legal action for whatever reason and you have signed for something you do not have.
If you use the OMF option, make special arrangements with picture editorial to develop a precise EDL along with copies of the audio files to build the dialog editor's Pro Tools session. (This process and protocol are discussed in detail in Chapter 15.)
Code Book
As discussed in Chapter 7, the bible of where to find this information is the code book. Picture editorial will supply a photocopy of the code book, which spends most of its time in the dialog editing department. Sometimes an extra copy of the code book is made, so that the first assistant sound editor has a dedicated copy in the assistant's room.
Lined Script
Photocopies of the lined script, including opposing pages of notes, are supplied by picture editorial. The ADR supervisor needs a copy for reviewing and cuing the picture for loop lines. The dialog editor needs one at the workstation, and the first assistant sound editor needs a dedicated copy in the assistant's room.
Cast List
The production office supplies you with a cast list, identifying who is playing which character. This list is vital to the ADR supervisor.
Continuity
Picture editorial supplies continuity, an outline form breakdown of each reel with the scene numbers included, along with a very short description of action. Each member of the sound editorial team receives a copy of the continuity, which makes it much easier to find their way around the picture, knowing the sequences included in each reel.
LFOP Chart
The LFOP (last frame of picture) chart, also known as the LFOA (last frame of action) chart, is supplied by picture editorial to rectify and compare notes with the first assistant sound editor. Every first assistant sound editor double-checks and verifies the validity of these charts and usually makes his or her own for accuracy.
As discussed in Chapter 7, in sound we must count Picture Start on the Academy leader as 000 feet and 00 frames, not frame 1. Most LFOP charts start out wrong because picture editorial often ignores the practical disciplines of postproduction and insists on counting Picture Start as frame 1; this can cause delays of time and wasted money because of sound editorial's delay in redoing these charts.
Another strange phenomenon is getting picture dupes or video transfers (whether videotapes or video QuickTime files) with either no tail pops at all, or tail pops that are not precisely 3 feet 0 frames from the last frame of picture. I am constantly puzzled that some picture editorial teams simply put one arbitrarily wherever they want one.
In 35-mm film, the head pop is precisely 9 feet 00 frames from the Academy leader Picture Start frame. That is represented by a single frame of 2 on the picture. Precisely 3 feet 00 frames from the head pop is the first frame of picture. The same is true for the tail pop, only in reverse, precisely 3 feet 00 frames from the last frame of picture. Experienced picture assistants often punch a hole through this frame so that it visually blips when you hear the one frame of pop and shows up clearly in the video transfer. Some picture assistants use a black Sharpie to draw a frame line around this tail pop frame and then draw an X from corner to corner, or they write tail pop in the frame itself.
Those who do not know what to use for audio pop for both head and tail pops should take a single frame from a 1,000-cycle tone (1 kHz). All kinds of line-up tones can be cannibalized on the head end of your 35-mm mag stripe dailies. If you are working entirely in the digital nonlinear domain, simply ask a sound editorial service to supply you with a tone folder of audio files. Any reputable sound service will be more than happy to supply you with the correct material, or you can access the line-up tones off the interactive DVD inside the back cover of this book.
Also remember that an important difference exists between video pop and film pop. If you are working on television material that has been shot at 30 frames and no drop frame is used, you use a video pop. Editors that work in time code reference rather than feet and frames in their nonlinear software forget this fact. For them, one frame is 1/30th of a second. Therefore when the sound is mixed together and transferred to film, the sound assistant rolls down the mixed fullcoat master on a synchronizer to find the head pop, only to discover that its duration does not quite reach the next frame line. Hence, it is important when working on a nonlinear editing system to develop your pop frame while working in the foot-and-frame mode, and not in time code.
A quick way to check the pop audio file in your tone folder is to simply drag it in and spot it precisely to a frame line, making sure that your session is in foot-and-frame mode. Zoom in extremely close so that you can see the end of the pop very clearly. If it does not precisely reach the next frame line, then it is not a film pop.
Developing the Cut List
The show is turned over for sound editorial work. The supervising sound editor delegates the production dialog editing chores to the dialog supervisor (as described in detail in Chapter 15). The ADR chores are turned over to the ADR supervisor (as described in Chapter 16). The Foley tasks are turned over to the Foley supervisor, or the supervising sound editor may opt to do them (as described in detail in Chapter 17).
Most supervising sound editors develop their own cut lists, rather than leaving the sound effect creative decisions up to the individual sound effects editors. Much of the time, they do this because they have a more thorough knowledge of the sound effects library; on a few occasions, they may be exercising fanatical control over each and every sound tidbit cut. Mostly, the cut list is meant as a creative guide. It helps the sound effects editor cutting sound for a particular reel or sequence establish continuity with the supervisor's vision for the sound as well as with other sound effects editors who may be cutting the same kind of action in other reels.
In the old days of cutting sound on magnetic film, supervisors assigned entire reels to a sound effects editor. With today's nonlinear technology, we are moving into what we call a “horizontal” style of cutting. Because we literally can be anywhere in the picture in a matter of seconds, the weight and physicality of winding down 35-mm film do not limit us. Therefore, we now assign types of sound to individual sound effects editors. One sound effects editor, known for a mechanical hardware style of sound editing, may be asked to handle the robotic sounds throughout the entire film and nothing else. Another sound effects editor may be asked to handle only animal vocals throughout the film and nothing else. Predub these horizontal layers separately, then play them back together to make the full soundtrack.
The supervising sound editor uses one or more computers to audition sound effects as he or she writes a cut list on a second computer. Because we are experiencing so many near-daily changes, we seldom list the foot and frame of the sound cue to which we are referring. We use the continuity, which was supplied by picture editorial, to list the scene number with a one-line description. Below that, we list the various sound event moments that need attention. Under these subheadings, we list the sound effect number and file name. For those sound editorial firms that have their libraries completely computerized, the description data, even if it does not apply to the picture at hand, is also printed.
We depend on the hired sound effects editors to know what we talk about within the context of a scene. If they are puzzled and do not understand, then we depend on them to ask specific questions, which can be easily answered. Most supervising sound editors allow their sound effects editors to be creative and add material into the mix as well, but first they must cut and fulfill the cut list.
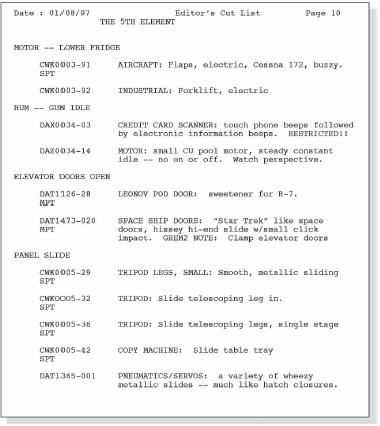
Figure 13.6 A single page of the “cut list” from R-2 of The Fifth Element.
WHICH PREPARATION TECHNIQUE?
No absolute exists as to how to approach the cutting and predub breakdown of any given film. Every project dictates its own spin, demands its own style, challenging you to overcome the various hurdles of budget shortcomings and unrealistic schedule demands. Two basic kinds of approaches can be adopted: all in and mix and A-B-C.
All In and Mix Approach
The “all in and mix” approach is used when the budget is so small and the dubbing schedule is short, loosely referred to as the hang-and-bang, a euphemism for put-it-up-and-just-mix-it-without-the-frills. This style of preparation is contingent on the film not being a heavy sound effects design show, not having events such as big car chases, gun battles, flying spaceships, or medieval warfare. If the show consists of simple vehicle work, such as door opens and closes, or phones ringing with pick-ups and hang-ups, then this kind of film can be done as an all in and mix.
Cut your most important sound cues in the first few soundtracks, moving out toward the last few reserved for backgrounds. The total number of soundtracks you are able to cut, to mix all at once, is contingent on how many inputs the dubbing console can handle and how many channels can be exported from the machine room. The other factor that must be dealt with is the number of channels required by production dialog, ADR, and Foley—as they must come along at the same time to achieve the concept of all in and mix.
It will behoove you to make a field trip to the dubbing stage contracted to mix the film, even if you have worked there in the past, as the sound facility may have upgraded the stage since last you mixed there.
A drawback to the all in and mix approach is that little margin exists for adding sound effects, especially ones that must be designed and cannot be thrown easily into the mix on a Pro Tools unit hooked into the console. Your delivered tracks must be as polished and final as you can make them.
The advantage to all in and mix is that nothing sits by itself naked to the client during predubbing. Rather than predubbing only the backgrounds, and having the client fuss and nitpick little flaws or choices, all the tracks are running at once, helping each other camouflage the inevitable imperfections each may have in its singularity.
A-B-C Approach
Soundtracks that are taken seriously are almost always mixed in the “A-B-C” approach. Essentially, all the basic elements are predubbed by themselves, then polished and refined exactly as intended. This approach also gives tremendously more control over the basic elements when you reach the final mix.
“A-B-C” refers to A-FX, B-FX, C-FX. The supervising sound editor tells the sound effects editor which approach to take for preparation. If the A-B-C approach is chosen, then the sound effects editor knows to break out the basic sound effect groups. On complex sound effect shows, the supervising sound editor often does this. He or she makes a chart and lists A-FX, B-FX, C-FX, and so forth.
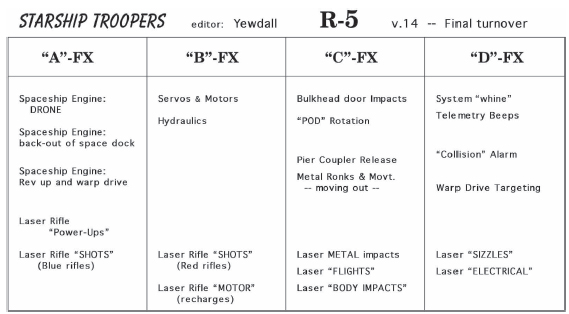
Figure 13.7 Predub group strategy assignments for A-FX, B-FX, C-FX, etc. for R-5 of Starship Troopers.
A-FX, B-FX, C-FX
Beneath each heading, the supervisor lists what kinds of sound groups are desired in each designation. Often the supervisor uses a felt marker, giving each group a color code, and then marking the cut list printouts of each color code by each sound effect listed, to avoid any error.
For example, take the sequence of reel 7 in John Carpenter's Christine where Christine slams into and destroys the gas station. I cut the car engine sound effects on A-FX. Nothing else was in this predub pass except the car engine. I could cut other sounds in this A-FX group only if they occurred before or after the car engine, but never during the car engine material, which had to be completely by itself.
In the B-FX pass, I cut the tire skids and the wet-road effects. I could cut other sound effects in this pass prior to or after the gas station scene, but never during tire skids or wet road cues.
In C-FX I cut metal-oriented sounds: suspension movement, collision impacts, bumper tears, gas pump metal impacts and falls, debris for explosions, and so forth.
In D-FX I cut the various layers of the explosions.
Predub these by themselves, and when you play them back together you have much better control over the individual concepts. If the director asks to favor the skids more, you have not married them to the engines, or vice versa. This technique is basically simple, in principal, but oddly enough falls apart in the heat of battle for beginners. Only after enduring the dubbing stage and gaining the logical and methodical style of a re-recording mixer does a sound editor truly learn how to break down sound effect sequences to maximum efficiencies.
This is another problem that nonlinear technology has brought to the learning process. In the old days of working on mag film, all my editors came to the dubbing stage. We would call back to the shop at a certain point in the dubbing process of a reel so that everyone could come watch the playback. The sound editors definitely were on stage for their reels.
With nonlinear technology allowing horizontal editing, as many as eight or ten editors may have worked on a single reel of sound on big action pictures. Having eight or ten sound editors sitting on the stage while part of the reel with their own work is being mixed is just not practical or economical. Therefore, we are losing whole groups of new sound editing talent who have not experienced the intimate techniques, styles, and tricks of interaction with re-recording mixers.
Marking Sync on Film
I describe this process to you, even though we work in the nonlinear world now, because many of you will, sooner or later, find yourself going through film vaults or old inventories of film productions made before digital technologies. You may find yourself working in restoration or developing a prior cut version than needs to be reconstructed. Therefore, it is valuable for you to understand how we did it and how it works. When we worked on film, as we have discussed, we used a Moviola and a synchronizer. After we had cut the sound cues in the desired fashion, we marked the closest even foot inside the sound cue.
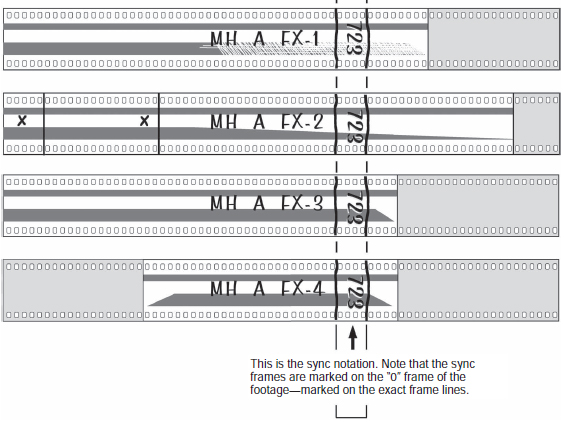
Figure 13.8 Marking sync on film with a black Sharpie.
Marking Film Sync
In Figure 13.8, the footage marked is “723.” Using a black Sharpie, box either side of the frame, then write the footage in the frame itself. The ink of the Sharpie does not harm the soundtrack. Behind it, mark an abbreviation for the show, especially when you have more than one show in the shop at a time. In this case “MH” is the abbreviation for Moscow on the Hudson, which was in the shop with two other projects. Mark the A-B-C pass designation and then the FX channel number. In this way, anyone picking up a piece of film lying on the floor that had been carelessly knocked aside knows exactly where it belongs because of these abbreviations.
The sound assistant rolls fill leader through the synchronizer and marks the frame (723) where the four cues land. The assistant backs out the fill leader strands, to the left of the synchronizer. Each sound cue then is taken off its respective trim bin hooks, one by one. The assistant carefully lays the boxed footage mark over the marks on the fill leader, then carefully guides the front end of the sound cue to the leading edge. At this point, the assistant turns both fill leader and mag film over and splices white 35-mm splicing tape on the backside to bind them. In the course of a single motion picture, it is not unusual to chew up half a million feet of fill leader, nearly a million feet of 35-mm mag stripe, and a hundred thousand feet of 35-mm fullcoat.
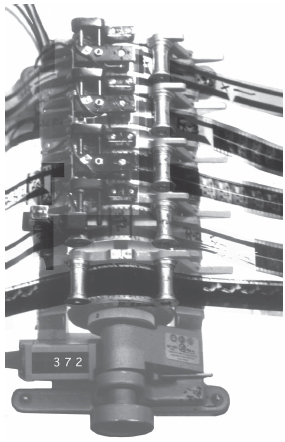
Figure 13.9 A four-gang synchronizer. The cut picture is in the first gang, closest to the front. Sound cues are built into the fill leader, with sync footage notations bracketed around the even foot frame.
Each roll of built sound cues is known as a unit. If you have cut 60 tracks of sound for B-FX, then you have 60,000-foot rolls of sound units built and delivered to the stage for predubbing. These racks of film units hold as many sound units as I cut for reel 9 of Leviathan, which had over 450 tracks at the height of the destructive climax. By the time the sea floor laboratory was destroyed by the monster, Mike Le-Mare and I had broken the sound action into A-through-W predubs.
Imagine the sheer weight of film stock that had to be carried around by the editorial team. I always felt sorry for the assistant sound editor and apprentice when they delivered units to a dubbing stage that had a machine room upstairs with no elevator or dumbwaiter to raise the tons of film. Hauling around a motion picture keeps you in better physical shape than working nonlinear.
If I remember correctly, when Universal sent their truck up the street to my editorial shop to pick up our unit inventory for John Carpenter's The Thing, the thousands of units of film weighed close to 5 tons!
Today, we can carry around thousands of sound effects, all the mix stems from all the reels of a major motion picture, all the cut sessions, final mixed stems, encoded AC3 files, and all the paperwork on a handful of DVD-Rs in a small black leather carrying case.
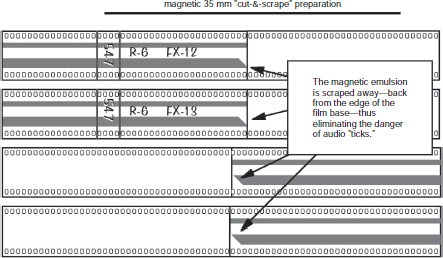
Figure 13.10 Cut sound cues showing several types of scraping or wiping techniques used on 35-mm mag stripe. Note the “thatching” technique in the upper track.
Separation of Sound Cues
No matter if we cut on film or cut on nonlinear systems, the wisdom of custom recording sound effect cues in single-cue actions becomes crystal clear. It is nearly impossible, and only a fluke of luck when it does occur, that you can record a single piece of action that covers everything. First, aside from being impossible, you would not have control over the levels of individual components. That is why you do not want your tire action sounds to be married to the engine. While you are recording, it is fun and thrilling. Now, however, at your workstation, you are cursing yourself for being foolish and allowing the stunt driver to do spinouts and skidding noises over the precious engine maneuvers. Yes, you want the tire skids and road texture, but you want to control them, putting them where you want, not where your recording dictates.
Leading Edges
Study the chart of the four tracks of sound cues from Moscow on the Hudson in Figure 13.10. Note that no leading edge of mag track actually touches the leading edge of the splice. We had to scrape the mag track away from the leading edge, just prior to the actual sound cue itself. This inhibited any ticks that may occur from a magnetic signal striking the sound head as the splice passed over it. The most common technique was to scrape across two perforations (half a frame) at a 45° angle.
Other techniques can also be used, such as a gentle fade-in (as in FX-2). This kind of fade was especially useful in the fade-out configuration, instead of enduring sudden cut-offs of overtones or unwanted ambience presences.
We use the exact techniques today in nonlinear digital editing, except, of course, we aren't using a single-edged razor blade or acetone to dissolve magnetic coating. Our nonlinear software is equipped with a whole selection of fade options to perform what we used to do on film—to a point.
The thatched fade-in technique as depicted in FX-1 is the only kind of track manipulation that nonlinear digital has not mastered yet, contrary to what any digital software writer tells you (they probably do not understand what it is). We frequently used to use this technique to break up and thin out vocal tracks, such as vocals over a radio that were coming and going in clarity as the operator rotated the frequency dial. We also used it, in the fine-thatched form depicted here, to thin out the volume of something that banged in too hard. Digital software writers state that this technique could be achieved by using the volume control, but it is not the same.
Whenever I need the thatched track effect for vocal break-up, I transfer the sound to a 35-mm mag track, break out the single-edged razor blade, and go at it. Then I transfer it back in a Pro Tools edit session.
Other little techniques demonstrate what degaussed single-edge razor blades are good for, such as crescent notches. I have tried to duplicate the effect with counterdigital cross-fades to varying degrees of success, but it was never as precise as what mag stock and a razor blade could do with a veteran editor who really knew what he or she was doing.
These comparisons are not meant to negate nonlinear. On the contrary, as a sound editor who has worked nearly 20 years on mag stripe and made a fruitful transition to nonlinear digital, I love it. I write about it to challenge and explain to digital software writers that the editorial tasks to emulate are not completely mastered yet. Thatching would be a fabulous ability to have in digital mode.
Crescent notching would be another. To master these techniques, however, you must sit down with the film veterans who used them in order to understand why they are used and why they are still needed. Then you will be able to write the software equivalents.
Fade techniques are obviously not reserved for magnetic film editing alone. The same technique is used in digital nonlinear preparation. The experienced editor knows to add a fade-in or fade-out to a cue, however short or long, as shown in Figure 13.11, and also use them to cross-fade as shown in Figure 13.12.
Digital Fade Choices
For veteran sound editors who cut on 35-mm mag film, the greatest joy about working with nonlinear digital is not having to scrape fade-ins and fade-outs as in the past, wearing out a 100-count box of single-edged razor blades. Many used the foul-smelling and finger-staining Track Wipe for years, which became a known carcinogen, thought to have been responsible for more than one death among the sound editor work force. (Track Wipe was a mixture of 50 percent acetone and 50 percent film cleaner. The percentages would differ depending on the strength and cutting desire of the editor using it.)

Figure 13.11 The fade-in and five fade-out choices available in a nonlinear Digidesign Pro Tools session.
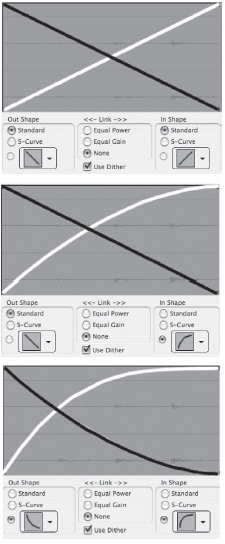
Figure 13.12 Using fades to cross-fade and blend in various combinations make for seamless transitions.
The real advantage of working with nonlinear digital is the ease with which undesirable fade-ins and fade-outs can be erased. In addition, unlike with magnetic film cutting, cross-fading between tracks is possible. This is a great boon to cutting and compositing sounds.
Cutting Backgrounds
I absolutely love backgrounds. When I started Escape from New York, I knew that rich stereo backgrounds were not only nice to have, but vital. The stereo background predub is the stereophonic canvas upon which the entire motion picture soundtrack sits. Music will not play all the time. Hard effects do not play all of the time. Foley, dialog, and ADR are monaural in nature. Group Walla can, and ought to, be recorded and cut stereophonically whenever appropriate and possible, but crowd scenes do not occur all the time. What does play all the time are the backgrounds, always present, so don't slough them off.
Unfortunately, most pictures do not have stereo backgrounds prepared thoroughly. A common tendency is to hold them down during predubbing, rather than letting their full potential thrive during the predubbing, adding yet another dimension to the film. How does the client know what wonderful textures are available if they are not heard during predubbing? If you choose to hold down the backgrounds during the final mix, fine, but do not squash them during predub. In more than one final mix I have had to stop the dub to have the machine room recall a background unit because a client was requesting something that had been held down and out during predubbing.
Another problematic area is the mastering process of the material itself. Not all sound effects libraries are created equal, as discussed in Chapter 11. Not all sound librarians see to it that the material is carefully cleaned and gleaned before the audio file is mastered to a permanent storage medium such as CD-R or DVD-R. Many effects, even at big sound editing facilities, have scads of sound cues with distortion, glitches, digital zits, drop-outs, and other blemishes. Unfortunately, many forget that sound editing means playing through and editing the material.
Having premastered material that has been carefully cleaned and polished is fabulous, and, as you become familiar with the material, you will gain confidence in each sound cue, remembering where its peculiar peccadilloes are located. However, if you expect the re-recording mixer to use your background material with trust, not only must you listen to it carefully and make sure it is smooth and polished, you also must “dramatically” listen to it against the action on the screen. Although it sounds extremely basic, you would be surprised how often this is not done. Most sound editors think of backgrounds as generic, nonsync audio texturing. I cut backgrounds to help tell the story of the action, often finding little bits of action that I can sync up to something in the background to give it a belonging.
The real magic of backgrounds does not happen when you cut one stereo pair. It happens when you lace up two or more stereo pairs. Two sounds played together are not 1 + 1 = 2. They become 1 + 1 = 3 or 4. They become a whole new sound. Listen to the background carefully as it plays against the production dialog track. If it distracts instead of adding, then change it.
Sometimes the most wonderful thing about a background is its magnificent power (e.g., the omnipresence of spaceship engines throughout entire scenes within a battle cruiser), and sometimes it is its delicacy and intimate subtlety (e.g., the quiet and musty basement of an old house before dawn). Backgrounds set a mood, like choral inversion airs or tonal presences. Two of the most requested backgrounds I have used in films are “Pipe Test” and “Peckerwood Canyon.”
“Pipe Test” was developed from only two frames of a “1” metal deck rustic grind, sampled and processed, then manipulated over a 2.5 growth—an unearthly presence that often fit the producer's request for “something we have never heard before.”
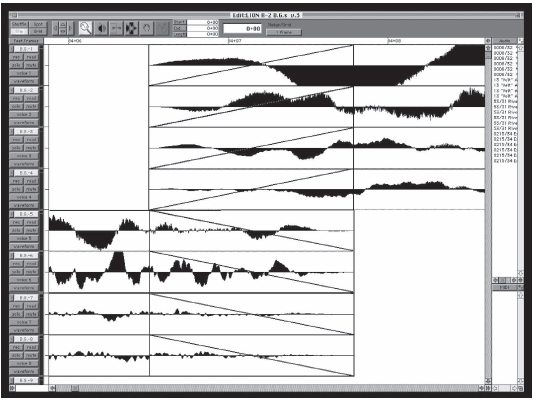
Figure 13.13 Note the outgoing audio tracks and incoming audio tracks overlap one full frame during the fade-in/fade-out cross-over.
My wife, Lisa, and I recorded “Peckerwood Canyon” just south of Yosemite Valley in the Sierra Nevada Mountains. It is the slow movement of air through the pine trees, with no bird calls, no movement, no insects—about every minute and a half is the most wonderful echo of a woodpecker as heard about a hundred yards away. Producers and directors have wanted audio cassette transfers of this background to play in their cars while commuting. Listen to the examples of backgrounds on the DVD provided with this book for a series of examples on layering stereo backgrounds to create an environmental envelope for the audience. Each series background example will add one additional layer to itself every 4 seconds, giving you the opportunity to study and evaluate the effect of layering.
To keep the re-recording mixer from taking the backgrounds casually, I often work on rather important sound cues, which can be justified to be in the background pass. By doing this, the mixer must listen to them and address their valuable addition, as they cannot be ignored.
Pro Tools One-Frame Overlaps
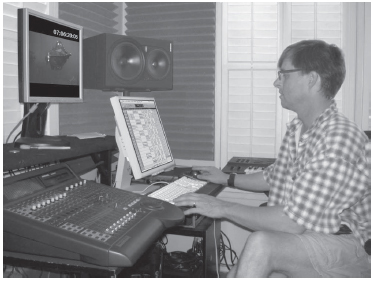
Figure 13.14 Charles Maynes, working at his studio set-up at home. Because of today's ability to send entire sessions via DigiDelivery, Charles finds that he is doing more and more work at home, instead of wasting valuable time commuting to and from the various studios.
Note the extreme close-up of the backgrounds in the Pro Tools session graph in Figure 13.13. At a scene change or a perspective split, I overlap the material by at least one full frame—sometimes as many as four frames, depending on how the transition sounds. Every cut situation will tell you how many frame overlaps work best. This same technique is used whether cutting on mag film or cutting nonlinear. This overlap, with a one-frame fade-in on the incoming background tracks and a one-frame fade-out on the outgoing background tracks, lends a smooth transition. By not using this technique, you risk a digital tick at the scene change, or at the very least you will experience a strange edginess to the cut, something not quite settled.
When stuck for a stereo background and all you have of the material is a monaural recording, make a “pseudo stereo” background version by following this simple procedure. After importing your monaural background into the Pro Tools session, drag it over into channel #1. Now highlight the background with the “hand,” hold down the Control and Option keys and drag down a duplicate copy of the background into channel #2. Now cut the background right in the center. If the background is 100 feet, cut it at the 50-foot mark. Now drag the second half of the background forward in front of the first half, allowing them to overlap about 6 to 8 feet. Now blend the two ends with at least a 5-foot cross-fade. Move both sections of the cut background so that the cross-fade is in the middle of the background on channel #1. Now, using the Cut/Reveal tool, open both ends of the cut background so that the lengths of the backgrounds of channel #1 and channel #2 are identical. Highlight and play the background. Most monaural backgrounds can be given a startling stereophonic illusion by using this process. The trick is, you must cut out any obvious impacts or sounds that show up a bit later in the other channel, thus giving away what you have done. (Listen to the audio examples of pseudostereo backgrounds on the DVD provided with this book from monaural material without using electronic delay techniques. Each example will play the original material monaurally for 4 seconds, then it will suddenly open up into its pseudostereo potential.)
Layering Techniques
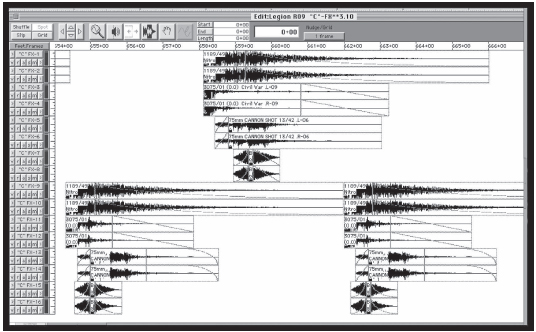
Figure 13.15 Pro Tools session—cannon barrage predub from Legionnaire.
Figure 13.15 shows a moment of an artillery barrage of a French Foreign Legion fortress in North Africa in the feature film Legionnaire. It is nearly impossible to find the perfect single sound effect for almost anything. By now it is probably apparent that layering sounds is how sound editors develop these rich and vibrant audio events that are so enjoyed. Listen to sound cue of layering Cannon Fire on the DVD provided with this book to hear the component cues and final combustions.
Pro Tools—Cannon Fire
The layering technique made the artillery field piece feel truly dangerous. From studying the C-FX session shown in Figure 13.15, you can see that I made the field piece by layering four stereo pairs of effects. These effects are only for the actual firing of the cannon, not for shell impact or any collateral debris effect.
The first effect is a rich black-powderish, low-end whomp explosion called “Nitroglycerine Blast.” The second layer gives the cannon a dangerous bite, achieved by using a Civil War cannon shot, which surprisingly does not have much low-end fullness, but does have a wonderful cutting edge that will cut through almost anything. I made several vari-speed versions of this effect, adding a speed recognition addendum to the audio file name—(0.0) meaning normal speed, (2.0) meaning half-speed, (4.0) meaning quarter-speed, and so on. The third layer is the shell flight of an M-4 Sherman tank's 75-mm cannon firing downrange. This gives the overall sound a historic period feel. I cut off the actual shot of the 75-mm cannon, using a quick fade-in of the projectile whirring away toward the target.
Although the final designed cannon shot sounds as if it had been recorded today with modern digital technology, it also sounds exactly correct for the period of the picture, which is 1925. I had exactly the concussionary shot I wanted with Nitroglycerine Blast and the Civil War (0.0) recoil. I wanted the effective shell whir as the 75-mm projectile flew downrange. Adding the discharge shot of the Sherman tank to both Nitroglycerine Blast and Civil War (0.0) recoil would only muddy the combination of sounds and detract from the fullness already achieved. The fourth layer is a short, high-end shell flight of an incoming mortar shell. This shrill high-end sweetener works much like the Civil War cannon bite, giving danger and menace to the flying shell projectile.
Refer to the three cannon shots shown in Figure 13.15. The second one shows the shell flight happening a little later than the first or third. This goes back to picture editorial issues discussed in Chapter 7. The picture editor did not make a thorough study of the material. Physics tells us that if the target is in the same place, and the cannons have not moved from their primary location, then the shell should take the same number of frames to travel from cannon discharge to shell impact. The biggest challenge I had in the cannon fire was to make each shell flight sound natural and believable; some flew for a long time, and others were instantly on target.
Whip Pan Techniques
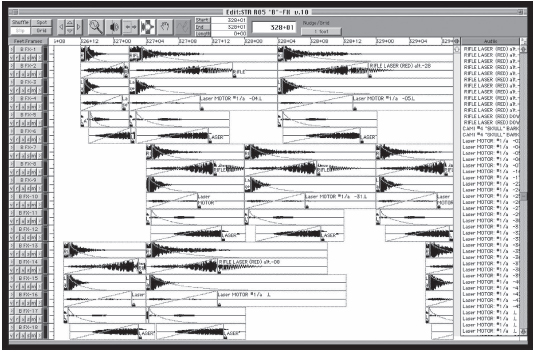
Figure 13.16 Pro Tools session—Laser Tag firefight elements from R-5 of Starship Troopers. Note the carefully sculpted fade-outs for fast left-to-right and right-to-left fly-bys.
The example shown in Figure 13.16 is a moment in the B-FX predub of Starship Troopers when infantry trainees are working out with tag laser rifles. This session is 18 channels wide. It contains three groups of three stereo pairs of sounds. (Listen to Laser Fire audio cues on the DVD provided with the book to hear this cue.)
Pro Tools—Laser Fire
Three stereo pairs work together to create the laser fire from one rifle. I did something here that I very rarely do and almost never recommend. If you look closely (you may need a magnifying glass), you will note that the fade-in and fade-out configurations on each stereo pair do not match. The reason for this is actually quite simple: no mixer on earth could have panned these laser shots quickly or accurately enough from left to right and right to left, so I decided to prepare the material with prepanned laser fire by virtue of radical inverted fade combinations. This must be undertaken very carefully; if prepared improperly, the mixer mostly likely will not be able to unwind it, requiring rework.
I started using this technique of prebuilding pans into the material by using fade-ins and fade-outs for the Wesley Snipes picture Boiling Point. The re-recording mixing schedule was woefully inadequate, especially considering that the sound effects mixer would have to devote several days to pan-potting all the car-bys needed for street traffic. By using this technique, though, the sound effects mixer needed to make only minor adjustments in balance and volume, leaving him free to pay closer attention to far more important sound effects. The fade panned car-bys simply performed as designed, crossing left to right or right to left as planned.
This places much responsibility on the sound editor and especially on the supervising sound editor should these prebuilds not perform as anticipated. What sounds like a piece of heaven at your workstation in the cutting rooms can easily degenerate into an ugly finger-pointing disaster when a producer watches the clock ticking off hundred-dollar bills because your designed pan-bys are not working correctly. However, situations such as the two described above frankly point to this technique as time and money savers. The best way to rally support from your mixing colleagues for using this method is to consult with them first, well in advance of predubbing. No re-recording mixer will be your ally and support you if it blows up in your face because it does not perform as you expected if you had not consulted him or her ahead of time. Mixers most likely will bounce the reel to save their own skin, sending you back to the editing room with egg on your face as you recut it.
Using an Off-the-Shelf Audio CD Sound Library
An advantage to buying ready-made sound effects from commercial CD sound libraries is the ability to amass thousands of sound effects in your audio arsenal very quickly as a beginning sound editor who has not had the benefit of years of custom recording. By the mid-1990s, audio CDs were finally starting to offer theatrical-style sound effects, which gained a wider acceptance among those accustomed to custom recording their own material.
Not all sound CD offerings are created equally. Many have that flat documentary-type sound, of little value to theatrical sound editors. Others are developed through synthesized means, which also offer little. Some sound libraries offer a few good sound effects on CD, with the rest of the material pure junk. Before spending money, try to listen to the product first.
One sound publication firm that has truly excelled in serving the feature-film market is Sound Ideas, based in Toronto. Starting with their 6000 General series, Sound Ideas began to develop a rich theatrical feel for its product. Subsequent library series have been as good, if not better.
Regardless of what audio CD series you use, the most disappointing flaw is the lack of sufficient variations. For instance, when cutting an action car sequence, you require numerous variations in the car-bys or maneuvers so you don't repeat the same cue. When it comes to complete vehicle series (aircraft, boats, cars, trucks, motorcycles, etc.), you will be extremely hard pressed to find any CD that gives you all the nuts and bolts you require. Here comes that same speed with that same road texture and that same little bump in the pavement thump at the same place in the car-by. When you think through your road texture and performance variations, you are looking at 25 to 40 variations, not the three or four usually offered on CD libraries.
Having good sound effect CDs in your library for secondary and miscellaneous sounds is absolutely necessary, but, for key action vehicles, consider custom recording. Review Chapter 10 for further details on custom recording a complete vehicle series.
Techniques in Cutting Vehicles
Almost everybody thinks cutting cars is easy, until they get in and try cutting anything but the standard ins and stops and start and aways, let alone complex maneuvers and car chases. Before getting into understanding complicated cutting, let me start by saying that the usual first mistake of a learning-to-cut sound editor involves how a car starts and stops. In many a film sequence, the sound editor does not take the time to observe the physics and mechanics of how a car actually works. The sound editor cuts the sound of the engine so that the rpm rises as the car visually moves forward, and I have watched many a scene where the engine sounds completely out of touch with the car coming to a stop. Observe the real thing before you try to duplicate it on film. Note that a car engine starts to accelerate before you see the vehicle move. Obviously you must play with it. If you allow the acceleration to begin too soon, it sounds odd; if you accelerate with the visual, it feels equally odd. Move the acceleration against the picture and play it against action until it feels connected.
Other things almost magically fall into place. Little bits of noises and nuances you heard before but did not make any sense suddenly fall where they should, such as the engagement of a transmission, little clunks that, when massaged for sync, bring the action to life. (Listen to sound cue of the Cut Car Sequence from the DVD provided to hear this cue and its components from the movie Jackie Brown.) For demonstration purposes, I have not cut this in an A-FX, B-FX, C-FX style, but in an all in and mix style, so that you can hear all the separate elements as well as how they work together.
Pro Tools—Car Sequence
The sequence cut in Figure 13.17 was when Robert Forster left the shopping center, got into a Cadillac, started it up, backed up, and drove away. Listening to the single combine, you may think it unremarkable, until you realize that the movements in the sequence are a careful weave of single audio events. Stop thinking of finding one sound cue that does it all, and start thinking of the component parts from the palette of sounds at your disposal, so that you may paint your own reality.
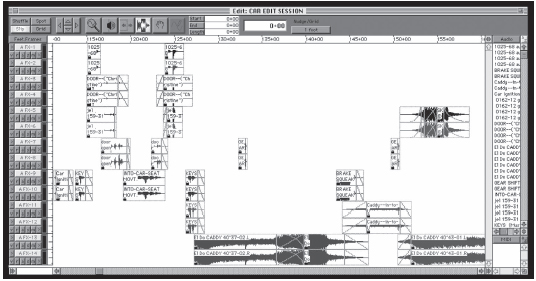
Figure 13.17 Pro Tools session—car predub from R-6 of Jackie Brown. Into car movement, door, keys, Cadillac start, back up, and away with tire grit and swerves.
I audition my file of various keys into door locks, looking for the more solid metal sedan key, not the CJ-5, which has a more hollow metal lock over-ring, and not the Honda, which sounds too small. I lengthen the unlocking movement as the man on film fiddles with the door longer than my sound effect lingers, and I shorten the part of the key extraction to speed up the urgency the actor displays.
I always cut two stereo pairs of car door opens and closes. Move in tight and match the latch movements on both effects exactly, or they do not sound as one door. No two are ever identical, nor should they be. If you do not match the latch movements, the two door effects only sound like one door cut on top of another, with no relationship to each other. Once you match the latch movements, the two doors will sound as one door—one-plus-one equals a new one! You can create an unlimited variety of doors and textures by mixing and matching doors. Experience and technique help develop your own favorite combinations.
(Car warning alerts, such as door open dinging or seat belt jingles, are optional. I usually do not cut them in unless the client specifically asks for them, and when I custom record vehicles I always try to defeat the warning alerts on the car prior to recording. On the screen, they are often distracting.)
I cut an into-car movement track. When I custom recorded the cars for Christine, I captured what has become one of the most used into-car seat movements in the business, better than Foley and with an interesting character of seat springs and cushion movement. Just sync up the seat spring point where the actor's weight has bottomed out (excuse the pun), then shorten or extend the ins and outs.
I usually cut two different key movements into the key ignition, depending on key ring and desirability of jingle. It is important to pay attention to the make of the car series you are using to cut. Many discerning ears, whether of the re-recording mixer, the producer, or the general viewer, are quick to point out when the cut sound effects are of a Dodge instead of the Ford depicted on-screen. The two vehicles sound different, so pay attention. That is not to say you do not use creative license, but certain signature elements, such as the throat of the engine that can take a viewer out of the story, are so wrong they are distracting.
I have the entire car series residing in a file folder on an external drive, where I can access it. I cut an engine start-up, and probably have to shorten the duration of the engine settling down into an idle. I cross to another track for the acceleration of the engine as the car backs up. I sweeten a little brake squeal on another track if it fits the character of the car. I cut in a little transmission clunk movement as the driver changes from reverse to drive. In this particular case, the driver is anxious and pulls out quickly, turning hard left, then accelerates down the street. On a separate track I cut in a little tire sweetener to sell the tire turn, as it grinds down on the pavement with the strong acceleration away.
Splitting off Tracks
Pay attention to preparing the sounds so that it is as easy as possible for the re-recording mixer to work with your material. This is especially true for fast action sequences, where perspective shifts change quickly. Sure, a re-recording mixer can make the perspective shifts on the console; sometimes it is necessary, for technical reasons, such as harmonic sounds that must not be split. However, most sounds can be split for perspective. If you do not prepare the material so that all the mixer does is set perspective volume levels or equalization shifts on one set of channels over another, you quickly will find your mixing counterpart becoming more perturbed with you, eventually bouncing reels back to the cutting room for more thorough preparation.
Say I am using 5 channels of sounds playing together to make the flying reality of an Apache helicopter. I cut the cues into FX-1, 2, 3, 4, and 5. Those 5 channels will be my close-up group. The action is working fine, and then I come to a cut where we favor the enemy tank as it barrels along on the ground with the Apache maneuvering in the background. I split off the material from FX-1, 2, 3, 4, and 5 and move the cues over to FX-6, 7, 8, 9, and 10 as a background group. As with the one-frame overlap technique shown in the cutting of backgrounds, I extend the leading edges of this perspective split, fade-out the outgoing channels, and fade-in the incoming channels.
The action holds on the enemy tank for a few moments, then cuts back to the close angle of the helicopter. Again, I split the five channels of sound back to FX-1, 2, 3, 4, and 5. This process goes on throughout the entire sequence of action. Analyze each shot, deciding where the perspective splits should be placed. Often I need an additional 5 channels for more complex coverage, as I may need a medium-angle group. In that case, I reserve 15 channels in a row to handle the perspective preparations for 5 channels of sound, split into three basic angle perspectives.
The next time you watch a car chase, such as the chase through Paris in John Frankenheimer's Ronin, note how many layers of material must have gone into the preparation for the two key vehicles. Engines, gear-box whines, tires on cobblestone and asphalt, suspension, skids—all need perspective splits made to control the two cars as they race through city streets.
To best way to understand the concept of when to split, how to split, and where to place the split-off material is to put yourself in the shoes of the re-recording mixer. If you had to mix this insane tidal wave of sound coming at you in real time, when do you want the material split-off, how would you like it split, and where do you want the material? Study the action—the film will tell you where it wants to be split—if you only pay attention and think it through.
The danger is that you can oversplit the material as well, called the “ping-pong” effect. As you develop a resumé of experience, you learn when you are running the danger of oversplitting. Sometimes you work it with the sable brush, and sometimes the most effective way is clubbing with a sledge hammer for sensation and dramatic effect.
The best advice I can give you is this, offered twofold.
First, if your mixer is hindered, you are not splitting it well. Remember, part of your job is to make that task as easy as possible so that time is not wasted in track management, but creatively spent mixing the material to a higher level of entertainment.
Second, if the audience is disrupted or distracted from the story, you have failed. Anything that draws attention away from the continual stream of storytelling to the fact you are making a movie is wrong.
Building in Volume Graphing and Equalization
With nonlinear workstations, it is easy to build in volume graphing, as well as equalization and other signal-processing additives. Today's editors exchange and talk about their plug-ins like kids trading their baseball cards on the playground. Play all you want, be as creative as you want, pump your signal-processing gear until you are blue in the face. Just remember this: when you have had your fun and think you're only decibels from an Academy Award nomination, walk onto the dubbing stage, turn your cue sheets over to the re-recording mixer, and face the responsibility of what you have done.
Very few sound craftspeople working today can signal process successfully prior to the dub stage. Many do it; many think their work goes to the stage and is mixed just fine. Many do not know their work is dumped and others are brought in to re-cut and re-prepare the material because their processed work is unmixable. With every signal-processing adjustment made, you progressively are inching out on the limb a little further. After a while, the breeze starts to kick up a bit; the branch becomes a bit more unstable. Decide how far out on that limb you are willing to go. Your next job may depend on the reputation of how much time and trouble you caused by having to have material re-prepared or remixed because you went too far.
We will discuss the reverse philosophy of what I have just preached in the next chapter (Chapter 14)—I am sure you cannot wait to hear how and why I will tell you one thing on this page and the flip side in the next chapter.
Volume graphing is not nearly so crucial an issue; in fact, many mixers do not mind a little volume graphing to help them understand the intent of the sound editor and facilitate the mix. It is not a good idea, however, to be finite about your levels, especially when you attempt to lower them too far.
Cueing the Picture
As made very clear, the vast majority of postproduction sound editorial work today is done in the nonlinear realm with videotape transfers of either the cut workprint or the Final Cut Pro or Avid picture edit sessions. However, many would prefer to mix, or at the very least, check predubs or final mix in a playback mode against the final 35-mm picture. Most picture editorial teams try and get the silent first trial answer print on the dubbing stage for the re-recording mixers to use during the re-recording session for at least final playback if not the final mixing process itself.
When the 35-mm first trial (often called the “black track” because there is a black mask where the optical soundtrack eventually goes when the final mix is complete) is made available, the first sound assistant cues the picture. The sound assistant calls the dubbing stage and asks the head mixer what kinds of picture cues the mixer prefers.
The Ten-Ten Cue Technique
Some mixers prefer what are called “ten-tens.” The sound assistant has a template, usually a strip of tape on the bench between the two rewinds. A line has been drawn on the left end of the tape. Ten frames of 35-mm film from that line cross from left to right. There is a bold cross drawn on frames 11, 12, and 13. The frame count continues to the right. Three more bold crosses are drawn on frames 24, 25, and 26. As the sound assistant winds the picture slowly from the left rewind to the take-up rewind on the right, he or she watches for the changes in shots. By this time, the assistant has the film virtually memorized. Where perspective and/or scene change cues need to be made, the assistant brings the film down to the tape template, placing the frame line at the line on the left side of the template. He or she takes a grease pencil (some mixers even dictate what color grease pencil, so ask) and boldly marks the two sets of three crosses where the template crosses are set.
As the film runs through the projector at 90 feet a minute, these crosses appear as a mere one-two beat prior to the perspective split or scene change. Where the third set of crosses would have occurred is where the change takes place.
The Wipe Cue Technique
Other mixers prefer the “wipe” cue, which is often not quite as precise in nature. The wipe cue is accomplished by drawing a diagonal straight-edged line with a grease pencil from left to right across the film, usually 1 foot prior to the perspective split or scene change. At the frame line of the wipe, the assistant uses the grease pencil to draw a thick line across the film, emphasizing the frame line itself. As the film runs through the projector, the wipe suddenly travels across the screen, ending in a blip-type frame line.
Presentation
A most vital concept to keep in mind is presentation. Dozens of sound effects must work together to make a reality. Very often, however, either confidence or doubt is set with the very first effect played by the effects mixer as the track is auditioned in a solo mode to determine what is truly there.
If you do not lead off with your strongest cue, you are inviting doubt, from the effects mixer back to producer and director. Make a good first impression. You do not want to give a perception of weak material, so why put your sweetener or support material in the first tracks the mixer auditions? Nobody cares if your support effects are not as strong, just as long as they are not your foundation sound pieces.
Cue Sheets: Hand-Made or Computer-Generated?
Cue sheets are not only the blueprint of the soundtrack you have spent weeks and months preparing. They are also the first turn key to the philosophy of presentation. I have seen many fine sound editors who could cut up a storm, who knew how to make magic of sound, but who also neglected the presentation of their cue sheets. Their cue sheets were sloppy, often with words misspelled. Before the first sound cues hit the screen, the producer and director had glanced at them and cringed, wondering what kind of soundtrack they were getting. Even if the work itself was superb, already the atmosphere of doubt was set.
Some editors still prefer to hand make cue sheets, citing the personal touch and their last authorship of the design. It gives them the opportunity to make side notes and draw flow lines, to add color-coded underlines.
Most, however, use a computer program that extrapolates an exact map of what was cut. The smart sound editor takes the time to ripple through the computerized columns to erase unnecessary number information, or to rename files from the sound master file according to the action on-screen.
The information header should have specific information of what show, who cut it, what kind of session it is, and what version date the cut represents.
An Example of an Information Header
Think about the comfort and the visual flow of the cue sheet so that the mixer is not wasting effort and time trying to figure out the cue sheet, taking away time from turning the dials and equalizing the material.
Show Title Believe it or not, I have seen re-recording mixers trying to figure out how to mix a reel with cue sheets that actually belonged to the same reel of an entirely different project. (No wonder nothing was in sync!)

Figure 13.18 The top of your cue sheet should have clear, neat, and pertinent information so that the re-recording mixer knows what show, what reel, who cut it, what predub group, and which version.
Editor The editor's name should always be on the cue sheet. Not only is this an indictment of the guilty party to throw rocks at if everything blows up, but more importantly, it tells anybody working on the mixing console who should know the content of the reel most intimately should questions arise that need swift and accurate answers.
Reel No. (#) The re-recording mixer should be able to see in large, clear print what reel he or she is working with.
Predub Group The cue sheet needs to clearly show what predub group the cue sheets represent. Remember, the cue sheets are a blueprint, a road map to most efficiently guide the re-recording mixer through the contents to be dealt with.
Version Do not forget the version number. If the sound effects are not working in sync, the first thing the re-recording mixer is going to do is first check the version number on the cue sheets and the version number on the picture (or videotape). If they do not match, well, get it off the stage until sound and/or picture editorial can bring the most current versions that have both a matching picture and cut audio elements. Some crews use the date rather than a version number. Both techniques work fine. It is not a good idea to interchange these techniques. Decide to use either version or date as a protocol for charting picture changes and updates and stick to that protocol.
The “Dubbing” Cue Sheet
Study the cue sheet pictured in Figure 13.19. This is a computer-generated cue sheet that has been “cleaned-up” for the dubbing stage. What that means is that any computer cue sheet program is going to display the data of the audio cut with all of the precise computeresque exactitudes. By that, I mean that the actual cue “Oil Fire” is actually listed in my library as: 097-42_Oil_Fire_w/low+6.
When the computer software displays it in the cut region the data may shoot up as: 097/42_Oil_Fire_w/low+6-18.R.
That means that it is showing you the entire name, the eighteenth cut in that session, then the right channel is displayed to you. I really do not want all that in each data window; it is just too much data clutter. So I will eliminate everything except what I want the mixer to see; and in this case, I will add a perspective description like “close” or “distant.” I will then highlight this new name and copy the text “Oil Fire close,” then scroll down and paste it into each cut region that the entire name shows up in, thereby giving me a name: Oil Fire close.
I will repeat this technique in each displayed channel and change any cut region field data that I wish to simplify.
If you look up at the channel data window, you will see that you can combine left and right channels into a single track. The reason that .R will show up at the end of the clip name is because I have combined all the stereo channels into one track. So the computer shows only the one track name that represents both the left and right sides. The data window tells you this by showing you this information expressed as Stereo.1/2.
This means that this single represented channel of sound is actually 2 channels of sound, because it takes a left and a right channel. As you can see, this will save on an awful lot of cue sheet paper by condensing stereo cues, as well as saving on the wear and tear of dubbing mixers’ eyes in studying the cue sheet. An additional help to the mixer is not to read the entire audio cue as “097/42 Oil Fire w/low+6-18.R”; therefore, I will go into the computer program and cleanup the cues, removing unnecessary data that will mean nothing to the re-recording mixer.
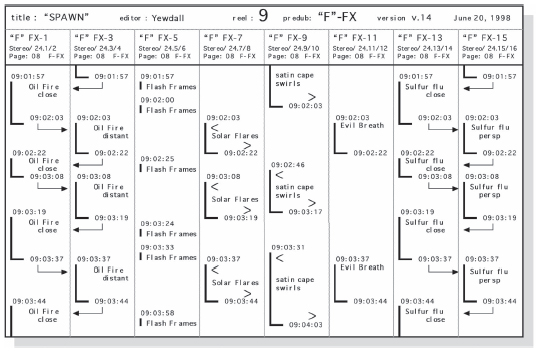
Figure 13.19 A typical computer-generated ‘dubbing’ cue sheet. Note the regimented line-up of time counts and the ‘cleaned-up’ audio file names for ease of use on the re-recording stage.
In addition, computer programs do not make split arrows such as you see in FX-1, FX-3, FX-13, and FX-15. I make an arrow template and put these in manually, because when an audio track is split for perspective and/or volume shift issues, a re-recording mixer is really thankful to see where the event is going.
You might want to check out computer cue sheet programs before you buy them. I really stay away from one program in particular, in that it makes you change the names of your audio files so that it will read them a certain way in the cue sheet. This is like the tail wagging the body of the dog: it is engineered backwards. Other computer cue sheet programs are designed to be much more friendly to editors, who usually have to make their cue sheets in the middle of the night or minutes before the actual mix commences and do not have time to put up with a lot of backward computer program engineering.
The sideways V's in FX-7 and FX-9 tell the mixer that the effect has built-in fade-ins or fade-outs. These symbols are built into the computer program and will show up automatically; although, once again they are canard, because if you are a precise editor who builds in one-frame fade-ins and fade-outs to guard against digital ticks, the computer will not know this any differently from a 30-frame fade-in or fade-out, but will show the fade-in and fade-out symbols regardless. So here again, I remove any fade-in or fade-out symbols that do not truly represent an important fade that the mixer may be interested in knowing about.
Packed and Ready to Go
The sound assistant has gone over the flow chart of the material advertised from the various departments. He or she has seen to it that the editors have cut to the proper versions. The assistant also has seen to it that the sessions have been backed up and protected. Finally he or she has seen to it that the cue sheets have been properly made and that the various editors are speaking with one style and voice, as far as presentation is concerned.
Since 1978 I have taken an organizational chart template to an economy copy center and have special 10” x 13” white envelopes printed up. Each envelope holds a reel of dialog cue sheets (including ADR and Group Walla), or a reel of Foley cue sheets, or a reel of hard effects cue sheets, or a reel of stereo background cue sheets. As each group of cue sheets is completed, the sound assistant check marks the appropriate box on the front of the envelope, along with the show title, editor's name, type of cue sheet group, completion of predubbing on the material, etc. On the bottom is a large box for the supervising sound editor to write notes while he is on the dubbing stage with the mixers. He or she can pencil in update notes to be made before the final mix.
This is not only a good organizational help to keep the flood of paperwork straight and easily accessible, but it is also good presentation to your client. They see how you work with clean and neat envelopes with precise notes that are easy to find. It instills their confidence in you and your ability to handle the complex job of developing their soundtrack, and they are more willing to listen to your advice when the chips are down because they have seen your neatness and orderly procedure.