
Chapter 15
Dialog Editors
Hollywood's Unsung Heroes
“Good dialog editing is like a form of magic—you carefully weave
the tracks like a sleight-of-hand to create an illusion transparency.
If you do your job right—nobody notices what you've done.”
– Dwayne Avery, M.P.S.E.
Dialog editor
How many times have you sat in the theatre, enjoying the movie, and sighed with admiration for the dialog editor's skill and handiwork? “Wow, that was great cross-filled presence. It's so transparent, you can't even tell the difference between those two angles.”
Of course you don't. If you did notice, it was not because the dialog editor did a good job; it would be because the dialog editor did a poor one. Dialog editing is an invisible art form. If the work is good, the audience never notices. This is a good news/ bad news thing to dialog editors. The good news is the great satisfaction that the transparency of their work does not reveal the fact that the dialog track is a patchwork of hundreds of cuts and pieces of presence so expertly prepared that the bits of production audio fit together seamlessly, smoothed by the dialog editor's handiwork. The bad news is that the dialog editor's efforts are usually so good that nobody notices. Only editorial colleagues know the work's excellence and the contribution of dialog editing to a motion picture.
How big of a contribution is it really? Sound effect design may be used or discarded, backgrounds may be used or discarded, music cues may be used or discarded—but the dialog track always plays, always! The dialog track is the most important audio element in the film, and as discussed in Chapter 5, one of the more neglected aspects of the production shoot.
QUALITY CONTROL BEFORE POSTPRODUCTION
On Frank & Jesse, a picture starring Bill Paxton and Rob Lowe, which I served as supervising sound editor, the production team had been working on a flatbed KEM and had never listened to the raw production track in a quality-controlled environment. To make a precise assessment of the ADR requirements, I insisted on running the picture with the contracted re-recording mixer, Bob Glass, Jr., on his stage. We barely got into the second reel when I called over to the editing room and told the producer we would wait until they came over to hear it for themselves.
Unbeknownst to them during the production shoot, the production mixer had been experiencing condensation popping on the microphone diaphragm. The cold morning air warmed up, and, as the sun rose toward noon, condensation was affecting the track with periodic popping noises. The producer and director listened in disbelief. Surely it must be something in the sound transfer. Could it have been introduced on the KEM? It couldn't have been that way on the set!
My first assistant pulled arbitrary ¼″ tapes from the boxes that had arrived from the lab. We laced them up one at a time and spun down and stopped randomly to listen. The popping noises were in the original ¼″ recordings. Vast sections of scenes filmed outdoors were affected. Glass and I advised the producer and director that as much as 80 percent of the picture had to be looped to fix the problem. Panic seized the studio executives. Nobody had budgeted or anticipated the tens of thousands of dollars in ADR costs to fix a problem that should have been discovered, flagged, and problem-solved during the production shoot.
As it turned out, we saved the studio vast sums of money by spending just a few thousand dollars in a cleverly prepared series of dialog tracks that were then carefully scrubbed and processed with an audio software known as Sonic Solutions.
The key was not processing raw dailies. Dwayne Avery, the dialog editor, prepared the flawed dialog tracks in edited form, then downloaded the separate cut dialog tracks into the Sonic Solutions system to be fixed. This process is known as “de-clicking.” While we were at it, we had the Sonic Solutions subcontractor do selective surgical processing on several problematic dialog angles that would have been virtually impossible for our re-recording mixer, Bob Glass, Jr., to accomplish with a traditional analog mixing console.
DIALOG EDITING STRATEGY
The supervising sound editor hires a key dialog editor, often referred to as the dialog supervisor. Depending on the size of the project, the length of the schedule, and other monetary factors, the dialog supervisor may decide that one or more other dialog editors are needed to assist in the work to be done.
During the course of sound editorial, the supervising sound editor may go over the work expectations from the client, including one or more temp dubs, as well as the calendar timeframe within which the work must be accomplished. The two also discuss what degree of polish and preparation are needed for the temp dub. The lead dialog editor should always be part of the “spotting session(s)” described in Chapter 9. He or she is there during those critical discussions with the director, picture editor, and producer that evolve into a finite battle plan to accomplish any temp dub wishes and to define the final expectations for a polished dialog track.
In turn, these discussions also focus the budget demands accordingly. If the director and producer expect a more polished dialog edit for the temp dub, more dialog editors are hired to get the work done quicker to better serve the temp dub needs. Conversely, if the director and producer are using their editor's cut track (also known as the editor's work track) as the dialog portion of the temp dub, with perhaps a few fixes for clarification or correction of a particularly bad passage of production sound, then that requires a much lighter dialog team on the temp dub and allows the dialog editor to properly cut the dialog over the sound edit schedule.
DIALOG SEQUENCE SHEETS AND THE EDL
When the turnover materials discussed in Chapter 13 arrive to the first sound assistant's bench, he or she immediately starts preparing material for the dialog editor. Back when we cut on film, before any cut editor's tracks may be handled by anyone in sound editorial, they were first sent to sound transfer where 1:1 copies (exact duplicates) are made, not only for protection, but because other departments (ADR, Foley, sound effects) needed a copy—not the original—of the editor's cut track. The dialog editor must have the original.
Today, cutting dialog on Pro Tools, we get the picture editor's guide track from the QuickTime video output. When picture editorial makes the QuickTime file, they will choose that both picture and sound be included. The smart way to make a guide track output is for the assistant picture editor to assign only the production (and temp dialog inserts) track on channel 1 (left). Channel 2 (right) can be the combined dialog, temp sound effects and temp music combined, especially if the picture editor and director have things that they want the sound team to match or to reference. But it is vital that channel 1 (left) be the production track only—no temp sound effects or temp music should be in this track as it will only hinder the progress of the dialog and ADR supervisor and their editing team to their job correctly.
Back when we worked on film, the assistant sound editor would roll the picture dupe and cut production track, which had the invaluable edge code numbers printed on the edge every 16 frames (one 35-mm foot). The assistant sound editor would carefully construct a dialog sequence sheet.
Dialog Sequence Sheet
The sound assistant laced up the picture dupe and the editor's cut track into a synchronizer, placing the start marks on the 0 and zeroing out the footage counter. The assistant lowered the sound head of the synchronizer onto the mag track and plugged the headsets into the workbench mixer. As the assistant rolled through the track, he or she would carefully watch for splices in the soundtrack. When one arose, the assistant paid close attention to the edge code numbers (described in Chapter 6).
In my shop, our technique was not to list every splice cut, as some did. We were more interested about listing the cuts when the edge code number changed. This represented a change in the sound roll. If splices occurred within a sequence where the edge code numbers did not change in sequential order, or changed very little, we knew that the picture editor had simply tried a cut, did not like it, and put it back together, or had made an internal cut, which we knew our own dialog editor would be able to sequentially match. We did not want to clog the dialog sequence sheet with hundreds of repetitious notations that we knew full well the dialog editor did not need. The dialog editor needed to know what rolls of reprints were necessary to commence cutting chores.

Figure 15.1 The dialog sequence sheet.
The assistant entered the first even-foot number that landed within the dialog cue to be listed. He or she then listed the first edge code number that appears on the edge of the film. He or she kept rolling through the roll, entering new edge code numbers as the scene/take/angle changed. After the assistant finished with that task, each edge code number listed in the codebook was looked up. The assistant listed the scene, angle, and take next to the edge code number entry.
In the sound roll column, the original source tape number was entered. The assistant made a photocopy of the sheets completed, three-hole punched them, and placed them in the supervisor's “bible.” Once this was done, the assistant turned over a picture dupe, the editor's cut track, and the dialog sequence sheets to the dialog editor.
The dialog editor then laced up the picture dupe and editor's cut track in the Moviola and ran the reel, pausing every so often to enter any notations in the “note” column. After the dialog editor had run through the entire reel, he or she decided how many dialog reprints were going to be required from the original ¼″ or DAT source. The dialog editor photocopied the completed dialog sequence sheets and gave a copy to the first assistant, who put together a transfer order so that sound transfer could complete the reprint work as quickly as possible.
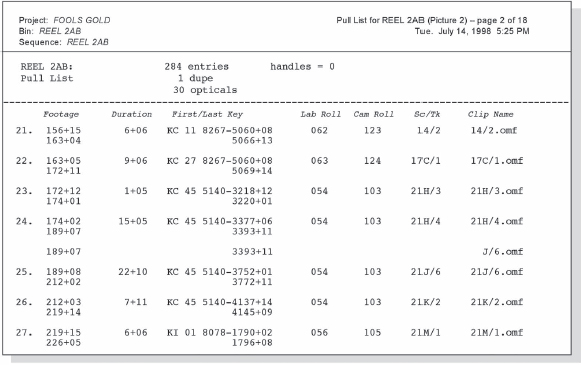
Figure 15.2 The EDL (edit decision list).
The EDL
Today, working in the digital nonlinear realm, the first sound assistant receives an EDL (edit decision list) from picture editorial when they generate the OMF (Open Media Framework). The EDL is cleaned up and made easier to read, as it is always a computer document that can lend itself to quick restructuring. It takes a little extra time to do this, as the picture department originally sent over is a tidal wave mass of numerical data. (Not the picture assistant's fault, that is just how computers work.) For some reason, some picture departments become confused about what data should be requested when they generate an EDL, so they are often not properly generated in the first place. That is why I would call in Wade Coonfer, an expert in postproduction procedures and nonlinear protocols, and have him output their EDLs and OMFs for us correctly in the first place.
Most of the time, sound editorial receives an EDL perfect for negative assembly, but that does not do sound editorial much good unless you request the scene/take as well as the sound roll entry. The lab roll is the sound roll. Most of the time the picture EDL is sent to us; this is significantly different from the sound EDL. All picture editors will overlap soundtracks, steal alternate readings, put in a bit of off-screen dialog that was not there before. A picture EDL will not reflect these cuts, but picture assistants forget to think about that when they choose the EDL menu options. Picture editorial must call sound editorial prior to making the EDLs to double-check the necessary items.
The EDL handles much the same chores as the dialog sequence sheet. It shows at what footage (or in time code if you prefer) each cut takes place. It shows the duration of the clip until the next cut, it shows the first and last of the key edge numbers. Remember, we do not have edge code numbers in the digital realm; only if we sync our dailies on film and edge code them prior to telecine and digitization do we have edge code numbers. The picture digital workstation does not have those edge code numbers, but it does have the negative key edge numbers. Sometimes these numbers are helpful to the dialog editor trying to find something in the codebook.
The EDL also lists scene/take and clip name. The computer is extremely literal. If you make a cut, it acknowledges it. We often get 50 to 60 pages of an EDL for a single reel, with the computer listing every single cut, even if it is the same scene and take, over and over. The smart supervising sound editor makes a copy of the EDL and cleans it up, so as to make the mass of data much easier to read by the dialog editor. Choose a clear typeface and large point size. Sound editors usually work in dimly lit rooms. Small font sizes squashed together are extremely hard to read, causing eye fatigue and burning out the dialog editor in a short time.
The supervisor sees that Scene 21“J”-3 is listed five times in a row, which is unnecessary. If an internal cut has been made, the dialog editor can figure that out in two seconds. The supervisor erases four of the repetitive listings, thus saving the dialog editor from scanning unnecessary lines. The next line reflects the next true change in a scene, angle, and take that the dialog editor must know.
Once the supervisor has finished cleaning up the reel, a copy is made and collapsed even further. All but the scene, angle, takes, and sound roll notations (or lab roll) may be eliminated. Finally, all redundancies are eliminated. Only one of any scene, angle, and take remains. The supervisor then rearranges the data according to sound roll numbers. Upon completion, this is printed out and forwarded to the first assistant to make up a transfer order so that sound transfer can complete the dialog reprint work as quickly as possible. You may find that what would have been 60 pages of massive number printouts that were hard to read is now reduced to some 12 to 20 pages that are much easier read and move the editorial work move along more efficiently.
AUTO ASSEMBLY: OMF OR PHASE MATCHING SYNC
Most EDLs denote the clip name showing “.omf” after the scene/take designation. It is important to transfer the dialog from the original source to use OMF software to extrapolate a Pro Tools session of exact cuts from the editor's work track. Unfortunately, many projects have to be completely reprinted from the original production tapes because the original digitization by the picture assistant was very poorly done. A tremendous loss in clarity had occurred, and noise had been introduced to the dialog recordings because of poor line connections prior to the workstation's digital interface or the use of cheap digital-to-analog encode equipment.
Open Media Framework
When it works, it is wonderful. It saves the extra step and cost of retransferring the source dialog material into the digital domain for dialog editing. It saves precious time in preparing for temp dubs as well as for finals. The key is in how well the picture department did its job when first entering the dailies into the digital picture workstation, such as Final Cut Pro or Avid.
Here is demonstrated the classic example of the adage, “Garbage in, garbage out.” If it is not put in clean, with attention to exact signal path disciplines, the result is a tainted and dirty dialog track from the OMF file that is not as good as that from the original source. If you do not pay attention to the exact disciplines of syncing dailies, the OMF audio file will never line up in precise sync. Your only hope for gaining true sync rests on how good the eyes and ears are and how many years of battle-line experience the dialog editor has.
I was finishing a temp dub on a film when the picture editor started ranting and raving about our out-of-sync cutting. I quietly slipped behind the stage Pro Tools unit, booted up the dialog session, and zoomed in extremely close on the very passage in question. The reprint was laid precisely in sync to his work track, and when he realized that, he stepped back and asked, “I don't get it. How is that possible?”
Everybody on stage knew how it was possible. His department was anything but the poster child for procedure and discipline. I allowed him to save face by telling him that this was just a temp dub and that we had not had the time to prepare the material fully, but that it would be in sync by the final mix, which we did. My dialog editors spent agonizing wasted days visually re-syncing material that should have been able to match-sync to a picture editor's 1:1 guide track.
To Trust or Not to Trust OMF Media Files
The first question a supervising sound editor must answer is whether the audio integrity of OMF media files are good enough to use for final sound editorial. My first assistant makes a Pro Tools edit session by using the OMF software to extrapolate a reel of dialog. The transfer engineer then pulls several tapes advertised on the EDL and makes half a dozen cues from various part of the reel, choosing one for intimate dialog, another for exterior ambience, and so forth. I drag the new dialog transfers into the Pro Tools edit session, phase-matching them against the OMF audio file that already exists in the session. I then pull the drive and take it onto the dubbing stage, where we can listen to and assess the quality of the material through the stage speaker system where the film is dubbed.
We boot up the session on the stage Pro Tools unit and make an A-B comparison, first listening to the OMF file, then flipping back to the new transfer from the original tape source. If we do not hear a difference in the two, we feel confident enough to use the OMF media files for dialog editing and final re-recording. If we do hear a difference, we know that picture editorial did not enter the original audio into the workstation properly.
We have resorted to reprinting more often than being able to use the OMF files as supplied by picture editorial. If you must transfer it over again, you will spend several thousand dollars unnecessarily because picture editorial did not do its job correctly the first time. This is part of what I keep talking about when I refer to collateral costs.
Hence, the experienced producer or postproduction supervisor always must ask who is handling transfer chores. The client makes a deal with a sound facility for handling the dailies and having a guaranteed individual handling the work because they know and understand that that particular transfer engineer doesn't just roll the stock and push the record button. They know that that particular individual handles the job like an artist, knowing how important it is to maintain the magic of the production track.
It is extremely rare to get this kind of service at the major laboratories or factory-style sound facilities. It is a specialty service found virtually at the independent boutique sound houses that specialize in theatrical craftspersonship. Entire feature projects are pulled away from facilities when the client discovers that the specific individual promised or contracted to do the work is not actually doing it.
A very important sound house was trying to cut costs on a project because they had other financial issues in the facility. They were handling the dailies on a rather important picture; they had gotten the contract to do the job with the understanding that a particular transfer man was going to handle the work. The picture editor knew, from a previous picture, that this transfer man handled the daily chores of transfer to 35-mm stripe with a simultaneous mastering to a Pro Tools session so that the digital dialog audio files were already mastered. The picture editor knew this person's work, he knew the kind of sound transfer notes this person made, including a separate list of interesting WT (wild track) and important audio notes to pay attention to. This kind of work is not done by 99 percent of transfer personnel.
The sound house needed to save money, so they replaced this transfer man with a less costly person. Within 24 hours the picture editor called up screaming, followed by the producer who called up screaming. Because the sound house was caught trying to shortchange the project, the daily transfer job was pulled from the facility. The collateral damage was that the word spread around to other producers. This sound house suddenly lost transfer work right and left and they were suddenly dropped from being considered to handle the postproduction editorial chores.
Sounds like an isolated case? You would be shocked to know how much this goes on all the time. Just know that this kind of game playing goes on, and remember this one important fact—studios do not make motion pictures, people make motion pictures.
REPRINTING DIALOG CUES FROM ORIGINAL SOURCE ON FILM
The transfer engineer opens the ¼″ tape box and pulls out the sound report (if the original sound is on digital DAT, it is usually folded and wrapped around the DAT cassette like a hot dog bun). (Flip back to Chapter 5 to refresh your memory on the sound report and to study the information at the top of the form. The information listed is key to how the transfer engineer is able to make a perfect duplicate of the original source.)
Quarter-inch (1/4”) tape usually syncs to a Pilotone or to 60 cycles, which resolves via a crystal controller, known as “crystal sync.” The 35-mm film recorder has a precision stepping motor that has been engineered to resolve to 60 cycles at precisely 24 frames per second or 25 fps, depending on whether the transfer engineer chooses the American 2i fps or the European 25 fps, by the simple press of a button.
The transfer engineer threads up the ¼″ tape (stored tails out) or the DAT cassette, which should always be stored rewound back to heads when not in use. The engineer spins the ¼″ tape at high speed. The tape should not be dragged over the sound head, but should glide just off the head. Even though it is not touching the playback head, the engineer can count the takes as they spin by. Clicks are heard, which at normal speed are the tail tones the production mixer enters. This makes it much easier for the transfer engineer to locate a precise cue quickly. Once the engineer finds it, he or she stops the tape machine, and then plays the verbal slate the production mixer recorded prior to rolling action to verify that the correct take is identified. The engineer rewinds the tape to just before the slate and stops.
The transfer engineer writes a scene/angle/take designation on a label placed prior to the actual material to be transferred. The engineer rolls the 35-mm film recorder; when it obtains speed, the engineer pushes the Record button. The engineer rolls the ¼″ or DAT machine. The production mixer is heard slating the desired take. Slate sticks are heard, and the scene plays out. These transfers are broken down by the first assistant or apprentice and forwarded to the dialog editor.
Nonlinear Reprinting
There are two ways to transfer production dialog into the computer for editing purposes. The first technique is very basic and grass roots in nature. When the scene is originally shot, a smart slate with a time code generator is not used. It basically runs on a tape recorder using crystal sync. The scene is slated, making a sync mark, either by using a clapper slate or by an actor verbally slating the take and clapping hands in plain view of the camera. Experienced dialog editors know how to drag this kind of transfer into an edit session and phase match the sync against the editor's work track.
Some picture budgets are so low that they cannot afford to rent the more expensive sound equipment to have the basic necessity of time code transfers or crystal sync resolution. We actually transferred the ¼″ tapes and/or the DAT cassettes into the computer without the benefit of a sync resolver. The transfers inevitably would drift slowly out of sync, but my dialog editors were from the old school of editing disciplines, and as long as they knew what they had, they could sync anything. Fortunately for us, our equipment would drift longer rather than shorter, thereby making it easier for the dialog editor to simply pull the material up, back into sync, rather than having to lengthen it, which makes the entire process much more difficult.
The second technique is taking advantage of the time code signal and using PostConform to accurately extrapolate a Pro Tools session with all the cuts in place, ready for the dialog editor to separate and massage. The transfer engineer carefully transfers the material into the computer using Lynx to precisely guarantee sync resolution. Once the transfer is recorded into the Pro Tools session, the engineer double-clicks on the audio file waveform, which allows renaming the file with the exact scene/angle/ take designation. The engineer then pulls down the menu option to time stamp the transfer, placing a precise time code address in the audio file's directory. This procedure is critical to linking and extrapolating a Pro Tools edit session with all the cuts and edit decisions the picture editor had made in exact sync.
PostConform gives you the benefit of using the power of the computer to extrapolate an editing session where the exact cuts have already been brought into sync to the editor's work track, saving the time of phase matching, traditionally part of the dialog editor's job. This allows the dialog editor to spend more time massaging the material to make it cleaner, work out the presence fill problems, split out the production effects, and so forth.
The advantage of PostConform over using OMF is that transfers are made from the original audio source, whereas OMF gives the dialog editor the audio file that the picture assistant or apprentice entered into the picture workstation. You are stuck with whatever the quality and technical discipline he or she had when executing input digitization. You are at the mercy of the technique and experience of the picture department, or lack of it.
First Assistant Becomes a Transfer Engineer
In today's ever-evolving industry, the tasks of sound transfer into the digital domain have changed dramatically. Sound transfer used to be the sacred task of sound transfer departments, and, for many kinds of transfer requirements, it still is. However, most audio transfer is now being handled by sound editors themselves as well as assistant sound editors and even apprentices. This book does not dwell on the union jurisdiction and philosophical arguments, but must acknowledge the evolution of those handling these transfer tasks, recognizing that each is very important. Whether these tasks are handled in the traditional way through the sound transfer department or whether more of these tasks are being handled by non-sound personnel, the audio disciplines detailed in this book still must be addressed.
Today, assistant sound editors take the responsibility of transferring back ADR from recording sessions as part of the editorial preparation. They usually receive the cues already in audio file form and name designated as they were burned onto a CD-R or DVD-R by the ADR stage where the recording session was conducted. This is a simple computer transfer. If, however, the session was conducted at a facility that has not been equipped with nonlinear recording gear, they will most likely turn over some kind of digital tape medium such as DATs or if you are unlucky, DA-88s. Assistants must learn the signal path disciplines as well as time stamping techniques when transferring such material into Pro Tools and preparing the proper audio files for the editors, always making sure to make a back-up copy of everything before turning it over to the editors for work.
LAYING OUT THE DIALOG TRACK STRATEGY
Dialog editors must be predictable. They must always prepare their sessions in the same methodical manner, always laying out the tracks the same way. This makes it much easier on the dialog mixer when predubbing commences. Mixers do not like to reinvent how they mix material from one reel to the next. They want each reel to match in style and technique; this not only allows them to get into and maintain a rhythm and a flow, but adds continuity to the track. Whether dialog editors cut on a Moviola and build sync on a sync block (synchronizer) or whether they cut nonlinear in a Pro Tools session, the technique and art form are absolutely identical.
The first track is the editor's work track, or guide track. After I import my QuickTime picture into my Pro Tools session, I will go back up to the Movie menu and select IMPORT AUDIO FROM CURRENT MOVIE. A menu will pop up, showing me whether or not there is an audio track embedded in the QuickTime video file; I choose it, and a menu will come up asking me if I want it in the AUDIO FOLDER of my present Pro Tools session, which I do.
Pro Tools will extrapolate a sound file transfer from the QuickTime movie and it will show up in the region list of my Pro Tools session (see Chapter 18). I then drag only channel 1 (left channel) across into the first audio track at the top, all the way over until it will go no further. This is the guide track to which either my OMF session will line up, or I use to phase match reprints or use as a waveform guide in cutting ADR lines.
If you have to use a videotape transfer and work with Pro Tools by locking to audio time code from the right channel of the tape, then you must transfer the left channel from the videotape, locked to time code to guarantee sync with the video picture. Most videotape machine audio outputs are 10 dB lower than 0 level. Hence, most dialog editors have a difficult time matching waveforms; the editor's work track transferred in from the videotape is 10 dB lower than the levels of their dialog reprints. If I have to use a videotape transfer, I will highlight the entire GUIDE TRACK, then go up to the AudioSuite menu and draw down to GAIN CHANGE and increase the volume by +10 dB.
Another way to raise the level is to have a “4-10” box, which converts -10 dB signal upward as needed. This allows the entering of material into the Pro Tools recording already elevated where desired. Panasonic DAT machines, such as the 3500 and 3700, formerly had a 4–10 switch on the back panel of their rack-mounted machines, but more recent models have done away with them.
Once the dialog editor has the editor's work track in, he or she checks that the head pop is precisely on the 9+00 foot and frame (exactly 6 seconds, zero frames in time code.) If the dialog editor is making a dialog editor from scratch, without the use of OMF or PostConform, then he or she will make several more audio tracks to the Pro Tools session. Most dialog editors who work nonlinear try to keep the number of dialog tracks to 8. The editor clicks on the audio track designation twice so that he or she can rename it. The tracks are retitled (DIA-A, DIA-B, DIA-C, DIA-D), as many DIA channels as the editor thinks are needed for the actual recut dialog. Then several other audio tracks are added and renamed X-DIA and P-FX. Some dialog editors have more than one X-DIA and often more than one P-FX track.
Pro Tools DIA Session
The X-DIA track holds any bits of sound used by the picture editor that the dialog editor is not using in the primary A, B, C tracks. These are the bits not meant to be used in the dialog predub; however, never throw away any production track a picture editor has cut—never! There will come a time, and rather often it seems, when the picture editor is pacing behind the re-recording mixers, wondering what happened to his or her track and must be able to account for it. In the X-DIA, track(s) are usually lines that cannot be used for the final soundtrack and must be looped, or they can be bits of noise and junk you do not want in the predub.
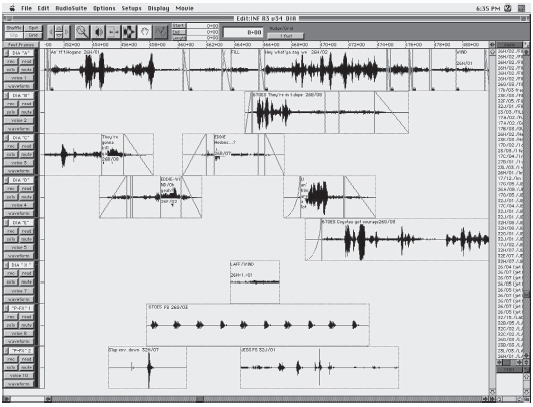
Figure 15.3 A typical dialog edit session.
The P-FX is where valuable sound effects that occurred during the production recording are split off, sounds you absolutely want to protect for the M&E version (foreign soundtrack). Often these little tidbits of sound are mastered up into a sound editorial library as magic tracks for future shows.
Different dialog editors approach the posturing of sync dialog cues on the A, B, C tracks differently. Some dialog editors working on character-driven projects that often have intimate controlled-dialog recordings find it preferable to favor a particular character to be on DIA-A and another character to be on DIA-B. This can be done on films shot in controlled-ambience environments, such as a sound stage.
Films shot in a mixed bag of locations (e.g., cars in traffic, city streets or practical interiors, office locals) prohibit assigning the character-per-track approach. Instead, the dialog editor keeps the same-recorded material in the same dialog track. Take, for instance, a scene shot on the loading dock of a shipyard. The scene is covered in a master angle, a medium shot, two over-the-shoulder opposing shots, and two close-ups.
Unavoidably, each angle has a slightly different colorization in the ambience of the background. Every time that microphone changes position, the background ambience is going to sound differently—that's pure acoustical physics. The dialog re-recording mixer reaches up on the console and twists the parametric equalizers to adjust and match each angle to another to make them sound as flawlessly the same as possible. The mixer may even send the signal out of the console to an outboard rack to the right, where the favorite signal processing equipment is kept, such as a universal dip filter. The mixer may pause and play the angle back and forth several times until satisfied with the equalization and/or compression and/or noise reduction that the track must be run through to achieve what is necessary.
The scene cuts to the opposing angle, and the dialog editor puts that cut on the next dialog track down, the DIA-B. The mixer goes through a similar procedure to balance that angle. The next picture cut, or several picture cuts into the scene, the picture editor returns to the same scene, angle and takes as the earlier cut where the dialog re-recording mixer had run through the signal-processing gear—but the editor did not remember to put it in DIA-A!
This is a mistake, and one of many reasons why dialog editors tactically must think carefully about their cuts. In these instances, the dialog sequence sheet or the EDL aids the dialog editor in thinking through the placement of the cuts. If scene 36“A”-2 was cut into DIA-A, and several cuts downrange in the sequence the picture editor used 36“A”-2 again to continue the action, then make sure all cuts of 36“A”-2 always show up in DIA-A. This makes it much easier for the dialog mixer to predub, as he or she does not need to stop and repatch the signal path to chase 36“A”-2 to a different channel.
The dialog editor's success depends on always laying out the dialog tracks in the same style and technique, keeping identical material in the same dialog tracks, splitting out throwaway material to the X-DIA, and separating all production sound effects to be kept for the M&E version (foreign) to the P-FX track(s).
Lip Smacks, Tisks, and Other Unwanted Noises
Most people who do not work with raw production sound recordings are amused when they hear them for the first time. These are very rough and unpolished, and one is amazed to hear a favorite actor smacking his lips, “tisking,” or clacking dentures! What is all this lip smacking? Many distracting and odd sounds emanate from the human face.
One job of the dialog editor is to decide what “lip” business is really acting, and what is nervousness, loose dentures, or a “ham-in-the-rye,” which is what most big lip smacks are.
Dialog editor craftspeople who cut on 35-mm film often have a special “diamond” punch for quickly eliminating “smacks” and “tisks.” This stainless steel punch has a sharp diamond pattern that is placed, pointing end-to-end, on the mag track. The playback head does not detect a dropout, not at 90 feet a minute, and the procedure is faster than physically cutting in a frame of fill track or taking a degaussed razor blade to it.
The dialog editor must be careful, however. Some lip smacks are part of the performance and must be left intact. When we start a new show, we often discuss the philosophy of lip smacks and tisks with the director, picture editor, and producer during the spotting session. Include the client in the decision-making process whenever possible; this way the sound editorial team does not go out on a limb, making an erroneous decision.
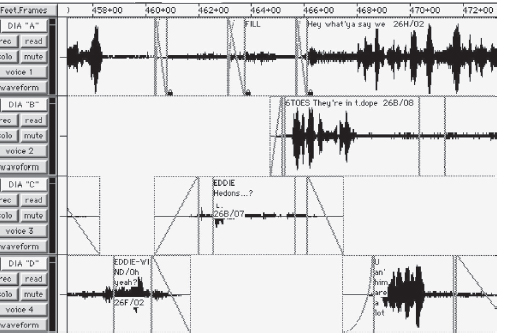
Figure 15.4 Closer view of the dialog edit.
Fixing denture “clacks” is not as easy. These either must be carefully scraped down with a razor blade or surgically filled. This is where the ability to cross-fade material in the digital domain of Pro Tools really pays off, for you cannot do this with 35-mm mag film.
P-FX Preparation
Not all production sound effects must be split out and protected for the foreign M&E. You may want the Foley to reduplicate the production sounds, so splitting them out for protection is not necessary. Sound effects may be developed that are better than what was recorded on the set. However, you may absolutely want to keep many little production-recorded jewels. Make sure these sounds do not have any dialog over them, as this defeats the whole purpose of saving them for the M&E.
Sometimes I like a particular prop that makes a specific sound, but the sync dialog take has an actor speaking while that prop makes its peculiar noise. If I am very interested in salvaging it, I listen to the alternate readings of the scene to see if the prop performs its unique sound between actors’ lines, and then I steal that sound cue, just for the prop noise.
On many occasions I review the reel with my dialog editor, pointing out particular production sounds I do not want left in the dialog tracks. Sounds that would muddy up and diffuse the precision of a sound effect specifically developed for that moment must be dropped and filled. In such cases, the dialog editor extracts the production sound effect, moves it down to the X-DIA, and then fills the hole in the dialog track with matching ambience to prevent a dropout.
I remember cutting dialog on the opening reels of The Punisher, starring Dolph Lundgren. I was the supervising sound editor and knew exactly what kind of sound effects I was going to lay into the various sequences. In reel 3, Lou Gossett, Jr., drives to a blown-up mansion in his unmarked police car. He greets his partner, opens the car door, gets out, and closes the door as he carries on a conversation. I did not like the edgy sounding production car or its distorted doors, so I cautiously extracted them, making sure not to encroach on Gossett's lines or those of his partner. I took another reprint of the same angle and take to pull pieces of production presence, which did not have car noise or dialog, but did have the production movement of the disaster team digging out the rubble, as this movement was the underlying presence of the shot.
After I cut in the pieces of ambience fill and feathered the splice with a degaussed single-edged razor blade, no one could tell I ever touched it; of course, you heard Gossett and his partner talking, and the background activity—you just did not hear the car come in to stop or the car door open and close.
When we predubbed the reel on dubbing 3 at Warner Brothers, the head mixer, Wayne Artman, noticed the delicately cut stealth vehicle with absolutely no anomalies to the dialog being spoken. He glanced over at me and smiled, knowing we would have a really good mix, realizing he would not need to grapple with having to control unnecessary production effects, which often get in the way of a well-designed sound effect track.
It is not always that easy for dialog editors to make precise decisions on extracting production effects. Most dialog editors are not involved in the sound design process and must review the reel with the supervising sound editor for specific instructions on what to move into the X-DIA and what to move to the P-FX. A thin line exists between a supervisory judgment call and a dialog editor's responsible preparation.
Creating Great Fill
Probably one of the most demanding chores that a dialog editor has to grapple with is the need to glean out of the production recordings good “fill” presence. It is vital to have smooth fill, the presence of the dialog performance where no one is actually talking, the ambience of the scene. This is really important if you have major differences between the various angles of the microphone in the “Apple,” “Baker,” “Charlie” angles and the colorization of the sound or the emphasis of some audio source (such as an air conditioning vent, traffic, or fluorescent ballast) changes so dramatically from cut to cut that you have to extend and fill it to smooth out the dialog. This is exactly what Dwayne Avery was referring to as the “sleight of hand magic”—if you can develop smooth fill that does not sound loopy then you are well on your way to being able to assemble a sequence that the re-recording mixer can weave together on the dubbing stage into a seamless work of art.
Sometimes you have some really challenging situations where finding fill is just impossible. Probably the biggest lament I hear from production mixers is being able to shut the crew up long enough to get 30 seconds of good clean ambience that will be pure gold in the postproduction edit process.
Probably the biggest challenge of room tone ambient fill is a large hard surfaced environment, one in which the overtones of any noise at all becomes a wave; this and harmonic tones are the deadliest challenges that face the dialog craftsperson.
To prove my point, if you have (or can rent) the DVD of Sister Act—run down to 53:00 and listen. This is a scene where Whoopi Goldberg has just conducted her choir of nuns for the first time in a song, performing it in a traditional manner. Then, there is a pause, a moment when you think the performance is over, but she then conducts the nuns in a more jazzed-up hip version. Listen carefully to the ambience of the cathedral during that moment of “silence” at exactly 55:19 seconds. There is a very bad bump where either the dialog editor made a sloppy cut or something happened in the re-recording process, where the mixer may have had to slide a track to extend to cover a hole (perhaps caused by the editor cutting out unwanted production noise or someone talking, or even the director calling “Cut” on the previous angle); and when the dialog re-recording mixer slid the track and tried to punch in, it bumped because the presence was not flat, there were descending overtones by some pew movement or something in the background, and at exactly 55:19 it was repeated.
The reason this is so important is because that bump yanks the audience right out of the movie. You are enjoying the film, you are into what is going on, and then a flaw in the track calls attention to a bad piece of editing or mixing and your attention and suspension of belief are broken. This is exactly what you do not want. It takes a dialog editor years to really master the various techniques and gimmicks of how to use the sleights-of-hand to camouflage the warts and rough edges that are inherent in all production dialog because of intercutting between the differences of microphone set-ups and of course the challenge of a quiet enough location in the first place.
I cannot think of a better example of a noisy location that had one of the worst dialog editing I have ever listened to than in Paul Mazursky's 1982 film Tempest with John Cassavetes. There is a scene shot at an exterior cafe with car-bys and busses with absolutely no extensions or attempt to make fill handles to smooth out the incredible bumps in the production traffic from cut to cut. I do not buy into the excuses from filmmakers when I call attention to bad dialog editing and they say, “It's real—it's documentary style … ,” or the best one, “I meant it like that.”
Bad filmmaking is bad filmmaking; even documentary films take great care in their production track. If you audibly yank the audience out of their fluid viewing of your film, then you are a bad filmmaker. There is no excuse for bad dialog editing, and unfortunately, too many directors and producers do not know who to hire to handle their production track like the precious lifeblood of the performance that it is.
With today's nonlinear digital editing platforms, the art of creating film is much easier than it was on 35-mm mag. If you run up against a piece of presence that will not loop end to end because it is different at the heads and tails, and if it does not have any kind of signature that will betray itself if run backwards, you can simply highlight, duplicate (Apple-D), and then go up to AudioSuite and draw down the menu to Reverse. In this fashion the duplication has to match, because the join will be exactly the same ending and starting. Every once in awhile you will run up against a cue that defies that approach, and you cannot use this technique on any fill that has internal audio events in the background, as they will instantly be recognized as reversed track.
What kills you is an actor who never shuts up and a director who is so paranoid about stock that he or she doesn't let the scene breathe so the dialog editor has any material to work with. I always sighed when I had to cut dialog tracks of actors who talk fast and never allow any places for fill. Of course, it could be worse. There are those actors who always seem to talk out of sync; even though the tracks phased perfectly, they always seem to look rubbery.
Magic and Transparency of Great Dialog Editing
There are dialog editors—and then there are dialog editors. Cutting dialog is not just the mechanical procedure of phase-matching reprints, filling holes, or extracting lip smacks and unwanted noise; it is the massaging and evolutionary improvement of an actor's performance. Master dialog editors take the time to review alternate takes, looking for a better reading, a clearer articulation, whatever brings the polish of a diamond to the spoken word. Remember, the dialog track always plays, truly the star of the soundtrack, and so a tremendous amount of attention must be paid to making it as clear and pristine as possible.
On Twilight Zone: The Motion Picture, my partner, Ken Sweet, handled the dialog editorial chores throughout the entire picture. Two challenging sequences were in the first episode when Vic Morrow is dragged to the train in the rain and, in the Spielberg episode, with Scatman Crothers.
Morrow tragically was killed during the filming, so we did not have access to him for ADR. The train sequence had been filmed the night before the accident. The artificial rain deluge was extremely heavy, thwarting any attempt by the boom operator to keep water from popping the microphone diaphragm without a rain bonnet. The director dismissed the need, saying they would ADR the scene later in post. We were not allowed to use a sound-a-like for looping the few lines obliterated by rain pelting, so Ken Sweet rolled up his sleeves and scrounged the production track like I have never seen a dialog editor do before.
He spent days cutting bits and pieces, sometimes as wide as one-fourth of a frame (a single perforation) from alternate takes to reconstruct a fluid piece of dialog that worked, without hearing the giant impacts to the microphone from the rain machine. Remember, Twilight Zone: The Motion Picture was cut years before digital nonlinear editing. Ken did not have the luxury of cross-blending two pieces of audio files with a digital cross-fade. Everything he cut was on 35-mm mag stripe.
In Spielberg's episode, Scatman Crothers offers the elder members of a retirement home a second chance at youth. Scatman was 81 years old when he filmed this magical segment, and understandably had trouble with precision in diction and enunciation. Ken Sweet tackled the dialog editing with a labor of love because of his admiration for Scatman and went the extra distance to pore over alternate takes, stealing “D”s, “T”s, and “R”s from outtakes where the actor had properly enunciated the consonant or vowel. Often Ken would steal such pieces from words or phrases entirely different from the word or phrase on which he was working. He would lift wherever he found a matching piece that could work, for he could not run the risk of making a single noticeable cut. Not one insert could be made that would give away the fact that Ken was re-sculpting the delivery of Scatman's speech. This was truly a work of editorial art.
Steve Rice faced a similar dilemma on The Aviator. When we spotted the picture with director George Miller, we were informed that Christopher Reeve was halfway around the world on another shoot and unavailable for any looping whatsoever. Somehow Steve would have to save all the production lines that dealt with the actor's voice. This was no small task, as Christopher Reeve wore a thick aviator's leather jacket throughout most of the picture. Naturally, the wireless microphone was positioned in such a way that the jacket was constantly rubbing the microphone any time Reeve moved.
I glanced over at Steve and we grimaced together, as we knew full well what challenges lay ahead. However, Steve Rice had been trained in the art of dialog editing by Ken Sweet just a few years before and he had learned his art well. As far as tenacious work habits, I have never seen better. Steve never came to me with a problem; he came to me with a solution to a problem. He had launched his dialog editing career with me on Battle Beyond the Stars and Escape from New York and, with Ken Sweet's tutelage, he became a master dialog artist.
Creating That Which Is Not There
When we started Moscow on the Hudson, we were faced with a potentially costly situation that Paul Mazursky already conceded would need to be done. In the sequence where Robin Williams is standing in a long cold line at night, waiting to buy shoes, he pauses to talk to Leonid, an old friend (Alexander Narodetzky), also waiting in line. When the scene was shot, Robin's close-up angle was fine, but, on Alexander's angle, the sound of the wind machine that gently blew snowfall dominated the audio track, making his close-up sync dialog completely unusable.
Les Fresholtz, the head dialog mixer on Warner Brothers Dubbing Stage 5, had earlier advised Mazursky to loop the actor. The picture editor, Richard Halsey, agreed with the director that it was a definite redo. To ADR this actor would require flight costs as well as daily expenses for at least the director and picture editor to fly to Munich to loop the actor's lines. Including the cost of an ADR stage, the funds needed to bring the actor back, and other stock expenses, Mazursky was facing at least a $10,000 black eye to the budget.
I suggested to Paul that he hold off making that kind of commitment until my dialog editor dug through alternate readings in an attempt to rebuild the original performance. Halsey scoffed at the idea, saying that Fresholtz had written it off as unsalvageable. I asked Paul if waiting another week would make that much of a difference on the schedule, after all, it was $10,000. Paul shrugged and gave us permission to at least try it. I told Steve Rice to work on that sequence first to see what could be done.
Late the following week, Mazursky asked me what the verdict was on the Alexander Narodetzky dialog. I turned to Steve who gave me the “high” sign that it worked just fine. I told Paul that the $10,000 did not need to be spent. Halsey was doubtful of the quality of the recut and asked Fresholtz to listen to it on the big screen in Dubbing 5. We assembled behind the sprawling console in Dubbing 5 the next day to run the sequence. Where the harsh and intrusive wind machine had marred the dialog track Steve had masterfully recut it from alternate angles where the wind machine had been. The trick had not been just using alternate takes, this is done all the time. The trick was finding usable alternate takes and making them fit in the full face-front close-up angles ruined by the wind machine, making the mouth movement precise, and especially not changing or altering the inflection of the actor's performance.
This last point is the key to the entire art form of dialog editing. It is not enough to understand and master the ability to sync lip-flapping movements with words. You carefully must guard and protect the performance and inflections so vital and cherished by the client.
Richard Halsey was so stricken with disbelief from the flawless and seamless work of Steve Rice that his knees literally gave out and he fell down in front of the credenza on his butt right next to me.
When to Equalize and Set Volume Graphing
The basic rule is never use signal processing on any cut dialog. You want interesting sounding vocals for monsters and ghouls? Prepare the material “flat”—signal processing is done by the re-recording dialog mixer on the stage. You do not have the proper acoustical environment to make such a decision in the editing room on a nonlinear workstation. The result would be something that cannot be unwound and reprocessed at the mixing stage; a smart dialog editor does not pre-equalize or preprocess the cut material in any way.
Prepare the elements of the material so that no matter how you wish to use it in processing the vocal, it is easier work for the mixer. For example, cut the voice on channel 1 and cut any additives, such as animal growls or inorganic pieces, on channel 2 in exact parallel to the cut dialog. In this way, the re-recording mixer can assign the two tracks into a Vocorder or Harmonizer and play with it while the director and producer attend. This way, it is their taste and creative desires you ultimately serve, not your own.
Many dialog editors use volume graphing more and more, building in volume shifts. A few years ago this practice was seen as an absolute editorial sin, but today it is done to a greater degree, with better results as dialog editors learn how to use the software.
As the evolution of nonlinear workstations and re-recording mix stages move and meld more and more into one and the same, there will be a greater need for dialog editors to work in rooms that truly do emulate the acoustical representation of a dubbing stage, as they will be asked to not only cut and prepare but to be responsible for the signal processing function, even unto mixing and delivering a dialog predub stem to the stage for a final mix.
Eventually, of course, more and more product will be prepared and mixed completely on mini-stages and not on full-scale dubbing theatres. More of this work is being done today than you might think, which is why we are seeing a lot of disparity between important feature film soundtracks and everything else.
View the interactive DVD with this book under button #4, Dialog Editing, for more organizational charts and an A-B comparison audio demo for EQing tracks. There is also a video demo of Bad to Worse, a film where you can view each stem of the soundtrack one at a time: the CUT EDITOR'S TRACK/my CUT DIALOG SESSION/my BACKGROUND session/my HARD FX session/the FINAL MIX.