
Chapter 5
The Challenging Battlefield of Production
“I'm sorry, David, but the # $%*!ing director won't give me
two minutes to slap a couple of wireless mikes on the actors, and
there's no room in the # $%*ing office for my boom man, so I
had to stick the mike on the floor under the desk, so don't
blame me if it sounds like #$%*!”
– Lee Howell, commenting on production DAT-14 while
working as a production sound mixer
Without a doubt, the most difficult and arduous recording process in the audio track development of a film is the on-camera production dialog recording. Here the lack of preparation and tactical planning rears its ugly and expensive head in the coming months of postproduction. Here the ignorance and apathy of other production-unit department heads, usually consumed by their own contracted concerns, becomes apparent; they do little to help the sound-recording team in what should be a collaborative effort to achieve ideal production audio tracks during the shoot. Only seasoned directors and producers know the loss that occurs of both real money (spent to ADR actors’ lines) and of the magic of on-camera performance, rarely recaptured and seldom improved.
Some actors have it written into their contracts that they will do no postproduction looping. In other words, if the sync production track is not usable, or if the director or producer decides that a line should be read differently or replaced for whatever reason, the actor would not be available to come onto an ADR stage and reperform it. These additional contractual complexities add even more pressure to capture the most pristine production recordings possible—pressure that seldom concerns other production heads, who so often have an immediate and dramatic impact on the ability of the production sound mixer and boom operator to achieve such recordings.
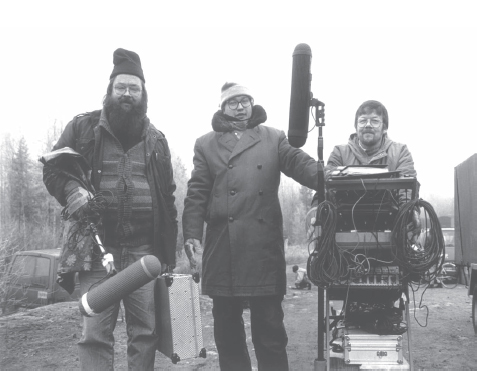
Figure 5.1 A typical basic production sound crew of three: the production sound mixer on the right (Paul Jyrälä), the boom operator on the left (Matti Kuorti), and the cable man in the center (Olli Viskari) working on Talvisota: The Winter War. (Photo by Ulla-Marja Parikka.)
I remember, while working on one film, watching the production crew filming a medium angle of Jamie Lee Curtis at MGM. I was amazed to see a crewman standing just off to the side of the camera's view, calmly eating an apple. The penetration of his teeth was clearly heard each time he bit into the apple's skin. An electrician stood beside him playing with the loose change in his pocket. Neither was making this “sound clutter” on purpose; both were clearly audio-ignorant. Nevertheless, I was stunned at the lack of respect and professionalism they paid to their audio craftspeople during the sequence filming. I knew that a few weeks hence, some sound editor would heave a sigh of disappointment and spend an unnecessary amount of time and extra production dollars to clean out the audible intrusions.
I talked to hundreds of various craftspeople while writing this book, and was constantly surprised and fascinated by the wide range of views and perceptions regarding sound. The vast majority agree that sound is one of the most important components of a film, and many actually rate sound as more important than the visual photography itself—yet most craftspeople not working in sound do not understand their own contributions to the success—or failure—of the production soundtrack.
THE PRODUCTION RECORDING TEAM
The Sound Mixer
Responsible for the quality of the sound recordings on the set, the head of the recording team is the sound mixer. During preproduction the sound mixer consults with the producer and director on the best ways to tackle the recording challenges of the production sound. Each project is different; each dictates its particular needs. Simple projects may have fairly straightforward requirements, so it might be agreed to record the dialog on a less expensive 2-channel digital recorder, most likely direct-to-hard disk within the machine or flash technology. Most digital dialog today is recorded at 48 kHz/24-bit, but there are projects that are seeing the wisdom to move up to 96 kHz/24-bit. Virtually every serious professional recording device today is rated at least to this level as they see this standard quickly approaching. A few units are already qualified to record at 192 kHz—decidedly prepared for future and inevitable growth. The retarding factor in this higher recording rate is the compatibility with nonlinear picture-editorial platforms such as Final Cut Pro and Avid. The incredible reduction cost in price-per-gigabyte disk space is making such leaps in improved audio file size much easier to deal with.
Most serious projects will probably require multiple-channel recording capabilities so the sound mixer can capture multiple microphone setups that will be in constant flux of different actors in constant motion on a complicated set on their own discrete channels. More and more complicated audio setups are becoming the norm, not the exception. Individual wireless microphones may be placed on each actor as well as two channels of overhead “air” mikes and two foreground boomed mikes. This could easily require at least one 8-track recorder. Such discrete control becomes vital in maintaining control in mixing the discrete channels later, and not prematurely mixing together two or more microphone sources, only to have misbalance mixing decisions made on the set and then be unable to rebalance them later.
The sound mixer must choose the right recording format for the project, rent or supply the necessary equipment to accomplish the task required, and use that equipment to the best of his or her abilities during the filming process. They not only supply picture editorial with the best possible recorded material, but also with a volume of copious notes and sound reports that help guide the picture editor, and later the sound editors, through the maze of sync recordings, wild tracks, and room tones.
The Boom Operator
The boom operator is an incredibly important position: if he or she does not get the microphone into the right position at the proper moment, the actor's voice is off-axis and sounds off-mike. There is no such postproduction “plug-in” to process off-mike dialog and correct it. Off-mike is off-mike! The boom operator must be strong and agile, as well as attentive and observant. He or she must know the exact positions of invisible boundaries below which the microphone must not dip down into camera view. The boom operator must also memorize light throws and angles so as not to allow the shadow of the microphone to be seen on any surface of the area being photographed.
For those readers who might think it cannot be any big deal dangling a microphone around over a couple of actors, try tying an unopened can of dog food to the end of an 18-foot pole and hold it (fully extended) over your head for 4 minutes. Now think about having to do this while concentrating on rotating and pivoting the pole to flip the microphone into position, first one way, then suddenly another way—all the while watching for microphone shadows and keeping it above the view of the camera lens. You must accomplish all of this without making any noise or vibration that will be telegraph low-end thumping into the microphone's diaphragm. Getting tired yet?
The boom operator must also know the delicate workings of radio microphones. He or she must know how to wire an actor quickly, yet know how to work diplomatically with performers’ often unpredictable personalities and temperaments. The boom operator has a personal kit: a tool or tackle box that holds the tools, tapes, batteries, supplies, and implements that make it all work. In a matter of moments, the wireless microphone must be placed on the actor, in exactly the right spot. The wire must be carefully hidden under the clothing and run to wherever the transmitter is being hidden on the actor's body. This is an art form onto itself.
The boom operator must be constantly on the lookout for anything making unwanted noise. Good boom operators do not complain and report problems to the sound mixer or first assistant director; they assess the problem and offer solutions for dampening the offending sound down, if not completely eliminating the audio intrusions from polluting the recording.
The Cable Man
The cable man used to be known as the “third man.” He or she is also known as the sound utility, and, when a second microphone boom is needed, the cable man wields it into place. The cable man literally clears the microphone cables and keeps the boom operator from backing into things or banging props or the side of the set with the fish pole when cast and crew are in motion. When a boom operator must make a backward maneuver to clear the way and reposition to capture the actors cleanly, the cable man guides the boom operator back with a hand on the belt or back, clearing cable or even silently moving things out of the way.
If a microphone cable has gone bad or is suspect, the cable man grabs another cable and changes it out instantly. The cable man is often creating an impromptu rain hat, using short sections of doweling (often precut thin lengths of branches) and wrapping it with a thin liner of plastic cover from a dry-cleaning bag and a section of air-conditioning “hog hair” filter. He or she anticipates problems before they arise and quietly solves them so the boom operator can concentrate on the job at hand.
The Sequence of Production Recording
The production mixer understands the rhythm of the production shoot. He can tell when the first A.D. (assistant director) is about to announce that they are ready to roll film for a take. The mixer sets his sound recorder into a standby, or “Test” position. This allows the electronics to power up and be warmed and ready to operate at nominal performance on command.
The production mixer's sound recorder has been parked in the pause (Test) mode, keeping the electronics live and ready to roll. The mixer activates the recorder in the Record mode. The tape turns at the designated speed, and the indicator shows a steady and dependable speed. The mixer presses his slate mike on his microphone mixing unit to verbally slate the shot, “Scene 29 Baker, take 3.”

Figure 5.2 Production mixer Glen Trew with his Deva 5 and Cameo handling the chores on James Agee's classic novel, A Death in the Family, for Masterpiece Theater.
Verbally slating the audio tape prior to the camera rolling can save valuable film negative. Many mixers actually preslate the upcoming take prior to the first A.D.’s announcement to roll sound. The mixer will preslate and then place the recorder in pause (“Test”) mode again, waiting for the first A.D. to call to “Roll sound.”
Sure enough, the first A.D. calls out, “Let's have the light and bell.”
The production mixer is also responsible for the warning light (the revolving red light) just outside the stage or on the perimeter of the location set. The mixer flips the warning light on, which also sounds the bell (one ring duration). Work activity stops and the crew holds their positions quietly for the shot.
Satisfied that activity has settled on the set, the first A.D. cries out, “Roll sound!”
The production mixer turns the recording machine into Record mode. Once he or she is satisfied that the machine is up to proper speed and that time code or pilot sync is true and steady the mixer will call out, “Speed.”
Nothing, and I mean nothing, can or will proceed until the sound mixer has called out “Speed.” I have seen too many beginning mixers feel so intimidated that they are holding up the shoot, that they call out “Speed” before their equipment is truly ready, especially if they had turned the recorder on from a cold start without having the electronics warmed up. This means that the first few seconds of recording will not sound clear, and on more than one occasion valuable dialog was ruined because the mixer did not take the extra few seconds to pay strict attention to the sound through the headsets and be satisfied that he or she was actually getting a proper clear and steady signal.
Just because we live in a digital world now does not mean that digital equipment does not have to be warmed up and up-to-speed and satisfaction before the mixer commits to go forward.
Once the mixer has announced “Speed,” then the first A.D. cues the camera crew, “Roll camera.”
The camera operator turns the camera on and gives it a moment to gain sound speed; then he or she answers, “Camera speed.”
The slate assistant (who is usually the film loader) holds up the slate that has the vital information for the show and scene number written on it. For our example purposes, it reads 29 “B” TK-3.
Most camera crews have the slate assistant verbally slate the scene, “Scene 29 Baker, take 3.”
Some crews forgo doing this as an excuse to save film. It is really up to the protocol desired and the concern of film stock that will dictate this choice of procedure. The slate assistant snaps the slate for sync and steps quickly out of camera view.
The first A.D. calls, “Cue background.”
The second A.D. cues the background extras so that they will be in motion. The director allows the action to take a few moments so that a few precious seconds of presence with background movement will be recorded (it will match any “inter-filling” that needs to be done later by a dialog editor). Then the director cues the actors, “Action.”
The preceding is the proper and ideal protocol for preslating, rolling sound, and on-screen slating by a slate assistant and for creating pre-action presence with the natural action of background extras as it will sound during the internal action of a scene. If you were to record presence tone without the background extras, the intercut presence would sound horribly out of place, cut in between actors’ lines, for instance, to replace a director's cue or an unwanted sound. With audio-aware directors and assistant directors, you will achieve this level of protocol and consideration consistently, rendering the best possible audio results.
The Basic Recording Kit
Like anything else, the composition and extent of the mixer's tools at his or her disposal differ with every picture and every budget at hand. Whether the project has no money to speak of or is a multimillion-dollar blockbuster, the basic recording kit does not change much. You need the following items:
• Sound cart
• Sound recorder(s)
• Portable mixer
• Microphones
• Microphone cables
• Wireless RF microphones
• Shock mount pistol grip with zeppelins
• Windscreen covers
• Miscellaneous adapters, phase inverters
• Smart slate
• Communication radios/comtechs
• Voltage meter for AC tie-ins
• Battery supply
• Cables
• Extra plugs, batteries, etc.
• Plastic and/or blanket for protection from flying objects or weather
ANALOG OR DIGITAL
Whether to record digitally or analog is a decision that requires factoring numerous technical and philosophical requirements and attitudes. One must not think that just because a new technology and/or “fad buzzword” is used means that it is better or more desirable. For instance, it is nearly impossible to convince someone that analog recording can not only be preferable, but superior, unless he or she has used both a digital DAT recorder and an analog Nagra under comparative recording conditions and compared the results.
Personally, I embrace both analog and digital recording, deciding what will accomplish the desired result. In the early days of DAT recording I became weary of listening to my colleagues argue back and forth that digital was better, and others say that analog was better. So I decided that we should go out and record analog and digital formats side-by-side simultaneously, using identical microphones that were arrayed together (for precisely the same recording aspect) and identical cables. The difference would be the tape recording device—analog or digital, and what format. To help you appreciate the recording differences, review the “comparative medium recordings” on the DVD provided with this book. Check the fifth button on the main menu of the DVD, named Custom Recording FX. The second button on the submenu is named Comparison Recording.
We felt that we needed a very dynamic intense audio event to make the comparison easier to analyze, and frankly, I could think of nothing more dynamically intense than a .308 Heckler and Koch assault rifle!
Most production mixers currently use the direct-to-disk digital recorders as their primary tool; however, many still keep a ¼″ Nagra in the sound truck. When the digital gremlins plague a recording session, and many mixers have their own “bad days” stories, they require a rugged and dependable back-up recorder until the digital gremlins have been vanquished.
For the first 10 or 12 years of production digital recording, serious audio craftspeople still preferred the fullness and warmth of analog recording, especially when they had the luxury to record on a Nagra at 15 ips. During those early days of digital production sound, very few of us disagreed with that ideal, especially those with an ear trained to harmonic subtleties. However, those of us who still recorded material in analog (for whatever practical reason) would immediately transfer the audio material into the digital environment for the postproduction process.
The question of analog versus digital recording then became an issue of the production challenges themselves, budget considerations and, of course, who handled the recording chores as mixer. I have had the pleasure of working with a handful of mixers who were extraordinary at recording digitally in the early days of DAT technology. Lee Howell (Los Angeles) is one; Paul Jyrälä (Helsinki) is another. Peter Meiselmann was, by nature a hardcore analog specialist, but was pressed into recording the production track for Terror Tract using a DAT recorder because the first-time producers felt they needed digital technology for some postproduction reason. It was Peter's first time using the DAT technology, but his years as a disciplined analog mixer served him well to adapt to the digital medium. In fact, I was stunned by the results, as I happened to handle this project. The usual flaws and recording mistakes that plague the digital world were not there. In fact, numerous sequences that had a screaming monkey, shotgun blasts, and other harsh concussive audio cues were not only recorded beautifully, but they were devoid of distortion and overload edginess—all of which were overcome because of Peter's analog experience and discipline know-how.
One must not be lulled into thinking that the final outcome of a film's soundtrack is reflective of the production mixer's work. It can be, but not necessarily. I have handled films where every second of production recording was ultimately stripped out of the track and every syllable of the movie was re-voiced.
BACK-UP TAPES
As discussed in Chapter 4, having back-up medium (DATs, DVD-Rs, or clone drives) may seem like an inconvenience and a waste of money, but when you first experience the shipping carrier losing the shipment on the way to the lab and sound facility, or the first time your primary DAT machine “eats” the tape at program number 88, or the audio data files on your removable drive are found to be corrupted, you will wish that back-up precautions had been a part of the budget.
The mixer should always hold on to the original material, sending the clone drive, DVD-R, or back duplicate back-up DAT back to picture editorial. The last thing you want is to ship both the original and back-up medium together (obviously all would be lost if the shipment got lost or was destroyed!). That is, after all, the whole point of the exercise.
The mixer has the original in his or her care should the director and producer have a critical question that may arise of “bad sound” or problems that actually became an issue of a bad sound transfer later at the lab or sloppy digitization by the assistant picture editor. Many a sound mixer could have avoided being the scapegoat in a finger-pointing row between the producer and sound transfer over the poor quality of a daily soundtrack. I know of several situations where the sound mixer was vindicated because an A-B comparison between the original recorded medium and the transfer was played side-by-side for the director and producer. On one particular picture, the studio was actually compelled to fire its own sound transfer department as contractor and then contract the sound transfer chores to a rival studio, all because the mixer had kept either a back-up tape (or drive) or the original, depending on which he or she sent back to picture editorial.
LINE-UP TONES
As described in greater detail in Chapter 6, it is critical that every tape, whether analog or digital, even when you are recording direct-to-disk hard drives, have a known lineup reference tone at the head of the tape or the first cue on the hard drive. The sound mixer threads up the first tape of the day onto the Nagra, or inserts the first DAT cassette into the recorder, or warms up the multichannel direct-to-disk recorder. The first thing he or she does is record an announcement of what is what and where they are and what kind of line-up tone is about to be heard.
Good morning, we're out here today at Glacier Point for Silver Run Entertainment's production of Five Rings of Michael. The date is Tuesday, June 26th, 2007. This is drive 3. We're recording on a Sound Devices 744t with a flat-EQ mode at a sampling rate of 96 K at 24-bit. Stand by for the reference tone which is -20 dB equals “0” VU.
In this short and to-the-point pell-mell of information, you have given the most important hit points.
• Location of recording
• Production company name
• Project name
• Date of recording—month, day, and year
• The ¼″ roll, DAT, or removable hard drive number
• Type/model of recording machine
• Equalization setting
• Tape speed or sampling rate being recorded at
• A clear definition of line-up tone
One must approach recording the information header of a fresh roll of recording tape, DAT, or hard drive as if the tape or drive itself will be the only thing that survives the shoot. The box will be lost, the data card will be lost, the sound report will be lost. Believe me, I know. I once had a big box handed to me that was just a huge wad of ¼″ tape from a shoot in the Philippines. No box, no reports, no reels, just thousands of feet of ¼″ tape. Anything and everything I was going to know about the material on it (once I unwound the scrunched up ball of magnetic ribbon) was going to be what I gleaned from the mixer's header information and verbal shot slates. With that kind of nightmare possibility looming around you, it really makes you keep in mind how vitally clear and precise vocal slates and information headers are to everyone who will work with your material.
• Location of recording: Though not vital to know, almost all sound mixers mention where the shoot is in the information header.
• Production company name: This identifies these recordings as the property of the company or individual that hired the recording mixer to do the assigned work.
• Project name: Always list the name of the project. In the case of episodic material, always name the project along with the production number.
• Date of recording: Name the date. There are numerous information data entries that will follow the shoot that use the date as a reference. Many times we will check the date of one or more shoots to satisfy what may supersede earlier versions; as well, sometimes it is vital information to be used for legal purposes.
• Roll or drive number: This is one of the most important pieces of information, as the roll or drive number is entered alongside the negative roll number (picture) in the code book and shows up on the EDL (Edit Decision List) of the final-cut version of the film from the nonlinear platform. It becomes the quickest way to access original roll material for reprints, alternate takes, or to make an A-B comparison between an OMF (Open Media Framework) file from the nonlinear platform to determine if a complete retransfer from source material will be required because the original digitized transfers were substandard (a subject we will discuss later in the book).
• Type/model of recording machine: Always tell us what kind of recording device you are using. The transfer facility will want to know this so they will not inadvertently try to transfer the material on a playback unit with the wrong head configuration.
• Equalization setting: It is valuable for the transfer tech or the assistant editor to know what kind of equalization setting was used, whether or not you rolled off any high or low end, etc.
• Tape speed or sampling rate: Tell us what tape speed (analog) or sampling rate (digital) you are recording at. Do not think that it is always obvious. You would be surprised how many times not knowing has screwed things up because someone assumed that it was obvious.
• Line-up tone: The line-up tone quoted above is written on the sound report as − 20 dB = “0” VU. Because there are so many variations of “0” levels that equal a prescribed peak meter level and other variations of recording equipment that use different levels and/or kinds of level protocols, it is a vital technique for the mixer to verbally tell us what kind of line-up tone he or she is about to record onto the tape or hard drive and what it means.
Once the line-up tone is defined, the mixer will lay down at least 8 to 12 seconds of line-up tone. The reference tone level quoted on the tape is interpreted to be referenced to “0” on the VU (volume unit) analog meter or is referenced to what level “0” is interpreted on a peak meter (i.e., 20 dB equals “0” VU; or if you are using a peak meter in transfer, make −20 dB equal −20 dB on the peak meter). Without this reference tone, one cannot accurately set playback levels to make exact 1:1 (one-to-one) copies at a later time.
SOUND REPORT
The sound report is the key to the mixer's hard work and efforts; it is the road map of what is on the recorded tape and where to find it. If properly filled out, the sound report also offers a wealth of information through notations made by the mixer as work progresses. Some mixers are more note-oriented than others; but if all mixers actually realized the value of their notes, they would probably pay more attention to making them.
As a supervising sound editor, I know the invaluable contribution of a mixer's notes, especially when it comes to comments about airplane noise or undesirable talking (listed as VOX) that may have marred the recording.
The most valuable of notes are those regarding wild tracks (listed as WT). When I begin a project, I immediately get a copy of the mixer's sound reports and quickly scroll through them, looking for any WTs or miscellaneous recordings that may determine what other recordings to which I may need to refer or authorize to have done.
On more than one occasion, I was required to look at the sound reports of a project before I committed a bid, and depending on the quality of note coverage (or lack thereof), I have actually rejected even bidding on a show because I could see the dialog work was going to be too much of a nightmare because of sloppy mixer notations and lack of vital information. The reverse is also true; I have accepted what appeared to be impossible edit assignments because the mixer's sound reports were highly detailed and had a wealth of notes regarding unwanted noise to watch out for, good production sound effect moments, as well as the presence of professional technique to record numerous WTs to help problem solve audio issues that sound editorial would eventually find invaluable.
It is equally important to list a shot where there is no sound. For one reason or another it may be decided to shoot a setup where the sound mixer is not rolling sound. He or she will list on the Sound Report the abbreviation MOS (which stands for without sound). Actually, a person could sit for hours and wonder how in the world you get the letters MOS out of “without sound,” until one knows the genesis of the abbreviation.
Back in the early 1930s, during the infancy of the motion picture sound process, a famous director was shooting a picture when he decided not to have the optical sound camera roll for whatever reason. He turned to his crew and in his heavy European accent, he announced to them, “Awlright children, this vun vee do mit out sound.” The continuity script girl did not ask what he meant by that, but listed the sound note of the shot as M.O.S. in the script notes, and to this day the acronym MOS has stuck.
Frankly, it is uncertain who actually coined the term. Believe me, every academic professor has his or her expert opinion, but I can guarantee you that none of them was there to witness it. I have heard of someone who claims to have been there, but when you scratch the surface of the claim it was actually hearsay. I have interviewed a number of my colleagues on this issue, several of whom date that far back, but none of them knows the answer beyond a shadow of a doubt. Many think that it was the colorful, if not legendary, Michael Curtiz who said it (The Sea Hawk, Casablanca, The Egyptian, We're No Angels). Curtiz certainly had an infamous reputation for mauling the English language. Others insist that it was Ernst Lubitsch (The Shop Around the Corner, Heaven Can Wait, To Be or Not to Be, That Uncertain Feeling) who said the immortal words; while Hal Mohr, a cinematographer who had worked with Paul Fejos many years ago, attributes the quote to Fejos himself, whose continuity script girl's abbreviation stays with us to this day.
Regardless of who said it, the fact remains, when the production sound mixer writes MOS on his or her sound report next to a scene/shot designation, every sound transfer facility in the world knows that the sound recorder was not rolling.
There is no doubt that at some point one or more of these individuals may well have slurred the pronunciation and enunciation of the directive. The truth of the matter is that that is not the genesis of the acronym, rather a romantic explanation by those who do not know the entire background. (Remember what I said in Chapter 1.)
The fact is that there is no substantiation that the curious expression spawned the acronym, whereas during the evolution of recording sound onto a 35-mm film negative, using a sound “camera” as a photographic optical medium for production sound recording, the designation MOS was well known to mean “Minus Optical Sound.” When the director did not require sync sound for a particular shot, the recording mixer simply listed MOS on the sound reports.
Unlike hearsay stories, there are actual written sound report notes that explain this fascinating story. Not as romantic and fun? Sorry. Remember, back during the first 25 years of motion picture audio, production sound recordings were accomplished by “photographing” the microphone pick-up via the optical sound camera.
Increasingly, more mixers are adopting a full-page-width sound report, which gives considerably more room for notation. The slender version of the sound report that dominated the industry for decades was designed so that you could fold it over and simply lay it inside the box of a 5″ or 7″ reel of ¼″ tape. Unfortunately, this convenient width also inhibited mixers from writing sufficient notations, and, believe me, we in the postproduction process will read as many notes, ideas, and warnings as the mixer will take the time to write.
As you study a typical sound report (Figure 5.3), note the types of vital information displayed there. Believe it or not, even the title of the picture is important. Too many times the transfer department is hung up trying to find a scene and take of a print only to discover that it picked up a similar-looking box assumed to belong to the same show because no markings indicated the contrary; hence, valuable time is lost as the transfer department searches for the right roll number from the wrong show title. Worse, when the “right” scene is found and the transfer department takes and prints it, it is sometimes discovered too late that it is from the wrong show.
Many times, mixers do not fully complete the information header, which has often confused transfer departments. Sometimes unusual head tone levels are utilized; these must be carefully noted.
If the mixer is using a DAT machine, he or she enters the PNO (program number) that the DAT recorder automatically assigns each time it starts a new recording. The PNO locator system has been a wonderful thing for us in postproduction. You simply enter the program number of the scene and take you want and hit the play button. The DAT machine spins at 200 times speed in search of this number, automatically stops, and aligns at the head of the recording and plays it—what a great timesaver!
Next to the DAT PNO, the mixer lists the scene and angle designation number of each recording. Generally, a mixer only enters the scene number once, then draws a line vertically alongside all the takes until the next angle. For example, the mixer lists scene 105 “A” in the scene box, then take 1. He or she lists take 2 below that and take 3 below that, all the while drawing a vertical line from 105 “A” until that angle is a wrap. The next setup is 105 “B.” Each take has its own line. Do not list all the takes together on one line. It is not only more convenient for the mixer to write, but it is much faster for an assistant editor or transfer tech to find material, as the writing will “eye-scan” much more easily and more efficiently.
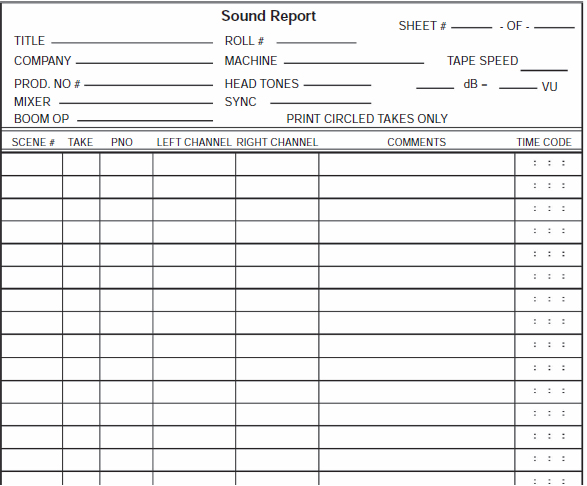
Figure 5.3 A typical 2-channel sound report form.
A mixer may use a single microphone but have it split on two channels. The first channel (left) is recording at standard level; the second channel (right) is recording the exact same information only at a lower level (often -10 dB) in case of sudden bursts of sounds, such as gunshots, crashes, screams, and so forth. The mixer makes this notation accordingly.
In the middle of the roll, a mixer may decide to use two microphones and keep them on dedicated channels. He or she notes that actor one is on channel 1 (left), and that actor two is on channel 2 (right).
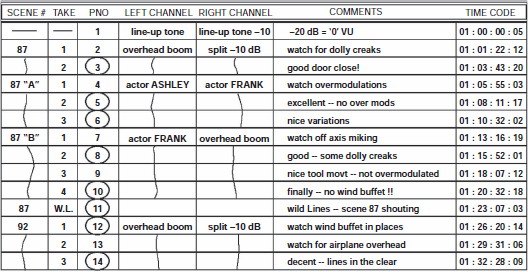
Figure 5.4 A closer view of the sound report data chart; lots of notes are the keystone for success.
In the comments column, the mixer makes any pertinent comments that he or she feels the postproduction people may need. I personally love it when a mixer makes a comment such as “Great door slam” or “Neat machinery ka-thumps” or “Watch out for airplane in track.” During interviews for this book, mixers confessed that if they really thought their notations were being read and used by anyone after the day's shoot, they would certainly make a bigger effort to write them. Sadly, many mixers do not feel that, in today's compressed postproduction schedules and budgets, anyone takes time to glean through their notes and/or ferret out wild tracks recorded for postproduction applications.
Many transfer departments use sophisticated calibrated vari-speed controllers. Many times, a director wants a set-up photographed off-speed, such as over-cranking the camera at 30 frames per second (fps) or higher for a slightly slowed-down effect, or under-cranking at 18 or 20 fps, which ultimately speeds up the shot when projected at a normal 24 fps. If the director does not want the harmonic pitch and timbre of the voice to sound pitched in relationship with the over-or under-cranking, then the vari-speed unit correctly pitch-shifts the audio up or down; this way, when it is played back at 24 fps, the visual action is slow-motion or accelerated, but the pitch and timbre of the soundtrack sound normal.
One particular underwater monster picture was entirely shot 2 fps slower than sound speed (22 fps) making the pace of the action faster. This not only allowed the producer to tell a 103-minute story in only 95 screen minutes (which also proved more desirable to the distribution company), but it also allowed a performance edginess and tension to be instilled because the cast was speaking and moving slightly faster. If such notations are made in the comments column, the transfer department can effect the transfer accordingly, making daily transfers to match the picture.
Note that the last column is formatted for time code notations. In today's ever-increasing world of “smart” slates and time code dailies, the far right-hand column, which used to be reserved for transfer notations, is now being utilized by the production mixer to list time code starts for each take.
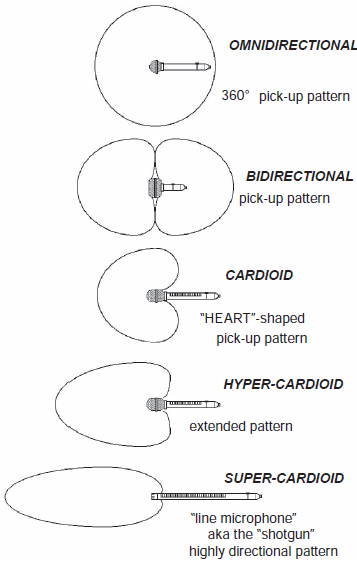
Figure 5.5 Basic microphone pick-up patterns.
MICROPHONES AND PICKUP PATTERNS
The primary tools in the arsenal of weapons at the mixer's disposal are the various kinds of microphones with their various types of pick-up patterns. Good mixers have carefully chosen kits they can mix and match, depending on the location and challenges of the sequence to record. Following is an explanation of the basic kinds of microphones generally used for production recording (Figure 5.5).
Microphone Pattern
Omnidirectional Microphone
This condenser microphone has an omnidirectional pick-up pattern, as illustrated in Figure 5.5. The good thing about the omnidirectional microphone is that it has a relatively even pattern that picks up everything around it. The bad thing is that it has a relatively even pattern and that it picks up everything around it, including but not limited to camera noise, feet shuffling, crew downrange who are whispering, aircraft high overhead, the eighteen-wheeler truck making the grade 5 miles away, and so forth. As with the use of any microphone, though, you must choose the right microphone for the right job. In some situations you could not be better served than by using a good solid omnidirectional microphone.
Cardioid: A Directional Microphone
Both dynamic and condenser microphones can be cardioid. As indicated in the diagram, the cardioid microphone has a directional pattern of some degree, or what is called a “heart-shaped” pick-up response. That means it picks up more signal directly in front of it than to the sides and especially behind it. It is not just a matter of sound level that is affected. It is a matter of axis. As the actor moves off-axis, or to the side of the microphone, the character and richness of the voice thin and the frontal presence falls away. This is referred to as being “off-mike.”
Dynamic microphones do not require phantom power and are known for being rugged and able to handle a wide dynamic range of sound-recording situations. Vents run alongside the microphone shaft, allowing sound to enter from behind, striking the diaphragm and canceling out some of the same ambient signal that enters from the front, which gives the directional microphone its unique function of cancellation. Signal cancellation is crucial for clear dialog recording, especially when working in exterior situations. Sound of identical character that enters the rear of the microphone as well as the front and that strikes the diaphragm equally is canceled out, thereby cutting down the amount of ambient noise in relationship to the unique sound being recorded directly in front of the microphone, such as the actor's voice. The more sound allowed in from behind the diaphragm, the more directional the pattern.
As you can easily see, this kind of microphone is more suited for precision miking of actors on a location set already filled with an abundance of unwanted ambient noise. The challenge is to keep the center of the pattern right on the origin of the desired sound; otherwise you suffer “off-mike” recordings.
Hypercardioid: Highly Directional or “Mini-Shotgun”
Like its directional cousin (the cardioid), this type of microphone is more than just somewhat directional, hence its nickname the “mini-shotgun.” Actually, the term is sort of a misnomer, its origin unknown, though sales personnel probably concocted it; regardless, “shotgun” has come to designate microphones with a more forward pick-up pattern. The longer the microphone tube, the greater the number of vents (to allow for rear-pattern cancellation and frequency compensation), and the more directional the microphone.
Supercardioid: Ultra-Directional “Shotgun”
Early supercardioids were called line microphones or rifle microphones. The supercardioid is just that—super highly directional, and equally more difficult to keep directly on the desired spot of origin for the most pristine of recordings. This microphone is not a good choice if your actor is doing much moving or if you have to cover more than one actor on the set; however, for single setups or two-shots where you cannot get in close with a fish pole and a traditional microphone, the supercardioid can really reach out and grab the signal.
The biggest mistake in using any microphone is forgetting that it does not have a brain. In other words, it cannot tell the difference between your voice and noise. Every application has a requirement; a right microphone exists for the right job. Your job is to know which to choose. For music applications, certain microphones can handle the sound-pressure levels that a kick drum might give out, or the brash brass of a trombone or saxophone. Other microphones cannot handle the percussiveness as well but have a much better reproduction of the top end for use in recording violins and triangles.
Unfortunately in our industry, many craftspeople try to make one microphone do too many chores. The veteran mixer will have developed a taste and style of recording, either personally owning or insisting on the rental of a precise mixed assortment of quality microphones to fill his or her arsenal of recording tools.
The MKH 60 is a lightweight short gun microphone (Figure 5.6). It is versatile and easy to handle and its superb lateral sound muting makes it an excellent choice for film and reporting applications. Its high degree of directivity ensures high sound quality for distance applications.
Features
• Extremely low inherent self-noise
• High sensitivity
• High directivity throughout the whole frequency range
• Transformerless and fully floating balanced output
• Infrasonic, cut-off filter
• Symmetrical transducer technology ensures extremely low distortion
• Switchable pre-attenuation, switchable roll-off filter, and switchable treble emphasis
• Rugged and weatherproof
• Black, anodized light metal body
Technical Specs
• Pick-up pattern: super-cardioid/lobar
• Sensitivity in free field, no load (1 kHz) 40 (12.5) mV/Pa
• Nominal impedance: 150 Ohm
• Minimum terminating impedance: 1,000 Ohm
• Equivalent noise level: 6 (14) dB
• Equivalent noise level weighted as per CCIR 468–318 (25) dB
• Power supply: Phantom 48 ± 4 V
Profile Super-cardioid/lobar (short gun) interference tube microphone with infrasonic cut-off filter, switchable pre-attenuation, switchable roll-off filter, and switchable treble emphasis. Frequency response 50 to 20,000 Hz, sensitivity (free field, no load) 40 (12.5) mV/Pa at 1 kHz, nominal impedance 150 Ohm, minimum terminating impedance 1 kOhm, equivalent noise level A-weighted 6 (14) dB, CCIR-weighted 18 (25) dB, maximum SPL 125 (134) dB at 1 kHz, phantom powering 48 ± 4 V, supply current 2 mA, dimensions Ø 25 × 280 mm, weight 150 g. Values in parentheses with attenuator switched on (−10 dB).

Figure 5.6 The Senheisser MKH 60 shotgun microphone. (Photo courtesy of Senheisser.)
Here are some guidelines for the proper selection of the various microphone capsule options if you are using the Schoeps “Colette” system (Figure 5.7). Schoeps is often asked to recommend a microphone for a particular recording application, whether you are recording production dialog, custom sound effects, and especially if you are recording music. Some microphone manufacturers readily answer such requests. That might make sense if a microphone has a frequency response that is tailored to the characteristic sound of a given instrument. But the possible applications for such microphones would then be restricted significantly.
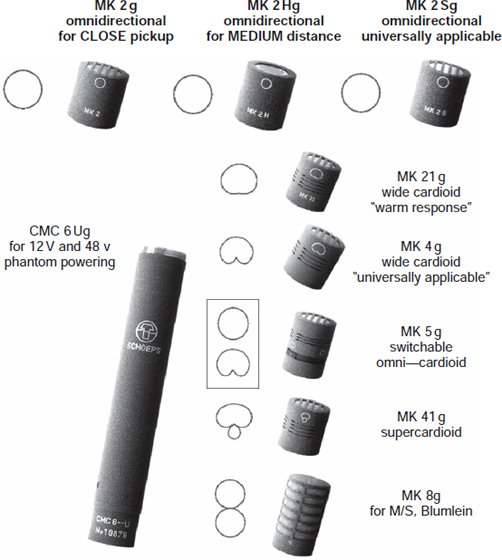
Figure 5.7 The Schoeps Colette, CMC “workhorse.” (Photo courtesy of Schoeps.)
Schoeps's opinion is that a good microphone ought to sound natural, just as one expects a good audio amplifier to sound; thus it should be suitable for any musical instrument or other production recording need. This requires flat frequency response and a directional characteristic independent of frequency. There will be no difference in sound quality whether the pickup is on-or off-axis. Obviously this ideal can be achieved only to a finite degree. With directional microphones, the proximity effect causes the low-frequency response to vary significantly while with nearly all microphones (especially omnidirectional microphones), the polar pattern is rarely ideal at the highest frequencies.
Only in rare cases can the correct microphone be chosen unequivocally, since, according to experience, one must also consider the aspects of taste, recording location, position of sound sources and the microphone, and the atmosphere of the music or other program material. Any absolute prescriptions would thus be of limited value at best. Schoeps offered the following text to help orient the choice(s) that the recording mixer must make before deciding which capsule(s) should be used for the recording challenge at hand.
The microphone type that comes closest to the theoretical ideal is the classic pressure transducer. It has an omnidirectional pickup pattern, reproduces even the lowest audio frequencies with full sensitivity, and has no proximity effect.
In practice some degree of directionality is generally considered desirable, and the most commonly used pattern for medium-distance pickup is the cardioid (MK 4/ CCM 4 oder MK 4V/CCM 4V). In particular situations, however, there may be good reasons to make a different choice, including these observations from Schoeps:
• For increased directivity either for the sake of a “drier” recording or for the suppression of sound from adjacent instruments: supercardioid type “41” (= MK 41 or CCM 41), assuming that there is no nearby sound source or loudspeaker behind the microphone because it has a rear lobe.
• For decreased directivity or very natural sound quality even for sound arriving at the sides, or for improved low-frequency reproduction: the type “21” wide cardioid.
• For essentially perfect pick-up of low-frequency information and “room” sound: the omnidirectionals, type “2H” or “2S.”
• For very close miking, with directional microphones it is necessary to compensate for the proximity effect by means of a corresponding bass roll-off. This is especially true when miking instruments; see our recommendations.
• For voice: the types “4S” or “4VXS.”
• For instruments: the omnidirectional, type “2” may be of interest (no proximity effect, low sensitivity to “popping” or to solid-borne noise); for grand piano: the BLM 03 Cg.
• For very distant miking with essentially perfect bass response and/or as an “ambience” microphone: omni type “3.”
• For outdoor recording if directivity is not required (at close miking distances): omni type “2S” + windscreen W 5 or W 5 D (advantage: low sensitivity to wind, “popping,” and handling noise).
• For high directivity: type “41” with W 5 D, W 20 R1, or WSR MS (“basket”-type windscreen with built-in elastic suspension for mono or stereo).
As a starting recommendation, Schoeps suggests the switchable omni/cardioid capsule MK 5 + CMC 6 Ug microphone amplifier of the modular “Colette” series, or the corresponding Compact Microphone CCM 5.
One of the hottest high-quality shotgun microphones to come onto the market is the CMIT 5U (Figure 5.8). When you need to record dialog outdoors and the surrounding environment is very noisy and you find your current supercardioid pressed to the limit and you are still not getting what you would like, you should look at the Schoeps CMIT 5U.
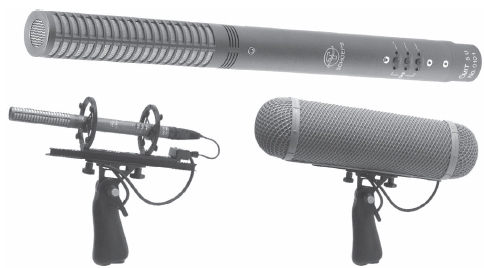
Figure 5.8 The Schoeps CMIT 5U “Shotgun” mike. (Photo courtesy of Schoeps.)
The Schoeps CMIT 5U has unusually low coloration of off-axis since the pick-up angles at low and high frequencies are kept reasonably similar to one another. At medium frequencies the directivity of the CMIT 5U is higher than one would expect from a microphone of this length, while at high frequencies the pick-up pattern is not narrow as with long shotgun microphones. This being the case, it is so much easier to cue the boom and keep actors “on mike” in very active scene scenarios.
This mike also has the audio quality that makes it extremely suitable for music recording as well as dialog. The directional pattern and sound quality are consistent in both the horizontal as well as the vertical planes, unlike some other shotgun microphones.
The CMIT 5U also enjoys a greater immunity to wind noise than the Schoeps supercardioid. It is very lightweight, utilizing a very sturdy all-metal housing. The capsule and amplifier of the CMIT 5U are built as a single unit, unlike the Schoeps “Colette” microphone series.
There are three pushbutton activated filters that allow the microphone to adapt to all kinds of recording situations—for high-frequency emphasis (+5 dB at 10 kHz) enhances speech intelligibility, and compensates the high-frequency loss caused by windscreens and “wooly” covers.
The steep low-cut filter (18 dB/oct. below 80 Hz) suppresses wind and boom noise nicely. A gentle low-frequency roll-off (6 dB/oct. below 300 Hz) compensates for the proximity effect.
Pairs of LEDs next to each pushbutton indicate the status of the filters, which is very handy when users need to know the status of their options on dark sound stages or night shoots.
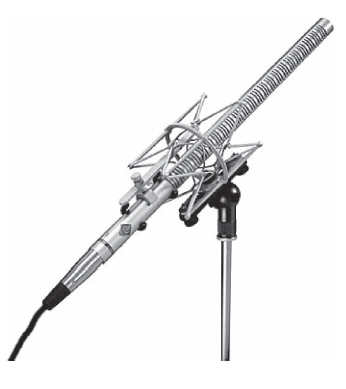
Figure 5.9 The Neuman KMR 82 is a shotgun microphone with a high directivity that remains within the acceptance angle independent of the frequency.
In principle, Neumann shotgun microphones use a combination of a pressure gradient transducer and an interference tube. If the wavelength of the frequency is longer than the tube length, the microphones work as pressure gradient transducers. At higher frequencies they operate as interference transducers for lateral sound. Off-axis sound sources are picked up with reduced level, but without coloration.
The KMR 82 is less sensitive to wind and pop noise when compared to the KM 150 miniature microphone with a similar high directivity (Figure 5.9). The shotgun microphone features extremely low self-noise, good impulse response, and high output level.
The polar patterns of the KMR 82 shotgun microphone show it to have very directional characteristics. The microphone capsule is positioned inside a housing tube that is acoustically open but has a high flow resistance. The directional pattern of the microphone is lobe shaped. The attenuation of lateral sound is practically independent of the frequency. The KMR 82 has a frequency independent directivity within a pickup angle of 45° for audio signals that determine the tonal balance of the program material.
The “Smart” Slate
Figure 5.10 shows the Denecke “smart” slate. This time code lit display slate device is very handy, and especially used in music video work and fast location shooting scenarios. A wireless transmitter hooks up to the time code “out” connector of your audio recorder—which, of course, needs to have a time code generator (either built-in or outboard hook-up). The time code that is being embedded into your recording sync signal is exactly what will be transmitted to the smart slate.
As you can see in the photograph, there is a small wireless receiver (usually fitted with a patch of velcro on the back). Note: When you plug the connector wire into the receiver from the smart slate, the receiver's little red indicator light will come on, thereby powering it up automatically.
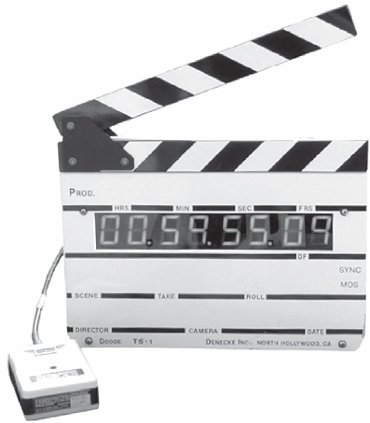
Figure 5.10 The smart slate.
On the backside of the slate is a small toggle switch that is seated on a slim metal battery case. (The smart slate uses eight “C” cell batteries.) If you flip the toggle switch one way the time code numbers will illuminate on “low” intensity. If you flip the toggle switch “ON” the other direction, the time code numbers will illuminate on “HI” intensity. Obviously, high intensity will make the numbers easier to see in bright light situations; and of course, just as obviously, the “HI” intensity choice will wear out your “C” cell batteries a lot quicker as well.
The slate assistant will hold the smart slate up, after he or she has handwritten the Scene-Angle-Take information on the front, as with traditional slates. When the recording mixer rolls the audio deck, the time code will advance on the slate. When the slate assistant snaps the slate, the time code number will freeze on 00:00:00:00 a moment and then turn off. There are two small flush-mounted contact points near the end of the clapper arm, so when the two touch at the SNAP point, it activates the time code to cut off.
Even though this is a seemingly convenient and visually easy thing to see for picture editorial, the fact of the matter is that many mixers find that sync is not precise. You may experience as much as plus or minus two frames’ accuracy. For those of us who come from the old school of precision, this is just not precise enough.
The Studio Microphone Boom
The studio microphone boom is a large wheeled perambulator with a small platform on which the boom operator stands while operating the traverse wheels that not only lengthen or shorten the boom extensions but also rotate and pivot the actual microphone position at the end of the boom arm. When properly operated, the boom functions silently and smoothly.
Studio microphone booms are used progressively less on feature films today because of complex and realistic set construction and the widespread use of practical locations being filmed under accelerated shooting schedules that don't allow the sound crew time and space to use the traditional perambulator boom. These silent microphone arms still have an important use in television production, though, especially when taping live-audience situations.
The techniques are considerably different from that of booming with a hand-held “fish-pole” style boom. Not only does a studio boom operator need coordination and dexterity to operate the traverse wheels accurately and smoothly, but he or she also must learn how to turn a microphone and extend the boom arm quickly (so as not to allow air buffeting to affect the delicate microphone diaphragm), and then rotate the microphone back into position once the boom arm has been thrust out into position. It is a technique wisely learned from the veteran boom operators who have worked the boom arms for many years, a technique that cannot be mastered overnight.
The Shock Mount and Wind Screen
Two of the biggest enemies of good exterior recordings are vibration and wind buffet. All microphones are mounted on something, whether a plastic friction clip or a cradle of a rubber band-mounted yoke. Budget constraints motivate you to new levels of inventiveness. Through experimentation and test recordings, you will develop a wide range of techniques to insulate the microphone from the vibrations of, say, a car as you hard-mount your microphone on the rear bumper to favor tailpipe exhaust. You will learn how to stuff foam around your mike and cram it into a crevice or lodge it between solid substances. You will learn how to detect wind direction and swirl patterns and how to effectively block them. You will learn to grab an assistant and physically place him or her between the source of unwanted breeze buffets and the microphone diaphragm.
Mount and Zeppelin
An effective way to control both vibration and wind buffet is a combination of the pistol-grip shock mount fitted with a windscreen tube called a Zeppelin. The microphone is fitted into the plastic ring clips, which hold it in place and protect it from undue vibration by the rubber-band trapeze.
Be careful to guide the microphone cable through the small round cutout at the bottom of the plastic ring, then snap the rear cap of the Zeppelin into place. Do not pull the microphone cable too tight, as the microphone shock mount works best if a little play of cable remains inside for movement. Depending on the breeze factor, you can either slip the gray “sock” over the Zeppelin or, if the breeze is fairly stiff, you might slip on the Ryocote “windjammer” (also referred to as a “wooly,” “dead cat,” “furry dog,” or the “high wind cover”) instead. These remarkable furry wonders have done much to knock down the kind of wind buffet that ruined many sound recordings in the past.

Figure 5.11 The pistol grip with the Zeppelin wind protection tube attached.
Fish-Pole Microphone Boom
As the name implies, the fish pole is a long pole with a microphone socket attachment to hold the microphone shock-mount. Most microphone fish poles are lightweight aluminum tubes that slide out and extend the length of the pole. Unlike with the studio microphone boom, do not extend the length of the fish pole during the recording process. You must either lengthen or shorten the desired length of the fish pole by unscrewing the friction locks and extending the second or third extension tube, then screwing it tight again before rolling sound.
Today, more and more production sound recording teams are taking advantage of wireless microphone booming techniques. This solves a multitude of issues, not the least of which is the length of cable that has to be constantly managed and monitored as the boom operator moves about as needed on the set. The wireless transmitter is located at the opposite end of the microphone boom from the microphone hanger. It does not take much to figure out that the collateral savings in costs and freedom of movement for the boom operator far outweighs the cost of having the microphone boom fitted out to be wireless.
GOOD MICROPHONE BOOM TECHNIQUES
Most microphone boom work is done by placing the microphone over the actors’ heads, higher than the line of sight of the camera lens, pointing downward toward the spoken word.
Some mixers want the microphone to be pointing straight down, using an omnidirectional pattern diaphragm mike, as it picks up a uniform ambient background recording, regardless of which way the performance comes at it. This view is not shared by all mixers and/or boom operators, just as all boom operators have their own favorite styles and techniques of how to record the best production tracks.
The unfortunate reality of having an omnidirectional microphone in a full-down position is that it tends to pick up many footstep sounds. Foot shuffling and movements will seem to dominate. Again, it depends on the circumstances and the surface of the floor.
Some boom operators cradle the fish pole downward, pointing the microphone up at the actor's voice, keeping the mike low enough to be out of camera view. Again, this lends itself to a less-than-desirable characterization of recording and does not always serve the project well. This technique is most often used for documentary or news work, where one is not concerned about the precise timbre or quality of the vocal recording or whether the microphone is seen in the frame. Many consider it a “lazy man's” cradle.
Truthfully, the best sound recording can be obtained by holding the fish pole high above your head and pointing the microphone at a downward, but slightly tilted, angle, aiming right at the throat of the actor. Some boom operators will tell you that the ideal target to aim the directional pattern at is the bridge of the nose. Others will tell you they aim at the upper chest, where the voice originates. They swear that the resonance of the chest is vital to the timbre of the recording. Still other boom operators aim right at the mouth, from where the voice issues.
These are all valid opinions that I have heard repeated many times. Each boom operator uses the technique that best serves the mixer and most successfully captures the desired vocal performance. Whatever technique you and/or your boom operator use, be consistent! Changing technique in the middle of recordings changes the timbre colorization from scene to scene.
Without a doubt, holding a fish pole above your head for takes is a grueling and punishing task (boom operators are perhaps the most physically fit craftspeople on the set). Because of this, it serves the recording team well for its members to look after each other. On one particular shoot, a boom operator held a big Sennheiser 815 supercardioid microphone on a fully extended fish-pole boom to cover an extremely slow dolly shot that moved in closer and closer on Lloyd Bridges, who gave a four-and-a-half minute performance at a pulpit. At the height of the sequence, the cable man could see that the boom operator was fatiguing badly. He carefully brought his own boom in, which was equipped with the same kind of microphone, and cautiously lowered it down next to the boom operator's. At a slight pause in Lloyd Bridges’ delivery, the mixer faded from the first microphone to the cable man's mike and whispered into the boom operator's headsets on his PL (communications term for “private line”).
The boom operator raised his boom up and out of the way and stepped back silently. He lowered the fish pole and allowed himself a moment to rest, then raised his pole and reinserted his microphone alongside the cable man's. Again, as Lloyd Bridges paused to draw a breath, the mixer faded from the cable man's mike back to the boom operator's so that he could finish the take. Without that kind of teamwork, it just would not have been possible to sustain a fully extended, heavy mike recording for that length of time.
As a general rule, the master wide shot does not sound as good or pristine as the other close-up coverage angles. It is simple practicality: you have more set to cover, with more lights to watch out for and more potential noise to consider.
Boom Operator During Set-Up
One of the first things good boom operators do when starting on a show without a prior working relationship with other department heads is to find out who serve as the “keys.” They also must identify the gaffer and key grip and introduce themselves, as these people decide how to fulfill the DP's (director of photography) lighting wishes. They decide exactly where a light is set and how the light is controlled, using flags, cutters, and scrims.
The importance of establishing a good relationship with fellow crew personnel is illustrated by the following example. A grip may “cut” (light control) a lamp by putting a “C”-stand on one side of the light. At the same time, the boom operator may really need that spot for maneuvering and properly booming the actors’ movements. The grip could just as easily place the “C”-stand on the other side and use an elbow joint to put the scrim in the original position, thereby leaving the floor space available for the boom operator. However, if the boom operator has not made introductions and explained what is needed to fulfill the microphone-placement requirements, then he or she can blame no one else if the microphone cannot be placed in the necessary spot when the director is ready to roll camera and make a take.
The smart boom operator “babysits” the set. The boom operator gets the fish pole and stands by while the crew lights the set. The boom operator may wear headsets, slid down around the neck. This way everybody knows the boom operator is there, standing by to assist in the lighting collaboration; now he or she can follow the action without a boom shadow thrown somewhere on the set where the camera lens will pick it up. Boom shadows are the quickest way to fall into disfavor with the director and DP.
Being a good boom operator is also being a good gaffer or a good grip. One must know how to read the lights. One must know where to stand, where the camera will be, what size lens is used. Often a boom operator asks a simple question of the camera operator, such as, “What size lens are you using?” Sometimes a simple question like this causes the DP to be more attentive and to ensure that the crew cooperates more fully with the boom operator, allowing sound to get in and do its job effectively.
Director and cinematographer John LeBlanc has lensed and directed both feature films and commercials. “If the boom operator is not in there with us setting up the shot, I have no sympathy for the sound crew. I want good sound! I know that good sound will only help to make my work play better, but if the sound crew is not dedicated to getting in and showing us where the boom and microphones need to be while we're lighting the set, then it's their problem if they can't get in because they are suddenly making shadows.”
As you can see, boom operators must know everyone's jobs in addition to their own to maximize the efficiency of the work. Unfortunately, although physical and technical demands on boom operators make theirs one of the most difficult jobs on the set, many production mixers will tell you they truly believe that boom operators are given the least respect—except, of course, from the production mixers themselves.
Checking with the Prop Department
The boom operator is responsible for talking to the prop department to discover pertinent information that will impact the sound recording, such as whether the firearms handler will use quarter-load, half-load, or full-load rounds in the guns to be fired on-screen. If full loads are used and a multitude of weapons are discharging, you will be deaf by the time you run through the sequence master and the various angles a few times. The microphones amplify the signal, and, with today's digital headsets for monitoring, the mixer and boom operator will have a bad time of it.
Many unfortunate situations occur when scenes using a practical weapon are rehearsed one way but actually performed differently. An example now gone to court is where an actor had rehearsed a scene during which he fires a pistol three or four times, then backs up and delivers his line. The mixer and boom operator compensated, covering the gunshots as rehearsed, then the actor lowered the pistol and began speaking. Right in the middle of his delivery, the actor whipped the pistol up and fired again. The mixer and boom operator flung their headsets off as they grabbed their ears in pain. They had already altered their record levels for the actor's voice, not his pistol shot, and they had been exposed and vulnerable.
USING THE WIRELESS MICROPHONE
Obviously many situations occur where the boom operator cannot take the microphone boom where traditional microphones may go. The obvious answer is to break out the RF (radio frequency) mikes. These wireless devices come in a multitude of models, but basically adhere to a simple and uniform configuration. A small microphone capsule can be either clipped or taped in a position somewhere on the upper part of the body, usually against the chest just above the heart. The capsule has a small wire that runs under the clothing to where the transmitter pack is attached. The transmitter pack is belted, taped, or otherwise affixed to the actor's body and has a short but critical transmission wire (antenna) taped in place to broadcast the signal to the mixer.
Batteries are consumed rapidly when using a radio microphone, so the boom operator should be prepared to change the batteries every couple of hours. It is not practical to turn the transmitter pack on and off between takes, so leave it turned on from the time you mike the actor to when you either wrap the actor or reach a point where the batteries, starting to show signal degradation, must be changed.
Before the boom operator approaches the actor, he or she goes to the wardrobe department to coordinate fabrics and textures as well as any special requirements, such as cutting holes inside the costume to allow wires of radio microphones to be connected to the transmitter worn somewhere on the talent's body.
Some fabrics, such as silk, wreak havoc with radio mikes, as they cause much noise. Another consideration may be whether an actress is wearing a brassiere. If so, the microphone wires can be hidden easily in the bra material, circling around the chest to the back. The wire can be taped as it descends down to the transmitter, which is often hidden in the small of the back. The absence of a bra necessitates carefully taping the wire to the body so that it does not move and show up as it pushes out against the fabric of the costume.
Due to delicate situations like the one above, boom operators must approach the task of placing radio microphones on acting talent in an extremely professional manner, concentrating on the primary mission: hiding the microphone where it will not be seen by the camera, where it captures the best recording of the actor's voice, while anticipating and solving potential problems with wardrobe fabrics and design.
Radio microphones are a fact of the entertainment world, and their use is increasing. A good boom operator not only understands the delicacies of the job but also is very sensitive to the feelings of all actors. The boom operator articulates clearly and succinctly what he or she requires of the performing talent in placing a radio mike on them. Humor and innuendoes are completely inappropriate and do not contribute to the professional trust factor that must be instilled and maintained. Every situation is different, and every actor responds differently. The boom operator adjusts the style of communication and demeanor to each, taking cues in comments or attitude. Again, the boom operator must never do or say anything to break the essential trust developed with the acting talent.
As Rusty Amodeo was handling the boom operator chores on an interview shoot with Barbara Walters and Jay Leno, the mixer warned Rusty to get it right the first time: “Get the microphone in the right place where it can't be seen and can't be heard, because Barbara won't let you get back in and adjust it.” As soon as Walters entered the room, Rusty approached her to introduce himself, “Barbara, I'm Rusty Amodeo and I'm here to put a microphone on you.”
“Well, give me the microphone and I'll put it on,” she replied.
That's a tough situation for any boom operator. The microphone must go into an exact spot, and, more important, the place must be fabric-managed. The boom operator must run the wire so that the camera will not see it, and the transmitter must be situated properly with the transmission wire placed in a precise attitude for a clear signal.
“Fine, you want to put the mike on,” Rusty answered as he held out the tiny microphone, pointing to a precise spot in the center of her chest, “then I need you to place the microphone right here, just under this flap of material, and then I need you to run the wire under and across to this side and tape it in place so that the connector will be—“
Barbara stopped him, “Well, maybe you should do it.”
Rusty knew he had convinced her to allow him to do his job, but now he needed to win her confidence and trust. The two went upstairs, where her wardrobe department made the gown choice. Rusty opened his kit and removed the toupee tape (a clear durable tape sticky on both sides) to start affixing the microphone wire to her blouse.
“What are you doing?” she asked.
As Rusty continued to work he explained that he did not want to just put a mike on her. He wanted her to look her best, and using toupee tape would rigidly hold the microphone wire in place and prevent the button-down front from bulging open as she turned and flexed. It also would be in her best interest to protect the microphone from rubbing. In other words, Rusty was doing his job to make her look and sound as good as possible. Later, during the shoot, Barbara did not hesitate to allow Rusty to readjust, as now she was convinced that a truly dedicated professional was looking out for her and her image.
Because of wardrobe or camera coverage, boom operators constantly must consider new hiding places for the radio transmitter pack. Sometimes the small of the lower back is not an option, due to lack of clothing or a tightly fitting costume with the camera covering the back of the actor. Sometimes a boom operator hides the transmitter pack in the armpit. The toughest of all situations is when scanty clothing is worn, and all options above the waist are ruled out. More than once a boom operator had to revert to hiding the transmitter high on the inside of the thigh.
Although it is most desirable to place the microphone in the upper center position of the chest, you are not always able to do this. For instance, it is difficult to hide the microphone there if the actor is not wearing any shirt. Such was the case on a Paul Mazursky picture, Moon over Parador, starring Richard Dreyfuss. Jim Webb (not to be confused with the songwriter of the same name), the production mixer, and his boom operator struggled to figure out where to put the microphone.
As Mazursky rehearsed the actors, the boom operator noticed how the character that played Dreyfuss’ valet followed him around like a shadow. The boom operator pointed it out to Jim, and the two of them hit upon the idea of literally making the valet character a traveling microphone stand. They placed a wireless microphone very carefully on the forward edge of the scalp of the valet, hidden just inside his hairline. In this manner, the valet, who spoke no lines of dialog during the scene, followed Dreyfuss back and forth in the bedroom of the manor, picking up Dreyfuss perfectly.
GETTING ROOM TONES AND WILD TRACKS
The production mixer must anticipate the audio trials and tribulations that will come during the postproduction sound-editorial phase. If the mixer works with the mind set that he or she is the one to make the material work, then the mixer is much more attentive to potential dialog lines or sequences, recommending recording pick-up wild lines with the actor after the camera has stopped rolling.
The mixer can either record such lines right then and there, while the crew holds still and the camera does not roll, or, what happens more often than not, the mixer takes the actor to a quiet area with a dead ambience and has the actor say the lines a number of times. These are usually short pieces of dialog spoken by a bit or minor character that were not clearly recorded during the actual on-camera shoot because of complex miking problems, practical equipment making noise that drowns out the line, or something like a door slam or a vehicle startup overpowering the dialog.
Aside from wild-track pick-up lines, ambient room tones are also needed. Many mixers try to record room-tone ambience whenever possible, but it is very difficult to get a full-scale camera crew to freeze in place and truly be silent while capturing a good 30 seconds of ambience. So many times we have gotten a room tone that has only a second or so of usable material. The mixer rolls tape, but the crew has not completely settled down, even to the sounds of feet shuffling. By the time the crew has actually come to an ideal audio texture, the director, extremely antsy to move on to the next setup, usually comments that that is enough, thinking the mixer has had a full 60 seconds, when in fact only 3 or 4 seconds of usable material can be salvaged.
People not sound aware often think that room tone is only needed for those little occasional holes or to patch over a director's voice cueing actors in the midst of a scene. They forget we may be required to patch-quilt entire scenes where one actor is looped but the other actors are not. Hence production dialog editors make a 3-second ambient piece fill a sequence lasting several minutes on-screen, as it must underline all the ADR dialog of the second actor that was looped. We often are stuck using a very loopy sounding ambience because the production crew did not religiously and seriously record room-tone ambience.
More times than not, the assistant director is responsible for helping the sound mixer get the necessary presence recordings. I have heard too many reports from mixers and boom operators alike about uncooperative assistant directors who do not care or understand the needs and requirements of anything but sync sound, which has inhibited presence recordings. The smart assistant director understands that by working with the sound mixer to record presence fill and wild-track pick-up lines, or even to arrange prop series sessions, such as recording a rare or unobtainable prop aside from the shoot, he or she is saving the production company literally thousands of future dollars that otherwise would be spent to recreate or fix something that hadn't been solved right then and there.
One of the most banal excuses I hear from those in positions to make decisions having collateral sound-cost consequences is that they are visual people. I have news for them: so am I, and so are my fellow craftspeople in the sound industry. Someone claiming to be “visually oriented” really is admitting to being sensory deprived. That person has immediately told me he or she knows very little about the storytelling process of making film. It is because we in sound are visually empowered that we can design and create spectacular audio events to make the visuality rise to new heights of production value, the whole becoming a more thrilling spectacle than visual-only thinking can produce.
SPLITTING OFF-SOURCE SOUND
Very often, the production mixer has a scene to record that has a practical television in the shot. The television audio should not play back and be heard by the actors’ mikes, so the mixer takes an audio feed from the video source feeding the television and records it onto a dedicated channel.
In many cases a mixer records on a 2-track Nagra or DAT. The mixer line-feeds the video source onto channel 2 as he or she records the actors’ dialog onto channel 1. This eliminates all the conversion speed-rate issues; it also creates ease in finding exact sync by having the live-feed material “transfer-recorded” in this fashion.
X-Y Microphone Configuration
The X-Y microphone configuration is important when you are recording a left-right stereo spread with two matching microphones. Recording stagnant ambiences with two matching microphones spread wide apart from one another is usually a problem, but whenever you have a situation where there is a sound-emanating source (such as a car, an airplane, or motorcycle) that is moving, ever changing the distance from itself and the two microphone diaphragms, you will experience phasing.
X-Y Pattern

Figure 5.12 The X-Y microphone configuration. (Photo courtesy of Schoeps.)
As depicted in Figure 5.12, a sound source such as a car passing across the median axis of a bilaterally symmetrical pattern of both microphones experiences a phase wink-out. As the car approaches, the sound of the engine takes ever so slightly longer to reach the far mike as it does the closer mike. As the car approaches, the time it takes to reach the far microphone decreases to the point that, as it hits the axis (center) point, the two microphones switch roles. Now it is taking increasingly longer for the sound to reach the far left mike. At this crossover point is a phase wink-out or drop-out of signal.
The severity of the phase wink-out is proportionate to how far apart the two microphone diaphragms are from each other. The closer they are to each other, the less the phase wink-out. That is why stereo microphones have the two diaphragms in the same capsule, either side by side or one on top of the other.
If you are using two monaural microphones to record stereo material and you have the potential for audio sources such as cars, trains, or aircraft, then you may wish to place the two mikes in what is called an X-Y pattern. In this configuration the left microphone is facing to the right, covering the right hemisphere, while the microphone on the right is pointing to the left, covering the left hemisphere. This places the microphone diaphragms physically as close as possible to each other to greatly reduce the time the audio source signal takes to reach one microphone diaphragm as to the other.
Figure 5.13 depicts a typical dual-capsule stereo microphone. Note how the diaphragms sit as closely as possible to each other, one on top of the other.

Figure 5.13 Stereo capsule microphone.
Stereo Capsule Microphone
The top diaphragm capsule rotates to increase or decrease the degrees of separation as desired. Be careful to maintain the correct up-and-down attitude of the stereo microphone, to keep the left and right coverage in correct aspect. The advantage of using a stereo “dual-capsule” microphone is that the left and right diaphragms are much closer together than by placing two monaural microphones in an X-Y pattern. The chances of experiencing phase cancellation and wink-outs are minimized greatly.
The USM 69i stereo microphone has two separate dual-diaphragm capsules. These are mounted vertically and rotate against each other. The directional polar patterns can be selected separately for each capsule. The capsules operate independently from each other. The USM 69i is a studio microphone for intensity stereo recording suitable for X-Y and MS recordings.
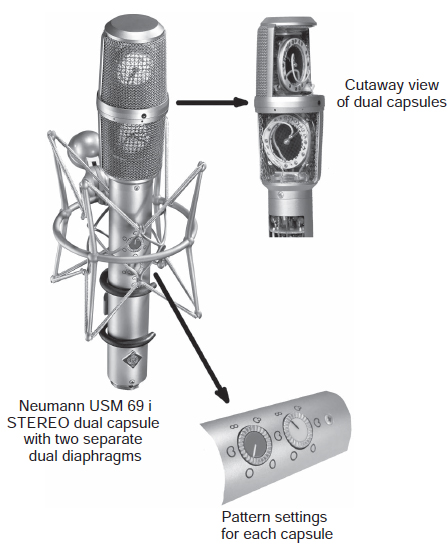
Figure 5.14 The USM 69i stereo microphone. (Photo courtesy of Neumann Corporation.)
The microphone consists of the amplifier section and the capsule head. The amplifier section contains two microphone amplifiers operating independently from each other. They have an extremely low self-noise. Two completely separate microphone capsules are positioned closely above each other within the capsule head. Their diaphragms are made out of gold-sputtered polyester film. The upper capsule rotates against the lower one over a range of 270°. Color markings on the lower capsule system help to identify the angle by which the upper capsule has been rotated.
When sound waves reach the microphone capsules from different directions they will generate audio signals with different intensity only, but not with time differences, since the capsules are in close proximity and the sound arrives at both capsules simultaneously. The result is an intensity stereo signal that can be summed together for excellent mono compatibility without causing interference.
The USM 69i has two built-in rotary switches. The five polar patterns of both capsules can be selected at the microphone itself. Therefore, no special AC power supply units or powering adapters are necessary. The two outputs attach directly to any 48-V phantom-powered connectors. In addition to the usual polar patterns (omnidirectional, cardioid, and figure-8), we have added a hypercardioid and a wide-angle cardioid pattern. A built-in DC converter generates the required capsule polarizing voltages.
THE ILLUSION OF MONITORING FIELD RECORDINGS
Eric Karson has been on many a shoot, both domestic and abroad, learning well the difference between what you think you've got and what you really have. Eric offers the following advice:
We're on location, in the heat of battle, making the picture, and we are given headphones to monitor what we believe is actually being laid down on tape. Later when we wrap the shoot and settle into the picture editorial process, we discover that it does not really sound how we remembered it. Oh, it is what the actors had said, but the perceived quality value that we thought we had at the time was not really on tape. As a producer or director, you learn that lesson early on and sometimes in a very hard and brutal way.
In another case, John LeBlanc was asked to serve as director of photography on a low-budget western. The producer had made commercials successfully for several years but was inexperienced in the handling of feature projects. I received a call from John, asking if I would mind if he brought the producer, the director, the unit production manager, and the person the producer had hired to handle the production mixing chores.
The following day, we met and discussed the various aspects of the show as they related to sound. Unknown to me, John had heard the production mixer talk about how he would handle recording on the set during previous preproduction meetings, and, knowing a few things about feature sound, several mental red flags had gone up. John segued the conversation into having the young man convey his intentions for me to hear for myself.
With a great amount of eagerness, he explained how he would record on a DA-88 so he could use up to 8 channels at once, placing microphones all around the set. He wound up his dazzling litany with the warranty that the producer need not waste money on Foley, as his production soundtrack would make all that obsolete. John turned to me, “Well, Dave, whad'ya think?”
I did not know whether to laugh or cry. “I think that you are hurtling toward an apocalyptic collision with postproduction hell—that's what I think.” The young man was offended by my comment, but I felt the need to make my point. “Tell me, son. How many feature films have you mixed sound for?”
He tried to change the subject. He started to detail all the big-name features he had mixed. I grabbed the previous year's edition of the Annual Index to Motion Picture Credits published by the Motion Picture Academy as I calmly began pointing out that one should not try to equate working on a postproduction re-recording stage in a totally controlled environment with the combat-zone-style rigors of recording in the field.
The young man finally admitted this was going to be his first time, but he had had more experience with digital sound than anyone else on the face of the earth. He actually extended his hand to me and said I could kiss his ring.
I returned to the Annual Index. “I don't see your name listed here under two of the titles you mentioned.”
He explained that he did not mix on the actual soundtrack for those films but had handled mixing the sound for a making-of-a-film television program. John LeBlanc rose and shook my hand, as he knew nothing more was to be said.
Despite that afternoon's revelation, the producer decided to have the young man handle the production mixing job anyway, based on the digital sleight-of-hand that was offered—and I am sure a lot of it had to do with the temptation to save monies earmarked for the Foley process.
Several months later, John showed up with a video of the film. It was a work in progress, but clearly revealed the caliber of work of the mixer. John recounted how the production mixer became progressively more bogged down during the shoot, totally underestimating the reality of the work. It had gotten to the point that the crew was even making fun of him. Not only did the producer have to go ahead with the original plans to have the Foley performed, but much more work in sound effect development became necessary. Potential ADR requirements also had grown more and more, not less. Instead of trying to reinvent the wheel, the producer would have been far better off using veteran experts and following their advice. With extremely few exceptions, we do things the way we do for good reason—because we have practiced our craft enough that we have developed it into an art form.
MULTICHANNEL MIXING
When we speak about production recording in a multichannel format we refer to 2 channels, either a 2-track Nagra or a 2-channel DAT. Nagra's ¼″ digital deck allows 4-channel field recording, and a very few individuals may from time to time record to a DA-88 8-channel.
When you think of the grandfather of multichannel production sound recording, you must be thinking of the renowned Jim Webb, who handled the production recording chores for the legendary film director Robert Altman on such pictures as California Split, Buffalo Bill, Three Women, A Wedding, and Nashville, the first Dolby 2-track matrixed stereo mix (this picture earned Jim the British Academy Award for Best Sound).
On A Wedding, Altman doubled the Nashville format. Jim Webb found himself recording on two 8-track machines simultaneously. Altman shot with two cameras amid 50 actors all interrelating with each other. Jim played musical microphones as he was mixing one group of actors holding a conversation, with camera setups moving from group to group. There was no real script, as Altman worked best with impromptu performances, so Jim had to be ready for anything.
For each setup, his cable man went out and made a character ID strip of tape with numbered assignments on each of the radio mikes affixed to the actors. When he came back to the sound cart, the cable man laid the assignment tape right across the bottom of Jim's fader pots on the mixing console so that he would know who was on which microphone.
“It was nuts. I had an assistant keeping the log on who was on what track just so that the script supervisor could keep all the material straight, as there was no time for me to keep an accurate log!” he remembers.
On California Split, Jim had the challenge of not only having to record 8-channel production dialog, but to do so while on a practical traveling location, a bus en route to Nevada. Keep in mind that, today, 8-channel mixing boards are commonplace, but in the 1970s Jim Webb's techniques were way ahead of mainstream production recording. The eight channels of signal had to be fed through two 4-channel audio mixers into the 1″ 8-channel tape recorder located on the bottom shelf of the cart near the floor. A ¼″ Nagra was fed a combined mix-down signal for protection back-up purposes. Jim Webb operated the first 4-channel mixer while his boom operator, Chris McLaughlin, operated the second 4-channel mixer.
RECORDING PRACTICAL PHONE CONVERSATIONS
For All the President's Men, director Alan Pakula told Jim Webb, “I don't want a throwaway soundtrack.” (A throw-away soundtrack basically means a guide-track is being recorded so the actors can loop their lines later in an ADR session.) Jim could not agree more, so for every aspect of the production recording process Jim left no stone unturned.
Warner Brothers removed the wall between sound stages 4 and 11 to build the full-scale set of the Washington Post newsroom through the breadth of both stages. Jim recalls:
We had one shot that was a 180-foot dolly shot inside the four walls of the set. In order to eliminate what would have been a nightmare of ballast hum due to the entire ceiling being filled with rows of fluorescent lamps, the construction crew rigged a huge rack for the ballast units just outside the sound stage and bundled the wiring in groups that fed back into the stage to the fluorescent tubes themselves.
As you know, it seems that half the picture was performed on telephones. Well, they didn't want the traditional style of actors having to act out a telephone conversation with no one on the other end of the phone to play off on, so it was decided early on with the help of the special-effects crew to build a practical telephone system into the set. We had five lines that you could switch back and forth on as Redford might put one call on hold while he answered another or placed a second call while keeping one or two other lines on hold. Each off-camera actor was on the other end of the phone conversation and was set up in an isolated area of the stage.
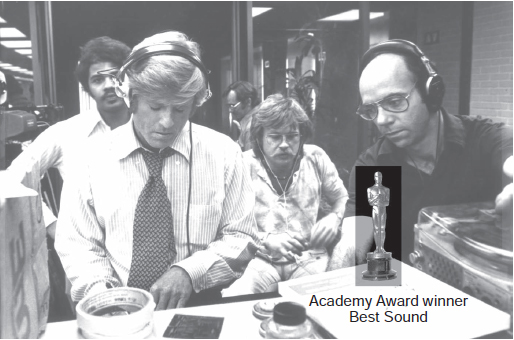
Figure 5.15 Production mixer Jim Webb won an Academy Award for his innovative techniques in recording complex multichannel production dialog on the political conspiracy thriller All the President's Men. (Photo courtesy of Warner Brothers.)
Jim warns that simultaneously recording an on-screen actor clean while also recording the telephone feed must be handled carefully:
All the multiple phone calls are recorded in real time, which can be a problem if the onscreen actor's voice is in the phone feed. What you need to do is take the transmitter out of the handset of the on-camera actor's phone so that you don't experience ‘double-up’ of the live mike with the phone-line tap. You set up the actors on the other end of the phone with headsets so that they are hearing the on-camera lines from the production mike (prior to the record head) so that you do not get that delay as heard from playback. The nice thing about this technique is that the off-camera phone feed has total isolation because the on-camera actor has the receiver right to his ear, listening to the off-camera voice so there is no acoustic leakage. Dialog overlaps are never a problem as you have both actors in complete isolation, recording each actor on a dedicated channel. This allows dialog interplay in real time.
It was the first time Robert Redford had ever used this kind of telephone technique while shooting a picture. After the director sounded “cut” on the first rehearsal, Redford looked up and exclaimed his excitement over being able to act and react to a live actor on the other end of the line. Jim could not have been happier with the results. “It really sets the actor free to act rather than try to play to nothingness, or to carefully avoid overlaps of lines being read off-camera by the script person.”
Was all this extra effort worth it? All the President's Men was awarded the Academy Award for Best Sound that year.
PERILS OF RECORDING IN SNOW
In the winter of 1989, digital production recording was anything but mainstream. Long before inclement-weather digital recording was being mastered, Paul Jyrälä had endured 105 days of production recording in freezing temperatures, handling the literal trench-warfare chores of mixing the war epic Talvisota: The Winter War in his homeland of Finland.
Moisture, hot and cold temperature extremes, dirt, and grit—all the sensitivity issues that inhibit DAT machines from working to their optimum potential plagued Paul during the grueling shooting schedule. His boom operator and cable man worked hard to wrap the equipment with cellophane and pad them with thermal blankets to keep moisture and cold at bay.
“There were times we thought we should be awarded, I think you Americans call it the Purple Heart,” chuckled Matti Kuortti, boom operator. “No matter how careful the special-effect crew was, there is always the possibility of something going wrong. During one scene where we filmed birch trees being blown apart, a rather large sliver of wood flew past the camera and pierced the director of photography in his shoulder. All of us had to be on guard, as there was danger everywhere.”
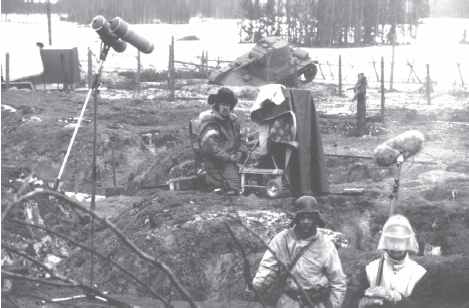
Figure 5.16 Production sound mixer Paul Jyrälä sits bundled against the freezing cold, his digital DAT and ¼″ Nagra protected by thermal blankets and battery-operated heating units. The boom operators wear machinist face shields and padded jackets to protect them from flying rocks and debris during explosion effects while recording spoken dialog. (Photo by Ulla-Maija Parikka.)
Paul used four Sennheiser 416 microphones, backed up by two Vega and two Micron wireless microphones. The team used Ryocote “woolies” to combat wind gusts and air concussion from explosion pots. Unlike American production recording techniques, Paul encoded the production recording on Talvisota with DBX II onto the original ¼″. After the crew wrapped shooting for the day, Paul returned to the location barracks and carefully transferred the day's work himself. He decoded the DBX II signal and then re-encoded a noise reduction called Telecom (a European version of the Dolby noise-reduction system) as he transferred the dialog dailies onto 2-channel 17.5-mm fullcoat film. The first channel was a “flat” transfer with no Telecom encode, making it convenient for the picture editor. The second channel was the Telecom-encoded version Paul would work with later during the postproduction process.
Because of the meticulous attention to detail that Paul Jyrälä brought to the production mixing chores, the picture only had 5 percent of its dialog “looped” later in an ADR session—an astoundingly small percentage given the difficult recording circumstances of snow, mud, flying dirt, and debris. Paul earned his fifth Jussi (the Finnish version of the Academy Award) for Best Sound, and Talvisota was one of the seven finalists that made the American sound effect “bake-off” for consideration for an Academy Award nomination.
RECORDING STRAIGHT TO HARD DISK
Zaxcom Deva V—Digital Recorder
The Zaxcom Deva V is a direct-to-disk digital audio recorder. This production sound mixer brings a highly durable machine into any recording scenario. In the late 1990s, the first Deva series was really the first professional field direct-to-disk digital recorder that overcame the sensitivity factor of traditional computer disk recording systems.
1. Faders 1, 2, 3, and 4: There are four hardware faders. They can be assigned to any channel or combination of channels in your Deva. Software faders are available for channels not assigned to the hardware faders.
2. Touch Screen Display: The touch screen display is the main interface of the Deva. Most selections are made and displayed using it. You can use either a PDA stylus or your finger to make selections.
3. Slate Mike
4. Function Buttons: F1, F2, F3, F4, F5, F6, MENU, and ENTER. Many of the function buttons are used for multiple tasks. When the touch screen display shows the home screen, the function buttons perform the function written above them. In other menu modes, the function buttons can be programmed to perform additional tasks. The MENU and ENTER buttons always perform only those functions.
• F1—CUE
Displays the Cue or Playback Menu on the touch screen.
• F2—C.TAKE
Marks a take as a “Circled Take” in the metadata file. This button can be pushed either during record or after the take has been recorded but before the next take has started.
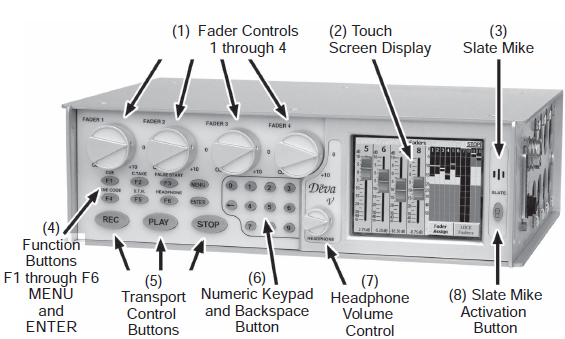
Figure 5.17 Photo courtesy of Zaxcom Corporation.
• F3—FALSE START
Marks a take as a “False Start” in the metadata file. When this is done, the segment number does not increment when placed into the record mode the next time. This button can be pushed either during or right after the false start record.
• F4—TIME CODE
Displays the time code menu on the touch screen.
• F5—S.T.N.
Displays the SCENE TAKE NOTE menu.
• F6—HEADPHONE
Displays the HEADPHONE matrix menu.
• MENU
Advances the screen to the next menu. This is the same as touching the status button in any menu.
• ENTER
Confirms data entry.
5. Transport Control Buttons: These three buttons provide the Record, Play, and Stop functions.
6. Numeric Keypad and Backspace Buttons: These provide an alternative means of entering numeric data such as time code and metadata.
7. Headphone Volume Control
8. Slate Mike Activation: This button requires you to push and hold it to activate the slate mike. All routing for the slate mike is performed in the Disk Mix menu.
The Zaxcom Deva has enjoyed a robust and successful run of service for serious sound mixers. The Deva V is a high-quality 24-bit analog-to-digital converter with both microphone and line inputs that ensure a wide dynamic range. The Deva V can record a Sound Designer II audio file or either mono or polyphonic Broadcast Wave audio files. By utilizing a small keyboard, the production mixer enters pertinent data into the audio file directory. The Deva V is capable of recording at a 192-kHz sampling rate with 10 discrete channels. With a dynamic range of 120 dB, it can handle some really challenging recording assignments. One nice change from the original model was that it now uses FireWire as an I/O data access.
The Deva V uses a 100-gigabyte removable internal hard drive, or you can opt for an internal DVD drive option. Zaxcom claims these hermetically sealed drives can withstand as high as 150 Gs—certainly 30 times more than I intend ever to endure—but it does bring a lot of recording time for the mixer on the set. A separate DVD-RAM unit is easily hooked up so that the mixer can lay back protection copies to a recordable DVD, using the hard drives as a working medium only to record and file manage. Once the DVD is made and the material is safe in the hands of the postproduction transfer facility, the mixer can wipe the drive clean and use it again, or put it in the archive for safe keeping as a back-up protection for all the dailies.
The mixer may choose to put the Deva V into an “Intermittent” mode, which allows the unit to automatically make back-up recordings to the DVD when the Deva is not in “Record” mode. As soon as the Record mode is off, the Deva automatically continues recording back-up audio files to the DVD-RAM over the SCSI connector. If the mixer wants to record both to the Deva hard drive as well as to the DVD simultaneously, he or she switches to “Turbo” mode.
The Deva V always maintains a 15-second “pre-roll” in the RAM buffer, so if the mixer presses the Record button, the previous 10 seconds is automatically laid down to the hard drive, thereby doing away with waiting for the pre-roll. This feature is extremely helpful on a busy shoot, where the mixer must review previous recordings or where the director either does not understand pre-roll protocol or has not thought to warn sound that he or she is about to go for a “take” and roll cameras.
Rather than being caught right in the middle of playing back a previous cue and finding yourself totally incapable of spinning down to virgin tape to start recording again, simply hit the Record button, which automatically starts recording to the hard disk. You will not damage or record over the material you are reviewing, as it is impossible to accidentally record over a section of the hard disk that has already been used. Remember, computers do not work in a linear fashion. You can change from singlechannel recording to multichannels for the next recording set-up by simply touching the proper buttons to tell the Deva how you want to record. In addition to industry standard XLR connectors, the Deva has a break-out cable with a multi-pin connector for line inputs.
Deva V—Left Panel
9. Power Input Connector: Standard 4-pin XLR connector for 9.5 V–18 VDC 1 Amp input
10. Hard Drive Compartment
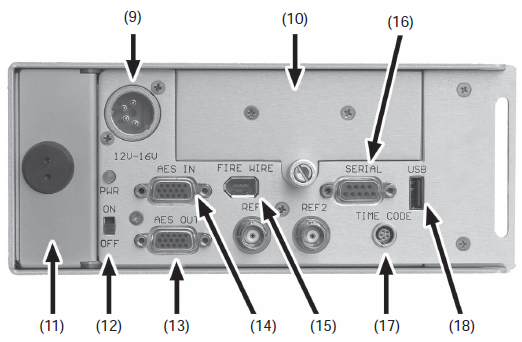
Figure 5.18 Deva 5 left panel. (Photo courtesy of Zaxcom Corporation.)
11. Battery Compartment: The black knob rotates to lock the battery compartment door. Li-ion and NiMH NP1 batteries can be used safely in the DEVA as long as they exceed 18 VDC.
12. Power Switch
13. AES Digital Output Connector: Connects the supplied AES. Digital output cable to this is a 15-pin mini which provides four pairs of AES digital outputs.
14. AES Digital Input Connector: Connects the supplied AES digital input cable to this 15-pin mini sub-four pairs of AES inputs.
15. IEEE 1394 (FireWire) Connector: This port can be used with FireWire hard drives, CD, and DVD-RAM device requires power, it can be turned on from the My DEVA menu.
16. Serial/RS422 Connector: This 9-pin connector is used for controlling the DEVA using an external Cameo or Deva-12 mixer.
17. Time Code Connector: This is the standard 5-pin Lemo connector used for time code I/O (Lemo EGG.OB.305.CLL).
18. USB Port: This port is designed for connecting Zaxcom-approved keyboards.
Deva V—Right Panel
19. Camera Connector: This is a standard 10-pin ENG-type camera connector. It outputs channels 5 and 6 to the camera and returns the monitor feed from the camera.
Note: The two monitor feeds are summed to mono.
20. Mike/Line Inputs 1, 3, 5, and 7: Each input is electronically balanced and internally padded to handle either mike or line level signals (selected via the INPUT CONTROL menu. (As of 8/28/04, Line Input Impedance has been increased to 4-K ohms).

Figure 5.19 Deva 5 right panel. (Photo courtesy of Zaxcom Corporation.)
21. Analog Outputs: 1–6–25-pin connector outputs 6 channels of line level audio. Menu selectable to output either channels 1–6 or 5–10.
22. Headphone Output ¼″: Stereo jack, optimal 100-Ohm impedance.
Note: Lower headphone impedances result in louder headphone output levels.
23. Mike/Line Inputs 2, 4, 6, and 8: Each input is electronically balanced and internally padded to handle either mike or line level signals (selected via the INPUT CONTROL menu.
Using a keyboard (not shown), off to the side of the unit, the recording mixer quickly enters the scene, angle, and take data that show up in the “slate” icon in the upper right-hand corner. This entry along with the time code is embedded in the directory of the audio file itself, thereby streamlining and removing possible errors by the assistant picture editor later in assimilating the material into the nonlinear editing system being used.
The Deva Mix-12 is a new concept in location mixing. It is a control surface for the embedded digital audio mixer of either the Deva IV or V location recorders. The Mix-12 is fully digital, only the microphone pre-amps, A-D, and D-A converts are used for analog connections to the outside world.
Mixing is performed in the digital domain via a floating DSP, ensuring the highest quality path to the recorder, unlike analog mixing consoles where distortion or channel-to-channel cross-talk and differences can occur over time or with temperature changes.

Figure 5.20 The Zaxcom Mix-12. (Photo courtesy of Zaxcom Corporation.)
The microphone preamps are sound studio quality, ensuring no coloration of audio by transformers or other analog circuitry. The effects are superb with the ability to remove hum, buzzes, and even crickets by the two notch filters on each channel. There are 3-band shelving filters with individual control of level, Q, and frequency via the Devas graphic interface.
The Mix-12’s soft knee compressor is one of the best available, chosen for its natural sound and transparency. Each of the 12 fader strips provides instant access to bus routing and effects for that channel. An LED input meter is provided on each channel strip to augment the Devas full-color output metering. Three separate talk-back busses can be routed to any combination of outputs and internal mix busses.
For further information, you can reach Zaxcom in Pompton Plains, New Jersey, at 973–835–5000 or on the Internet at www.zaxcom.com.
The ability to mirror duplicate back-up drives quickly to a cost-effective medium as well as the ability to build in data files to the directory of each audio file as they are created greatly enhances not only speed issues but also reduces the chances of error in data assignments later at the laboratory or at picture editorial.
Several other companies have brought some very impressive direct-to-hard-drive recording systems for the field.
Sound Devices—Digital Recorders
The introduction of Sound Devices 7-Series recorders in 2004 re-defined the category of file-based recorders for production sound. Their extremely compact size and high-feature content made them the first product capable of being a legitimate replacement for time code DAT. While file-based recorders for production sound have been available since 1998 (when the Zaxcom Deva was introduced) their use was limited to only the largest feature films. Sound Devices 7-Series moved file-based recording into the hands of sound engineers recording effects, reality television, episodic television, commercial spots, documentary film and video, and feature film.
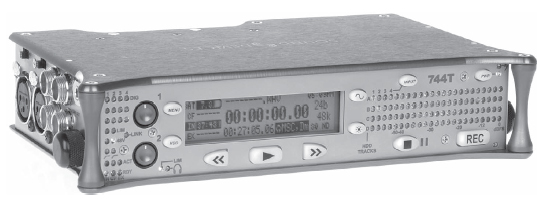
Figure 5.21 Sound Devices 744t. (Photo courtesy of Sound Devices Corporation.)
The 7-Series recorders were originally targeted to sound engineers working in over-the-shoulder environments. The unit's controls, size, and complement of connectors is more specific to “shoulder-bag” work versus cart work. Because the recorder is typically used alongside a field mixer, wireless systems, and power distribution in a single production bag, it needs to be as compact as possible. Additionally, only two sides can be used for connectors and only one control surface is practical in bag applications. Other portable products are available with controls on secondary surfaces, but these are less common in portable applications.
The transition to file-based recording opens numerous options and challenges to the engineer. The 7-Series has much depth in its choices of file type, sampling rate, time code rate, and file management that tape-based systems never offered.
The Sound Devices 744t is a hardy portable 4-track digital field recorder with time code capability. The super-compact 744t records and plays back audio to and from its internal hard drive or compact flash medium, making field recording simple and fast. It writes and reads uncompressed PCM audio at 16 or 24 bits with sample rates between 32 and 192 kHz. Compressed (MP3) audio playback and recording from 64 to 320 kbs are also supported. The time code implementation makes the 744t ready for any recording job from over-the-shoulder to cart-based production.
The 744t implements a no-compromise audio path that includes Sound Devices's next generation microphone preamplifiers. Designed specifically for high-bandwidth, high-bit-rate digital recording, these preamps set a new standard for frequency response linearity, low distortion performance, and low noise.
A 744t with microphone and headphones—no other recorder on the market matches its size or feature set. In addition, its learning curve is quite short—powerful does not mean complicated. While the 744t is a very capable recorder by itself, it truly excels when used in conjunction with an outboard audio mixer such as Sound Devices’ own 442 or 302.
Its two recording media (hard drive and Compact Flash) are highly reliable, industry standard, and easily obtainable. The removable, rechargeable battery is a standard Sony-compatible Li-ion camcorder cell. The 744t interconnects with Windows and Mac OS computers for convenient data transfer and backup.
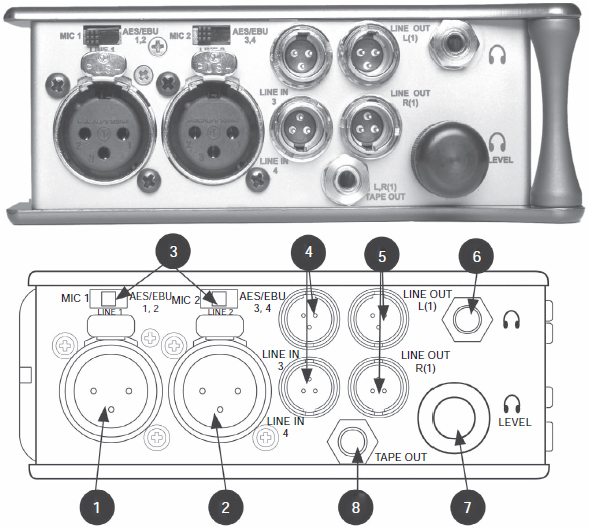
Figure 5.22 Sound Devices 744t, left side. (Photo courtesy of Sound Devices Corporation.)
1. XLR Input 1/AES3 Input 1 and 2: Dual function INPUT connection. Input type set with switch above. Active-balanced analog microphone, or line-level input for input 1. Transformer-balanced 2-channel AES3 input (1 and 2).
2. XLR Input 2/AES3 Input 3 and 4: Same as above only for 3 and 4.
3. Mike-Line-AES3 Input Switch: Selects the input level and mode of the associated XLR input connector.
4. TA3 Channel 3 and 4 Line Inputs: Active-balanced line-level input connectors. Pin-1 (GROUND), Pin-2 (+), Pin-3 (−).
5. TA3 Master (L/R) Analog Outputs: Active-balanced, line-level analog L/R Outputs for the Master Output Bus. Program source and attenuation level are user selectable. Pin-1 (GROUND), Pin-2 (+), Pin-3 (−).

Figure 5.23 Sound Devices 744t, right side. (Photo courtesy of Sound Devices Corporation.)
6. Headphone Output: 3.5-mm TRS stereo headphone connector. Can drive headphones from 8 to 1,000-Ohm impedances to very high levels. TIP (left), RING (right), SLEEVE (ground).
7. Headphone Volume: Adjusts the headphone volume. Note: The 744t is capable of producing ear-damaging levels in headphones!
8. Tape Output: Unbalanced tape (-10 dBv nominal) OUTPUT on 3.5-mm TRS stereo connector. Signal source is identical to the Master OUTPUT Bus. TIP (left), RING (right), SLEEVE (ground).
1. Time Code Multi-Pin: Time code INPUT and OUTPUT on 5-pin LEMO connector.
2. AES3id Inputs 1 & 2 and 3 & 4: Unbalanced digital INPUT accepts two channel AES3 (or S/PDIF) on BNC connectors. Supports sample rates up to 200 kHz.
3. FireWire (IEEE-1394) Port: Connection to a computer to access the internal hard drive and compact flash volumes as mass storage devices. Direct connection to Mac OS (10.2 or higher) and Windows (XP and 2000 only) computers.
FireWire Transfer Notice: Sound Devices STRONGLY recommends shutting down equipment before connecting TO or FROM any FireWire device with a connection that carries power (6-pin). There have been reports of isolated problems when “hot-plugging” IEEE 1394 (FireWire) devices. (Hot-plugging refers to making the connections when one or more of the devices is on, including the computer.) When hot plug-in, there are rare occurrences where either the FireWire device or the FireWire port on the host computer is rendered permanently inoperable. It is a common opinion that a FireWire connection which carries power is susceptible to this type of damage.
4. C. Link In/Out: RS-232 protocol interface on 6-pin modular (“RJ-22”) connector for linking multiple 722 and 744t recorders together. Word clock, machine transport, and time code are carried on the C. Link connector.
5. External DC In: Accepts sources of 10–18 volts DC for unit powering and removable Li-ion battery charging. The Hirose 4-pin connector is wired PIN-1 (NEGATIVE -) PIN-4 (POSITIVE +) PIN-2 (-) and PIN-3 (+) are used to charge the removable Li-ion battery. DC ground at both PINS 2 and 3 is at the same potential as chassis and signal ground.
6. Word Clock Input and Output: Provides clock INPUT and OUTPUT for the 744t. Word input accepts sampling rates between 32 and 192 kHz. Word clock OUTPUT is the rate that the box is running. There is no sample rate conversion onboard the 744t.
7. AES3id Output Bus 2: Unbalanced digital OUTPUT, 2-channel, for OUTPUT Bus 2. Signal source is menu-selected.
8. AES3id Master Output Bus: Unbalanced digital OUTPUT, 2-channel, for the Master OUTPUT Bus. Signal source is menu-selected and is identical to the Analog Master OUTPUT Bus signal.
9. Multi-Function Rotary Switch: When in the set-up menu, the rotary switch moves between menu selections; push to enter selection or enter data. In RECORD and PLAYBACK modes, selects headphone monitor source; push action is user selectable.
Aaton Cantar-X—Digital Recorder
The Cantar-X Features the ability to record up to 8 discreet tracks of 96 kHz/24-bit audio to either an internal 60-gig hard drive or an external hard drive or optical drive via its built-in 6-pin FireWire connector, providing over 57 hours of 2-track 48 kHz/ 24-bit audio and more than 7 hours of 8-track 96 kHz/24-bit.
Any one of the Cantar's five transformer balanced mike-pres, four analog line-level or eight AES digital inputs can be routed to any track, or multiple tracks, quickly and easily in Cantar's intuitive routing input menu. Changes to routing or monitoring can be achieved “on-the-fly” by recalling custom presets that are stored in its nonvolatile memory. Phantom power, limiters, phase reverse, and an adjustable hi-pass filter are switchable for each microphone input. A stereo mix-down of the discrete tracks can be recorded as a separate file and/or routed to any of the Cantar's two adjustable line-level analog outputs, AES digital output or headphone matrix.

Figure 5.24 Aaton's Cantar, a lightweight, low-power mixer/recorder. Photo courtesy of Aaton.

Figure 5.25 Another view of Aaton's Cantar. Photo courtesy of Aaton.
A unique magnetic fader panel is provided for creating the stereo down-mix in the field and for controlling Pan and PFL SOLO checking for each track. The stereo mix-down file, the discrete tracks, or all can be burned at the end of the day to either an optional internal optical drive or an external FireWire drive, and the Cantar allows you to choose between CD-R/DVD+R/DVD-RAM formats so your resulting disks will realize a wide cross-platform compatibility in the postproduction environment.
The Cantar interface is the easiest to use in the most difficult missions. It offers the largest display surface of all portable recorders which simultaneously show every critical recording parameter. The custom-designed high-contrast LCD displays remain visible under bright sunlight, and at very low temperatures too; and because the swiveling front panel always offers the best viewing angle for both cart and over-the-shoulder work.
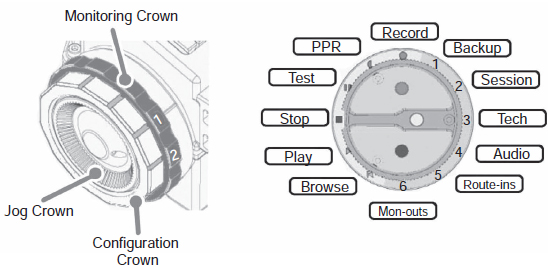
Figure 5.26 The 3-crown turret (left) with main selector (right). (Image courtesy of Aaton.)
The 3-Crown Turret (on left)
Monitoring Crown
1. So: 5 mike inputs, 4 line inputs, 6 digi inputs, and active tracks are sent to the headphones as Solos.
2. Ph: Mixer output and 17 user's grids to headphones.
3. Lo: Mixer and 9 user's grids to dual line-out.
4. Fb: Mixer and 9 user's grids to dual foldback.
5. Di: Mixer and 9 user's grids to dual Digi-out (AES). Note: the headphones receive the same signal as the one sent to the output being configured.
Configuration Crown In TEST and PPR, push the Solo-Mix-Pan slider battery side, press the routing button (top left of the swiveling panel), and rotate the config crown to browse the 15 Input-to-Track configs and to activate the one showing while the routing button is released.
In REC, push the Solo-Mix-Pan slider battery side, press the routing button to verify the Input-to-Track configuration in use.
Note: To avoid finger errors, the current configuration cannot be modified in REC but there is a shortcut: by switching to PPR you have plenty of time (up to 35 seconds) to select another configuration and go back to REC. This operation creates another file and does not lose any audio sample between the two.
In REC, pull the Solo-Mix-Pan slider operator side, press the routing button to turn the three circular screens into a large Mon-Outs “Left-Center-Right” display. Since this doesn't affect the recording signals, you can on-the-fly listen to and select another monitoring pattern by rotating the config crown.
Jog Crown The “one finger” jog is used to move the cursor in the message panel, to edit Scene&Take, to select high-pass filters, to modulate the backlight, to control the pan-pots, and to scrub the player in fast forward/reverse.
Note: [Shift•Jog] 10× accelerates the jog speed.
The Main Selector (on right)
The large 12-position Main Selector eliminates diving into subdirectories, and the unique three-crown turret gives instant access to all recording and monitoring configurations, even with gloves on.
Six “sound managing” positions: • Rec • PPR •Test • Stop • Play • Browse, laid in the standard way.
Six “operand” positions: • Mon-outs • Route-ins •Audio •Tech • Session • Backup, give access to all the possible settings of the machine. The black, white, and red buttons are made for the thumb; they work together with the large blue key [shift] activated by the index.
In test PPR Rec:
• [white] (reserved to insert prelocating marks)
• [shift•white] in PPR opens/closes the editing pane
• [black] sends slate mike to line-out and foldback
• [shift•black] sends slate mike to tracks too
• [red] in PPR & REC toggles the take gender: “p” (pickup), “w” (wild sound), “t” (sync), “n” (ignore)
• [shift•red] triggers the tone generator; tone stays “on” if SHIFT is released first
In Play
• [white] stops and starts the player from the marker
• [black] puts a start mark on the played position (to make a pause, press [white] then [black])
• [shift•black] resets the player to 00
In Inputs-to-tracks and Mon-outs
• [black] sets routing links, e.g., mike-in 3 to track 5
• [red] erases routing links
Nine rotary analog faders plus six linear digital faders—each entirely devoted to one specific task—give more possibilities and are faster to handle than four multifunction knobs.
All of Cantar's rotary knobs, faders, switches, and the enclosure itself are sealed against the elements to guard against damage caused by dust and moisture. Aaton's optional 12-volt rechargeable and re-cellable NiMH batteries connect to the Cantar via its dual 4-pin XLR DC inputs providing up to 15 hours of autonomous operation in the field.
Important note: When in Stop, internal Hdd sleeping, the current drain is a mere 270-mA. To keep the internal sync-clock running, do not switch off the Cantar during the working day. The sleep mode activation can start one second after Stop. (For more details, visit the Cantar web site and review the operational manual—see Tech chapter.
The Twin Battery Safety
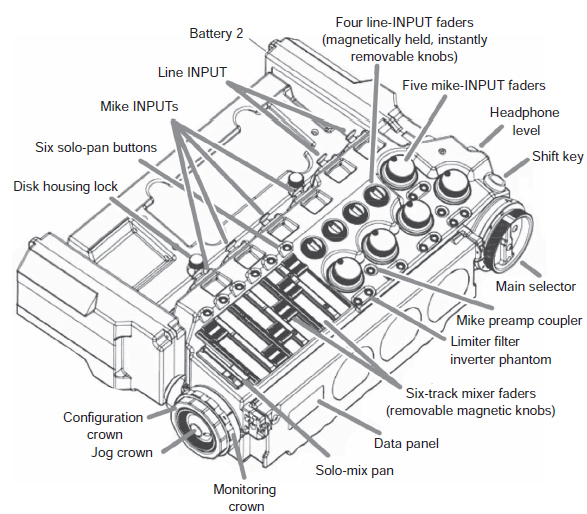
Figure 5.27 Aaton's Cantar mixer/recorder. Photo courtesy of Aaton.
The Cantar low-power high-efficiency electronics have the longest working time of all portable recorders. With a single set of on-board NiMH batteries, the 18 (15)-hour Cantar beats all other recorders. And with the twin you will never be taken by surprise. While working on a mains-powered cart, keep a battery onboard. Activating both batteries will buffer the possible mains drops or cable bad contacts.
External 12 to 16 V DC can also be used, maintaining compatibility with most common DC packages. An optional Bluetooth module provides two-way communication between the Cantar and a Bluetooth-enabled PDA to vividly display all of the Cantar's settings at a glance. The Aaton Cantar records Broadcast Wave files which can be directly imported to most popular editing systems.
Routing 15 Inputs to 8 Tracks
Six primary tracks, T1 to T6, can receive any one of the 15 independent and permanently active inputs: lines 1 to 4, mike inputs 1 to 5, Digi (Aes) 1 to 6.
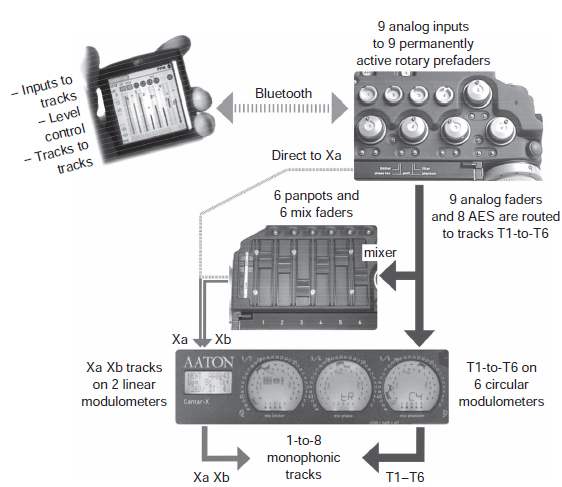
Figure 5.28 Aaton's Cantar mixer/recorder. Photo courtesy of Aaton.
Fifteen inputs-to-tracks configs can be stored. They are instantly recalled through the swiveling panel routing button and the config crown (a one-hand operation).
The primary tracks are monitored by pairs T1T2, T3T4, and T5T6 on the circular screens.
Two extra tracks (Xa Xb) receive the reference sounds out of the built-in digital mixer. These reference sounds are clearly separated from the T1 to T6 primary tracks: they are displayed on the rectangular display bar graphs. They also can be displayed on the rightmost circular modulometer by pressing the [EYE] button.
When the Xa Xb track pair is generated by the mixer, they are sent to tracks 7 and 8 and a “mix” icon shows on the circular displays.
When recording 8 tracks and no mix-down, tracks 1 to 6 are routed the standard way and the 7 and 8 tracks directly receive the signals selected in AUDIO-12; that is Line-in 3 and 4, or Mike 3 and 4, or Aes-in 7 and 8, or nothing (this latter position saves disk space).
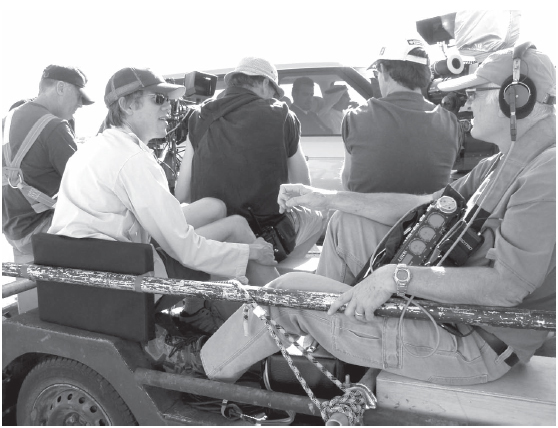
Figure 5.29 Production sound mixer Petur Hliddal strapped into the truck as he tackles the grueling task of capturing a clean production track on location for Syriana. Carl Fischer, boom operator.
See Cantar PostChain at www.soft.aaton.com/swcantar; Aaton, France +33 4 7642 9550; [email protected]
Petur Hliddal, veteran sound mixer for such diverse styles of productions as Lucky You, The Aviator (2004 version), Big Fish, Divine Secrets of the Ya-Ya Sisterhood, Planet of the Apes (2001 version), and The Cider House Rules, comments about using the Cantar X on the challenging shoot of Syriana:
I just finished work on Syriana, an ambitious globetrotting thriller involving five parallel stories, which intersect and diverge, all related to the international oil business. We shot dialogue scenes with two hand-held cameras, frequently with no lighting, in self-driven cars, boats, elevators, airplane cabins, and one 600-foot long supertanker. This was in addition to the usual assortment of inaccessible locations—rooftops, schoolrooms, desert hideaways, odiferous Moroccan kebab shops, Pakistani construction workers’ shantytowns, desert power transmission line towers. Many of these locations were located far from the work trucks, on rough ground or sand, necessitating our using small departmental 4 × 4 pickups for equipment transport and storage.
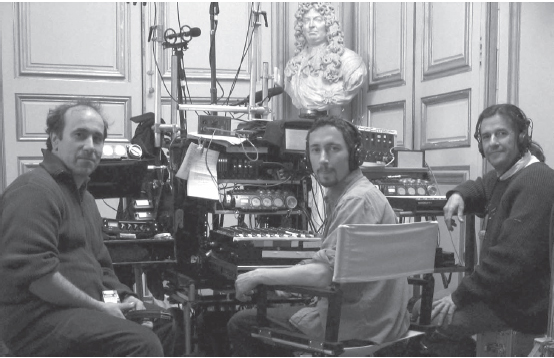
Figure 5.30 Production sound mixer, Stuart Wilson, using three Cantar X recorders simultaneously to cover all the wireless mikes and Ambience booms for the 2006 production of Marie Antoinette. Stephane Lioret, boom operator.
At times the scenes we shot were loosely scripted or improvised and it was not unusual for us to be running four or five wireless mikes together with M-S ambience tracks to help with uncontrolled backgrounds. When you are shooting far from trucks or carts, and the camera crews are hustling from moving car interiors to exterior drive-bys and back, shooting as fast as they can shoulder the camera and push the button, you have got to be light, fast, and flexible to keep up. The Cantar X could not have been more perfectly suited to the production problems I had to face and I could not have done nearly as good a job without it.
Our data traveled in two ways. When working on the cart, I mirrored the Cantar hard drive with a LaCie D2 DVD-RAM, which I shipped to the lab for warehousing. When over-the-shoulder, I used LaCie 60 GB pocket drives stuck in a carry case pocket. These were shuttled between the lab where DVD-RAM copies were struck for warehousing and our locations, where we reused them as needed. In addition, each weekend I loaded the Cantar drive to LaCie 120 GB hard drives on which I maintained a second file warehouse on location.
I have now completed two films with the Cantar X and I have to say for the first time since the “digital revolution” in film sound began, I feel I have stabilized my format decision-making. This machine is a beauty; your responsiveness, attention to the details of support, improvement, and modification are impeccable. Thank you so much for an excellent, elegant machine.
Stuart Wilson, production mixer for such projects as Harry Potter and the Order of the Phoenix, The Constant Gardener, A Cock and Bull Story, Code 46, The Last Dreamers, The Intended, Room to Rent, Born Romantic, and The Last Yellow to name just a few, shares his experience working with the Cantar X:
I'm just starting my next feature with the Cantar X and I think it's fantastic! From The Constant Gardener in the heat and dust of Northern Kenya and Sudan to the rain back in Europe, the faders and knobs are well sealed and have coped with a lot of rough treatment. It's definitely enabled me to do things I wouldn't have been able to do otherwise; mostly for those running-around shots where one has to be portable, I've been able to have a boom and up to five radios and mix on the shoulder.
The latitude one has is very good; the self-noise is very low and the headroom very high, so much so that I'm getting a bit lazy having left some of my old analogue gain riding technique to keep the signal within a healthy range as I know the recorder can cope with it.
On The Cock and Bull Story, the last Michael Winterbottom film, I was recording a scene with muskets and cannons and a crowd of extras: I set the levels so that the explosions wouldn't overload and recorded a couple of takes, but then you miss the value of having all those extras shouting in the heat of battle so I decided to do a take with levels set for the crowd and I would let the explosions go over (thinking it is easier to add a cannon shot in post than recreate 200 screaming soldiers in the studio!). The crowds were sounding good and then the explosions started and the Cantar wouldn't distort! There was a good 30-dB difference in the levels I'd set and it sounded great! The limiters are incredible.”
On the issue of problem solving locations for good dialog recording, Stuart shared this situation:
I had this interview with Bertolucci. He said he didn't want to postsynch (loop) anything— and he said that he wanted to shoot it in a real Paris apartment. I immediately asked him, “How is the floor?” Because I knew that all the apartment buildings in Paris use these parquet floors.
Then he answered, “Well, the floors in these Paris apartments—they have their own voice.” I replied, “But we don't want that voice to become a character in the film.” So then I turned to the production manager and said, “I want to see the location.” The production manager replied, “Well, you can't come. It's not finished yet and the art department is still doing stuff.” I agreed, “Yeah, exactly that—when it's finished, it's too late!” After all, the art department has done their stuff, dressing and everything. I have to be there before and see if there is anything we can do about any problems, and if we can, can they be worked into the schedule.
The production manager tried to keep me away because he thought it was going to cause trouble or cost money. I wrote them an email and said that it was up to them. If I'd just arrive on the location site and it's already a fait accompli, then I cannot be held responsible for the sound. I will deal with what I could, and if that wasn't what they wanted, then that would be just fine! But, if they wanted me to take the responsibility for the sound, and that is the way I prefer to work, then I needed to see the place to see if there was any preparation that needed to be done or what could be done—what was practical. Obviously, they had to budget it, but I can give my proposals and then it's up to the producer and director.
Then they got nervous and said, “Okay, can you come tomorrow?” So I went to Paris from my home in London and recommended some things. I said that they should double glaze all the windows and they did it. In the main bedroom, where a lot of dialog was taking place, I talked to the production designer and he was thinking maybe he would have carpet on the wooden floor and eventually, I was not only able to persuade him to have carpet in this room, but to lift the carpet out and lay a new wooden floor on top of the old creaky one and then put the carpet on top of that. That really helped us a lot!
An argument used in the defense of leaving a location the way it is, is that when the actors move around and it's creaking, then it's like life and it's natural and it can be nice and atmospheric. But the problem is, if the camera moves like when we had a steadicam operator moving and the actors are still, then it's ridiculous and you can't use it because you just become aware of the camera and who's behind the camera.
The art department was very good. If they have two or three weeks to make some changes, screwing down floor boards, fixing door frames, that don't fit properly or window frames that don't close properly, then they can do it. They can get a carpenter in for one day. It's not really a big expense. They can do it as long as they have the time to do it. If they don't have much time (i.e., if I'm not brought in until the last minute) then it's stress for them and everybody is busy and then it's a problem.
In the end they were very happy and towards the end of the shoot the French production manager came to me and said that he was very impressed because I'd been very clear and that the director was very pleased with the sound—in fact they only looped one scene, so it was worth the gamble of making myself unpopular during pre-production so when it came to shoot the prep work was done and we all could concentrate on trying to get quality rather than just getting something just “usable.”
THE ULTIMATE GOAL AND CHALLENGE
The challenges of production sound recording make it a difficult and arduous job. The production mixers and their teams face the daunting and often disheartening struggle with the ignorance factor of the producer(s) and director and their lack of personal empowerment by not knowing what is possible and what preparations and techniques can most efficiently accomplish the mission. If they do not understand what is possible (and they will not understand that unless you have at least certain tools and procedural protocols), and if they do not understand the importance of what “quiet on the set” really means, then how can they hope to deliver what is truly possible? How can they dream to deliver the magic opportunities of production sound?
Nearly every director I have worked with in postproduction jumps up and down insisting on how much he or she wants the magic of production, but in reality so many of them do not do their part to assist the production mixers and their teams to bring that magic of performance to its fullest possible potential. So many times the opportunities are lost in the logistical heat of battle, in the sheer struggle of shooting the film, getting the shot before they lose the light. If ever a phase of the creation of the motion picture cried out for the discipline and regimentation of a military operation, it is the challenging battlefield of production.