
Chapter 11
The Sound Librarian
The Curator of an Audio Empire
“The best chefs collect the best ingredients before they start
cooking—and the best sound editors approach sound effects the
same way. Recording fresh sounds and building a library of
them is more important than the latest digital “gizmo” or plug-in.
You don't need an atomic eggbeater to make a cake. It might
make it faster—but not always better.”
– Steve Lee, Weddington Productions
Custom recording new sound is vital! It is what keeps our work fresh and exciting. But recording the new sound dues is not enough. If you ever hope to efficiently work with the recordings you spent so much time making, adopt a sound library system that not only assimilates the data but offers swift and easy access to it. A dedicated sound librarian developing and maintaining the sound library helps. Because few of us can afford such a luxury, we must do it ourselves. In my particular case, I am too protective of my material not to do it myself. This is not necessarily bad. Being your own librarian gives you an incredible edge because you have an intimate knowledge of not only each cue's labels, but you also know exactly how you entered and “cleaned” the material.
THE EVOLUTION OF “FINDING IT”
Supervising sound editors know they must work quickly and be extremely flexible in custom recording and gathering precise sound cues from the sound effects library to mount their film or audio project. Before the advent of digital sound technology, the most common media in which to store sound effects were 35-mm magnetic film (both monaural stripe and fullcoat for multichannel stereo), ¼” tape, and audio cassette tape. A few unique libraries transferred sounds to 4-channel ½” tape or 24-track 2” tape (using time code as a reference), but they were not really part of the mainstream theatrical sound editorial community.
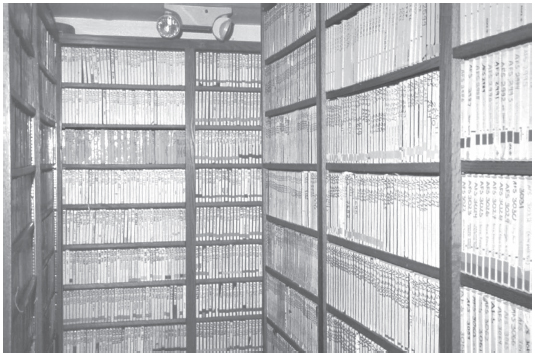
Figure 11.1 At Weddington Productions, thousands of ¼” tapes are kept in a temperature- and humidity-controlled environment, even after they have been digitally transferred to DAT cassettes. These tapes await retransfer as soon as technology significantly improves analog-to-digital converters or geometrically higher sampling rates and bit depth. At that point, it is worthwhile to return to the original ¼” tapes to take advantage of the analog source. (Photo by David Yewdall.)
For sound effects, most of us started custom recording our sound effects on ¼” tape in the 1970s and early 1980s. Back then we carefully edited and “leadered-out” the individual sound cues by splicing in white ¼” leader. Most of the time we physically wrote the cue number on each white section of white tape. In this manner, the transfer operator could easily count the white leaders that would spin across the sound head at high speed. Some used a red Sharpie to edge every tenth sound cue leader, making it even easier for a transfer operator to identify and spin down to cue 46, for instance. He or she simply counted as four red-edged leaders flew by and then paid closer attention to counting the last six white leaders.
OPTICAL SOUND TO MAGNETIC FILM
Thousands of priceless sound effects have filtered down to us from previous years on magnetic 35-mm film; many were carefully remastered from 35-mm optical track. These first sound effects were originally recorded in a device known as a sound camera. The equipment was so bulky it had to be mounted inside a vehicle called the sound truck to move it quickly from one location to another. The sound mixer recorded directly into the sound camera, which “photographed” an image of the sound onto the area just inside the perforation holes of 35-mm film.

Figure 11.2 The 35-mm film optical track.
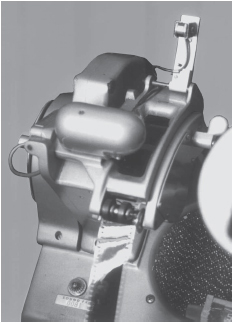
Figure 11.3 This Moviola is equipped to read both magnetic and optical sound. The editor has flipped up the magnetic sound head (single track) out of position to check the optical soundtrack from a section of release print. Note the thick cylindrical unit protruding from the film. An exciter lamp inside shines a narrow beam of light through the optical track. The light is read and translated into modulations.
This continual undulating area of “photographed” sound is known as an optical track. Optical track technology still is used today in theatrical presentations of features presented in theatres with no digital technology. Also, optical track still is used in the audio presentation of 16-mm prints. The sound is created through an exciter lamp in the sound camera that creates one of many types of optical track formats. The film is then sent to the laboratory and developed. The optical soundtrack can then be played on a synchronizer, Moviola, or projector also equipped with a playback exciter lamp optical head. Light passes through the optical soundtrack image of the film and strikes a photoelectric cell, causing current fluctuations that accurately reproduce the analog audio signal for playback.
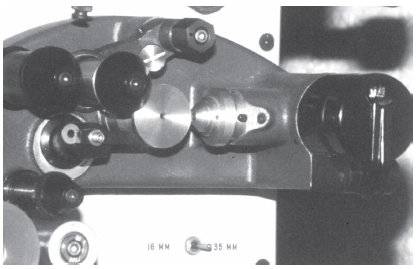
Figure 11.4 Projector optical reader head.
During the first three decades of motion picture sound, sound editors had to work with their tracks very carefully. An editor would take much greater care in ordering the needed sound effects, especially the number of repetitions. If cutting a gun battle, you ordered enough repetitions of a particular gun to cut the sequence. If you suddenly came up short or ruined the material with which you were working, the remedy was not as easy as it is today with digital technology. Now we simply highlight the needed sound and duplicate it with a computer keystroke. An editor back then, though, would have to order the desired sound cue from the sound librarian, who would build the master effect into a roll with other 35-mm optical masters, which would then be shipped with a work order to be loaded onto an optical camera and shot over and over again onto a fresh roll of 35-mm film. The magazine of film would then be shipped to the laboratory to be developed. Depending on how busy the sound department and laboratory were, a day or two could easily pass before a sound editor would receive reprints of the necessary gunshot effect to complete the work.
Not only did the sound editor need to be careful about the amount of material ordered, but also with handling the film. Most sound editors wore at least one white cotton glove so that fingerprints or skin oils would not be left inadvertently on the track. The emulsion of the track could easily be scratched, causing pops and crackles. The sound editor laced up the optical track on the sound head of the Moviola. After adjusting the sync point of the sound effect, the sound editor carefully noted on the film the exact foot and frame point for the sound assistant to build the cue into individual reels of sound called “sound units.” These units held numerous individual sound cues, spaced precisely apart by “fill leader” (35-mm film that was usually recycled newsreel or release prints).
The sound editor assembled sound cues with the “fill leader” together with Mercer clips. This roll was then sent to assembly, where the assistant hot spliced the sections of film together; and, using “blooping ink,” the assistant made sure the splice points did not have any exposed scraped emulsion areas that would cause loud pops due to a bright burst of light leaking into the optical reader.
With the advent of magnetic film in the early 1950s, the cut-and-assembly technique changed dramatically. Although the sound librarian still had to send assembled masters of sound effects to the transfer department for quantities of reprints to be made for sound editors, 35-mm magnetic film was not developed at a lab. Once it had been removed from the 35-mm magnetic film recorder, it was instantly ready to be broken down and used by the sound editor.
The sound editor still threaded the 35-mm magnetic film under the sound head of the Moviola or synchronizer and still made precise sync notations, but instead of preassembling the sound cues with sections of filler using mercer clips for hot splicing, the sound editor merely hung the cut sections of magnetic sound effects on a series of hooks in a trim bin.
After the sound editor completed cutting the reel, the trim bin was rolled into the assistant's room, where an apprentice assembled the individual sound cues into the sound units. As before, the empty distance between sound cues was spaced out with “fill leader,” but instead of hot splicing the cuts and painting the splices with blooping ink, the apprentice used a Rivas tape splicer and taped the backside of the film.
Whether the sound editor cuts with optical sound, magnetic film, or modern digital technologies, the basic techniques and demands on the sound librarian have changed very little. As this book has repeated over and over—only the tools change; technical disciplines, artistic techniques, strategies, and philosophy of sound always have remained the same—and always will.
ORGANIZING A SYSTEM TO FIND STUFF
At the heart of the sound editorial world is the sound library—a vast wealth of sounds, both historical and designed. The sound library must be a highly organized and protected shelter, safe from the ravages of heat and moisture, safe from destruction or loss, yet available at a moment's notice as demands may require. The sound librarian is the gatekeeper, shepherd of the flock, audio accountant, charged with the responsibility of organizing and protecting the limitless frontier of sound bites.
The sound library is never complete—ever growing, ever expanding. Challenges to the sound librarian not only include the management and care of hundreds of thousands of sounds, but also involve keeping track of the continually evolving technology by which the library is archived, cataloged, accessed, and protected.
I find sound library work both relaxing and enriching. I have learned much about our world through listening to and working with my own sound library. Some of the most enjoyable times in my audio work have been dealing with historical sound effects, especially recordings of that which does not exist today, or of museum pieces no longer utilized. When was the last time you heard a Daimler-Benz engine or a Messerschmitt 109 approach and rip by at emergency war speed? What distinguished the sound of a P-38 Lightning with its turbo-charged engines from all other aircraft? One can almost catch the acrid smell of burned oil in the nostrils after a long day of processing and remastering these fabulous historic recordings. It can be very stimulating, especially knowing your work goes toward preserving and archiving these vanishing wonders.
Assigning Sound Cues Part Numbers
No industry standard exists by which one builds and maintains a sound library. Sure, techniques abound, some designed to serve and expedite the sound editor, others designed only to serve the supervisor/owner, shrouding the contents of the library from outside influences.
The first and foremost starting point for precise identification and accessibility of an audio cue is carefully assigning a “part number” to each sound cue entered in the library. Regardless of whether a computer database is utilized, nothing is more accurate in recognition than a dedicated part number.
“Topic-Roll-Cue” System
Some sound libraries are set up with initials to designate the topic, prior to the actual part number, such as CR6-87. “CR” stands for crashes, “6” stands for sound roll number, and “87” stands for cue #87. The transfer operator reads the sound effect numbers from the transfer order form, seeing the need to print CR6-87 for a sound effects editor. From the tape rolls stored on the library shelf, the transfer operator withdraws tape CR6, loads it into the playback machine (usually an analog ¼” or ½” tape, but sometimes a digital DAT), and spins down to cue #87. If the material is archived on ¼” tape, the transfer operator listens to the 40-cycle tone voice slates, which at high speed “beep” as they fly by the playback head. If the material is archived on ½” tape, the transfer operator enters the time code reference, which spins the tape down to the precise point on the tape. The transfer operator decides on which of the three available channels the desired sound cue can be found.
If the material is archived on digital DAT, the transfer operator simply enters the PNO (program number) on the keypad of the machine or remote on the unit's keypad and then presses the play button. The machine spins at 200 times speed to find the precise PNO requested.
As library part numbering systems go, the “topic-roll-cue” system at least allows for an ongoing growth of the sound library, in a linear fashion, while keeping common topic sound effects together. Instead of sound rolls numbering from 1 and progressing numerically, sound rolls have initials for topic designations and any number of rolls in that category. This is not a common system.
“Linear Numbering” System
Many sound libraries use a linear style of numbering rolls and sound effects, making for an easy and universally understood way to cross-verify material. This system works especially well when mastering sound cues to consecutive digital DATs. This system can be applied whether you are sending a transfer order to have analog transfers made (i.e., 35-mm fullcoat or 35-mm single stripe) or you are sending an order to have the sound cues downloaded into a nonlinear computer editing system, such as Pro Tools. Say the transfer order notes that DAT 0120-73 must be transferred stereophonically. The transfer operator knows it is the 120th DAT in the sound library, puts the DAT into the machine, and punches in 73 as the PNO.
ARCHIVING STABILITY
In today's computer audio file environment, many an editor has suddenly lost gigabytes of audio files when a drive corrupted, was accidentally dropped, or died in some other rather uncreative fashion. I have heard too many horror stories of “I didn't have any back-up” or “I should have burned the stuff to disk before I started work!” or some other wrist-cutting statement.
Most of us have crossed over from the days when we cut the sound for our projects on 35-mm fullcoat and 35-mm single stripe. Many of us adapted to the changing technology and growing success of our businesses and scope of work. Very few of us working today remember recording sound effects from a sound truck with the optical camera—no, I am not one of them. Most of us remember venturing out from our editing rooms to record with Sony TCD-5 audio cassette recorders, then graduating to Nagra ¼”, along with higher quality microphones as budgets allowed. With early experimentations in digital recordings, many of us tried the clumsy and cumbersome Sony F-1, while others ventured into true experimenting with incredibly expensive digital tape decks that were only teases of things to come.
Then, in the late 1980s, the first gray-market digital DAT decks were adopted by those who wanted digital technology in the field. As you can see, this gave us a sound effects library compilation filled with a frightening intermixture of technologies and formats.
As a sound library tool, digital DAT was the answer to many technological and organizational problems, not the least of which is the ability to defeat print-through of overmodulated sound effects such as gunshots, explosions, crashes, metal, and so forth. Sound librarians jumped with joy as they were able to record a digitized program code number with each sound effect recorded on the DAT. During search-and-seize time to make transfers of these sound effects, nothing was faster in the tape format world.
DAT technology presented a great opportunity to retransfer our multi-format sound libraries into digital-based realms, a medium that would solve a host of problems that had plagued sound artists for decades. By 1987 the race was on to convert to a DAT master system. Naturally, a new set of problems and disagreements arose, not the least of which was understanding the differences between the standard VU meter, which sound craftspeople had been using for decades, and digital peak meters that digital DAT machines used. This misunderstanding caused thousands of overmodulated transfers to DAT among many linear thinking sound facilities throughout the industry. This costly mistake is felt even today, as many libraries had to return to their 35-mm mag and ¼” originals vaulted away in cold storage and remaster them all over again.
Even the manufacturers of the digital DAT machines disagreed on what “0” VU equaled on their DAT meters. Many claimed it was at -12 dB on the peak meter; most thought it was -16 dB. Still others who did not understand the calibration differences at all simply thought that, like Nagra machines, they should set their “0” dB reference tone at -8 dB on the digital peak meter. All these choices resulted in overmodulation, and, depending on the degree of error, you can easily see the degree of the disaster.
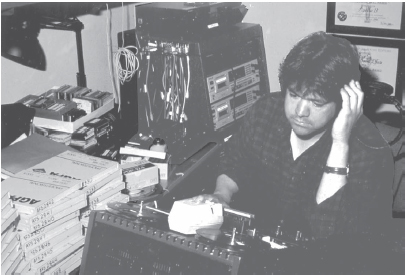
Figure 11.5 As the sound librarian at Weddington Productions, Steve Lee carefully edited original ¼” tapes before having them digitally transferred to DAT master tapes. Eventually these DATs will be retransferred to CD-ROMs and DVDs as carefully prepared audio files (such as AIFF, WAV, or SDII).

Figure 11.6 An overmodulated audio file, improperly mastered due to using -12 dB instead of -18 dB or more = “0” VU.
After several years of disagreement and trial and error, most of us now generally accepted and understood that the “0” VU level equaled -18 dB on the digital DAT peak meter. Since many action sound effects, such as gunshots, explosions, crashes, and impacts, were recorded in the “saturation” style (see Chapter 10), that extra headroom certainly would be needed to properly remaster the analog recording. Many sound editorial facilities, especially those with a reputation for high-concept sound effects, started using -20 dB as equaling “0” on the VU meter.
Mastering to CD-Rs—and Then DVD-Rs
The CD-ROM was a great and cost-effective per megabyte rate for drag-and-drop storage medium for several years. With a maximum capacity of 700 megabytes, the cost hovered at around a penny per 15 megabytes of storage. As the cost of DVD-R recorders and disks dropped, the cost per megabyte for storage became extremely beneficial. A DVD-R holds approximately 6 times as much data as a CD-R; and with the introduction of Blu-Ray technology the storage protection capacities are astounding.
Even so, the traditional DVD-R is assured considerable life as a cheap, high- capacity, and affordable way to record to a medium that, if properly stored and maintained, has the ability to sustain a very long shelf life. Unlike a digital DAT, or other analog media, DVD-Rs can be scanned by computer archival software, and, in a very short time, you can build an extremely complex and thorough database in which to find the material you need.
Following are three important things you must be aware of in handling CD-R/ DVD-R.
1. Do not touch the data surface of a disk. Do not set a disk on a tabletop, and of course never slide the disk's data surface across anything. Doing so will cause scratches and damage that does not allow the CD-R/DVD-R player's laser to properly read bytes of data, causing error and the danger of permanent loss of audio files.
2. Do not store CD-Rs or DVD-Rs in an environment that is too hot, or atop equipment that radiates heat. If the disk warps, you cannot get it to read correctly in a player, resulting in the loss of material on it.
3. Do not store these disks in bright light for any length of time. Whenever I transport my disks from one facility to another, I either pack them in black leather carrying cases with zip flaps, or, if I am moving full racks of CD-Rs or DVD-Rs, I spread heavy towels over them to avoid exposure to direct sunlight in transit.
Several of us in the sound community ran fade tests on various brands of disks, placing them in direct sunlight as it shone through an open window for various lengths of time to test the stability of the disks after bright light. We discovered that not all CD and DVD brands are created equal. Two of the brands tested faded, resulting in a permanent loss of data after only 15 minutes of direct exposure to sunlight. Others lasted for several hours; still two others took 2 weeks of day-in and day-out exposure to show fade damage. Regardless of the rate of fade damage, such a test should motivate you always to keep your CD-Rs and DVD-Rs stored in a dimly lit and temperature-stable environment.
To prepare audio files for disk mastering, the sound librarian first “cleans up” (explained later in this chapter) each audio sound file until he or she is satisfied it is ready to be committed to be “burned” to a CD-R or DVD-R disk.
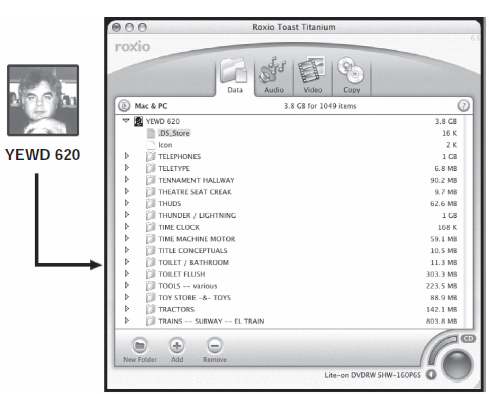
Figure 11.7 DVD-R file for burning. Once you have put together your folder of audio files, you must run Norton Utilities software on it, as well as computer “virus” and “worm” checks so that you do not include dangerous anomalies onto your CD-R and DVD-R masters.
The sound librarian creates a folder and names it; in the case of my own sound library, and the example being shown, the disk name is YEWD 620. YEWD 620 is the DVD-R “disk address.” If you desire a custom icon on your DVD-R you must highlight a file icon that has the desired image on it. I always leave an empty file folder with my library icon image on the desktop of the computer. Then you will Apple keystroke/“i” to open the information window. The icon image will be shown in the upper left corner of the information window. Move the cursor over and highlight the icon image; then copy the icon by using Apple keystroke/“C.” Move the cursor up to the upper left-hand corner and tap on the little gray box to put the window away. Next, you will highlight the new DVD-R file folder that you just created and open its information window. Highlight the file icon in the information window and paste the custom icon (Apple keystroke/“V”) that you have just copied from your master icon image.
With the assistance of color-coding and the infinite variations of custom icons available, your DVD-Rs are easily recognized as a workstation copy from a vault master, or a work-in-progress back-up from a finished DVD-R master. I use unique icons to distinguish Foley back-up DVD-Rs or dialog back-up DVD-Rs from anything else I am using. You create additional topic folders that reside inside the DVD-R master folder. You place audio files to be mastered inside these topic folders.
After the DVD-R master folder is filled (not to exceed 4.3 gigabytes), you are very wise to run Norton Utilities’ Disk Doctor and at least one anti-virus software to ensure that the data directories and resource forks are not damaged or missing. It does not do any good to master an audio file and not to be able to use it later because it is damaged or does not open and function.
Close the DVD-R master folder and click on it twice. The folder menu will pop up, displaying the inner topic folders. Now is the time for you to reposition the folder window on the computer monitor screen exactly the way you want it to appear whenever the disk is used later, for this is exactly the position and configuration that the DVD-R will permanently format it, in the manner in which it will always open.
Once these processes are complete, you boot up the DVD-R recording software, such as Adaptec's “Toast.” You must select the DATA option on the software window to burn a DVD-R for data storage. You drag-and-drop the folder, in this case “YEWD 620” of the master file to be burned onto blank DVD-R. The software scans it and shows it to you in its own menu window.
The drawer of the recorder opens as a prompt asks for a blank DVD-R to be loaded. Place a fresh disk in the tray and close it, commencing the recording of data called “burning.” A menu will appear, asking at what speed you wish to burn the disk. Even with today's ultra high-speed burners that can burn at incredible speeds, I still burn my master DVD-Rs at “BEST QUALITY” (slower) speed. You will suffer fewer artifacts later.
Note the open folder to the left. This is only to show you what the folders inside the computer disk drive looks like. Note that the software window shows YEWD 620 as a disk icon (the custom icon is shown as the first item as a document). The audio files inside the first folder show exactly as they did in the original drive.
Burning a duplicate master back-up copy is always wise, as it can be stored in a dark temperate place so that, if necessary, it can generate additional copies in the future. A work copy is made, one used for the day-to-day workstation environment.
Even if you are working in a big editorial environment with terabyte servers, you still need to burn DISK vault DVD-Rs as protection. Drives will fry, files can corrupt—accidental deletions will always happen. Without a dependable disk vault archive, you are playing Russian Roulette.
BASIC “CLEANING UP” OF AUDIO FILES
The sound cue rarely comes directly from the microphone into the recording device in a pristine configuration. Though many of us personally learned and taught our colleagues and recording assistants to speak as little as possible when recording sounds in the field, unwanted vocals always need to be removed. In addition, the audio action does not always start on cue or play out as planned.
We always try to record everything during a session. Even if it goes wrong, the sound event that follows has value and a use sometime, somewhere. While recording sound effects for Christine, I had briefed the dual recording team not to speak or react, even if disaster struck. If an accident should occur, I wanted the sound of it to be clean. As it turned out, the stunt driver lost control of the car during a power reverse on a section of highway just wet down by the water truck. He spun off the road and slid right for my brand new Cadillac El Dorado. In my heart, I knew he could not avoid a collision, yet I held the stereo microphones steady as I watched. Fortunately, the stunt driver narrowly missed my car, after slamming the transmission into first gear and gunning the engine so hard that it threw a rooster tail of mud and dust across not only my own car but two others. Of course one unplanned bonus to this near catastrophe was that we got a great clean recording of a high whine gear box with tires spinning in mud, swerving up onto the pavement and a great wet spin-out skid as the car throttled down the road. And no, not one person on my team let out a vocal reaction, not even a heavy breath until I yelled, “and CUT!!” Then of course everybody came unglued.
The point was that I was prepared and disciplined to keep the mouths of my team and my own shut. My recording crews did the same. However, many recording crews often talk and react, making all kinds of unnecessary movements and extraneous noise, such as eating, gum chewing, or jingling coins in their pockets while recording. I do not like editing out these voices every time I need to use the audio cue. If a sound editor is pressed for time and has to cut the sound cue for an edit session hurriedly, he or she is more likely to overlook vocals and extraneous noises and movement, which only show up on the re-recording stage later. Therefore, make sure that all nonperformance vocals are edited out of the master, and that you have carefully gone through the sound cue to ferret out other problems, which must only be edited out and fixed repeatedly during sound editorial sessions. Cutting and cleaning the sound cue once prior to CD-R or DVD-R mastering prevents all this unnecessary work.
Listen for digital ticks, zits, or glitches, and be prepared to remove them. Using the digital pencil, you can “draw” out a digital tick simply by zooming in very close, so that you can clearly and easily connect the waveform from the exact point at which it suddenly shoots straight up to the point (usually only a few samples in length) to where the tick returns to the normal waveform. By drawing across it in this manner, the digital tick itself disappears, and you probably will not hear any residual aftereffect. (Listen to cue #14 on the accompanying CD to better understand the sounds of digital ticks, zits, and glitches.)
Drawing out the digital tick is not always possible, especially when working with a very active sound with a very busy frequency field. Sometimes with harmonic sounds it is impossible to completely purge the audio file without hearing a bump. Two other options of removing ticks is to cut them out, being careful to select cut points where the audio wave is at a curve point that matches smoothly and does not cause yet another tick or snap.
When all else fails, you should import the audio file into a Pro Tools edit session, cut out the offending problem using the “shuttle” option, then build in cross-fades until you are happy with the resulting playback.
Sometimes neither one of these options solves the problem. In such cases, it is necessary to create a Pro Tools edit session, import the audio file into the session, find the offending problem(s), and then cut and cross-fade to blend away the bump that a direct cut cannot solve. Once I have cut, cross-faded, and reviewed the audio file, I then create a new copy by using the Bounce-to-Disk option. (The mechanics of digital editing and manipulation is discussed in Chapter 18.)
Once the new audio file has been re-recorded using Bounce-to-Disk, I then throw the original file into the computer trash can and flush it away. The new bounced file becomes the audio file to master the CD-R or DVD-R—free of those bedeviling ticks and snaps.
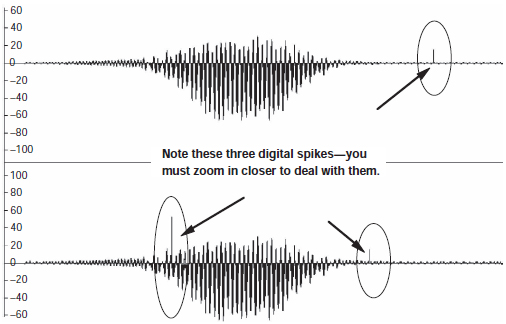
Figure 11.8 Three digital ticks to deal with.
COMPLEX SOUND EFFECT MASTERING
When I transfer my sound effects into the digital realm of my workstation, I utilize the strengths of both digital and analog technologies in what I refer to as a grass roots, common sense approach. I do not like to overprocess the sound cue or cut raw material. My goal is to deliver to the re-recording console a cut session of sounds not requiring the mixer to signal process and noise gate to the degree it does when material comes completely raw.
Depending on the rawness and dirtiness of the original recording, the effort devoted by the mixer to each cue can take a staggering amount of stage time. As the hourly rate ticks by, the mixer can be stuck with the time-consuming task of trimming equalization on each cue or feeding some cues through noise gates.
On the other hand, prepolished sound mastering is not a task for beginners. The most common mistake made by sound editors who start working with signal processing is that they lay on excessive amounts, using the various DSP (digital signal processing) functions with the finesse of a rhinoceros suffering from diarrhea. They try to make the sound effect as pristine as if it were a final mix. You can overprocess the sound effect to a point that the mixer cannot unwind or use it for the project. The beginner does not understand that the dynamics and character of sound change when cues are layered together. What may sound good when played by itself may be completely lost and overwhelmed when layered in against other sound cues. If you remove or manipulate the audio file's frequency and dynamic qualities too much before mastering, you may emasculate its potential use later during sound editorial.
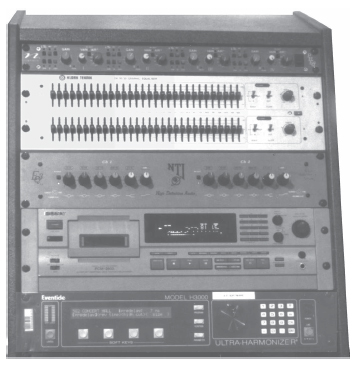
Figure 11.9 A simple but extremely effective signal path for entering sound into the digital domain. The DAT sends the analog signal from the Sony deck, up to the 30-band Klark-Teknik equalizer, down to the Night Technologies EQ3, down to the Eventide Harmonizer, then into the Pro Tools interface.
If I am transferring sound effects cues into the computer, I use a Night Technologies EQ3 equalizer in tandem with the Klark-Teknik DN 30/30, a 30-band graphic equalizer. The signal path of the sound goes from the DAT machine (analog outs), through the two equalizers, then into the Pro Tools interface, where it is digitized into the computer. The Night Technologies EQ3 equalizer allows tremendous flexibility in a virtual nonphase shift environment to manipulate the range of frequencies to emphasize, especially in the high end, referred to as the “air” bands. I experience tremendous success with all kinds of sounds that need extra help with high-end clarity. Adding such high-end emphasis with any other equalizer always brings a rush of bias hiss or unwanted “shushy”-type anomalies.
Although nonlinear editing is wonderful and convenient, DSP functions, especially regarding equalization options, are still a bit “edgy” for my ears, lending an undesirable sterility and a noticeable footprint of signal processing to the sound. There are those who can make magic with these plug-ins, but not many. It is kind of like the adage that anybody can pick up a bow and draw it across the stings of a violin, but how many really make music? And then there are those who can play a Stradivarius.
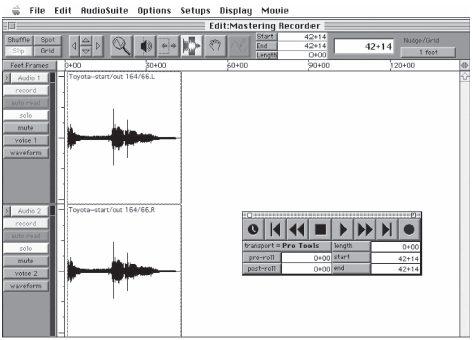
Figure 11.10 Digitizing (recording) audio data into a Pro Tools session.
I digitize my sound into the computers two different ways. I will either transfer an entire sound effect DAT or ¼” tape into a Pro Tools session. Then I will break the transfer audio file down into the desired individual cues. As I make each cut I will tap twice on the cue (which will pop up the NAME AS option) and rename the segment as I wish the new audio cues to be named. If the audio files are stereo, I name the left channel (always ending the name with .L). Then I highlight the name and copy the name (Apple + “C” key) so that every letter and space will be exact. I then tap twice on the right channel of the cut clip. The NAME AS option window will appear. I highlight the name that is there and paste in the copied name from left channel (Apple + “V” key). I then back up two spaces (to erase .L) and type in .R. I move on to the next cut audio cue and rename it.
After I have cut up and renamed all of the cue clips that I want and eliminated the unwanted audio material, I highlight all of the cut audio segments; then I go up to the upper right-hand side of the Pro Tools session window to the AUDIO bar and open that menu up, come three-fourths of the way down the list of options to “Export Selected as Files,” and release. Up comes the OUTPUT OPTIONS menu.
You must make a series of choices to make sure that your final audio files are exactly as you want them and exactly where you want them.
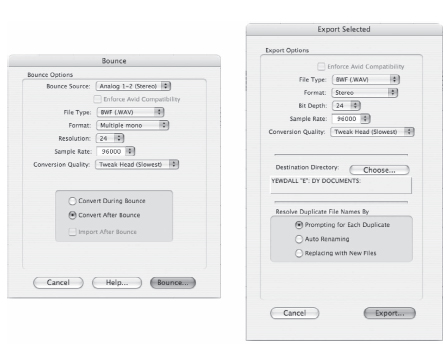
Figure 11.11 The Output Options Window to “Export Selected as Files.”
FILE FORMAT: You may choose to output your new audio files in Sound Designer II (SDII), AIFF, or .WAV.
RESOLUTION: You can output your new audio files in either 16 or 24 bit.
CHANNELS: You can output your audio files in either mono (1), or stereo from .L/.R (interleaved). If you have stereo audio files and intend to work with them in nonlinear environments then you will want your stereo .L and .R files to be output as mono (1). The stereo output option is when you are making audio files that you wish to burn later as audio CD disks—which means that they will be at a sampling rate of 44.1 kHz and interleaved as stereo from your .L/.R source.
SAMPLE RATE: You can output your files at the following sample rates: 96 kHz, 48 kHz, or 44.1 kHz (if you are using Pro Tools HD).
CONVERSION QUALITY: You can choose how good the quality of the output will be. Like most things, higher quality means trading out speed. You can output it: LOW (fastest); GOOD; BETTER; BEST; TWEAK HEAD (slowest). Obviously I never opt for anything but the “Tweak Head” speed. With today's gigahertz speed CPUs, there is no reason to opt for anything of less quality.
DESTINATION DIRECTORY: You push “CHOOSE” and a window will come up for you to guide a path for the computer to place your new audio file outputs into a particular target folder.

Figure 11.12 A typical workstation SIGNAL PATH.
RESOLVE DUPLICATE FILENAMES BY: You will choose how you wish the computer to deal with any accidental duplicates. This will not become an issue if you are targeting a file folder simply to hold your new files for later disbursement.
Today's hard-drive storage space capacities are light years beyond where they were just a few years ago. Believe it or not, when I worked on Starship Troopers, a 9-gig drive was as big as we could get. Now, we think nothing of hooking up multiple 500- gig drives or 1- to 2-terabyte drives. Every editor will have his or her own way of using drives. Some companies will work from a server; some editors will dedicate entire 350-gig drives to each project. It all depends on the project and the budget that the editor (or company) has to work with.
When loading a drive with audio files or cutting sessions, do not invade the storage capacity of the drive beyond the recommended 10 percent margin. On a 300- gigabyte drive, this would leave you with a relatively safe working storage volume of 30 gigs. That may be a lot of computer memory to some, but those of us who cut theatrical-style sound know we need much more drive space, as disk memory gets chewed up in a hurry. This is primarily why I spend seemingly immense, yet appropriate, preparation time before cutting. Recognize the need to prepare and polish sound effects before you cut them, a seemingly obvious concept often overlooked in the heat of battle when cutting complex sequences.
My primary thought in prepping audio sound files is to distill them down to a reasonable and workable size, cutting out unnecessary and wasteful parts that gobble up valuable disk-storage space. Once the sound is trimmed to a realistic size, I decide whether I should spend the time and effort to polish it even further, such as building in fade-ins/fade-outs. Be very careful in making fade decisions in the audio file master, as they cannot be removed from the editorial session later. Conversely, as you become proficient in the art of complex audio cleaning and preprep, you will discover that sounds with logical permanent fade-ins or fade-outs built into them save much time for the editor later.
Listen to “CLEANING A SOUND CUE” example on the DVD included with this book. This depicts a before-and-after comparison of identical sounds. The “before” version is the raw recording as played back from the DAT master. The “polished” version is the same sound, but after I muted the space between performances, being very careful not to clip the overtones on the end too tightly, and then added short but effective fade-ins and fade-outs.
I prefer to have front-end sync sound effects, such as door-opens and closes, gunshots, impacts, face punches, telemetry beeps, and other precise cues prepared whenever possible for drag-and-drop or spot-mode sync cutting. These obviously benefit the sound editor when frame flipping across countless visual special-effects computer graphic scans for the purpose of cutting precise, frame accurate bursts and trills.
When the clock is ticking and you are cutting a complex gun battle with multiple shooters wielding various weapons, nothing speeds the ability to assemble a full and dynamic impact firefight more than having the weapons mastered with spot mode preparation. Thorough preparation of audio file masters to better achieve this editing style is time-consuming, but the untold hours of future schedule time it saves is well worth the investment.
Now is an appropriate moment to comment on the monitoring system used when you are working on complex mastering of your audio files. Do not attempt this by only listening to your material through headphones. In 1988 the Hollywood sound editing community got a fabulous boost by the advent of Sony's MDR-series dynamic stereo headphones. Editors stood aghast as they heard sounds in their own material that had been inaudible through conventional headphones. Many editors adopted these headsets as the new standard. At my own shop, we insisted everyone use them, as we did not want disparity between what editors heard.
Regardless of the new technological breakthrough, we discovered the hard way that a sound editor does not hear the full and complete frequency range needed when determining cut points during editing. We got the material to the re-recording stage only to discover that editors were clipping off the long low-frequency overtones of metal rubs, explosions, and gunshots because they could not hear the low-end frequencies in their headsets.
The ideal way to work, of course, is to invest in a superior set of monitor speakers for your workstation. Even with expensive digital headsets, you are not going to be able to hear a lot of low-frequency signal.
To properly monitor the full frequency and dynamic value of audio, pay close attention to your speakers. Be very picky about choosing a good close proximity speaker. It should perform with a transparency that allows you to properly evaluate the material and not worry that the speaker is adding any “color.” Nothing is worse for a sound editor than to hear the session play as desired at the workstation, only to take the material onto the re-recording stage and discover that the realities of the material do not translate.
This is another reason why I do not bulk up my room with artificial amounts of subwoofer toys. I have listened to numerous editors having a great time playing with sounds in their rooms, cutting massive helicopter chases or moving the framework of the walls with concussive explosion effects—but the truth is that they are only fooling themselves. The material never sounds like it did in their editing suite on the rerecording stage. The editor will be in for one big sickening surprise.
Audio file preparation is not simply a case of distilling the effect to a workable size to make more disk storage space for other sound effects. This is not about just cutting out unnecessary audio within the effect (e.g., recordist voices, unnecessary bumps, and movements as the recordist repositions or prepares for another performance). This is about internal signal integrity and gleaning the maximum richness each sound effect cue can yield. For lack of a better term, I call it dynamic expansion.
Listen to MOVING A GRAND PIANO sound cue on the DVD included with this book. The recording is of two men pushing a grand piano on a hollow wood floor. The first task was to distill the 2:30 minutes of raw sound recording down to a workable 30 seconds. Another task was remedying the fact that the maximum volume peaks of the wheels striking either grit or hardwood floor seams were suppressing the wonderful low-end richness of the piano's wood frame, which was reverberating from the vibration of its internal strings. Using the DSP function “normalize” as a global parameter would not achieve any further richness.
Sure, I could have used a dynamic envelope algorithm that would act like a noise gate and a gain brain expander, but such tools are only good for quick bandage-type work, often yielding disappointing flat and sterile results. (I use the zoom-in function to get extremely close so I can study each waveform, often enlarging the waveform image to single samples, ferreting out digital ticks and zits. I study and remove distortion patterns and often redraw the waveform itself to repair and salvage, rather than cut and remove, the offending material.)
It took me 4 hours to bring the rolling piano effect to a full richness, bringing out the resounding piano chords and the rumble and weight of the instrument, rather than the lifeless original rolling about with massive distortion spikes.
Most sound designers and sound editors choose to use one or more software functions to accomplish DSP tools in Audio Suite. Of course, I use DSP parameters as well, but not as an end-all and certainly not as a defining formula to accomplish a desired result. I listen to each sound, not just what it sounds like, but what it tells my instincts about how to maximize its potential. At this level, I audition and understand the dynamic possibilities that lie within the overall performance. I then highlight precise regions, even within a fluid action, and lay on DSP functions ranging from normalization to pitch shift to parametric equalization. This kind of decision making can only come from years of experience supervising pictures, cutting and combining millions of sound effects, and working on the re-recording stage with the mixer to learn what one should and should not do to an audio file prior to the re-recording mixer for the predubbing process.

Figure 11.13 Audio signal “crash” breakup.
Listen to the NORMALIZATION EXAMPLE sound cue on the DVD provided with this book to listen to two examples of using the Normalization DSP function as well as simple equalization.
AUDIO FILE PROTOCOL
It is very frustrating to find audio files that have been mastered onto a CD-R or DVD-R with incorrect stereo designations. This is a direct result of ignorance on the part of inexperienced librarians importing audio files from ¼”, DAT, or any other outside audio source into the Pro Tools nonlinear workstation.
Pro Tools works with stereo files in single split left and right monaural files, which, when laced precisely together, make a stereophonic image. The file designations contain an L for left channel, and an R for right channel. When entry recordists import audio directly into a Pro Tools session as the recording platform, Pro Tools automatically names the incoming file according to the channel into which it was imported, and it assigns a sequence designation. If you import a stereo pair into a Pro Tools session on the first two audio channels, the resulting designation assigned to the recording by the Pro Tools software is as follows:
• Audio 2-01
Rename Audio 1-01 by double-clicking on the file waveform of Audio 1-01. A name window will appear. It will ask you to name the region. As an example, you may rename it “078/02 Peckerwood Canyon.” To designate the stereo left/right position, you must add a period (.) immediately followed by an L. You want the option “name region and disk file” highlighted so that the file name is altered. Before you choose “okay,” you should highlight the window with the new designation and copy it with the Command/C keystroke.
Audio 1-01 now reads “078/02 Peckerwood Canyon.L”. Now double-click on Audio 2-01. The name window will appear. Paste in the copied name so that the exact duplication of the name and use of characters and spacing is assured. Back up one space to erase the L and replace it with R. It now appears as follows:
• 078/02 Peckerwood Canyon.L
• 078/02 Peckerwood Canyon.R
This gives you a proper stereo pair. The point to this whole left/right designation issue is that only one way exists to properly prepare a Sound Designer II audio file so that it will be acknowledged as a stereo cue and show up as such in the region list. The period (.) and L or R must appear as shown above; otherwise it will not boot up correctly as stereo.
Following are several examples of files seen at other sound facilities where inexperienced craftspeople did not understand audio file protocol. These designations are noted incorrectly, and Sound Designer II software does not allow them to boot up into its stand-alone platform.
The left/right designation does not come before the description; it does not have the period (.) come after the L or R; it does not appear in parentheses or brackets. The stereo left/right designation only works at the end of the file name and only with the period (.) immediately preceding it.
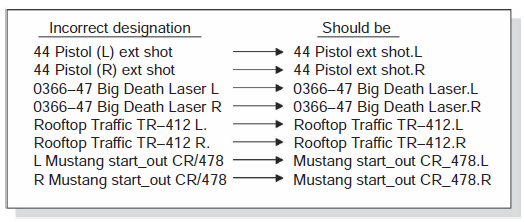
Figure 11.14 Left-Right audio file designations.
I am making a big deal of this because I have wasted countless hours retransferring and re-labeling sound files from other sound libraries. The lack of disciplined library procedure throughout the industry is staggering. Editing talent gets bogged down with file management work that should have been done correctly in the first place. The cost of wasted CD-Rs and DVD-Rs with improperly labeled audio files is compounded by the additional time and financial expense of downloading the material to a work drive, re-addressing the mastering and labeling chores, and then remastering to CD-R or DVD-R.
Contrary to the opinion of some librarians, it is not necessary to put a period (.) and an M at the end of a monaural sound file. If there is no designation, it is de facto a monaural sound file without a mate. Many librarians put this on the end of a monaural file so that it will not be confused with an interleaved stereo file, which has no dot (.) designation at the end of the audio name.
MULTICHANNEL MASTERING TECHNIQUES
You can only record single or stereo pair channels into Sound Designer II software. With a limitation of two inputs, you must record wider formats directly into a Pro Tools session, where you are limited by the number of inputs of the I/O interface. For instance, if you are recording into a Digidesign 888 I/O, 8 discrete channels can be recorded simultaneously. Be careful to make sure that you have your XLR inputs plugged correctly. XLR #1 goes into input channel one, XLR #2 goes into input channel 2, and so forth. Before opening the Pro Tools recording session, check your inputs to ensure proper calibration. (You can learn how to check your equipment and recalibrate your system interface in Chapter 6, Line-Up Tones. Also, a step-by-step demonstration of how to properly tone and calibrate BIAS on magnetic stock can be viewed on the DVD included in this book; under button #1 SOUND—an OVERVIEW—submenu WE USED TO DO IT ON FILM.)
Once satisfied that your inputs are calibrated correctly, you can either open or create a Pro Tools session to record multiple channels. If you are recording 8 channels simultaneously, you need to create 8 audio tracks, under File in the menu bar.
Open the mix window under Display in the menu bar and verify that the inputs are coming in accordingly. Make sure that each audio track has its own voice and will not be in conflict with another track, either because of voice assignment or duplicated input channel assignments.
Turn off the record safeties on each audio track, which illuminate white with red lettering. Hit the return bar on the computer keyboard, returning the digital sound head to the 000+00. Open the transport window under Display in the menu bar. Press the round Record button on the far right in the transport window control bar. Roll your source tape and press the Forward button on the transport window (the single triangular button just to the right of the black, square Stop button). If you have followed these steps correctly, all 8 channels will start laying down a red band path, in which you will see waveforms drawn in each channel shortly after you hear sound.
When you reach the end of the material you wish to record, press the black square Stop button in the transport window control bar. The recorded red bands will suddenly turn white showing their automated name designations.

Figure 11.15 Eight-channel music transfer.
Say this is a live concert multi-track recording. The production mixer would have completed a track assignment sheet (review Chapter 5 on multi-track recording). Rename the audio files so they are easier to work with later in an edit session. After studying the production mixer's track assignment sheet, you may rename the audio files as described earlier and as shown in Figure 11.15.
After I have recorded in a number of synchronous 8-channel cues and renamed them, my preference is to color code the groups of 8 with alternating color designations. This helps distinguish each set of 8 audio files from each other. I color code the first set red, the second set pale blue, the third set red, the fourth set pale blue, and so forth. This checkerboarding effect makes the hundreds of audio files easily stand out in their 8 groups as they are listed in the drive partition window.
MIXED MEDIUM SYNCHRONOUS MASTERING
An interesting technique in today's action-oriented sound effects world is using multiple recorders during custom recording sessions to record the same action from various points of view (see Chapter 10). Any time multiple points of view are desired, especially when the dynamics and action are constantly changing, this technique of recording and subsequent mastering is of supreme value.
A sound librarian received seven sets of raw recorded audio rolls from Eric Potter, who had been contracted to put together and cover the recording session of a 5-ton Kaiser truck. These rolls had not been recorded in interlock or time code. The stereo Nagras had their crystal sync modules in during recording, so the material was resolved to sync during transfer by the sound librarian. Recording with a digital DAT using absolute time is extremely accurate, causing no concern about speed drift. The material had been recorded with different types of tape recorders in different formats, yet each recording was of the same audio performance event recorded at the same time by different recordists in different points of view.
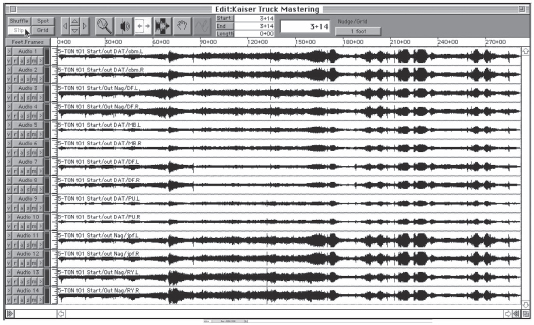
Figure 11.16 Multi-angle recording of a Kaiser truck maneuver.
The sound librarian first loaded each version of the recordings into the computer. Following the sound reports very carefully, the sound librarian was careful to account for each matching set of cues for each of the seven recorders.
After entering the hundreds of cues, the sound librarian created a Pro Tools edit session just to align, trim, and remaster each recorded event in its seven discrete angles. He then dragged in the first 7 stereo pairs. Finding the “clicker” sound at the head of each cue, the librarian zoomed in extremely close to align the click sync point of each stereo pair exactly together.
That was the easy and obvious part. From then on, the librarian had to watch out for and correct the drift of the recordings, finding occasional points easily aligned and matched, such as a gear box clunk, sudden burst revs from the exhausts, and so forth. (An experienced sound editor who understands this type of waveform matching and editing usually performs this task.) At each cut or move, the librarian used an appropriate cross-fade to heal the cut, avoiding the potential for digital ticks due to mismatching waveforms at the cut point or a difference in the rise and fall of the engine's performance.
A series of recordings like this is incalculably valuable for the sound editor throughout the sound editorial process. The editor can either choose one angle over another according to the visual on the screen, or can use one or more angles played together to further dramatize the action, knowing that the rise and fall of the engine and the dynamics of the performance will always match.
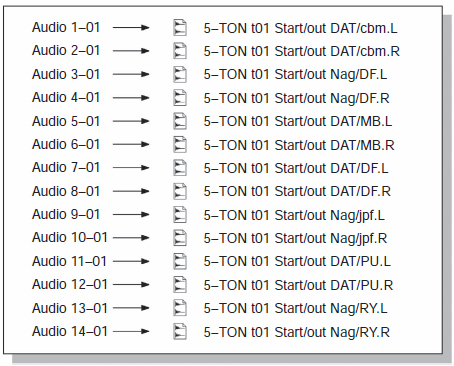
Figure 11.17 Five-ton truck rename files.
After the raw recordings had been aligned and cut to match each other, the sound librarian opened the mix window under Display in the menu bar. He checked that each stereo pair was set for output channels one and two. Then the librarian performed a Bounce-to-Disk of each stereo pair by highlighting the entire sound cut, making sure that all the cuts and fades had been included. Bounce-to-Disk is found under File in the Pro Tools menu bar. A Bounce window will appear.
Under Bounce Type, the librarian chose the split stereo (two mono files, best for Pro Tools) option. Then the librarian chose Bounce, which brought up a window for naming the new files and designating where to store the new material. Some librarians like to store a shorthand of information that helps the sound editor know what kind of recording medium was used (in some cases, the initials of the recordist), which helps track style patterns throughout the entire recorded series. Using this technique, the performance cue shown in Figure 11.17 may be retitled.
These 14 audio cues (7 stereo pairs) represent the simultaneous recording of a single audio event. You can see how easy it would be for a sound editor to recognize the desired files. “5-TON” denotes the vehicle. The take (or cue) of the audio file is listed as “t01.” The take number is placed in this precise order of the name, as the take number automatically lines the groupings of recordings together in their stereophonic pairs. All of “t01” line up, then “t02,” and so forth. If the take number were placed at the end of the audio file name, the computer would look at the alphabetically first word used in the description. In this case it would be an S.
A very short description of action is listed next. (A complete description can be entered into each audio file by opening the information window and leaving the entire text there.)
The recording medium is listed next, noted as DAT or Nag, for Nagra. The recordist's initials are listed after the recording medium, followed by the appropriate stereophonic designation (.) .L or .R.
THE SOUND EFFECTS INVENTORY DATABASE
As you amass an audio empire, it is very difficult to recall material. The thousands of audio files become a blur as you struggle to remember where you put the “inverted numb-knuckle lock screw metal squeak.” The number one weapon in the arsenal of organization for the sound librarian is a good computer database. You can acquire database software that has been specifically designed and written for sound library work, such as Leonardo or Metropolis, or you can use one of the numerous off-the-shelf software programs, such as FileMaker Pro or ClarisWorks, and structure your own. Regardless of whether you purchase sound librarian software or tailor your own from preexisting software, you must have a structured regimen whereby the entered data can be retrieved in various ways.
DiskTracker
If you are on a very tight budget—and believe me, the vast majority of us are—you will get a lot of service and firepower from a program called DiskTracker. (You can find DiskTracker on the Web at DiskTracker.com.) The fee is amazingly reasonable, especially in light of what you can do with it.
Once you have installed your DiskTracker software, you will want to find the application icon program in the DiskTracker folder and highlight it. Open the information window (Apple/keystroke i) and increase the memory allowance. Because of the size of the scanned data I keep I have had to increase the memory allocation ten times the original size.
Boot up the software and make a new library file. Scan a few disks and then quit. Go back into the DiskTracker folder to find the document that you have just made. Highlight it and make an alias (Apple/keystroke M). Drag this alias out onto the desktop of your computer. Personally, I place my library alias in the lower center of my screen. From now on, if you need to access it to search for audio files or scan in new CD-R or DVD-R disks, all you have to do is tap twice on the alias icon on the desktop.
Once you have burned a sound effects library on CD-R or DVD-R, put it back in the disk tray and boot up your software from the desktop file icon. When your CD-R or DVD-R appears on the desktop, open the SCAN MOUNTED VOLUME option under the SCAN window in the menu bar. The window will open and show you all of the data volumes that your computer is seeing. Your internal and external drives will show up as drive icons. Your CD-R or DVD-R will show up as a disk icon with its assigned name next to it. Highlight the CD-R or DVD-R icon and press the SCAN button on the lower right of the window. The DiskTracker software will scan the disk. Once the scan is complete, put the CD-R or DVD-R in the computer trash can to EJECT.

Figure 11.18 DiskTracker scanned data file.
It is a good idea to SAVE after each disk scan. The software has a tendency to crash if you scan too many disks without saving, and you can save yourself the angry moment of having to face doing it all over again by simply getting into the rhythm of this habit.
Notice in Figure 11.18 that the CD or DVD icons match your original files exactly. You can open up the folders and physically look through the ranks of audio file data. By going up to the menu bar to VIEW and selecting LIST VIEWS … you may select exactly what kind of data you wish to be shown: Name, Size, Kind, Type, Creator, Created Date, Modified Date, Free Space, Scanned Date, Items, Serial Number, and so on.
I keep my viewing data extremely simple: Name, Size, Kind. I can always change it later, but I really do not need to wade through a lot of visual text on a day-to-day basis.
Printouts
If I should wish to print a hard copy of disk data (I do not personally use the printing option in the software; I find the material too difficult to read), I will open up what disk icons and folders in the DiskTracker software window that I wish to reveal; then I go up to VIEW and open the LIST VIEWS … option and turn off all but the NAME option.
I then select all (Apple/keystroke A), which will highlight the entire data scan; or, if I want to print data on only one or just a few CD-R or DVD-R disks, I will simply highlight with the cursor those disks I wish to capture.
I then move over to the word processing software (such as AppleWorks or Word) and paste (Apple/keystroke V) the selected data in. Now I can quickly tidy up the data document, such as highlighting and changing font selections for disk titles so that they will stand separate from audio files. I also keep an icon art palette in my word processing folder from which I can highlight CD disk icons or folder icons. By quickly scrolling down the page and pasting (Apple/keystroke V) in disk icons or folder icons I can make a very easy document for the eye to scan. For permanent hard copy outputs I even go back and color code all of the audio file names just as they appear in the original data field.
Duplicate Files
At one time it was a huge problem to grapple with duplicate files. Especially if you are your own librarian as well as handling the chores of supervising projects and cutting reels for the stage, when would you have time to physically research the duplicate audio file issues? DiskTracker can do that for you. When you are in between projects and want to do some library maintenance, open up the software and go up to the menu bar to SEARCH. Come down and highlight the DUPLICATE ITEM CRITERIA option. The menu will offer you a number of choices to choose from. You can create a filtering combination by cross referencing files by duplicate Name, Size, Kind, Label, Creation Date, Modification Date, Depth, Item Note, Finder Comment or File Type, Creator or Version, etc.
I simply choose NAME. I then press the OK button and go back up to SEARCH and draw down to FIND DUPLICATE ITEMS. That window will come up and you will need to make sure that the upper box is checked—CHECK ONLY ITEMS WHICH MATCH THE FILTER.
You will need to select the kinds of folders or applications or icon files that you either wish to ignore or wish to see. Then select that you want to look at your entire scanned list and engage. The software will scan through its data and present you with a detailed list of any and all things that have duplicate names (or by whatever filter you opted to utilize). You can print this out to a hard copy if you wish; or, if your audio files reside on drives within your server, such as the 2.5-terabyte resources I use, you can actually sit and carefully weed out your duplicates. By that I mean that when you highlight a name in the scan and eliminate it (Apple/keystroke X), the software will not only remove the audio file data from the software but will remove the audio file itself from the hard drive if the hard drives are connected to the CPU you are using—that is why you must be careful when eliminating data from the scan file.
As you learn to use this option with skill you will be able to use it like a surgeon's scalpel, but until you master the technique I highly suggest you use caution. I have found myself having to go back to cold storage CD-R or DVD-R back-ups and restoring several files that I had accidentally eliminated from the data scan, only to find that it had also eliminated them from the computer hard drive I was using.
Looking for Audio Files
Now you have an up-to-date data scan of your sound effects CD-R or DVD-R library. You suddenly are given a cutting task and find that you need to pull dozens of sound effects, many of which you cannot remember where they reside. Boot up your alias icon and go up to the SEARCH option in the menu bar. Select FIND … and a window will appear (see Figure 11.19).
First rule of the DiskTracker search technique: do not attempt to enter the exact name of what you are looking for. Chances are you will not get it right and you will just be frustrated. Remember that a computer only knows what you tell it. It only knows what has been entered and it does not read your mind. By the way, here is a major reason why I do not like unrelated nicknames given to sound files. An audio file that has been named “Joe's Magic Whirly” has nothing in the name that you can grab onto in a subject-style search. In reality this effect may be a powerful wind-up and constant motor that you recorded at a local car wash. In the sound project that you used it in, you may have used it for a prop or scene that was a magical machine wind-up that belonged to Joe or the recordist's name was Joe. So what?! Years later, you are trying to find this sound that you know is perfect for your needs and you cannot remember the exact name and you cannot even use something like “machine” or “car whoosh” or something else that should have been part of the name.
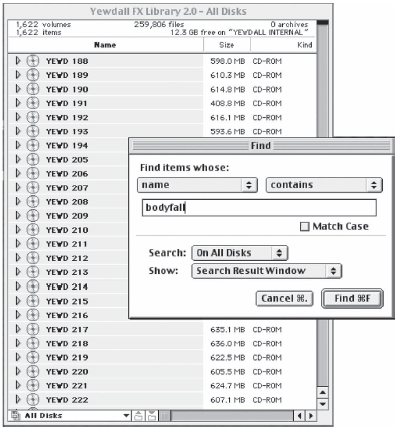
Figure 11.19 SEARCH menu to FIND audio files by matching name data in DiskTracker.
That lecture over, let us move on to searching for things that do have something in the name that we can find easily. Think in terms of topic names or a piece of a name that you would most likely have used. There is a favorite New York traffic sound that I love to use, but I can never remember where I put it. All I can remember is that a good colleague friend of mine from New York gave it to me and she had used the name “Bronx” in the title, so whenever I want it I simply enter “Bronx” and up it comes.
Sure, that works fine when you remember a word in the name, but what if you can't remember that? What if it isn't just one audio file, but a series or genre of sound? That is when “topic” works best. I want to pull some bulkhead wrenching sounds for a deep pressure dive on a submarine. I don't look under “submarine.” That sound is made by metal, and I know that I would have put it in with metal. Enter “metal” in the FIND window. Up may come several hundred audio files (and folders) that have the word “metal” in them. Believe me, it takes only a minute or two to scroll through several hundred audio names rather than search through a quarter of a million audio files in the entire data scan.
The truth of the matter is, once you are visually scanning the genre or type of sounds, looking for the one you remembered, you will come across dozens that will trigger your imagination and give you ideas that you did not previously think of. That is another reason why I like to take a little time and just wade through the files, reminding my subconscious about material that can be utilized to fulfill some audio event design.
As you practice doing this, you will develop little tricks and short-cuts on how to get to your desired destination. I know, for instance that a favorite “pfft!” effect I like to use resides in a folder I named “magic.” I just need to enter “magic” and find which CD-R or DVD-R disk has the “magic” folder and I know I will find the desired sound effect.
Perhaps you need a variety of bodyfalls. Instead of listing “bodyfalls” as a plural, list it as a singular “bodyfall” as the scan may disregard a plural word because the “s” is not in the text. However, the singular text is part of the plural spelling, and therefore will show up.
After you enter the name to search for, hit the Return key and the software will scroll out a SEARCH RESULTS window (Figure 11.20). Notice the bi-directional arrow near the upper right-hand side, just to the right of Modified. If you touch the bi-directional arrow with your cursor the Size/Kind/Created/Modified data field will change to Path. This field will show you exactly where your desired audio file can be found. It will list the CD-ROM designation name and then the Folder name that the audio file resides in.
THE TRADITIONAL CATALOG DATABASE
The data itself and how it is entered into the computer will determine the ease with which you find specific material and the amount of customized filtration you need to search for information. By entering data with a slant toward accessibility, you will quickly discover that adding terms or abbreviations will increase the ease of finding material later. As you build a sound library, regardless of whether the root master is on digital DAT or analog tape, you need to compile a linear log.
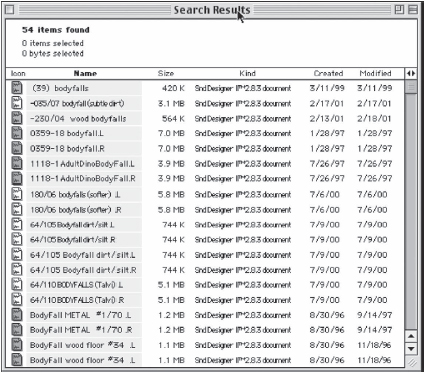
Figure 11.20 The matching audio file names to “bodyfall.”

Figure 11.21 Root master log.
Figure 11.21 is an example of a root master log. This is ¼” tape AFS 1909 from the Weddington Sound Effects Library. When Steve Flick and Richard Anderson worked on The Final Countdown, they had a sound recording team on the aircraft carrier USS Nimitz, recording anything and everything they could, from interior ambiences of Combat Information Center to the explosive shriek of steam catapults hurtling F-14 Tomcats into flight.
Every audio file mastered into a sound library comes from another source, whether recorded on a Foley stage, a scoring stage, on location during production, or from a custom sound effects recordist. These sources have different formats and are on different original media. Part of the data entered into a library should also be a notation of its source.
In the case of the example shown, note in the header data of the catalog under “Notes” that AFS 1909 used to be known as MX-11. The librarian has also notated what recording speed the analog tape had been recorded at, that the format of tape was ¼”, and that it was recorded on a full track monaural head stack. Listed as well is the date on which the material was recorded. Most logs today also denote the recordist's name. The header relates to the project that the effect was specifically recorded for, in this case for The Final Countdown. The tone is 1 kHz (1,000 cycles), and the flux notation signifies the strength of the recording and the amount of magnetic influence.
Each cue is listed in numerical order. The sound librarian enters the “Description” information in a manner making cross-referencing easy. In the case of the first cue, a sound editor can ask the computer to find all the jets; if the sound editor is interested in a strong engine/afterburner sound, “launch” or “launching” can be requested. Maybe the editor is interested in aircraft carrier material. The filter parameters the editor sets in the search request narrow the material displayed for review. If the sound librarian does not enter a detailed enough description into the catalog entries, the computer cannot accurately search and retrieve the material that is being sought. Hence it is unwise to list only cute nicknames that add no meaningful information to the content.
The sound librarian will want to keep track of the monaural or stereo FORMAT (Fmt). The length, or TIME duration, of the sound cue is helpful. In the case of this catalog data entry, the original ¼” roll and cue number are listed, as well as the subsequent digital DAT master roll number and PNO. In this case AFS 1909 was digitized to DAT 1266. Most of us have digitized our ¼” and 35-mm mag masters to digital DAT masters. Do not discard the ¼” originals! Many of us realized the advantages in being able to return to the original ¼” source and re-digitize after better technologies and techniques have been developed. Among other things, many of us learned that the analog-to-digital encoders on many digital systems were not as good as they could have been, and, for the sake of our libraries’ integrity, we decided to start using outboard analog-to-digital encoders as outboard augmentations to the mastering system.
With data carefully entered in such a thorough manner, the sound librarian can ask the computer to print out catalog pages so that he or she can have a linear compilation of the library's root masters in sequential order.
Now the editor is interested in jets and enters “jet” into the search parameter. He or she scrolls through all the sound entries that have “jet” listed. Note that each of the F-14s is listed together in a group because the sound librarian had listed the make of jet first. If it hadn't been done that way, the computer would have looked at the first word of the description and listed all sound cues of jets in alphabetical order, based on the first letter of the first word, making it much harder to group the types together. Inputting a specific jet type, such as F-14 or 737, makes locating the effects you desire easier to retrieve.
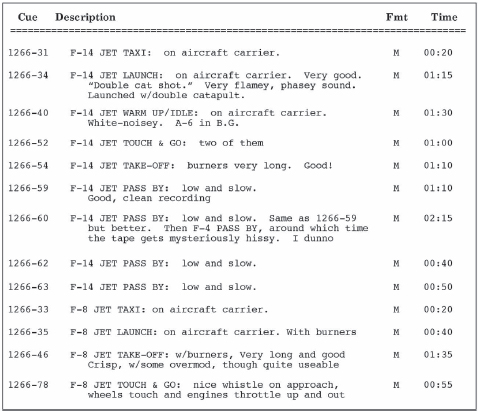
Figure 11.22 Index: “jets.”
Note that the Cue numbers are not sequential. In this case, the computer is alphabetically lining up to F first, then the number. Although an F-8 is a lower designation than an F-14, the computer is looking at the first number after the F. The number 1 is lower than 8; therefore the F-14 comes up on the computer before the F-8. To perform good data entry as a sound librarian, think of sound with the cold logic of a computer. Only then will you produce a database with the greatest flexibility and information access.
UPGRADING OUR LIBRARIES TO 96 kHz/24-BIT
As we are now evolving up to a 96 kHz/24-bit audio file standard format, we will have no choice but to go back to our original ¼” and 35-mm mag source to recapture the deeper bit rate and geometric breadth of the audio that is there, but had not been captured when we worked at 48 kHz/16-bit starting back in the late 1980s.
Converting your 48 kHz/16-bit audio files to 96 kHz/24-bit files is a total waste of time. Why convert a 48/16 to 96/24 when you will not experience any additional gain in signal fullness?
To achieve the desired broader richness, you must go back to the root source. It is for this reason that those who started building our sound libraries back in the days of 35-mm mag and recording ¼” analog never threw original analog recordings away. We put them into cold storage, waiting patiently for the next upgrade of technology to pull them out of the vault and re-digitize them with the new digital possibilities. It is kind of like the old adage of building a home. The builder's saying goes, when you build your house, you will actually do it three times because, as you go, you will rethink and redesign changes. The same is true with the early digitization of analog libraries to digital.
The really ironic thing about this is that those of us who recorded analog when we custom recorded our sound effects, especially those of us who understood the superior performance of 15 ips, will benefit completely from retransferring to a 96 kHz/24-bit standard. Those who custom recorded the material in the early days of DAT that, for the majority, was 48 kHz/16-bit will not benefit any additional depth or fullness because the 1s and 0s are just not there.