
David Navas
The Cottage
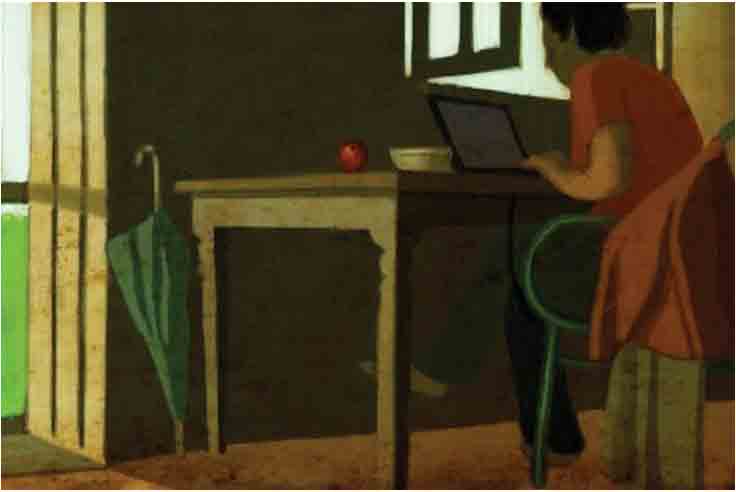
The Cottage
BY DAVID NAVAS
Painter, Illustrator, Animator
California, USA
What is unique here is this artist’s methodology which helps define his vision. Using multiple references to color and composition, he refines his art to get to the core of his subject.

Step 1
In the app “Brushes”, I started by sketching out ideas and taking color notes. In this case, the color sketch made me realize that the important thing here was balancing the composition, the color, and the light.

Step 2
I took a photograph of the scene for its accuracy of perspective. In the photo, the head was perfectly backlit and that provided a great visual idea that was used in the final piece.

Step 3
I opened the photo in the app in “iDoodle2” and traced the image by importing the photo as background and tracing it with the thin black pencil. Then I saved it to the camera roll.

Step 4
I multiplied the traced drawing with a flat color in the app “Photo Canvas”, as this app allows you to compose four layers using different modes (Multiply, Divide, Overlay, etc.). Then I saved it to the camera roll.


Step 5
In “Brushes”, I opened the traced image and put it on the top layer, putting the original color sketch on the bottom layer so I could use the color picker to select colors from the starting color notes. In this case, I can paint on the sketch layer since I want the lines to disappear.
Step 6
Since this is a tribute piece to Hopper, I’m much more interested in limiting my palette and keeping my focus on composition and light. We finish a few details like the apple, the bowl, and Judy’s arm painting in a very hi-zoom mode (400 to 800 percent) and picking colors from the surroundings. Save the image to the camera roll.


Step 7
I open the image in the app “FX Photo Studio”, and apply the Vintage Paper setting. This effect gives nice textures to some lighter parts of the painting and adds an overall warmth to the piece. We save the image to the camera roll.
Step 8
I open it back up in the app “Brushes” for final retouching. This consists of erasing some of the texture so this effect is applied much more selectively, lightening up the color of the sky and, finally, changing the color of the bottom shirt hanging on the chair.